2008 CHEVROLET EQUINOX weight
[x] Cancel search: weightPage 35 of 436
Child Restraints
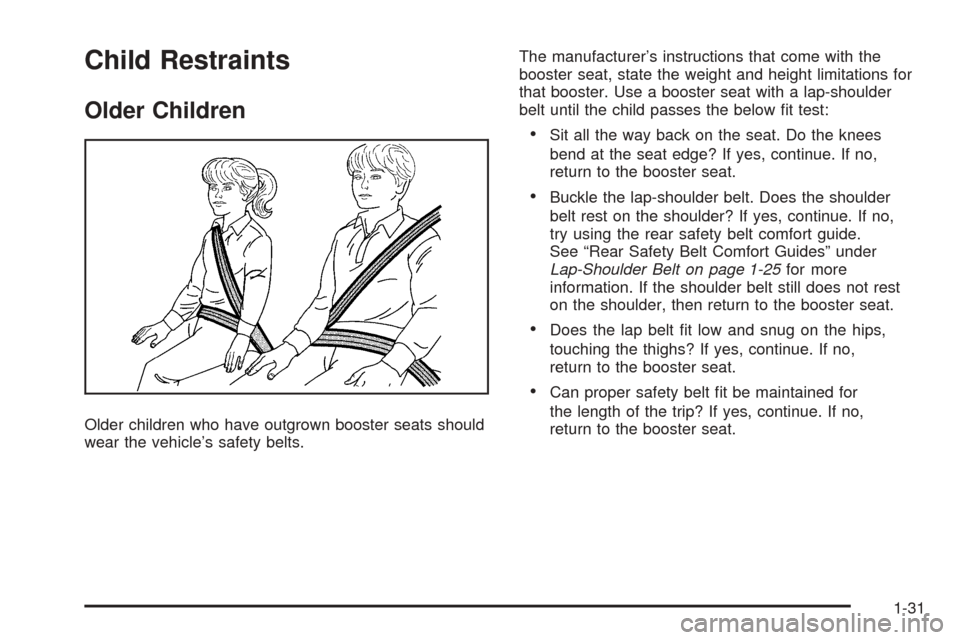
Older Children
Older children who have outgrown booster seats should
wear the vehicle’s safety belts.The manufacturer’s instructions that come with the
booster seat, state the weight and height limitations for
that booster. Use a booster seat with a lap-shoulder
belt until the child passes the below �t test:
Sit all the way back on the seat. Do the knees
bend at the seat edge? If yes, continue. If no,
return to the booster seat.
Buckle the lap-shoulder belt. Does the shoulder
belt rest on the shoulder? If yes, continue. If no,
try using the rear safety belt comfort guide.
See “Rear Safety Belt Comfort Guides” under
Lap-Shoulder Belt on page 1-25for more
information. If the shoulder belt still does not rest
on the shoulder, then return to the booster seat.
Does the lap belt �t low and snug on the hips,
touching the thighs? If yes, continue. If no,
return to the booster seat.
Can proper safety belt �t be maintained for
the length of the trip? If yes, continue. If no,
return to the booster seat.
1-31
Page 40 of 436
Q:What are the different types of add-on child
restraints?
A:Add-on child restraints, which are purchased by
the vehicle’s owner, are available in four basic
types. Selection of a particular restraint should
take into consideration not only the child’s weight,
height, and age but also whether or not the
restraint will be compatible with the motor vehicle
in which it will be used.
For most basic types of child restraints, there are
many different models available. When purchasing
a child restraint, be sure it is designed to be
used in a motor vehicle. If it is, the restraint will
have a label saying that it meets federal motor
vehicle safety standards.
The restraint manufacturer’s instructions that come
with the restraint state the weight and height
limitations for a particular child restraint. In addition,
there are many kinds of restraints available for
children with special needs.
{CAUTION:
Newborn infants need complete support,
including support for the head and neck.
This is necessary because a newborn infant’s
neck is weak and its head weighs so much
compared with the rest of its body. In a crash,
an infant in a rear-facing seat settles into
the restraint, so the crash forces can be
distributed across the strongest part of an
infant’s body, the back and shoulders. Infants
should always be secured in appropriate
infant restraints.
1-36
Page 71 of 436
If your vehicle does not have a rear seat that will
accommodate a rear-facing child restraint, we
recommend that rear-facing child restraints not be
transported in your vehicle, even if the airbag is off.
The passenger sensing system is designed to turn off
the right front passenger’s frontal airbag if:
The right front passenger seat is unoccupied.
The system determines that an infant is present in
a rear-facing infant seat.
The system determines that a small child is present
in a child restraint.
The system determines that a small child is present
in a booster seat.
A right front passenger takes his/her weight off of
the seat for a period of time.
The right front passenger seat is occupied by a
smaller person, such as a child who has outgrown
child restraints.
Or, if there is a critical problem with the airbag
system or the passenger sensing system.
When the passenger sensing system has turned off the
right front passenger’s frontal airbag, the off indicator
will light and stay lit to remind you that the airbag is off.
SeePassenger Airbag Status Indicator on page 3-28.If a child restraint has been installed and the on indicator
is lit, turn the vehicle off. Remove the child restraint from
the vehicle and reinstall the child restraint following the
child restraint manufacturer’s directions and refer to
Securing a Child Restraint in the Right Front Seat
Position on page 1-52.
If, after reinstalling the child restraint and restarting the
vehicle, the on indicator is still lit, check to make sure that
the vehicle’s seatback is not pressing the child restraint
into the seat cushion. If this happens, slightly recline
the vehicle’s seatback and adjust the seat cushion if
possible. Also make sure the child restraint is not trapped
under the vehicle head restraint. If this happens, adjust
the head restraint. SeeHead Restraints on page 1-7.
Remove any additional material from the seat such as
blankets, cushions, seat covers, seat heaters, or seat
massagers before reinstalling or securing the child
restraint.
If the on indicator is still lit, secure the child in the child
restraint in a rear seat position in the vehicle, and check
with your dealer/retailer. If no rear seat is available,
do not install a child restraint in this vehicle, and check
with your dealer/retailer.
1-67
Page 111 of 436
Leaving Your Vehicle With the
Engine Running
{CAUTION:
It can be dangerous to leave your vehicle
with the engine running. Your vehicle could
move suddenly if the shift lever is not fully in
PARK (P) with the parking brake �rmly set.
And, if you leave the vehicle with the engine
running, it could overheat and even catch �re.
You or others could be injured. Do not leave
your vehicle with the engine running.
If you have to leave your vehicle with the engine running,
be sure your vehicle is in PARK (P) and your parking
brake is �rmly set before you leave it. After you have
moved the shift lever into PARK (P), hold the regular
brake pedal down. Then, see if you can move the shift
lever away from PARK (P) without �rst pressing the
button on the console shift lever. If you can, it means
that the shift lever was not fully locked into PARK (P).
Torque Lock
If you are parking on a hill and you do not shift your
transmission into PARK (P) properly, the weight of
the vehicle may put too much force on the parking
pawl in the transmission. You may �nd it difficult to
pull the shift lever out of PARK (P). This is called
“torque lock.” To prevent torque lock, set the parking
brake and then shift into PARK (P) properly before
you leave the driver’s seat. To �nd out how, see
Shifting Into PARK (P) on page 2-32.
When you are ready to drive, move the shift lever out
of PARK (P) before you release the parking brake.
If torque lock does occur, you may need to have another
vehicle push yours a little uphill to take some of the
pressure from the parking pawl in the transmission,
so you can pull the shift lever out of PARK (P).
2-33
Page 242 of 436
Braking
SeeBrake System Warning Light on page 3-31.
Braking action involves perception time and reaction
time. First, you have to decide to push on the brake
pedal. That is perception time. Then you have to bring
up your foot and do it. That is reaction time.
Average reaction time is about three-fourths of a
second. But that is only an average. It might be less
with one driver and as long as two or three seconds or
more with another. Age, physical condition, alertness,
coordination, and eyesight all play a part. So do alcohol,
drugs, and frustration. But even in three-fourths of
a second, a vehicle moving at 60 mph (100 km/h) travels
66 feet (20 m). That could be a lot of distance in an
emergency, so keeping enough space between your
vehicle and others is important.
And, of course, actual stopping distances vary greatly
with the surface of the road, whether it is pavement
or gravel; the condition of the road, whether it is wet,
dry, or icy; tire tread; the condition of the brakes; the
weight of the vehicle; and the amount of brake force
applied.Avoid needless heavy braking. Some people drive in
spurts — heavy acceleration followed by heavy
braking — rather than keeping pace with traffic. This is
a mistake. The brakes might not have time to cool
between hard stops. The brakes will wear out much faster
if you do a lot of heavy braking. If you keep pace with the
traffic and allow realistic following distances, you will
eliminate a lot of unnecessary braking. That means better
braking and longer brake life.
If your vehicle’s engine ever stops while you are driving,
brake normally but do not pump the brakes. If you do,
the pedal could get harder to push down. If the engine
stops, you will still have some power brake assist. But
you will use it when you brake. Once the power assist is
used up, it can take longer to stop and the brake pedal
will be harder to push.
Adding non-dealer/non-retailer accessories can affect
your vehicle’s performance. SeeAccessories and
Modifications on page 5-3.
4-4
Page 260 of 436
Rocking Your Vehicle to Get It Out
First, turn the steering wheel left and right to clear
the area around the front wheels. Turn off any traction
or stability system. SeeTraction Control System
(TCS) on page 4-6andStabiliTrak
®System on
page 4-7. Then shift back and forth between
REVERSE (R) and a forward gear, spinning the wheels
as little as possible. To prevent transmission wear, wait
until the wheels stop spinning before shifting gears.
Release the accelerator pedal while you shift, and press
lightly on the accelerator pedal when the transmission is
in gear. By slowly spinning the wheels in the forward and
reverse directions, you will cause a rocking motion that
could free your vehicle. If that does not get your vehicle
out after a few tries, it might need to be towed out. If your
vehicle does need to be towed out, seeTowing Your
Vehicle on page 4-28.
Loading Your Vehicle
It is very important to know how much weight your
vehicle can carry. Two labels on your vehicle
show how much weight it may properly carry, the
Tire and Loading Information label and the Vehicle
Certi�cation label.
{CAUTION:
Do not load your vehicle any heavier than
the Gross Vehicle Weight Rating (GVWR),
or either the maximum front or rear Gross
Axle Weight Rating (GAWR). If you do,
parts on your vehicle can break, and it
can change the way your vehicle handles.
These could cause you to lose control
and crash. Also, overloading can shorten
the life of your vehicle.
4-22
Page 261 of 436
Tire and Loading Information Label
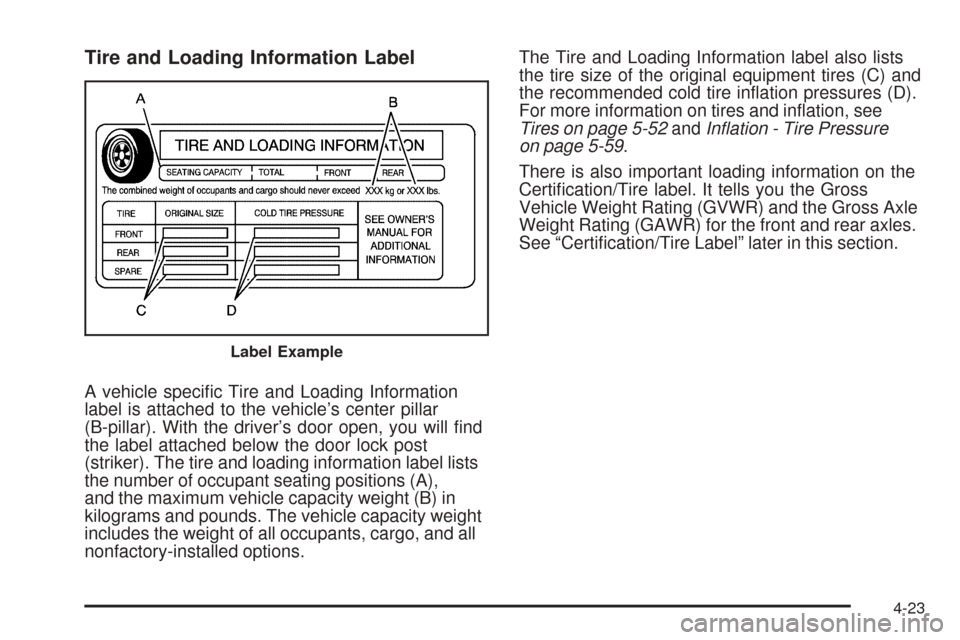
A vehicle speci�c Tire and Loading Information
label is attached to the vehicle’s center pillar
(B-pillar). With the driver’s door open, you will �nd
the label attached below the door lock post
(striker). The tire and loading information label lists
the number of occupant seating positions (A),
and the maximum vehicle capacity weight (B) in
kilograms and pounds. The vehicle capacity weight
includes the weight of all occupants, cargo, and all
nonfactory-installed options.The Tire and Loading Information label also lists
the tire size of the original equipment tires (C) and
the recommended cold tire in�ation pressures (D).
For more information on tires and in�ation, see
Tires on page 5-52andInflation - Tire Pressure
on page 5-59.
There is also important loading information on the
Certi�cation/Tire label. It tells you the Gross
Vehicle Weight Rating (GVWR) and the Gross Axle
Weight Rating (GAWR) for the front and rear axles.
See “Certi�cation/Tire Label” later in this section.
Label Example
4-23
Page 262 of 436
Steps for Determining Correct Load Limit
1.Locate the statement “The combined weight
of occupants and cargo should never exceed
XXX kg or XXX lbs” on your vehicle’s placard.
2.Determine the combined weight of the driver
and passengers that will be riding in your
vehicle.
3.Subtract the combined weight of the driver
and passengers from XXX kg or XXX lbs.
4.The resulting �gure equals the available
amount of cargo and luggage load capacity.
For example, if the “XXX” amount equals
1400 lbs and there will be �ve 150 lb
passengers in your vehicle, the amount of
available cargo and luggage load capacity is
650 lbs (1400−750 (5 x 150) = 650 lbs).
5.Determine the combined weight of luggage
and cargo being loaded on the vehicle. That
weight may not safely exceed the available
cargo and luggage load capacity calculated
in Step 4.
6.If your vehicle will be towing a trailer, the load
from your trailer will be transferred to your
vehicle. Consult this manual to determine how
this reduces the available cargo and luggage
load capacity for your vehicle.If your vehicle can tow a trailer, seeTowing a
Trailer on page 4-33for important information on
towing a trailer, towing safety rules, and
trailering tips.
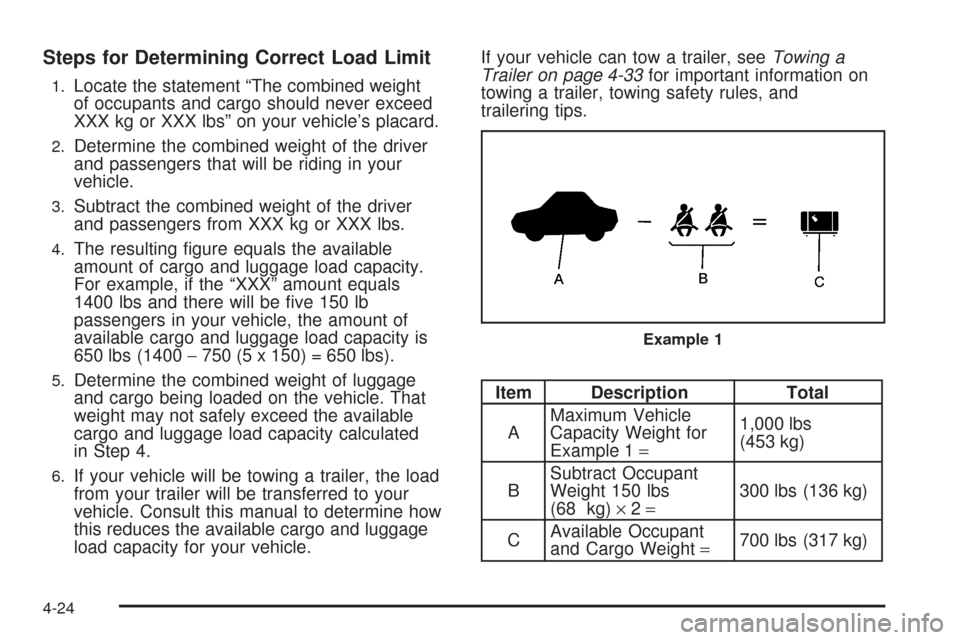
Item Description Total
AMaximum Vehicle
Capacity Weight for
Example 1=1,000 lbs
(453 kg)
BSubtract Occupant
Weight 150 lbs
(68 kg)×2=300 lbs (136 kg)
CAvailable Occupant
and Cargo Weight=700 lbs (317 kg)
Example 1
4-24