Page 82 of 436

Remote Keyless Entry (RKE)
System
If the vehicle has the Remote Keyless Entry (RKE)
system, it operates on a radio frequency subject
to Federal Communications Commission (FCC) Rules
and with Industry Canada.
This device complies with Part 15 of the FCC Rules.
Operation is subject to the following two conditions:
1. This device may not cause interference.
2. This device must accept any interference received,
including interference that may cause undesired
operation of the device.
This device complies with RSS-210 of Industry Canada.
Operation is subject to the following two conditions:
1. This device may not cause interference.
2. This device must accept any interference received,
including interference that may cause undesired
operation of the device.
Changes or modi�cations to this system by other than
an authorized service facility could void authorization to
use this equipment.At times you may notice a decrease in range. This is
normal for any RKE system. If the transmitter does not
work or if you have to stand closer to your vehicle
for the transmitter to work, try this:Check the distance. You may be too far from your
vehicle. You may need to stand closer during
rainy or snowy weather.
Check the location. Other vehicles or objects may
be blocking the signal. Take a few steps to the
left or right, hold the transmitter higher, and
try again.
Check to determine if battery replacement is
necessary. See “Battery Replacement” later in this
section.
If you are still having trouble, see your dealer/retailer
or a quali�ed technician for service.
2-4
Page 85 of 436

Matching Transmitter(s) to
Your Vehicle
Each RKE transmitter is coded to prevent another
transmitter from unlocking your vehicle. If a transmitter is
lost or stolen, a replacement can be purchased through
your dealer/retailer. All transmitters need to be re-coded
to match the new transmitter. The lost transmitter will
no longer work after the new transmitters are re-coded.
The vehicle can have a maximum of four transmitters
matched to it. Or, see “Learn Remote Key” underDIC
Operation and Displays on page 3-43for instructions
on how to match RKE transmitters to your vehicle.
Battery Replacement
The battery is weak if the transmitter will not work at
the normal range in any location. If you have to get
close to your vehicle before the transmitter works,
change the battery.
Notice:When replacing the battery, use care not
to touch any of the circuitry. Static from your
body transferred to these surfaces may damage
the transmitter.To replace the battery in the RKE transmitter:
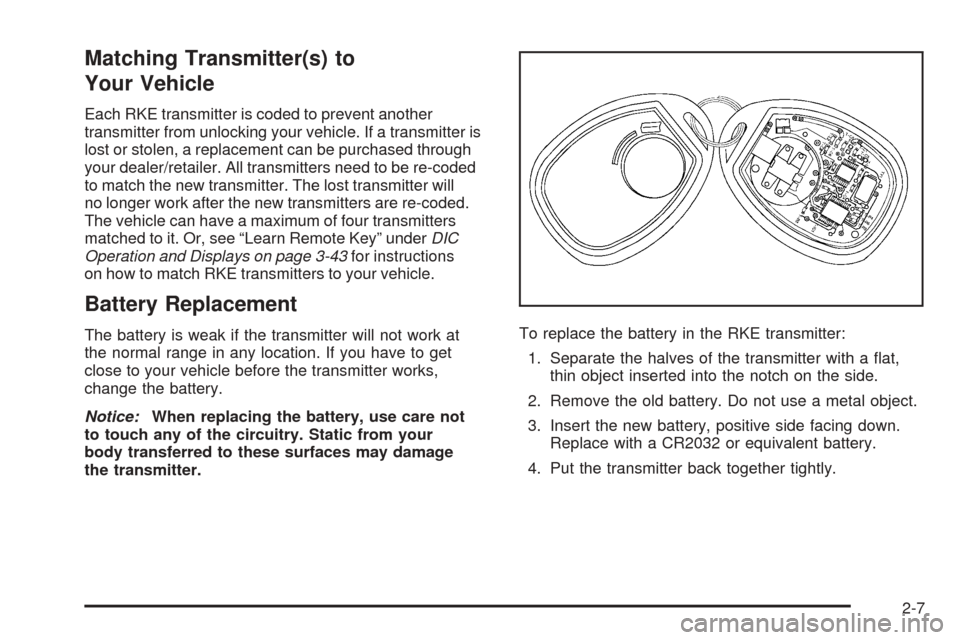
1. Separate the halves of the transmitter with a �at,
thin object inserted into the notch on the side.
2. Remove the old battery. Do not use a metal object.
3. Insert the new battery, positive side facing down.
Replace with a CR2032 or equivalent battery.
4. Put the transmitter back together tightly.
2-7
Page 174 of 436

If there is a problem with the battery charging system,
the DIC will display SERVICE BATTERY CHARGING
SYSTEM. See “SERVICE BATTERY CHARGING
SYSTEM” underDIC Warnings and Messages on
page 3-49. Also, seeElectric Power Management
on page 3-17for more information.
LEARN REMOTE KEY
This display allows you to match Remote Keyless
Entry (RKE) transmitters to your vehicle. To match
an RKE transmitter to your vehicle:
1. Make sure the vehicle is in PARK (P).
2. Press the vehicle information button until LEARN
REMOTE KEY PRESS
VTO BEGIN displays.
3. Press the set/reset button until REMOTE KEY
LEARNING ACTIVE is displayed.
4. Press and hold the lock and unlock buttons on
the �rst transmitter at the same time for about
15 seconds.
A chime will sound indicating that the transmitter
is matched.
5. To match additional transmitters at this time,
repeat Step 3.
Each vehicle can have a maximum of
four transmitters matched to it.
6. To exit the programming mode, you must
cycle the key to LOCK/OFF.
CALIBRATE COMPAS (Compass)
Your vehicle may have this feature. The compass can
be manually calibrated. To calibrate the compass
through the DIC, seeDIC Compass on page 3-46.
CHANGE COMPASS ZONE
Your vehicle may have this feature. To change the
compass zone through the DIC, seeDIC Compass
on page 3-46.
Blank Display
This display shows no information.
FEATURE SETTNGS (Settings):
PRESS
VTO SELCT (Select)
This display allows you to personalize the feature
settings on your vehicle. SeeDIC Vehicle
Personalization on page 3-58for more information.
DIC Compass
Your vehicle may have a compass in the
Driver Information Center (DIC).
Compass Zone
The zone is set to zone eight upon leaving the factory.
Your dealer/retailer will set the correct zone for your
location.
3-46
Page 315 of 436

2. Get the vehicles close enough so the jumper cables
can reach, but be sure the vehicles are not touching
each other. If they are, it could cause a ground
connection you do not want. You would not be able
to start your vehicle, and the bad grounding could
damage the electrical systems.
To avoid the possibility of the vehicles rolling, set
the parking brake �rmly on both vehicles involved
in the jump start procedure. Put an automatic
transmission in PARK (P) or a manual transmission
in NEUTRAL before setting the parking brake.
Notice:If you leave your radio or other accessories
on during the jump starting procedure, they could
be damaged. The repairs would not be covered
by your warranty. Always turn off your radio and
other accessories when jump starting your vehicle.
3. Turn off the ignition on both vehicles. Unplug
unnecessary accessories plugged into the cigarette
lighter or the accessory power outlet. Turn off the
radio and all lamps that are not needed. This will
avoid sparks and help save both batteries. And it
could save your radio!
4. Open the hoods and locate the positive (+) and
negative (−) terminal locations on each vehicle.
You will not need to access your battery for jump
starting. Your vehicle has a remote positive (+) and
a remote negative (−) jump starting terminal for that
purpose.The remote positive (+) terminal is located under
the engine compartment fuse block cover, and
is marked with a plus (+) symbol on the cover.
To remove the fuse block cover, push in the two
locking tabs located on the rear of the cover, and
lift. To reinstall, �t together the tabs located on the
front of the cover and push down on the cover until
the tabs on the rear of the cover, click into place.
5-37