2008 CHEVROLET EQUINOX parking brake
[x] Cancel search: parking brakePage 315 of 436
2. Get the vehicles close enough so the jumper cables
can reach, but be sure the vehicles are not touching
each other. If they are, it could cause a ground
connection you do not want. You would not be able
to start your vehicle, and the bad grounding could
damage the electrical systems.
To avoid the possibility of the vehicles rolling, set
the parking brake �rmly on both vehicles involved
in the jump start procedure. Put an automatic
transmission in PARK (P) or a manual transmission
in NEUTRAL before setting the parking brake.
Notice:If you leave your radio or other accessories
on during the jump starting procedure, they could
be damaged. The repairs would not be covered
by your warranty. Always turn off your radio and
other accessories when jump starting your vehicle.
3. Turn off the ignition on both vehicles. Unplug
unnecessary accessories plugged into the cigarette
lighter or the accessory power outlet. Turn off the
radio and all lamps that are not needed. This will
avoid sparks and help save both batteries. And it
could save your radio!
4. Open the hoods and locate the positive (+) and
negative (−) terminal locations on each vehicle.
You will not need to access your battery for jump
starting. Your vehicle has a remote positive (+) and
a remote negative (−) jump starting terminal for that
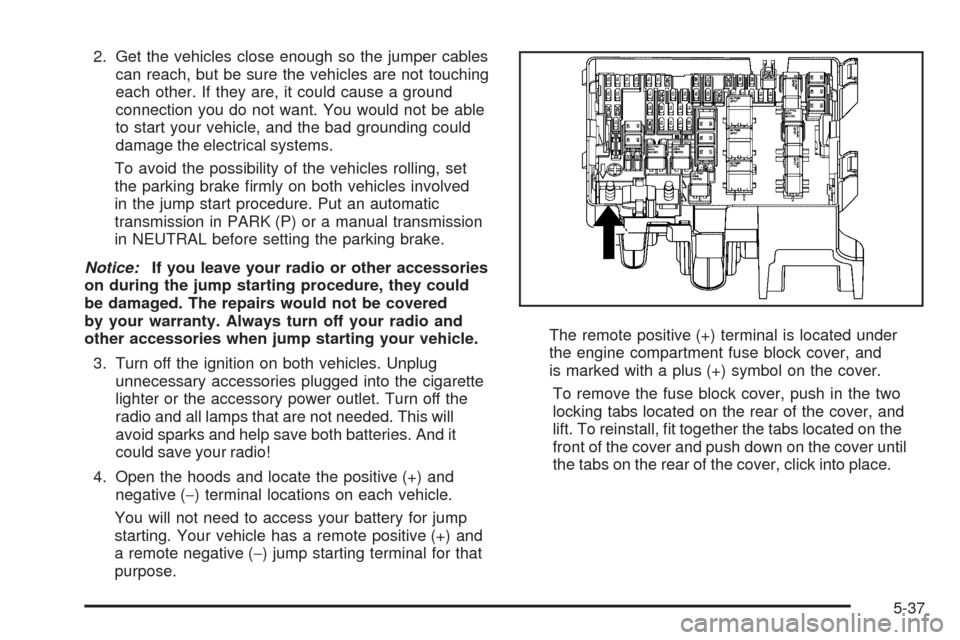
purpose.The remote positive (+) terminal is located under
the engine compartment fuse block cover, and
is marked with a plus (+) symbol on the cover.
To remove the fuse block cover, push in the two
locking tabs located on the rear of the cover, and
lift. To reinstall, �t together the tabs located on the
front of the cover and push down on the cover until
the tabs on the rear of the cover, click into place.
5-37
Page 344 of 436
The TPMS sensor matching process is outlined below:
1. Set the parking brake.
2. Turn the ignition switch to ON/RUN with the
engine off.
3. Press the Remote Keyless Entry (RKE) transmitter’s
LOCK and UNLOCK buttons at the same time for
approximately �ve seconds. The horn sounds twice
to signal the receiver is in relearn mode and TIRE
LEARNING ACTIVE message displays on the DIC
screen.
4. Start with the driver side front tire.
5. Remove the valve cap from the valve cap stem.
Activate the TPMS sensor by increasing or
decreasing the tire’s air pressure for �ve seconds,
or until a horn chirp sounds. The horn chirp, which
may take up to 30 seconds to sound, con�rms that
the sensor identi�cation code has been matched to
this tire and wheel position.6. Proceed to the passenger side front tire, and repeat
the procedure in Step 5.
7. Proceed to the passenger side rear tire, and repeat
the procedure in Step 5.
8. Proceed to the driver side rear tire, and repeat the
procedure in Step 5. The horn sounds two times to
indicate the sensor identi�cation code has been
matched to the driver side rear tire, and the TPMS
sensor matching process is no longer active.
The TIRE LEARNING ACTIVE message on the DIC
display screen goes off.
9. Turn the ignition switch to LOCK/OFF.
10. Set all four tires to the recommended air pressure
level as indicated on the Tire and Loading
Information label.
11. Put the valve caps back on the valve stems.
5-66
Page 354 of 436
Changing a Flat Tire
If a tire goes �at, avoid further tire and wheel damage by
driving slowly to a level place. Turn on your vehicle’s
hazard warning �ashers. SeeHazard Warning Flashers
on page 3-6for more information.{CAUTION:
Changing a tire can be dangerous. The vehicle
can slip off the jack and roll over or fall on you
or other people. You and they could be badly
injured or even killed. Find a level place to
change your tire. To help prevent the vehicle
from moving:
1. Set the parking brake �rmly.
2. Put the shift lever in PARK (P).
3. Turn off the engine and do not restart
while the vehicle is raised.
4. Do not allow passengers to remain in the
vehicle.
To be even more certain the vehicle will not
move, you should put blocks at the front and
rear of the tire farthest away from the one
being changed. That would be the tire, on the
other side, at the opposite end of the vehicle.
5-76
Page 393 of 436

Maintenance Footnotes
(a)Visually inspect brake lines and hoses for proper
hook-up, binding, leaks, cracks, chafing, etc. Inspect
disc brake pads for wear and rotors for surface
condition. Inspect other brake parts, including calipers,
parking brake, etc. Check parking brake adjustment.
(b)Visually inspect front and rear suspension and
steering system for damaged, loose, or missing parts or
signs of wear. Visually check constant velocity joints,
rubber boots, and axle seals for leaks. With 3.4L
V6 engine: Inspect electric power steering cables for
proper hook-up, binding, cracks, chafing, etc. With 3.6L
V6 engine: Inspect hydraulic power steering lines and
hoses for proper hook-up, binding, leaks, cracks,
chafing, etc.
(c)Visually inspect hoses and have them replaced if
they are cracked, swollen, or deteriorated. Inspect
all pipes, fittings and clamps; replace with genuine parts
as needed. To help ensure proper operation, a pressure
test of the cooling system and pressure cap and cleaning
the outside of the radiator and air conditioning condenser
is recommended at least once a year.(d)Inspect wiper blades for wear, cracking, or
contamination. Clean the windshield and wiper blades, if
contaminated. Replace wiper blades that are worn or
damaged. See Windshield Wiper Blade Replacement on
page 5-50andWindshield and Wiper Blades on
page 5-95for more information.
(e)Make sure the safety belt reminder light and safety
belt assemblies are working properly. Look for any
other loose or damaged safety belt system parts. If you
see anything that might keep a safety belt system
from doing its job, have it repaired. Have any torn or
frayed safety belts replaced. Also see Checking the
Restraint Systems on page 1-72.
(f)Lubricate all key lock cylinders, hood latch
assemblies, secondary latches, pivots, spring anchor
and release pawl, hood and door hinges, rear folding
seats, and liftgate hinges. More frequent lubrication may
be required when exposed to a corrosive environment.
Applying silicone grease on weatherstrips with a clean
cloth will make them last longer, seal better, and not stick
or squeak.
(g)If you drive regularly under dusty conditions, the
filter may require replacement more often.
6-7
Page 396 of 436
At Least Once a Year
Starter Switch Check
{CAUTION:
When you are doing this inspection, the
vehicle could move suddenly. If the vehicle
moves, you or others could be injured.
1. Before you start, be sure you have enough room
around the vehicle.
2. Firmly apply both the parking brake and the regular
brake. SeeParking Brake on page 2-31.
Do not use the accelerator pedal, and be ready to
turn off the engine immediately if it starts.
3. Try to start the engine in each gear. The vehicle
should start only in PARK (P) or NEUTRAL (N).
If the vehicle starts in any other position, contact
your dealer/retailer for service.
Automatic Transmission Shift Lock
Control System Check
{CAUTION:
When you are doing this inspection, the
vehicle could move suddenly. If the vehicle
moves, you or others could be injured.
1. Before you start, be sure you have enough room
around the vehicle. It should be parked on a level
surface.
2. Firmly apply the parking brake. SeeParking Brake
on page 2-31.
Be ready to apply the regular brake immediately
if the vehicle begins to move.
3. With the engine off, turn the ignition to ON/RUN,
but do not start the engine. Without applying the
regular brake, try to move the shift lever out of
PARK (P) with normal effort. If the shift lever moves
out of PARK (P), contact your dealer/retailer
for service.
6-10
Page 397 of 436
Ignition Transmission Lock Check
While parked, and with the parking brake set, try to turn
the ignition to LOCK/OFF in each shift lever position.
The ignition should turn to LOCK/OFF only
when the shift lever is in PARK (P).
The ignition key should come out only in
LOCK/OFF.
Contact your dealer/retailer if service is required.
Parking Brake and Automatic
Transmission Park (P) Mechanism Check
{CAUTION:
When you are doing this check, your vehicle
could begin to move. You or others could be
injured and property could be damaged. Make
sure there is room in front of your vehicle in
case it begins to roll. Be ready to apply the
regular brake at once should the vehicle begin
to move.Park on a fairly steep hill, with the vehicle facing
downhill. Keeping your foot on the regular brake, set the
parking brake.
To check the parking brake’s holding ability:
With the engine running and the transmission
in NEUTRAL (N), slowly remove foot pressure from
the regular brake pedal. Do this until the vehicle
is held by the parking brake only.
To check the PARK (P) mechanism’s holding ability:
With the engine running, shift to PARK (P). Then
release the parking brake followed by the
regular brake.
Contact your dealer/retailer if service is required.
Underbody Flushing Service
At least every spring, use plain water to �ush any
corrosive materials from the underbody. Take care to
clean thoroughly any areas where mud and other debris
can collect.
6-11
Page 424 of 436
Audio System (cont.)
Radio Reception........................................3-110
Setting the Time..........................................3-65
Theft-Deterrent Feature...............................3-108
Audio System(s).............................................3-68
Automatic Headlamp System............................3-14
Automatic Transmission
Fluid..........................................................5-21
Operation...........................................2-24, 2-27
B
Battery..........................................................5-35
Electric Power Management..........................3-17
Run-Down Protection...................................3-17
Brake
Emergencies................................................ 4-6
Brakes..........................................................5-33
System Warning Light..................................3-31
Braking........................................................... 4-4
Braking in Emergencies..................................... 4-6
Break-In, New Vehicle.....................................2-20
Bulb Replacement...........................................5-44
Halogen Bulbs............................................5-44
Headlamp Aiming........................................5-44
Headlamps, Front Turn Signal, Sidemarker,
and Parking Lamps..................................5-45
License Plate Lamps....................................5-49Bulb Replacement (cont.)
Replacement Bulbs......................................5-50
Taillamps, Turn Signal, Stoplamps and
Back-up Lamps........................................5-48
Buying New Tires...........................................5-69
C
Calibration.....................................................3-46
California Fuel.................................................. 5-6
California Perchlorate Materials Requirements....... 5-4
California Proposition 65 Warning....................... 5-3
Canadian Owners................................................ ii
Capacities and Speci�cations..........................5-107
Carbon Monoxide...........................2-35, 4-17, 4-33
Care of
Safety Belts................................................5-93
Cargo Lamp...................................................3-16
Cargo Tie Downs............................................2-49
CD, MP3 ...............................................3-87, 3-92
Center Console Storage Area...........................2-42
Chains, Tire...................................................5-74
Charging System Light....................................3-30
Check
Engine Light...............................................3-34
Checking Things Under the Hood......................5-10
Chemical Paint Spotting...................................5-97
2
Page 431 of 436
N
Navigation System, Privacy..............................7-18
Navigation/Radio System, see Navigation
Manual......................................................3-98
New Vehicle Break-In......................................2-20
O
Odometer......................................................3-26
Odometer, Trip...............................................3-26
Off-Road Recovery..........................................4-12
Oil
Change Engine Oil Light...............................3-38
Engine.......................................................5-15
Pressure Light.............................................3-37
Oil, Engine Oil Life System..............................5-18
Older Children, Restraints................................1-31
Online Owner Center........................................ 7-4
OnStar, Privacy..............................................7-18
OnStar
®System, see OnStar®Manual...............2-39
Other Warning Devices...................................... 3-6
Outlet Adjustment............................................3-22
Outlets
Accessory Power.........................................3-18
Outside
Convex Mirrors............................................2-38
Power Mirrors.............................................2-38Overheated Engine Protection Operating Mode.....5-26
Owner Checks and Services.............................. 6-8
Owners, Canadian............................................... ii
P
Paint, Damage...............................................5-97
Park Brake....................................................2-31
Park (P)
Shifting Into................................................2-32
Shifting Out of............................................2-34
Parking
Over Things That Burn.................................2-34
Passenger Airbag Status Indicator.....................3-28
Passenger Compartment Air Filter.....................3-22
Passenger Sensing System..............................1-65
Passing.........................................................4-12
PASS-Key
®III+..............................................2-18
PASS-Key®III+ Operation................................2-18
Perchlorate Materials Requirements, California...... 5-4
Power
Door Locks.................................................2-11
Reduced Engine Light..................................3-39
Retained Accessory (RAP)............................2-21
Seat............................................................ 1-3
Steering Fluid.............................................5-31
Windows....................................................2-16
9