2008 CHEVROLET EQUINOX climate control
[x] Cancel search: climate controlPage 147 of 436
Climate Controls
Climate Control System
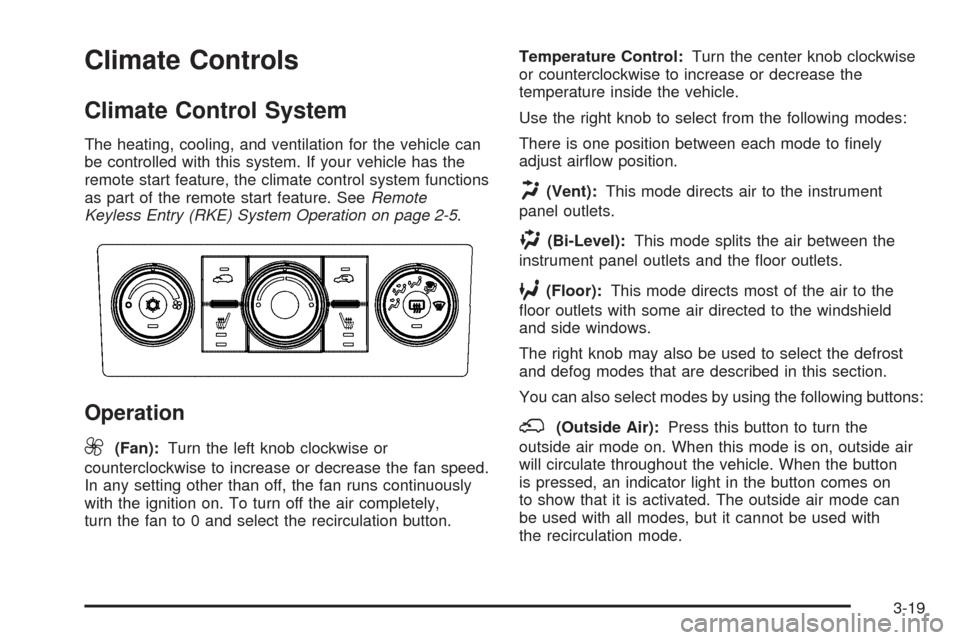
The heating, cooling, and ventilation for the vehicle can
be controlled with this system. If your vehicle has the
remote start feature, the climate control system functions
as part of the remote start feature. SeeRemote
Keyless Entry (RKE) System Operation on page 2-5.
Operation
9
(Fan):Turn the left knob clockwise or
counterclockwise to increase or decrease the fan speed.
In any setting other than off, the fan runs continuously
with the ignition on. To turn off the air completely,
turn the fan to 0 and select the recirculation button.Temperature Control:Turn the center knob clockwise
or counterclockwise to increase or decrease the
temperature inside the vehicle.
Use the right knob to select from the following modes:
There is one position between each mode to �nely
adjust air�ow position.
H(Vent):This mode directs air to the instrument
panel outlets.
)(Bi-Level):This mode splits the air between the
instrument panel outlets and the �oor outlets.
6(Floor):This mode directs most of the air to the
�oor outlets with some air directed to the windshield
and side windows.
The right knob may also be used to select the defrost
and defog modes that are described in this section.
You can also select modes by using the following buttons:
;(Outside Air):Press this button to turn the
outside air mode on. When this mode is on, outside air
will circulate throughout the vehicle. When the button
is pressed, an indicator light in the button comes on
to show that it is activated. The outside air mode can
be used with all modes, but it cannot be used with
the recirculation mode.
3-19
Page 149 of 436
Defogging and Defrosting
Fog or frost on the inside of windows is a result of high
humidity (moisture) condensing on the cool window
glass. This can be minimized if the climate control
system is used properly.
Use the defog mode to clear the windows of fog or
moisture and warm the passengers. Use the defrost
mode to remove fog or frost from the windshield more
quickly. When either of these modes are selected, the
system runs the air conditioning compressor and cancels
the recirculation mode to dry the air. For best results,
clear all snow and ice from the windshield before
defrosting.
Turn the right knob to select the defog or defrost mode.
-(Defog):This mode directs half of the air to the
windshield and the side window outlets, and half to
the �oor outlets.
0(Defrost):This mode directs most of the air to
the windshield and the side window outlets, with some
air directed to the �oor outlets.
Rear Window Defogger
The rear window defogger uses a warming grid to
remove fog from the rear window.
The rear window defogger only works when the ignition
is in ON/RUN.
<(Rear):Press this button to turn the rear window
defogger on or off. An indicator light on the button
comes on to show that the rear window defogger is
activated.
The rear window defroster stays on for about 10
minutes if the vehicle remains at slower vehicle speeds
or until the button is pressed, or unless the ignition
is turned to ACC/ACCESSORY or LOCK/OFF. If turned
on again, the defogger only runs for about �ve
minutes before turning off again. At higher vehicle
speeds, the defogger may stay on continuously. The
defogger can always be turned off by pressing the
button again or by turning off the ignition.
3-21
Page 150 of 436
If your vehicle has the remote start feature, the rear
defogger automatically turns on if it is cold outside.
When the vehicle transitions out of the remote start
mode, the rear defogger will turn off. SeeRemote
Keyless Entry (RKE) System Operation on page 2-5.
Notice:Do not use anything sharp on the inside
of the rear window. If you do, you could cut or
damage the warming grid, and the repairs would
not be covered by your warranty. Do not attach
a temporary vehicle license, tape, a decal or
anything similar to the defogger grid.
Remote Start Climate Control Operation
If your vehicle has the remote start feature and it
is activated, the climate control system heats and cools
the inside of the vehicle using the modes that were
set before the vehicle was turned off and the rear
defogger automatically turns on. If your vehicle has
heated seats, they may turn on if it is cold outside
and will shut off when the key is turned to ON/RUN.
SeeHeated Seats on page 1-4.
Outlet Adjustment
Use the louvers located on the air outlets to change
the direction of the air�ow.
Operation Tips
Clear away any ice, snow, or leaves from the air
inlets at the base of the vehicle that may block
the �ow of air into your vehicle.
Do not use any non-GM approved hood de�ectors
that could adversely affect the performance of the
system.
Keep the path under the front seats clear of objects
to help circulate the air inside of your vehicle more
effectively.
Passenger Compartment Air Filter
Outside air is routed through a passenger compartment
air �lter before entering the vehicle. This �lter removes
certain particles from the air, including pollen and
dust particles. Reductions in air�ow, which may occur
more quickly in dusty areas, indicate that the �lter needs
to be replaced early.
The �lter should be replaced as part of routine scheduled
maintenance. SeeScheduled Maintenance on page 6-4
for when to replace the �lter.
3-22
Page 176 of 436
Compass Calibration
The compass can be manually calibrated. Only calibrate
the compass in a magnetically clean and safe location,
such as an open parking lot, where driving the vehicle
in circles is not a danger. It is suggested to calibrate
away from tall buildings, utility wires, manhole covers,
or other industrial structures, if possible.
If CAL should ever appear in the DIC display,
the compass should be calibrated.
If the DIC display does not show a heading, for example,
N for North, or the heading does not change after
making turns, there may be a strong magnetic �eld
interfering with the compass. Such interference may
be caused by a magnetic CB or cell phone antenna
mount, a magnetic emergency light, magnetic note
pad holder, or any other magnetic item. Turn off
the vehicle, move the magnetic item, then turn on
the vehicle and calibrate the compass.To calibrate the compass, use the following procedure:Compass Calibration Procedure
1. Before calibrating the compass, make sure the
compass zone is set to the variance zone in
which the vehicle is located. See “Compass
Variance (Zone) Procedure” earlier in this section.
Do not operate any switches such as window,
sunroof, climate controls, seats, etc. during
the calibration procedure.
2. Press the vehicle information button until
PRESS
VTO CALIBRATE COMPAS (Compass)
displays.
3. Press the set/reset button to start the compass
calibration.
4. The DIC will display CALIBRATING: DRIVE IN
CIRCLES. Drive the vehicle in tight circles at
less than 5 mph (8 km/h) to complete the calibration.
The DIC will display CALIBRATION COMPLETE
for a few seconds when the calibration is
complete. The DIC display will then return to
the previous menu.
3-48
Page 275 of 436
Driving with a Trailer
{CAUTION:
If you have the liftgate open and you pull a
trailer with your vehicle, carbon monoxide (CO)
could come into your vehicle. You cannot see
or smell CO. It can cause unconsciousness or
death. SeeEngine Exhaust on page 2-35.To
maximize your safety when towing a trailer:
Have your exhaust system inspected for
leaks, and make necessary repairs before
starting on your trip.
Keep the liftgate closed.
If exhaust does come into your vehicle
through a window in the rear or another
opening, drive with your front, main
heating or cooling system on and with the
fan on any speed. This will bring fresh,
outside air into your vehicle. Do not use
the climate control setting for maximum air
because it only recirculates the air inside
your vehicle. SeeClimate Control System
on page 3-19.Towing a trailer requires a certain amount of experience.
Before setting out for the open road, you will want to
get to know your rig. Acquaint yourself with the feel of
handling and braking with the added weight of the trailer.
And always keep in mind that the vehicle you are
driving is now a good deal longer and not nearly as
responsive as your vehicle is by itself.
Before you start, check all trailer hitch parts and
attachments, safety chains, electrical connector, lamps,
tires and mirror adjustment. If the trailer has electric
brakes, start your vehicle and trailer moving and then
apply the trailer brake controller by hand to be sure the
brakes are working. This lets you check your electrical
connection at the same time.
During your trip, check occasionally to be sure that the
load is secure, and that the lamps and any trailer brakes
are still working.
4-37
Page 350 of 436
Treadwear
The treadwear grade is a comparative rating
based on the wear rate of the tire when tested
under controlled conditions on a speci�ed
government test course. For example, a tire
graded 150 would wear one and a half (1.5) times
as well on the government course as a tire
graded 100. The relative performance of tires
depends upon the actual conditions of their use,
however, and may depart signi�cantly from
the norm due to variations in driving habits, service
practices, and differences in road characteristics
and climate.
Traction – AA, A, B, C
The traction grades, from highest to lowest, are
AA, A, B, and C. Those grades represent the tire’s
ability to stop on wet pavement as measured
under controlled conditions on speci�ed
government test surfaces of asphalt and concrete.
A tire marked C may have poor traction
performance.
Warning
:The traction grade assigned to this
tire is based on straight-ahead braking
traction tests, and does not include
acceleration, cornering, hydroplaning, or peak
traction characteristics.
Temperature – A, B, C
The temperature grades are A (the highest), B,
and C, representing the tire’s resistance to the
generation of heat and its ability to dissipate heat
when tested under controlled conditions on a
speci�ed indoor laboratory test wheel. Sustained
high temperature can cause the material of the tire
to degenerate and reduce tire life, and excessive
temperature can lead to sudden tire failure. The
grade C corresponds to a level of performance
which all passenger car tires must meet under the
Federal Motor Vehicle Safety Standard No. 109.
Grades B and A represent higher levels of
performance on the laboratory test wheel than the
minimum required by law.
Warning
:The temperature grade for this tire
is established for a tire that is properly in�ated
and not overloaded. Excessive speed,
underin�ation, or excessive loading, either
separately or in combination, can cause heat
buildup and possible tire failure.
5-72
Page 380 of 436
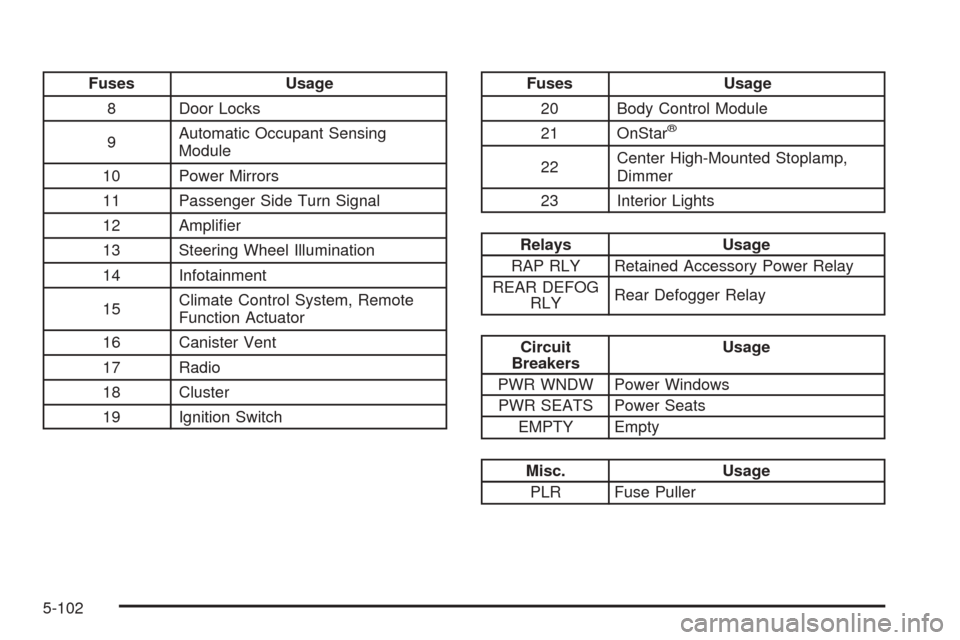
Fuses Usage
8 Door Locks
9Automatic Occupant Sensing
Module
10 Power Mirrors
11 Passenger Side Turn Signal
12 Ampli�er
13 Steering Wheel Illumination
14 Infotainment
15Climate Control System, Remote
Function Actuator
16 Canister Vent
17 Radio
18 Cluster
19 Ignition SwitchFuses Usage
20 Body Control Module
21 OnStar
®
22Center High-Mounted Stoplamp,
Dimmer
23 Interior Lights
Relays Usage
RAP RLY Retained Accessory Power Relay
REAR DEFOG
RLYRear Defogger Relay
Circuit
BreakersUsage
PWR WNDW Power Windows
PWR SEATS Power Seats
EMPTY Empty
Misc. Usage
PLR Fuse Puller
5-102
Page 384 of 436
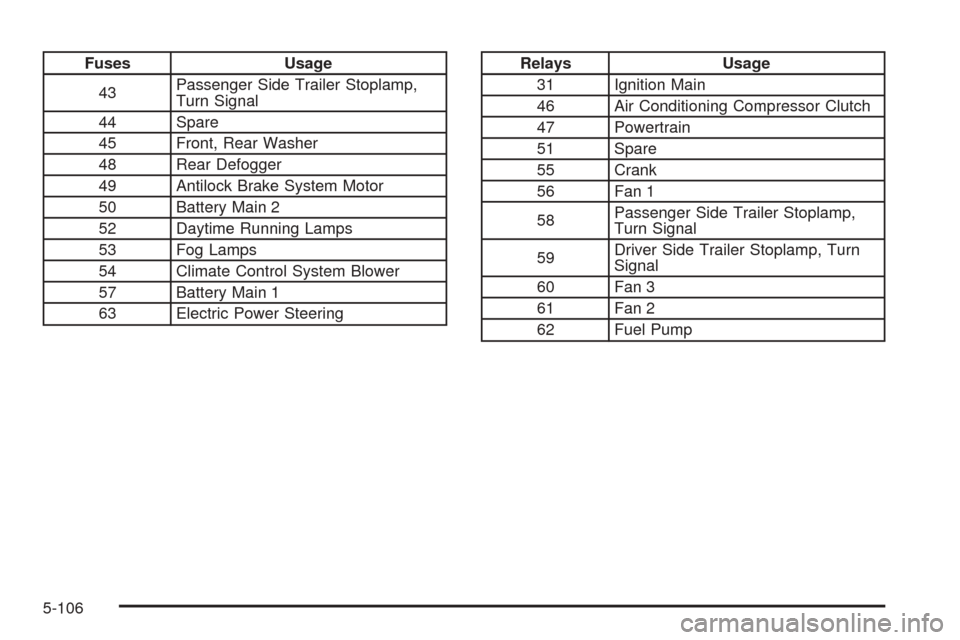
Fuses Usage
43Passenger Side Trailer Stoplamp,
Turn Signal
44 Spare
45 Front, Rear Washer
48 Rear Defogger
49 Antilock Brake System Motor
50 Battery Main 2
52 Daytime Running Lamps
53 Fog Lamps
54 Climate Control System Blower
57 Battery Main 1
63 Electric Power SteeringRelays Usage
31 Ignition Main
46 Air Conditioning Compressor Clutch
47 Powertrain
51 Spare
55 Crank
56 Fan 1
58Passenger Side Trailer Stoplamp,
Turn Signal
59Driver Side Trailer Stoplamp, Turn
Signal
60 Fan 3
61 Fan 2
62 Fuel Pump
5-106