2008 CHEVROLET CORVETTE remote start
[x] Cancel search: remote startPage 1 of 432

Seats and Restraint Systems........................... 1-1
Front Seats
............................................... 1-2
Safety Belts
.............................................. 1-9
Child Restraints
.......................................1-26
Airbag System
.........................................1-43
Restraint System Check
............................1-58
Features and Controls..................................... 2-1
Keys
........................................................ 2-3
Doors and Locks
......................................2-10
Windows
.................................................2-16
Theft-Deterrent Systems
............................2-18
Starting and Operating Your Vehicle
...........2-21
Mirrors
....................................................2-37
OnStar
®System
......................................2-43
Universal Home Remote System
................2-46
Storage Areas
.........................................2-53
Roof Panel
..............................................2-57
Convertible Top
.......................................2-62
Instrument Panel............................................. 3-1
Instrument Panel Overview
.......................... 3-4
Climate Controls
......................................3-26
Warning Lights, Gages, and Indicators
........3-34
Driver Information Center (DIC)
..................3-51
Audio System(s)
.......................................3-84Driving Your Vehicle....................................... 4-1
Your Driving, the Road, and the Vehicle
....... 4-2
Towing
...................................................4-29
Service and Appearance Care.......................... 5-1
Service
..................................................... 5-3
Fuel
......................................................... 5-5
Checking Things Under the Hood
...............5-12
Rear Axle
...............................................5-51
Headlamp Aiming
.....................................5-51
Bulb Replacement
....................................5-52
Windshield Replacement
...........................5-55
Windshield Wiper Blade Replacement
.........5-55
Tires
......................................................5-58
Appearance Care
.....................................5-87
Vehicle Identi�cation
.................................5-98
Electrical System
......................................5-99
Capacities and Speci�cations
...................5-107
Maintenance Schedule..................................... 6-1
Maintenance Schedule
................................ 6-2
Customer Assistance Information.................... 7-1
Customer Assistance and Information
........... 7-2
Reporting Safety Defects
...........................7-16
Vehicle Data Recording and Privacy
...........7-18
Index................................................................ 1
2008 Chevrolet Corvette Owner ManualM
Page 65 of 432
Keys...............................................................2-3
Keyless Access System...................................2-5
Keyless Access System Operation....................2-6
Doors and Locks............................................2-10
Door Locks..................................................2-10
Power Door Locks........................................2-12
Automatic Door Lock.....................................2-12
Programmable Automatic Door Unlock.............2-12
Lockout Protection........................................2-12
Hatch..........................................................2-13
Windows........................................................2-16
Power Windows............................................2-17
Sun Visors...................................................2-18
Theft-Deterrent Systems..................................2-18
Theft-Deterrent System..................................2-18
Immobilizer..................................................2-20
Immobilizer Operation....................................2-20
Starting and Operating Your Vehicle................2-21
New Vehicle Break-In....................................2-21
Front Air Dam..............................................2-21
Ignition Positions..........................................2-22Retained Accessory Power (RAP)...................2-23
Starting the Engine.......................................2-23
Automatic Transmission Operation...................2-26
Manual Transmission Operation......................2-30
Parking Brake..............................................2-32
Shifting Into Park (Automatic Transmission)......2-33
Shifting Out of Park......................................2-34
Parking the Vehicle (Manual Transmission).......2-35
Parking Over Things That Burn.......................2-35
Engine Exhaust............................................2-35
Running the Vehicle While Parked..................2-36
Mirrors...........................................................2-37
Automatic Dimming Rearview Mirror with
OnStar
®and Compass...............................2-37
Automatic Dimming Rearview Mirror with
Compass.................................................2-39
Outside Power Heated Mirrors........................2-41
Outside Automatic Dimming Mirror..................2-42
Outside Convex Mirror...................................2-42
OnStar
®System.............................................2-43
Universal Home Remote System......................2-46
Universal Home Remote System Operation......2-46
Section 2 Features and Controls
2-1
Page 111 of 432
Be sure to keep the original remote control transmitter for
use in other vehicles, as well as, for future programming.
Only the original remote control transmitter is needed for
Fixed Code programming. The programmed buttons
should be erased when the vehicle is sold or the lease
ends. See “Erasing Universal Home Remote Buttons”
later in this section.
Park the vehicle outside of the garage when
programming a garage door. Be sure that people and
objects are clear of the garage door or gate that is being
programmed.
Programming Universal Home
Remote — Rolling Code
For questions or help programming the Universal Home
Remote System, call 1-866-572-2728 or go to
www.learcar2u.com.
Most garage door openers sold after 1996 are Rolling
Code units.
Programming a garage door opener involves
time-sensitive actions, so read the entire procedure
before starting. Otherwise, the device will time out and
the procedure will have to be repeated.To program up to three devices:
1. Press START or put the vehicle in accessory mode.
SeeIgnition Positions on page 2-22for additional
information.
Programming can only occur when the vehicle is
running or in accessory mode.
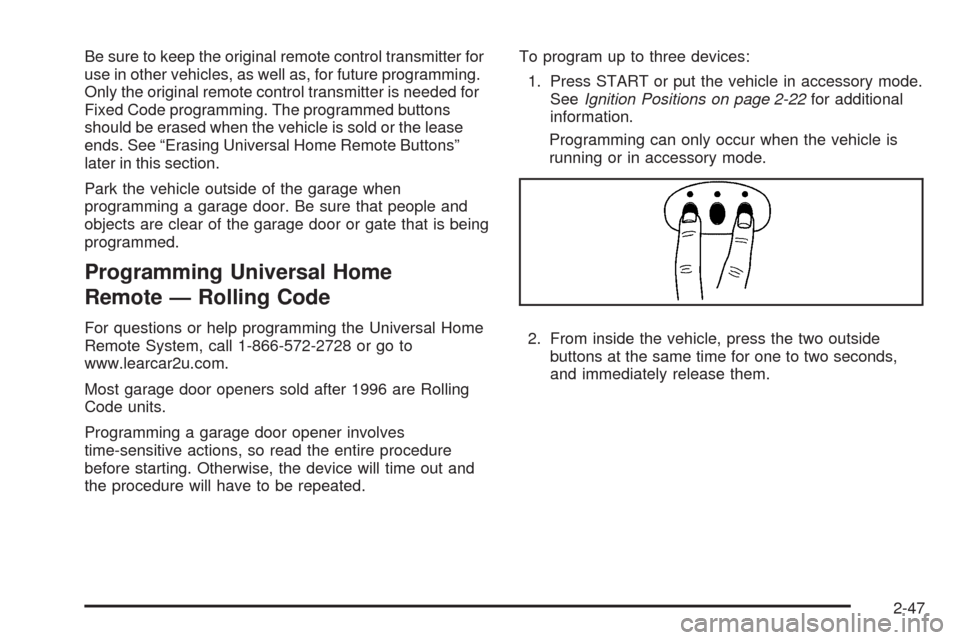
2. From inside the vehicle, press the two outside
buttons at the same time for one to two seconds,
and immediately release them.
2-47
Page 113 of 432
Programming Universal Home
Remote — Fixed Code
For questions or help programming the Universal Home
Remote System, call 1-866-572-2728 or go to
www.learcar2u.com.
Most garage door openers sold before 1996 are Fixed
Code units.
Programming a garage door opener involves
time-sensitive actions, so read the entire procedure
before starting. Otherwise, the device will time out and
the procedure will have to be repeated.
To program up to three devices:
1. Press START or put the vehicle in accessory mode.
SeeIgnition Positions on page 2-22for additional
information.
Programming can only occur when the vehicle is
running or in accessory mode.2. To verify that the garage door opener is a Fixed
Code unit, remove the battery cover on the hand
held transmitter supplied by the manufacturer of the
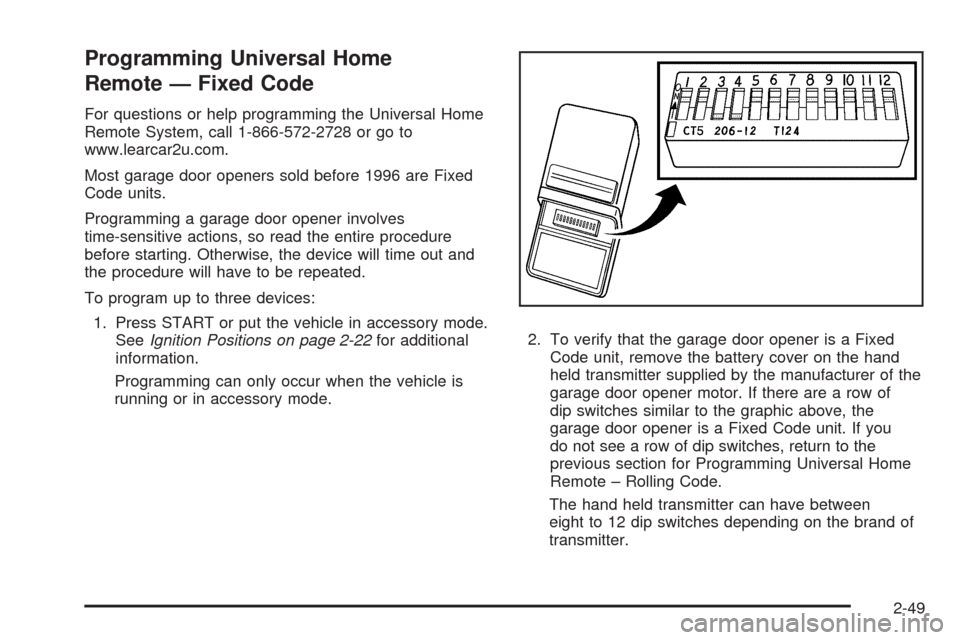
garage door opener motor. If there are a row of
dip switches similar to the graphic above, the
garage door opener is a Fixed Code unit. If you
do not see a row of dip switches, return to the
previous section for Programming Universal Home
Remote – Rolling Code.
The hand held transmitter can have between
eight to 12 dip switches depending on the brand of
transmitter.
2-49
Page 201 of 432
NO FOBS DETECTED
This message displays if the vehicle does not detect the
presence of a keyless access transmitter when you
have attempted to start the vehicle or a vehicle door has
just closed. The following conditions may cause this
message to appear:
Driver-added equipment plugged into the accessory
power outlet on the center console is causing
interference. Examples of these devices are cell
phones and cell phone chargers, two-way radios,
power inverters, or similar items. Try moving
the keyless access transmitter away from these
devices when starting the vehicle. In addition,
PDA devices and remote garage and gate openers
may also generate Electromagnetic Interference
(EMI) that may interfere with the keyless access
transmitter. Do not carry the keyless access
transmitter in the same pocket or bag as these
devices.
The vehicle is experiencing Electromagnetic
Interference (EMI). Some locations, such as
airports, automatic toll booths, and some gas
stations have EMI �elds which may interfere with
the keyless access transmitter.If moving the transmitter to different locations within
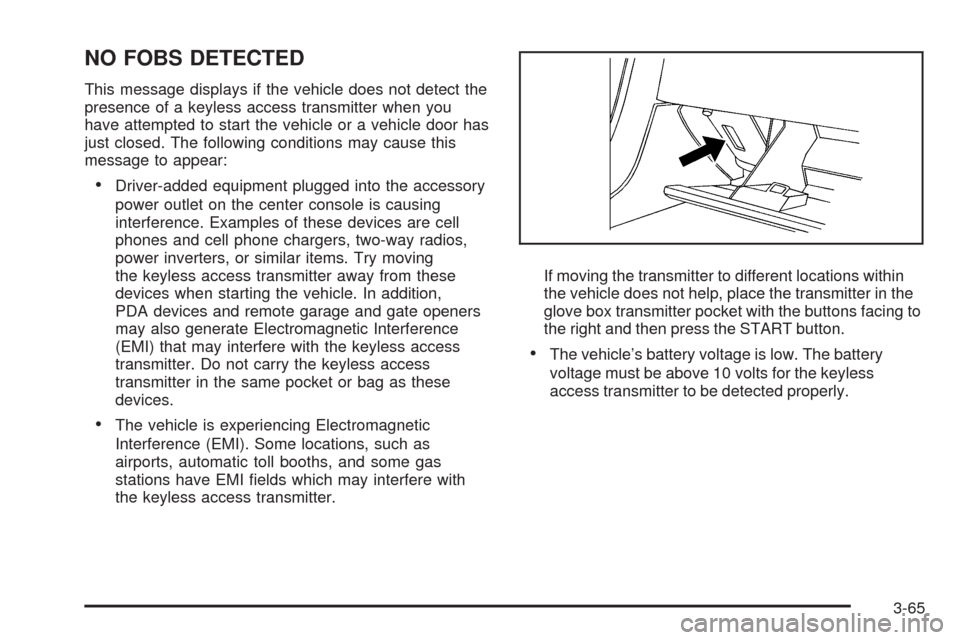
the vehicle does not help, place the transmitter in the
glove box transmitter pocket with the buttons facing to
the right and then press the START button.
The vehicle’s battery voltage is low. The battery
voltage must be above 10 volts for the keyless
access transmitter to be detected properly.
3-65
Page 231 of 432
X(Eject):Press to eject the CD. EJECT can be
activated with either the ignition or radio off.
tSEEKu:Press the left arrow to go to the start of
the current track if more than eight seconds have
played. Press the right arrow to go to the start of the
next track. If either arrow is held or pressed more than
once, the player continues moving backward or
forward through the CD.
tSCANu:To scan one CD, press and hold either
arrow for more than two seconds until SCAN displays
and a beep sounds. The radio goes to the next
track, plays for 10 seconds, then goes to the next track.
Press either arrow again, to stop scanning.
To scan all loaded CDs, press and hold either arrow for
more than four seconds until CD SCAN displays and
a beep sounds. Use this feature to listen to 10 seconds
of the �rst track of each loaded CD. Press either
arrow again, to stop scanning.AUTO EQ (Automatic Equalization):Press to select
the equalization setting while playing a CD. The
equalization is stored when a CD is played. For more
information on AUTO EQ, see “AUTO EQ” listed
previously in this section.
BAND:Press to listen to the radio when a CD is
playing. The inactive CD(s) remains inside the radio for
future listening.
CD AUX (Auxiliary):Press to play a CD when listening
to the radio. CD displays when a CD is in the player.
If your system has a remote playback device, pressing
this button a second time allows the remote device
to play.
Playing an MP3 CD-R Disc
Vehicles with the MP3 feature has the capability of
playing an MP3 CD-R disc. For more information on how
to play an MP3 CD-R disc, seeUsing an MP3 on
page 3-98later in this section.
3-95
Page 319 of 432
Notice:If you leave your radio or other accessories
on during the jump starting procedure, they could
be damaged. The repairs would not be covered
by your warranty. Always turn off your radio and
other accessories when jump starting your vehicle.
3. Turn off the ignition on both vehicles. Unplug
unnecessary accessories plugged into the cigarette
lighter or the accessory power outlet. Turn off
the radio and all lamps that are not needed.
This will avoid sparks and help save both batteries.
And it could save the radio!4. Open the hoods and locate the positive (+) and
negative (−) terminal locations on each vehicle.
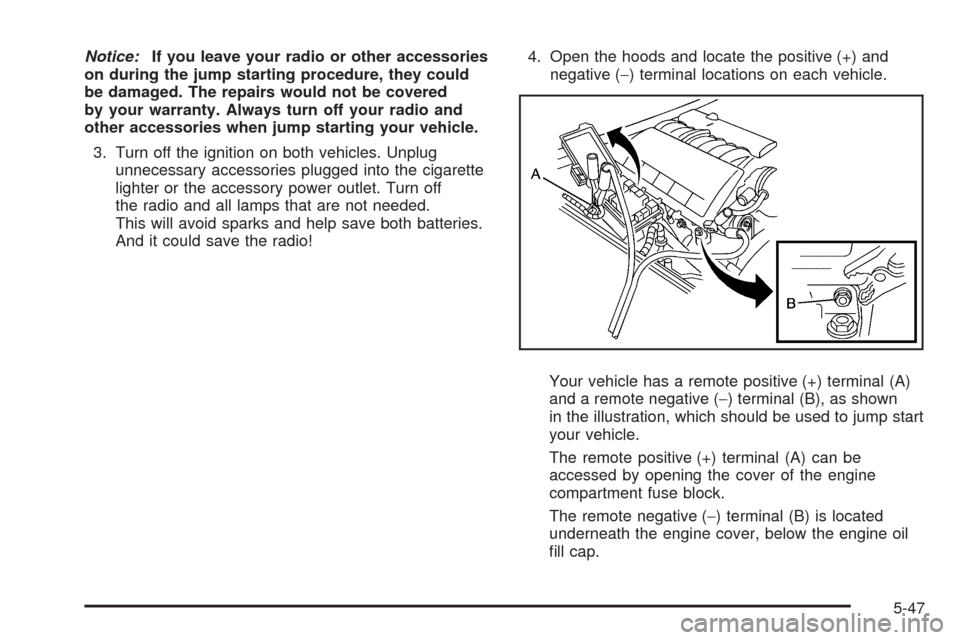
Your vehicle has a remote positive (+) terminal (A)
and a remote negative (−) terminal (B), as shown
in the illustration, which should be used to jump start
your vehicle.
The remote positive (+) terminal (A) can be
accessed by opening the cover of the engine
compartment fuse block.
The remote negative (−) terminal (B) is located
underneath the engine cover, below the engine oil
�ll cap.
5-47
Page 320 of 432
SeeEngine Compartment Overview on page 5-14
for the location of the engine compartment fuse
block and engine oil �ll cap.
You will not need to access the battery for jump
starting. The remote terminals are for that purpose.
{CAUTION:
An electric fan can start up even when the
engine is not running and can injure you.
Keep hands, clothing and tools away from any
underhood electric fan.
{CAUTION:
Using a match near a battery can cause battery
gas to explode. People have been hurt doing
this, and some have been blinded. Use a
�ashlight if you need more light.
Be sure the battery has enough water. You do
not need to add water to the battery installed
in your new vehicle. But if a battery has �ller
caps, be sure the right amount of �uid is there.
If it is low, add water to take care of that �rst.
If you do not, explosive gas could be present.
Battery �uid contains acid that can burn you.
Do not get it on you. If you accidentally get it
in your eyes or on your skin, �ush the place
with water and get medical help immediately.
5-48