2008 CHEVROLET CORVETTE warning
[x] Cancel search: warningPage 96 of 432

Downshifting (Manual Transmission)
Do not downshift into the gear shown below at a speed
greater than shown in the table:
FIRST (1) 50 mph (80 km/h)
SECOND (2) 74 mph (119 km/h)
THIRD (3) 101 mph (163 km/h)
FOURTH (4) 130 mph (209 km/h)
Notice:If you skip more than one gear when you
downshift, or if you race the engine when you
release the clutch pedal while downshifting, you
could damage the engine, clutch, driveshaft or the
transmission. Do not skip gears or race the
engine when downshifting.
The six-speed transmission has a spring that centers
the shift lever near THIRD (3) and FOURTH (4).
This spring helps you know which gear you are in when
you are shifting. Be careful when shifting from
FIRST (1) to SECOND (2) or downshifting from
SIXTH (6) to FIFTH (5). The spring will try to pull the
shift lever toward FOURTH (4) and THIRD (3).
Make sure you move the lever into SECOND (2) or
FIFTH (5). If you let the shift lever move in the direction
of the pulling, you may end up shifting from FIRST (1)
to FOURTH (4) or from SIXTH (6) to THIRD (3).
Parking Brake
The parking brake lever is located to the right of the
center console.
To set the parking brake, hold the brake pedal down.
Pull the parking brake lever up. If the ignition is on, the
brake system warning light will come on.
To release the parking brake, hold the brake pedal
down. Then push the release button in as you move the
parking brake lever all the way down.
Notice:Driving with the parking brake on can
overheat the brake system and cause premature
wear or damage to brake system parts. Make sure
that the parking brake is fully released and the brake
warning light is off before driving.
2-32
Page 119 of 432
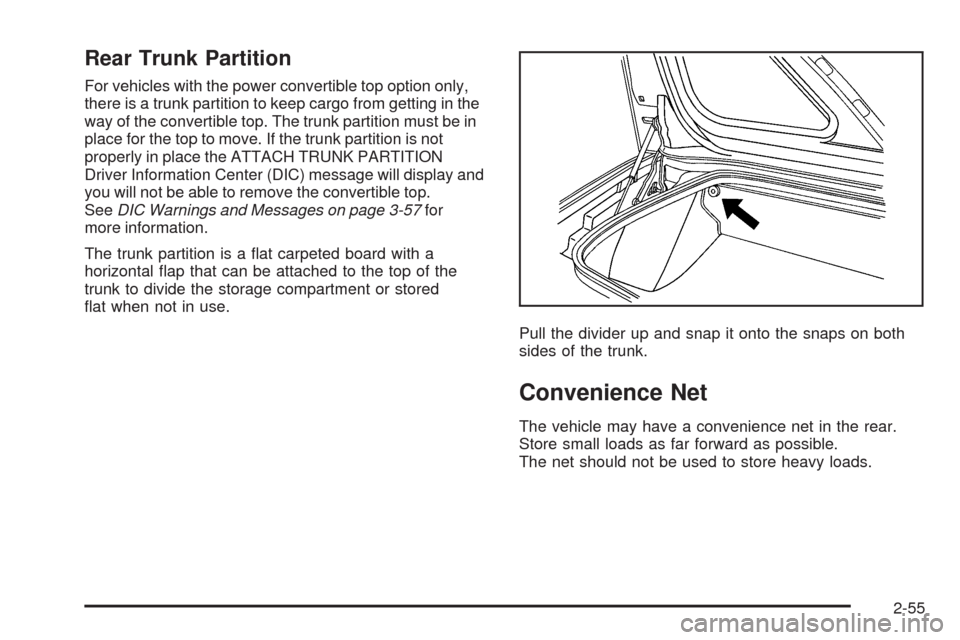
Rear Trunk Partition
For vehicles with the power convertible top option only,
there is a trunk partition to keep cargo from getting in the
way of the convertible top. The trunk partition must be in
place for the top to move. If the trunk partition is not
properly in place the ATTACH TRUNK PARTITION
Driver Information Center (DIC) message will display and
you will not be able to remove the convertible top.
SeeDIC Warnings and Messages on page 3-57for
more information.
The trunk partition is a �at carpeted board with a
horizontal �ap that can be attached to the top of the
trunk to divide the storage compartment or stored
�at when not in use.
Pull the divider up and snap it onto the snaps on both
sides of the trunk.
Convenience Net
The vehicle may have a convenience net in the rear.
Store small loads as far forward as possible.
The net should not be used to store heavy loads.
2-55
Page 133 of 432
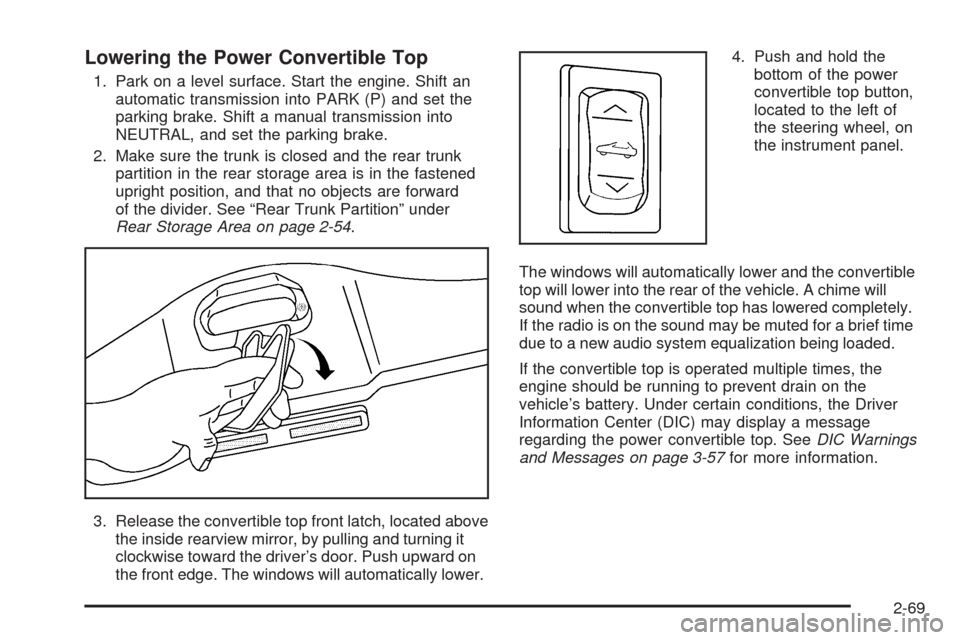
Lowering the Power Convertible Top
1. Park on a level surface. Start the engine. Shift an
automatic transmission into PARK (P) and set the
parking brake. Shift a manual transmission into
NEUTRAL, and set the parking brake.
2. Make sure the trunk is closed and the rear trunk
partition in the rear storage area is in the fastened
upright position, and that no objects are forward
of the divider. See “Rear Trunk Partition” under
Rear Storage Area on page 2-54.
3. Release the convertible top front latch, located above
the inside rearview mirror, by pulling and turning it
clockwise toward the driver’s door. Push upward on
the front edge. The windows will automatically lower.4. Push and hold the
bottom of the power
convertible top button,
located to the left of
the steering wheel, on
the instrument panel.
The windows will automatically lower and the convertible
top will lower into the rear of the vehicle. A chime will
sound when the convertible top has lowered completely.
If the radio is on the sound may be muted for a brief time
due to a new audio system equalization being loaded.
If the convertible top is operated multiple times, the
engine should be running to prevent drain on the
vehicle’s battery. Under certain conditions, the Driver
Information Center (DIC) may display a message
regarding the power convertible top. SeeDIC Warnings
and Messages on page 3-57for more information.
2-69
Page 136 of 432
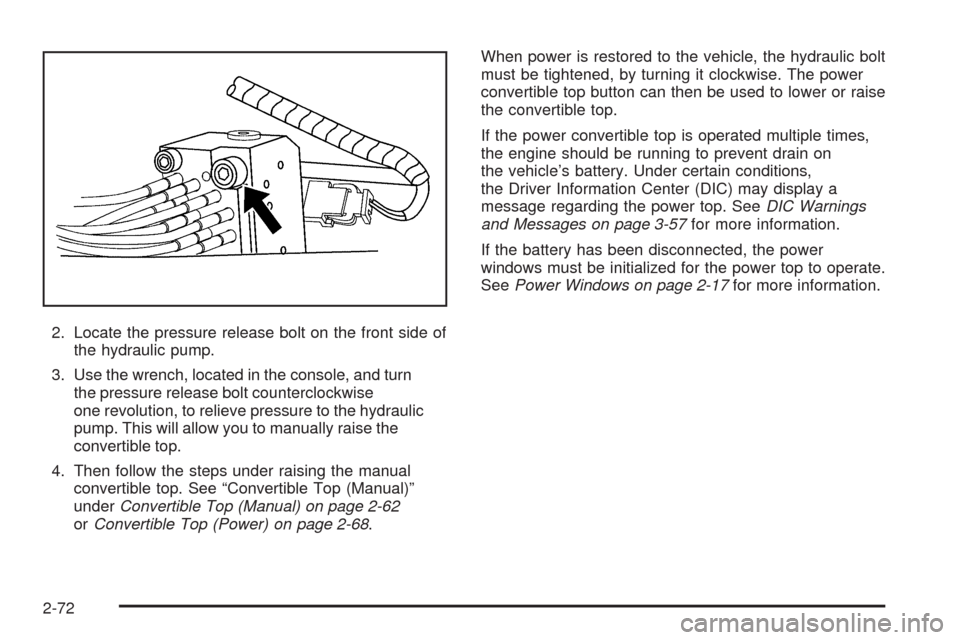
2. Locate the pressure release bolt on the front side of
the hydraulic pump.
3. Use the wrench, located in the console, and turn
the pressure release bolt counterclockwise
one revolution, to relieve pressure to the hydraulic
pump. This will allow you to manually raise the
convertible top.
4. Then follow the steps under raising the manual
convertible top. See “Convertible Top (Manual)”
underConvertible Top (Manual) on page 2-62
orConvertible Top (Power) on page 2-68.When power is restored to the vehicle, the hydraulic bolt
must be tightened, by turning it clockwise. The power
convertible top button can then be used to lower or raise
the convertible top.
If the power convertible top is operated multiple times,
the engine should be running to prevent drain on
the vehicle’s battery. Under certain conditions,
the Driver Information Center (DIC) may display a
message regarding the power top. SeeDIC Warnings
and Messages on page 3-57for more information.
If the battery has been disconnected, the power
windows must be initialized for the power top to operate.
SeePower Windows on page 2-17for more information.
2-72
Page 137 of 432
Instrument Panel Overview...............................3-4
Hazard Warning Flashers................................3-6
Other Warning Devices...................................3-7
Horn .............................................................3-7
Tilt Wheel.....................................................3-7
Turn Signal/Multifunction Lever.........................3-8
Turn and Lane-Change Signals (Auto Signal).....3-9
Headlamp High/Low-Beam Changer..................3-9
Flash-to-Pass...............................................3-10
Windshield Wipers........................................3-10
Windshield Washer.......................................3-11
Cruise Control..............................................3-11
Exterior Lamps.............................................3-15
Wiper Activated Headlamps............................3-16
Headlamps on Reminder................................3-16
Daytime Running Lamps (DRL).......................3-16
Fog Lamps ..................................................3-17
Twilight Sentinel
®..........................................3-18
Exterior Lighting Battery Saver........................3-19
Instrument Panel Brightness...........................3-19
Courtesy Lamps...........................................3-19
Entry/Exit Lighting.........................................3-19
Reading Lamps............................................3-20Battery Run-Down Protection..........................3-20
Head-Up Display (HUD).................................3-20
Accessory Power Outlet(s).............................3-24
Ashtray(s) and Cigarette Lighter......................3-25
Climate Controls............................................3-26
Dual Automatic Climate Control System...........3-26
Outlet Adjustment.........................................3-32
Passenger Compartment Air Filter...................3-32
Warning Lights, Gages, and Indicators............3-34
Instrument Panel Cluster................................3-35
Speedometer and Odometer...........................3-36
Tachometer.................................................3-36
Safety Belt Reminders...................................3-36
Airbag Readiness Light..................................3-37
Passenger Airbag Status Indicator...................3-38
Voltmeter Gage............................................3-40
One-to-Four Shift Light
(Manual Transmission)...............................3-40
Brake System Warning Light..........................3-41
Antilock Brake System (ABS) Warning Light........3-42
Traction Control System (TCS) Warning Light......3-42
Active Handling System Light.........................3-43
Engine Coolant Temperature Gage..................3-44
Section 3 Instrument Panel
3-1
Page 138 of 432
Tire Pressure Light.......................................3-44
Malfunction Indicator Lamp.............................3-45
Engine Oil Pressure Gage.............................3-48
Security Light...............................................3-49
Fog Lamp Light............................................3-49
Lights On Reminder......................................3-50
Highbeam On Light.......................................3-50
Fuel Gage...................................................3-50
Driver Information Center (DIC).......................3-51
DIC Operation and Displays...........................3-52
DIC Warnings and Messages.........................3-57
Other Messages...........................................3-74
DIC Vehicle Personalization............................3-75Audio System(s).............................................3-84
Setting the Clock..........................................3-85
Radio(s)......................................................3-85
Using an MP3..............................................3-98
XM Radio Messages...................................3-102
Navigation/Radio System..............................3-103
Theft-Deterrent Feature................................3-103
Audio Steering Wheel Controls......................3-103
Radio Reception.........................................3-104
Diversity Antenna System.............................3-105
XM™ Satellite Radio Antenna System............3-105
Section 3 Instrument Panel
3-2
Page 141 of 432
The main components of your instrument panel are the following:
A. Air Outlet. SeeOutlet Adjustment on page 3-32.
B. Head-Up Display Controls (If Equipped).
SeeHead-Up Display (HUD) on page 3-20.
C. Turn Signal/Multifunction Lever. SeeTurn
Signal/Multifunction Lever on page 3-8. Cruise
Control. SeeCruise Control on page 3-11. Fog
Lamps. SeeFog Lamps on page 3-17. Headlamp
Controls. SeeExterior Lamps on page 3-15.
D. Manual Shift Paddles (If Equipped). SeeAutomatic
Transmission Operation on page 2-26.
E. Driver Information Center (DIC). SeeDriver
Information Center (DIC) on page 3-51.
F. Instrument Panel Cluster. SeeInstrument Panel
Cluster on page 3-35.
G. Audio Steering Wheel Controls (If Equipped).
SeeAudio Steering Wheel Controls on page 3-103.
H. Windshield Wiper/Washer Lever. SeeWindshield
Wipers on page 3-10andWindshield Washer
on page 3-11.
I. Driver Information Center (DIC) Controls.
SeeDIC Operation and Displays on page 3-52.J. Center Air Outlets. SeeOutlet Adjustment on
page 3-32.
K. Hazard Warning Flasher Button. SeeHazard
Warning Flashers on page 3-6.
L. Audio System. SeeAudio System(s) on page 3-84.
M. Climate Controls. SeeDual Automatic Climate
Control System on page 3-26.
N. Fuel Door Release Button. SeeFilling the Tank
on page 5-8. Hatch/Trunk Release Button.
See “Hatch/Trunk Lid Release” underHatch on
page 2-13.
O. Instrument Panel Brightness Control. SeeInstrument
Panel Brightness on page 3-19.
P. Power Folding Top Switch (If Equipped).
SeeConvertible Top (Manual) on page 2-62or
Convertible Top (Power) on page 2-68.
Q. Tilt Wheel Lever. SeeTilt Wheel on page 3-7.
R. Telescopic Wheel Button (If Equipped). SeeTilt
Wheel on page 3-7.
S. Ignition Switch. SeeIgnition Positions on page 2-22.
3-5
Page 142 of 432
T. Heated Seat Controls (If Equipped). SeeHeated
Seats on page 1-4.
U. Shift Lever (Automatic Shown). SeeAutomatic
Transmission Operation on page 2-26orManual
Transmission Operation on page 2-30.
V. Active Handling Button. SeeActive Handling System
on page 4-7.
W. Accessory Power Outlet. SeeAccessory Power
Outlet(s) on page 3-24.
X. Selective Ride Control. SeeSelective Ride Control
on page 4-10.
Y. Center Console Cupholder. SeeCupholders on
page 2-53.
Z. Ashtray and Cigarette Lighter. SeeAshtray(s) and
Cigarette Lighter on page 3-25.
AA. Parking Brake. SeeParking Brake on page 2-32.
AB. Glove Box. SeeGlove Box on page 2-53.
AC. Instrument Panel Fuse Block. SeeInstrument Panel
Fuse Block on page 5-100.Hazard Warning Flashers
Your hazard warning �ashers let you warn others.
They also let police know you have a problem. Your
front and rear turn signal lamps will �ash on and off.
The hazard warning
�asher button is located
near the center of the
instrument panel.
Your hazard warning �ashers work no matter what
mode the ignition is in, even if the ignition is turned off.
Press the button to make the front and rear turn
signal lamps �ash on and off. Press the button again to
turn the �ashers off.
When the hazard warning �ashers are on, your turn
signals will not work.
3-6