2008 CHEVROLET AVALANCHE Car seat
[x] Cancel search: Car seatPage 1 of 528

Seats and Restraint Systems........................... 1-1
Front Seats
............................................... 1-2
Rear Seats
..............................................1-12
Safety Belts
.............................................1-14
Child Restraints
.......................................1-35
Airbag System
.........................................1-60
Restraint System Check
............................1-76
Features and Controls..................................... 2-1
Keys
........................................................ 2-3
Doors and Locks
......................................2-10
Windows
.................................................2-23
Theft-Deterrent Systems
............................2-26
Starting and Operating Your Vehicle
...........2-30
Mirrors
....................................................2-49
Object Detection Systems
..........................2-58
OnStar
®System
......................................2-61
Universal Home Remote System
................2-64
Storage Areas
.........................................2-71
Sunroof
..................................................2-96
Instrument Panel............................................. 3-1
Instrument Panel Overview
.......................... 3-4
Climate Controls
......................................3-21
Warning Lights, Gages, and Indicators
........3-32
Driver Information Center (DIC)
..................3-50
Audio System(s)
.......................................3-75Driving Your Vehicle....................................... 4-1
Your Driving, the Road, and Your Vehicle
..... 4-2
Towing
...................................................4-42
Service and Appearance Care.......................... 5-1
Service
..................................................... 5-3
Fuel
......................................................... 5-5
Checking Things Under the Hood
...............5-12
Rear Axle
...............................................5-47
Four-Wheel Drive
.....................................5-48
Front Axle
...............................................5-49
Headlamp Aiming
.....................................5-50
Bulb Replacement
....................................5-53
Windshield Wiper Blade Replacement
.........5-55
Tires
......................................................5-56
Appearance Care
.....................................5-99
Vehicle Identi�cation
...............................5-107
Electrical System
....................................5-108
Capacities and Speci�cations
...................5-115
Maintenance Schedule..................................... 6-1
Maintenance Schedule
................................ 6-2
Customer Assistance Information.................... 7-1
Customer Assistance and Information
........... 7-2
Reporting Safety Defects
...........................7-14
Vehicle Data Recording and Privacy
...........7-16
Index................................................................ 1
2008 Chevrolet Avalanche Owner ManualM
Page 16 of 528
Rear Seats
Rear Seat Operation
The rear seat is a 60/40 split bench seat that can be
folded to give you more cargo space and access to the
folding midgate. SeeMidgate
®on page 2-12for
more information on operation of the folding midgate.
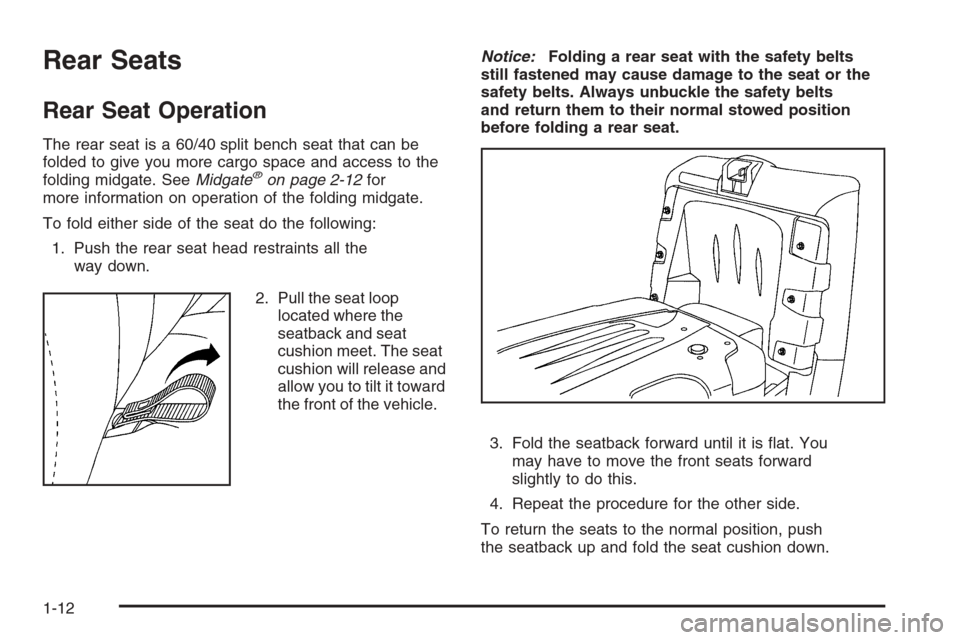
To fold either side of the seat do the following:
1. Push the rear seat head restraints all the
way down.
2. Pull the seat loop
located where the
seatback and seat
cushion meet. The seat
cushion will release and
allow you to tilt it toward
the front of the vehicle.Notice:Folding a rear seat with the safety belts
still fastened may cause damage to the seat or the
safety belts. Always unbuckle the safety belts
and return them to their normal stowed position
before folding a rear seat.
3. Fold the seatback forward until it is �at. You
may have to move the front seats forward
slightly to do this.
4. Repeat the procedure for the other side.
To return the seats to the normal position, push
the seatback up and fold the seat cushion down.
1-12
Page 18 of 528
Safety Belts
Safety Belts: They Are for Everyone
This part of the manual tells you how to use safety
belts properly. It also tells you some things you should
not do with safety belts.
{CAUTION:
Do not let anyone ride where he or she cannot
wear a safety belt properly. If you are in a
crash and you are not wearing a safety belt,
your injuries can be much worse. You can hit
things inside the vehicle harder or be ejected
from it and be seriously injured or killed. In the
same crash, you might not be, if you are
buckled up. Always fasten your safety belt,
and check that your passenger(s) are
restrained properly too.
{CAUTION:
People riding on the tailgate (if equipped) can
easily lose their balance and fall even when
the vehicle is operated at low speeds. Falling
from a moving vehicle may result in serious
injuries or death.
{CAUTION:
It is extremely dangerous to ride in a cargo
area, inside or outside of a vehicle. In a
collision, people riding in these areas are more
likely to be seriously injured or killed. Do not
allow people to ride in any area of your vehicle
that is not equipped with seats and safety
belts. Be sure everyone in your vehicle is in a
seat and using a safety belt properly.
Your vehicle has indicators as a reminder to buckle your
safety belts. SeeSafety Belt Reminders on page 3-34.
1-14
Page 101 of 528
Lowering the Midgate®with the Rear
Glass in Place
The Midgate®can be lowered to allow the cargo area of
your vehicle to extend into the cab. The rear glass
can be either installed in its normal position, or it can be
removed and stored in the rear glass storage pocket.
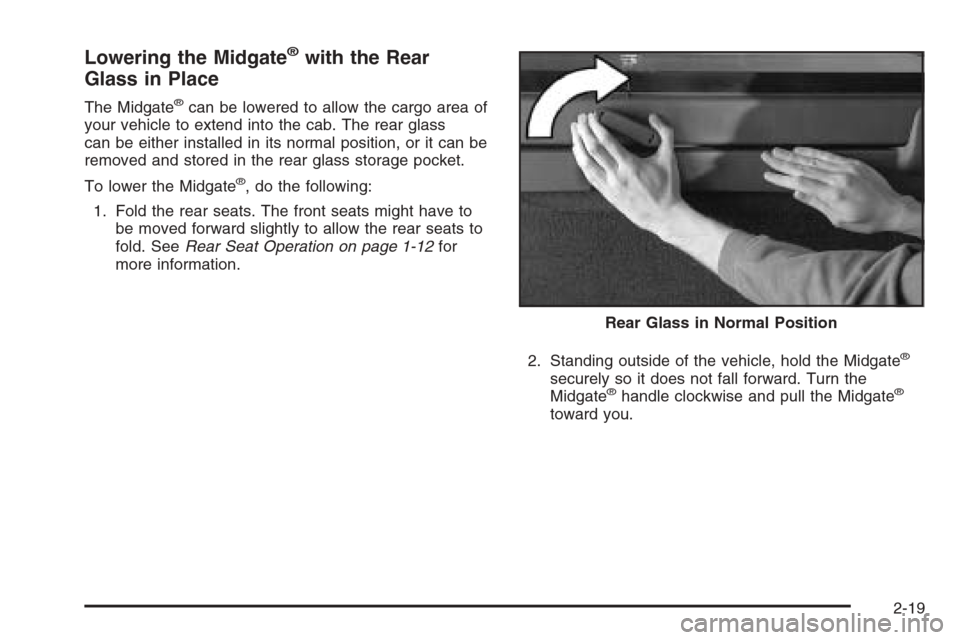
To lower the Midgate
®, do the following:
1. Fold the rear seats. The front seats might have to
be moved forward slightly to allow the rear seats to
fold. SeeRear Seat Operation on page 1-12for
more information.
2. Standing outside of the vehicle, hold the Midgate
®
securely so it does not fall forward. Turn the
Midgate®handle clockwise and pull the Midgate®
toward you.Rear Glass in Normal Position
2-19
Page 137 of 528
Manual Folding
The mirrors can be manually folded inward to prevent
damage when going through an automatic car wash.
To fold, push the mirror toward the vehicle. To return the
mirror to its original position, push outward. Be sure
to return both mirrors to their original unfolded position
before driving.
Heated Mirrors
The button to turn the heated mirrors on or off is located
on the climate control panel. Press this button to warm
the driver’s and passenger’s outside rearview mirrors to
help clear them of ice, snow, and condensation.
See “Rear Window Defogger” underDual Automatic
Climate Control System on page 3-24for more
information.
Convex Mirror
The passenger’s side mirror may have convex glass.
A convex mirror’s surface is curved so more can
be seen from the driver’s seat.
{CAUTION:
A convex mirror can make things (like other
vehicles) look farther away than they really are.
If you cut too sharply into the right lane, you
could hit a vehicle on your right. Check your
inside mirror or glance over your shoulder
before changing lanes.
2-55
Page 155 of 528
Rear Storage Area
Your vehicle has a rear armrest/cupholder for the rear
seat passengers.
To open it, pull up and then out on the tab, located at
the top center of the armrest, and pull the armrest down.
Cargo Cover Panels
{CAUTION:
Improperly stored cargo cover panels could
be thrown about the vehicle during a collision
or sudden maneuver. You or others could be
injured. If you remove a panel, always store it
in the proper storage location. When you put
it back, always be sure that is securely
reattached.
Notice:Exceeding the weight limit of 250 lbs
(113 kg) can damage the cargo covers, and the
repairs would not be covered by your warranty.
Do not put anything on top of the cargo covers
over the weight limit.
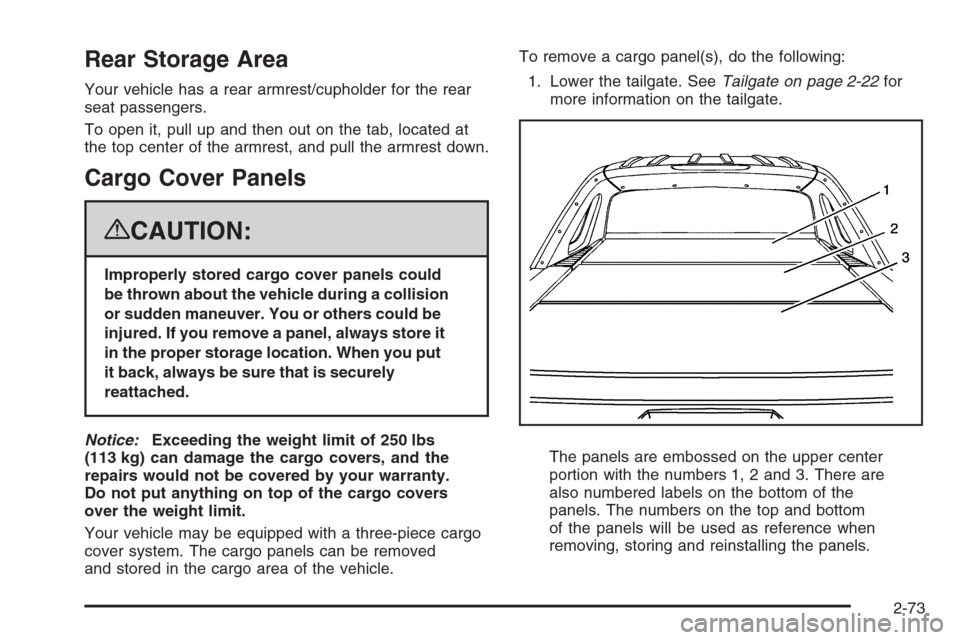
Your vehicle may be equipped with a three-piece cargo
cover system. The cargo panels can be removed
and stored in the cargo area of the vehicle.To remove a cargo panel(s), do the following:
1. Lower the tailgate. SeeTailgate on page 2-22for
more information on the tailgate.
The panels are embossed on the upper center
portion with the numbers 1, 2 and 3. There are
also numbered labels on the bottom of the
panels. The numbers on the top and bottom
of the panels will be used as reference when
removing, storing and reinstalling the panels.
2-73
Page 265 of 528

Playing a CD (In Either the DVD or
CD Slot)
Insert a CD partway into the slot, label side up. The
player pulls it in and the CD should begin playing
in 5 to 20 seconds for a CD, and in 30 seconds for a
DVD, depending on media type and format ranges.
If the ignition or radio is turned off, while a CD is in the
player, it stays in the player. When the ignition or radio is
turned on, the CD starts playing where it stopped, if it was
the last selected audio source. The CD is controlled by
the buttons on the radio faceplate or by the RSA unit.
SeeRear Seat Audio (RSA) on page 3-116for more
information. The DVD/CD decks, (upper slot is the DVD
deck and the lower slot is the CD deck) of the radio
are compatible with most audio CDs, CD-R, CD-RW,
and MP3s.
When a CD is inserted, the text label DVD or CD
symbol displays on the left side of the radio display.
As each new track starts to play, the track number
displays.
The CD player can play the smaller 3 inch (8 cm) single
CDs with an adapter ring. Full-size CDs and the
smaller CDs are loaded in the same manner.
Care of CDs
If playing a CD-R, the sound quality can be reduced due
to CD-R or CD-RW quality, the method of recording, the
quality of the music that has been recorded, and the way
the CD-R or CD-RW has been handled. Handle them
carefully. Store CD-R(s) or CD-RW(s) in their original
cases or other protective cases and away from direct
sunlight and dust. The CD or DVD player scans the
bottom surface of the disc. If the surface of a CD is
damaged, such as cracked, broken, or scratched, the
CD does not play properly or not at all. Do not touch the
bottom side of a CD while handling it; this could damage
the surface. Pick up CDs by grasping the outer edges or
the edge of the hole and the outer edge.
If the surface of a CD is soiled, clean it with a soft, lint
free cloth or dampen a clean, soft cloth in a mild, neutral
detergent solution mixed with water. Make sure the
wiping process starts from the center to the edge.
3-85
Page 296 of 528
Cleaning the RSE Overhead Console
When cleaning the RSE overhead console surface, use
only a clean cloth dampened with clean water.
Cleaning the Video Screen
When cleaning the video screen, use only a clean cloth
dampened with clean water. Use care when directly
touching or cleaning the screen, as damage could result.
Rear Seat Audio (RSA)
This feature allows rear seat passengers to listen to
and control any of the music sources: radio, CDs, DVDs,
or other auxiliary sources. However, the rear seat
passengers can only control the music sources the front
seat passengers are not listening to, except on some
radios where dual control is allowed. For example, rear
seat passengers can control and listen to a CD through
the headphones, while the driver listens to the radio
through the front speakers. The rear seat passengers
have control of the volume for each set of headphones.The RSA functions operate even when the main radio is
off. The front audio system will display the headphone
icon when the RSA is on, and will disappear from
the display when it is off.
Audio can be heard through wired headphones (not
included) plugged into the jacks on the RSA. If the
vehicle has this feature, audio can also be heard on
Channel 2 of the wireless headphones.
The audio system mutes the rear speakers when the
RSA audio is active through the headphones.
To listen to an iPod or portable audio device through
the RSA, attach the iPod or portable audio device to the
front auxiliary input (if available), located on the front
audio system. Turn the iPod on, then choose the
front auxiliary input with the RSA SRCE button.
3-116