2008 CHEVROLET AVALANCHE battery
[x] Cancel search: batteryPage 344 of 528
Dolly Towing
Front Towing (Front Wheels Off the
Ground)
Two-Wheel-Drive Vehicles
Notice:If you tow a two-wheel-drive vehicle with
the rear wheels on the ground, the transmission
could be damaged. The repairs would not be
covered by your warranty. Never tow your vehicle
with the rear wheels on the ground.
Two-wheel drive vehicles should not be towed
with the rear wheels on the ground. Two-wheel-drive
transmissions have no provisions for internal lubrication
while being towed. To dolly tow a two-wheel-drive
vehicle, you must tow the vehicle with the rear wheels
on the dolly. See “Rear Towing (Rear Wheels Off the
Ground)” later in this section for more information.
Four-Wheel-Drive Vehicles
Use the following procedure to tow your vehicle:
1. Drive the vehicle up onto the tow dolly.
2. Firmly set the parking brake.
3. Shift the transmission to PARK (P).
4. Turn the engine off, but leave the ignition on.
5. Securely attach the vehicle being towed to the
tow dolly.
{CAUTION:
Shifting the transfer case to NEUTRAL
can cause your vehicle to roll even if the
transmission is in PARK (P). You or someone
else could be seriously injured. Be sure to set
the parking brake before placing the transfer
case in NEUTRAL. SeeParking Brake on
page 2-44.
6. Shift the transfer case to NEUTRAL (N). See
Four-Wheel Drive on page 2-39for the proper
procedure to select the neutral position for your
vehicle.
7. Release the parking brake only after the vehicle
being towed is �rmly attached to the towing
vehicle.
If the tow vehicle will not be started or driven for
six weeks or more, remove the battery cable
from the negative terminal (post) of the battery to
prevent your battery from draining while towing.
4-44
Page 345 of 528

Rear Towing (Rear Wheels Off the Ground)
Two-Wheel-Drive Vehicles
Use the following procedure to tow your vehicle from
the rear:
1. Drive the vehicle onto the dolly.
2. Firmly set the parking brake. SeeParking Brake on
page 2-44for more information.
3. Put the transmission in PARK (P).
4. Follow the dolly manufacturer’s instructions to
attach and secure the vehicle being towed to
the dolly and then the loaded dolly to the tow
vehicle.
Make sure the wheels are straight before
proceeding to the next steps.
5. Release the parking brake only after the vehicle
being towed is �rmly attached to the tow vehicle.
If the tow vehicle will not be started or driven for
six weeks or more, remove the battery cable
from the negative terminal (post) of the battery to
prevent your battery from draining while towing.
Four-Wheel-Drive Vehicles
Use the following procedure to tow your vehicle from
the rear:
1. Drive the vehicle onto the dolly.
2. Firmly set the parking brake.
3. Put the transmission in PARK (P).
4. Turn the engine off, but leave the ignition on.
5. Follow the dolly manufacturer’s instructions to attach
and secure the vehicle being towed to the dolly and
then the loaded dolly to the tow vehicle.
Make sure the wheels are straight before
proceeding to the next steps.
4-45
Page 346 of 528
{CAUTION:
Shifting the transfer case to NEUTRAL
can cause your vehicle to roll even if the
transmission is in PARK (P). You or someone
else could be seriously injured. Be sure to set
the parking brake before placing the transfer
case in NEUTRAL. SeeParking Brake on
page 2-44.
6. Shift the transfer case to NEUTRAL (N). See
Four-Wheel Drive on page 2-39for the proper
procedure to select the neutral position for your
vehicle.
7. Release the parking brake only after the vehicle
being towed is �rmly attached to the tow vehicle.
If the tow vehicle will not be started or driven for
six weeks or more, remove the battery cable
from the negative terminal (post) of the battery to
prevent your battery from draining while towing.
Level Control
The self-adjusting rear suspension may come as part of
the premium smooth ride suspension package.
This type of level control will provide a leveled riding
position as well as improved handling under a variety of
passenger and loading conditions. A hydraulic pump
inside each rear shock absorber raises the rear of the
vehicle to the proper height, based on inputs from the
road surface, while the vehicle is being driven. It take
approximately 2 miles (3.2 km) of driving for the leveling
to complete, depending on the road surface conditions.
If the loaded vehicle is not moved for approximately
12 hours, the leveling system may bleed down to a lower
height. This can be especially apparent if a trailer is
left attached to a parked vehicle for long periods of time.
The vehicle must be driven to re-level the vehicle.
If a weight-distributing hitch is being used, the vehicle
should be driven approximately 2 miles (3.2 km) with the
trailer prior to adjusting the hitch.
4-46
Page 348 of 528
If You Do Decide To Pull A Trailer
If you do, here are some important points:
There are many different laws, including speed limit
restrictions, having to do with trailering. Make sure
your rig will be legal, not only where you live but
also where you’ll be driving. A good source for this
information can be state or provincial police.
Consider using a sway control. See “Hitches” later in
this section.
Don’t tow a trailer at all during the �rst 500 miles
(800 km) your new vehicle is driven. Your engine,
axle or other parts could be damaged.
Then, during the �rst 500 miles (800 km) that you tow
a trailer, don’t drive over 50 mph (80 km/h) and don’t
make starts at full throttle. This helps your engine
and other parts of your vehicle wear in at the heavier
loads.
You can tow in DRIVE (D). If the transmission
shifts too often (e.g., under heavy loads and/or hilly
conditions) you may want to shift the transmission to
a lower gear selection or enable the Tow/Haul mode.
See “Tow/Haul Mode” later in this section.Three important considerations have to do with weight:
the weight of the trailer,
the weight of the trailer tongue
and the weight on your vehicle’s tires.
Tow/Haul Mode
Tow/Haul is designed to assist while your vehicle is
pulling a large or heavy load or trailer. The purpose of
the Tow/Haul mode is to:
Reduce the frequency and improve the predictability
of transmission shifts when pulling a heavy trailer or
a large or heavy load.
Provide the same solid shift feel when pulling a
heavy trailer or a large or heavy load as when
the vehicle is unloaded.
Improve control of vehicle speed while requiring
less throttle pedal activity when pulling a heavy
trailer or a large or heavy load.
Increase the charging system voltage to assist in
recharging a battery installed in a trailer.
4-48
Page 359 of 528
Trailer Wiring Harness
Heavy-Duty Trailer Wiring Package
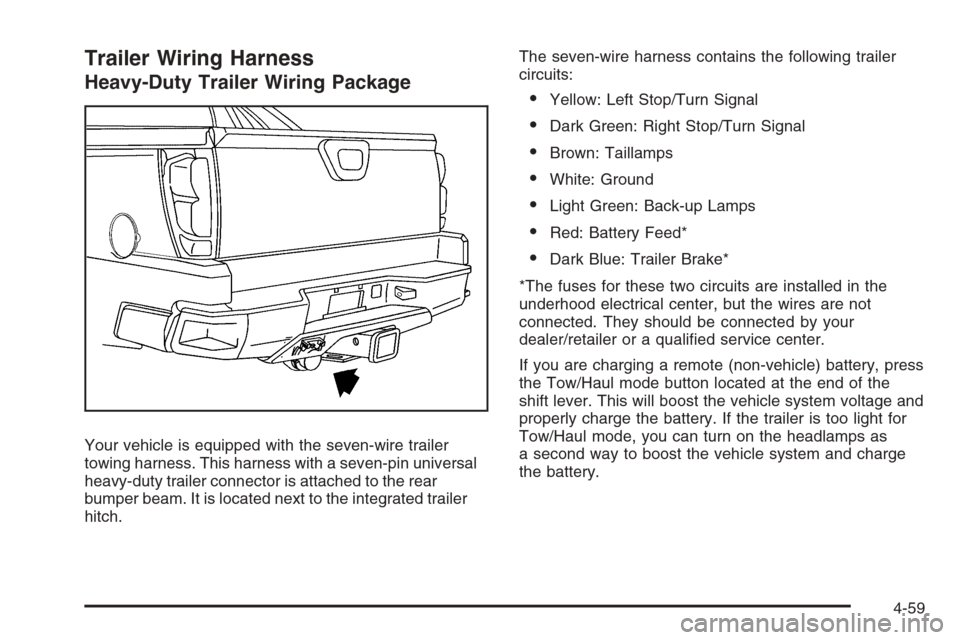
Your vehicle is equipped with the seven-wire trailer
towing harness. This harness with a seven-pin universal
heavy-duty trailer connector is attached to the rear
bumper beam. It is located next to the integrated trailer
hitch.The seven-wire harness contains the following trailer
circuits:
Yellow: Left Stop/Turn Signal
Dark Green: Right Stop/Turn Signal
Brown: Taillamps
White: Ground
Light Green: Back-up Lamps
Red: Battery Feed*
Dark Blue: Trailer Brake*
*The fuses for these two circuits are installed in the
underhood electrical center, but the wires are not
connected. They should be connected by your
dealer/retailer or a quali�ed service center.
If you are charging a remote (non-vehicle) battery, press
the Tow/Haul mode button located at the end of the
shift lever. This will boost the vehicle system voltage and
properly charge the battery. If the trailer is too light for
Tow/Haul mode, you can turn on the headlamps as
a second way to boost the vehicle system and charge
the battery.
4-59
Page 360 of 528
Electric Brake Control Wiring
Provisions
These wiring provisions are included with your vehicle
as part of the heavy-duty trailer wiring package.
These provisions are for an electric brake controller.
The instrument panel contains blunt cut wires near
the data link connector for the trailer brake controller.
The harness contains the following wires:
Dark Blue: Auxiliary
Red/Black: Battery
Light Blue: Brake Switch
White: Ground
The trailer brake controller should be installed by your
dealer/retailer or a quali�ed service center.
Trailer Recommendations
You must subtract your hitch loads from the Cargo
Weight Rating (CWR). CWR is the maximum weight
of the load your vehicle can carry. It doesn’t include the
weight of the people inside, but you can �gure about
150 lbs. (68 kg) for each seat. The total cargo load
must not be more than your vehicles CWR.
Weigh your vehicle with your trailer attached, so that
you won’t go over the GVWR or GAWR. If you are using
a weight-distributing hitch, weigh the vehicle without
the spring bars in place.
You’ll get the best performance if you spread out the
weight of your load the right way, and if you choose the
correct hitch and trailer brakes.
For more information seeTowing a Trailer on page 4-47.
4-60
Page 361 of 528

Service............................................................5-3
Accessories and Modi�cations..........................5-3
California Proposition 65 Warning.....................5-4
California Perchlorate Materials Requirements.....5-4
Doing Your Own Service Work.........................5-4
Adding Equipment to the Outside of
Your Vehicle..............................................5-5
Fuel................................................................5-5
Gasoline Octane............................................5-5
Gasoline Speci�cations....................................5-6
California Fuel...............................................5-6
Additives.......................................................5-6
Fuel E85 (85% Ethanol)..................................5-7
Fuels in Foreign Countries...............................5-8
Filling the Tank..............................................5-9
Filling a Portable Fuel Container.....................5-11
Checking Things Under the Hood....................5-12
Hood Release..............................................5-12
Engine Compartment Overview.......................5-14
Engine Oil...................................................5-15
Engine Oil Life System..................................5-18
Engine Air Cleaner/Filter................................5-20
Automatic Transmission Fluid.........................5-22
Engine Coolant.............................................5-25
Coolant Surge Tank Pressure Cap..................5-28
Engine Overheating.......................................5-28Overheated Engine Protection
Operating Mode........................................5-30
Cooling System............................................5-31
Engine Fan Noise.........................................5-35
Power Steering Fluid.....................................5-36
Windshield Washer Fluid................................5-37
Brakes........................................................5-38
Battery........................................................5-41
Jump Starting...............................................5-42
Rear Axle.......................................................5-47
Four-Wheel Drive............................................5-48
Front Axle......................................................5-49
Headlamp Aiming...........................................5-50
Bulb Replacement..........................................5-53
Halogen Bulbs..............................................5-53
Taillamps, Turn Signal, Sidemarker,
Stoplamps and Back-up Lamps...................5-53
License Plate Lamp......................................5-54
Replacement Bulbs.......................................5-55
Windshield Wiper Blade Replacement..............5-55
Tires..............................................................5-56
Tire Sidewall Labeling...................................5-57
Tire Terminology and De�nitions.....................5-61
In�ation - Tire Pressure.................................5-64
Section 5 Service and Appearance Care
5-1
Page 375 of 528

A. Engine Air Cleaner/Filter. SeeEngine Air
Cleaner/Filter on page 5-20.
B. Air Filter Restriction Indicator (If Equipped).
SeeEngine Air Cleaner/Filter on page 5-20.
C. Coolant Surge Tank and Pressure Cap. SeeCooling
System on page 5-31andCoolant Surge Tank
Pressure Cap on page 5-28.
D. Remote Positive (+) Terminal. SeeJump Starting on
page 5-42.
E. Battery. SeeBattery on page 5-41.
F. Engine Oil Fill Cap. See “When to Add Engine Oil”
underEngine Oil on page 5-15.
G. Automatic Transmission Dipstick. See “Checking the
Fluid Level” underAutomatic Transmission Fluid
on page 5-22.
H. Remote Negative (−) Terminal (Out of View).
SeeJump Starting on page 5-42.
I. Engine Oil Dipstick (Out of View). See “Checking
Engine Oil” underEngine Oil on page 5-15.
J. Engine Cooling Fan. SeeCooling System on
page 5-31.
K. Power Steering Fluid Reservoir. SeePower Steering
Fluid on page 5-36.L. Brake Master Cylinder Reservoir. See “Brake Fluid”
underBrakes on page 5-38.
M. Underhood Fuse Block. SeeUnderhood Fuse Block
on page 5-111.
N. Windshield Washer Fluid Reservoir. See “Adding
Washer Fluid” underWindshield Washer Fluid
on page 5-37.
Engine Oil
Checking Engine Oil
It is a good idea to check the engine oil every time you
get fuel. In order to get an accurate reading, the oil
must be warm and the vehicle must be on level ground.
The engine oil dipstick handle is a yellow loop.
SeeEngine Compartment Overview on page 5-14
for the location of the engine oil dipstick.
1. Turn off the engine and give the oil several minutes
to drain back into the oil pan. If you do not do this,
the oil dipstick might not show the actual level.
2. Pull out the dipstick and clean it with a paper towel
or cloth, then push it back in all the way. Remove it
again, keeping the tip down, and check the level.
5-15