2008 CHEVROLET AVALANCHE headlamp
[x] Cancel search: headlampPage 247 of 528

Entering the Feature Settings Menu
1. Turn the ignition on and place the vehicle in
PARK (P).
To avoid excessive drain on the battery, it is
recommended that the headlamps are turned off.
2. Press the customization button to scroll through the
available customizable options.
Feature Settings Menu Items
The following are customization features that allow you
to program settings to the vehicle:
DISPLAY IN ENGLISH
This feature will only display if a language other than
English has been set. This feature allows you to change
the language in which the DIC messages appear to
English.
Press the customization button until the PRESS
VTO
DISPLAY IN ENGLISH screen appears on the DIC
display. Press the set/reset button once to display all
DIC messages in English.
DISPLAY LANGUAGE
This feature allows you to select the language in which
the DIC messages will appear.
Press the customization button until the DISPLAY
LANGUAGE screen appears on the DIC display.
Press the set/reset button once to access the settings
for this feature. Then press the customization button
to scroll through the following settings:
ENGLISH (default):All messages will appear in
English.
FRANCAIS:All messages will appear in French.
ESPANOL:All messages will appear in Spanish.
NO CHANGE:No change will be made to this feature.
The current setting will remain.
To select a setting, press the set/reset button while the
desired setting is displayed on the DIC.
You can also change the language by pressing the
trip odometer reset stem. See “Language” under DIC
Operation and Displays (Without DIC Buttons) earlier in
this section for more information.
3-67
Page 320 of 528

Sound the horn as you approach the top of the hill
to let opposing traffic know you are there.
Use your headlamps even during the day. They
make your vehicle more visible to oncoming
traffic.
{CAUTION:
Driving to the top (crest) of a hill at full speed
can cause an accident. There could be a
drop-off, embankment, cliff, or even another
vehicle. You could be seriously injured or
killed. As you near the top of a hill, slow
down and stay alert.There are some things you should do if the vehicle
stalls, or is about to stall, and you cannot make it up
the hill:
Push the brake pedal to stop the vehicle and keep
it from rolling backwards. Also, apply the parking
brake.
If the engine is still running, shift the transmission to
REVERSE (R), release the parking brake, and slowly
back down the hill in REVERSE (R).
If the engine has stopped running, you will need
to restart it. With the brake pedal pressed and the
parking brake still applied, shift the transmission
to PARK (P) and restart the engine. Then, shift to
REVERSE (R), release the parking brake, and
slowly back down the hill as straight as possible
in REVERSE (R).
As you are backing down the hill, put your left hand
on the steering wheel at the 12 o’clock position. This
way, you will be able to tell if the wheels are straight
and maneuver as you back down. It is best that you
back down the hill with the wheels straight rather
than in the left or right direction. Turning the wheel
too far to the left or right will increase the possibility
of a rollover.
4-20
Page 327 of 528

If the water is not too deep, drive slowly through it. At
faster speeds, water splashes on the ignition system and
your vehicle can stall. Stalling can also occur if you get
the tailpipe under water. And, as long as the tailpipe is
under water, you will never be able to start the engine.
When you go through water, remember that when the
brakes get wet, it may take you longer to stop.
SeeDriving in Rain and on Wet Roads on page 4-28for
more information on driving through water.
After Off-Road Driving
Remove any brush or debris that has collected on
the underbody, chassis, or under the hood. These
accumulations can be a �re hazard.
After operation in mud or sand, have the brake linings
cleaned and checked. These substances can cause
glazing and uneven braking. Check the body structure,
steering, suspension, wheels, tires, and exhaust
system for damage. Also, check the fuel lines and
cooling system for any leakage.
Your vehicle will require more frequent service due
to off-road use. Refer to the Maintenance Schedule
for additional information.
Driving at Night
Night driving is more dangerous than day driving
because some drivers are likely to be impaired — by
alcohol or drugs, with night vision problems, or by
fatigue.
Night driving tips include:
Drive defensively.
Do not drink and drive.
Reduce headlamp glare by adjusting the inside
rearview mirror.
Slow down and keep more space between you and
other vehicles because headlamps can only light up
so much road ahead.
Watch for animals.
When tired, pull off the road.
Do not wear sunglasses.
Avoid staring directly into approaching headlamps.
Keep the windshield and all glass on your vehicle
clean — inside and out.
Keep your eyes moving, especially during turns or
curves.
4-27
Page 333 of 528

You can run the engine to keep warm, but be careful.
{CAUTION:
Snow can trap exhaust gases under your
vehicle. This can cause deadly CO (carbon
monoxide) gas to get inside. CO could
overcome you and kill you. You cannot see it
or smell it, so you might not know it is in your
vehicle. Clear away snow from around the
base of your vehicle, especially any that is
blocking the exhaust pipe. And check around
again from time to time to be sure snow does
not collect there.
Open a window just a little on the side of the
vehicle that is away from the wind. This will
help keep CO out.
Run your engine only as long as you must. This saves
fuel. When you run the engine, make it go a little faster
than just idle. That is, push the accelerator slightly. This
uses less fuel for the heat that you get and it keeps the
battery charged. You will need a well-charged battery to
restart the vehicle, and possibly for signaling later on with
the headlamps. Let the heater run for a while.
4-33
Page 359 of 528

Trailer Wiring Harness
Heavy-Duty Trailer Wiring Package
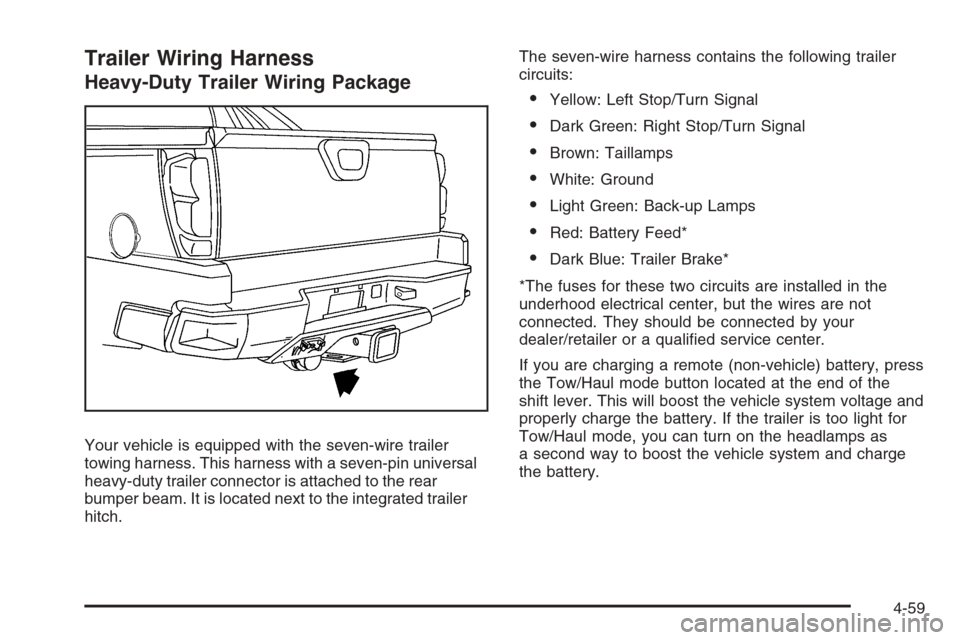
Your vehicle is equipped with the seven-wire trailer
towing harness. This harness with a seven-pin universal
heavy-duty trailer connector is attached to the rear
bumper beam. It is located next to the integrated trailer
hitch.The seven-wire harness contains the following trailer
circuits:
Yellow: Left Stop/Turn Signal
Dark Green: Right Stop/Turn Signal
Brown: Taillamps
White: Ground
Light Green: Back-up Lamps
Red: Battery Feed*
Dark Blue: Trailer Brake*
*The fuses for these two circuits are installed in the
underhood electrical center, but the wires are not
connected. They should be connected by your
dealer/retailer or a quali�ed service center.
If you are charging a remote (non-vehicle) battery, press
the Tow/Haul mode button located at the end of the
shift lever. This will boost the vehicle system voltage and
properly charge the battery. If the trailer is too light for
Tow/Haul mode, you can turn on the headlamps as
a second way to boost the vehicle system and charge
the battery.
4-59
Page 361 of 528

Service............................................................5-3
Accessories and Modi�cations..........................5-3
California Proposition 65 Warning.....................5-4
California Perchlorate Materials Requirements.....5-4
Doing Your Own Service Work.........................5-4
Adding Equipment to the Outside of
Your Vehicle..............................................5-5
Fuel................................................................5-5
Gasoline Octane............................................5-5
Gasoline Speci�cations....................................5-6
California Fuel...............................................5-6
Additives.......................................................5-6
Fuel E85 (85% Ethanol)..................................5-7
Fuels in Foreign Countries...............................5-8
Filling the Tank..............................................5-9
Filling a Portable Fuel Container.....................5-11
Checking Things Under the Hood....................5-12
Hood Release..............................................5-12
Engine Compartment Overview.......................5-14
Engine Oil...................................................5-15
Engine Oil Life System..................................5-18
Engine Air Cleaner/Filter................................5-20
Automatic Transmission Fluid.........................5-22
Engine Coolant.............................................5-25
Coolant Surge Tank Pressure Cap..................5-28
Engine Overheating.......................................5-28Overheated Engine Protection
Operating Mode........................................5-30
Cooling System............................................5-31
Engine Fan Noise.........................................5-35
Power Steering Fluid.....................................5-36
Windshield Washer Fluid................................5-37
Brakes........................................................5-38
Battery........................................................5-41
Jump Starting...............................................5-42
Rear Axle.......................................................5-47
Four-Wheel Drive............................................5-48
Front Axle......................................................5-49
Headlamp Aiming...........................................5-50
Bulb Replacement..........................................5-53
Halogen Bulbs..............................................5-53
Taillamps, Turn Signal, Sidemarker,
Stoplamps and Back-up Lamps...................5-53
License Plate Lamp......................................5-54
Replacement Bulbs.......................................5-55
Windshield Wiper Blade Replacement..............5-55
Tires..............................................................5-56
Tire Sidewall Labeling...................................5-57
Tire Terminology and De�nitions.....................5-61
In�ation - Tire Pressure.................................5-64
Section 5 Service and Appearance Care
5-1
Page 410 of 528

Headlamp Aiming
The vehicle has a visual optical headlamp aiming
system. The aim of the headlamps have been preset at
the factory and should need no further adjustment.
However, if the vehicle is damaged in a crash, the aim
of the headlamps can be affected and adjustment
can be necessary.
If oncoming vehicles �ash their high beams at you, this
can mean the vertical aim of your headlamps needs
to be adjusted.
It is recommended that the vehicle is taken to your
dealer/retailer for service if the headlamps need to
be adjusted. It is possible however, to re-aim the
headlamps as described.The vehicle should:Be placed so the headlamps are 25 ft. (7.6 m) from
a light colored wall.
Have all four tires on a level surface which is level
all the way to the wall.
Be placed so it is perpendicular to the wall.
Not have any snow, ice, or mud on it.
Be fully assembled and all other work stopped while
headlamp aiming is being performed.
Be normally loaded with a full tank of fuel and one
person or 160 lbs (75 kg) sitting on the driver seat.
Have tires properly in�ated.
Have the spare tire is in its proper location in the
vehicle.
Headlamp aiming is done with the vehicle’s low-beam
headlamps. The high-beam headlamps will be correctly
aimed if the low-beam headlamps are aimed properly.
5-50
Page 411 of 528

To adjust the vertical aim:
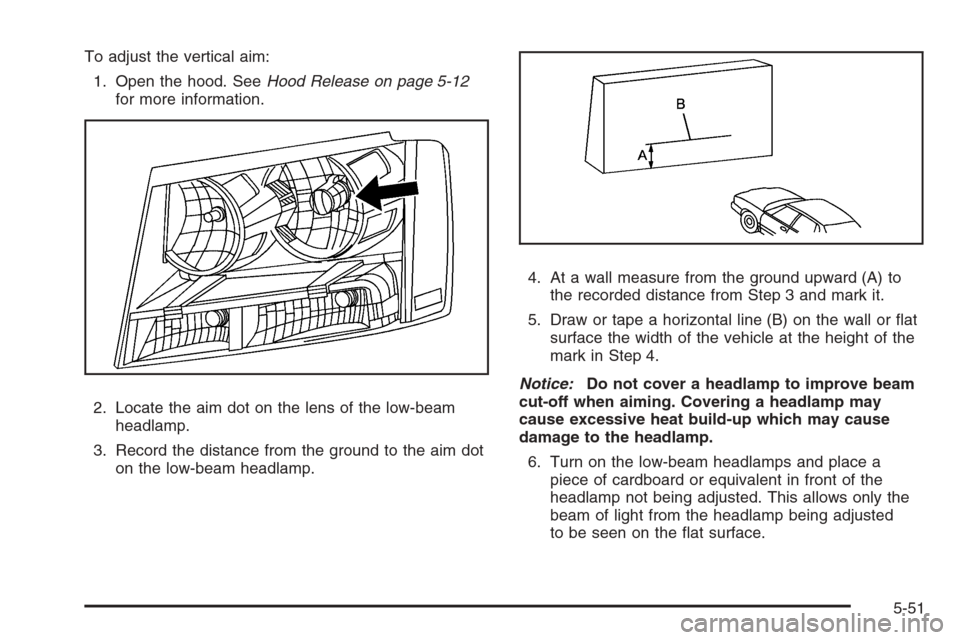
1. Open the hood. SeeHood Release on page 5-12
for more information.
2. Locate the aim dot on the lens of the low-beam
headlamp.
3. Record the distance from the ground to the aim dot
on the low-beam headlamp.4. At a wall measure from the ground upward (A) to
the recorded distance from Step 3 and mark it.
5. Draw or tape a horizontal line (B) on the wall or �at
surface the width of the vehicle at the height of the
mark in Step 4.
Notice:Do not cover a headlamp to improve beam
cut-off when aiming. Covering a headlamp may
cause excessive heat build-up which may cause
damage to the headlamp.
6. Turn on the low-beam headlamps and place a
piece of cardboard or equivalent in front of the
headlamp not being adjusted. This allows only the
beam of light from the headlamp being adjusted
to be seen on the �at surface.
5-51