2008 CADILLAC CTS instrument panel
[x] Cancel search: instrument panelPage 160 of 490

Daytime Running Lamps (DRL)
Daytime Running Lamps (DRL) can make it easier for
others to see the front of your vehicle during the
day. DRL can be helpful in many different driving
conditions, but they can be especially helpful in the short
periods after dawn and before sunset. Fully functional
daytime running lamps are required on all vehicles
�rst sold in Canada.
The DRL system will make either the reduced intensity
low-beam headlamps or dedicated DRL’s come on
when the following conditions are met:
It is still daylight and the ignition is in ON/RUN or
START.
The exterior lamp control is in off or AUTO and the
headlamps are off.
The automatic transmission is not in PARK (P).
When DRL’s are on, only the reduced intensity
low-beam headlamps or dedicated DRL’s will be on.
No other exterior lamps will be on. The instrument panel
cluster will not be lit up either.When the exterior lamp control is in AUTO and it is dark
enough outside, the DRL turns off and the low-beam
headlamps will turn on. When it is bright enough outside,
the low-beam headlamps will go off, and the DRL will
turn back on. If the vehicle is started in a dark garage,
the automatic headlamp system comes on immediately.
Once the vehicle leaves the garage, it takes about
one minute for the automatic headlamp system
to change to DRL if it is light outside. During that delay,
the instrument panel cluster may not be as bright as
usual. Make sure the instrument panel brightness lever
is in the full bright position. SeeInstrument Panel
Brightness on page 3-20.
Turning the exterior lamp control to off or to the
low-beam headlamp position will turn off the DRL.
If the parking lamps or the fog lamps were turned on
instead, the DRL will still turn off.
This will work regardless of gear position and whether
or not the parking brake is set.
3-18
Page 161 of 490

Light Sensor
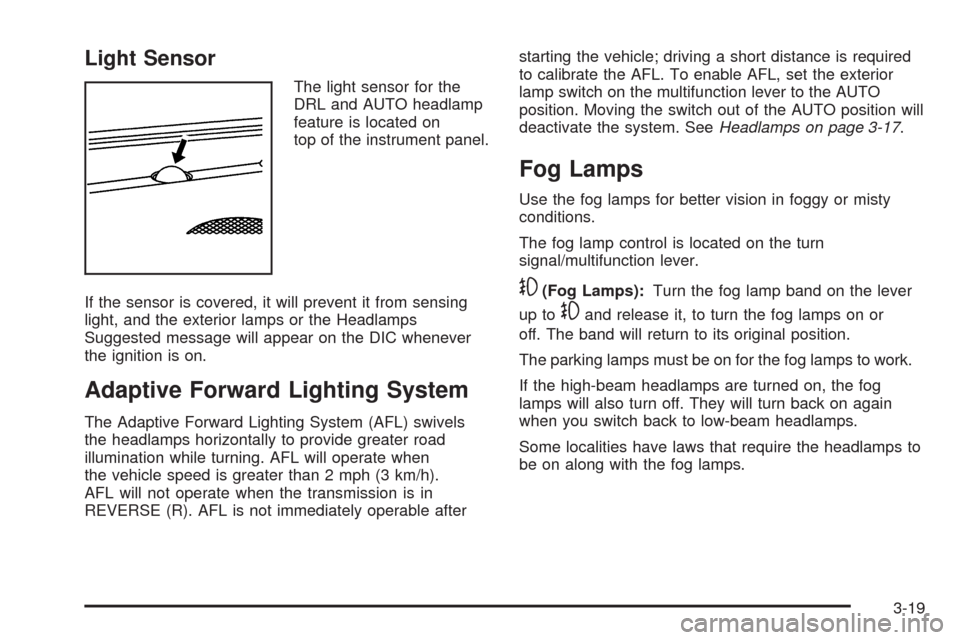
The light sensor for the
DRL and AUTO headlamp
feature is located on
top of the instrument panel.
If the sensor is covered, it will prevent it from sensing
light, and the exterior lamps or the Headlamps
Suggested message will appear on the DIC whenever
the ignition is on.
Adaptive Forward Lighting System
The Adaptive Forward Lighting System (AFL) swivels
the headlamps horizontally to provide greater road
illumination while turning. AFL will operate when
the vehicle speed is greater than 2 mph (3 km/h).
AFL will not operate when the transmission is in
REVERSE (R). AFL is not immediately operable afterstarting the vehicle; driving a short distance is required
to calibrate the AFL. To enable AFL, set the exterior
lamp switch on the multifunction lever to the AUTO
position. Moving the switch out of the AUTO position will
deactivate the system. SeeHeadlamps on page 3-17.
Fog Lamps
Use the fog lamps for better vision in foggy or misty
conditions.
The fog lamp control is located on the turn
signal/multifunction lever.
-(Fog Lamps):Turn the fog lamp band on the lever
up to
-and release it, to turn the fog lamps on or
off. The band will return to its original position.
The parking lamps must be on for the fog lamps to work.
If the high-beam headlamps are turned on, the fog
lamps will also turn off. They will turn back on again
when you switch back to low-beam headlamps.
Some localities have laws that require the headlamps to
be on along with the fog lamps.
3-19
Page 162 of 490

Exterior Lighting Battery Saver
The exterior lamps turn off about 10 minutes after the
ignition is turned to LOCK/OFF, if the parking lamps
or headlamps have been left on. This protects against
draining the battery. The battery saver does not
work if the headlamps are turned on after the ignition
is turned to LOCK/OFF.
To keep the lamps on for more than 10 minutes, turn
the lamps back on with the exterior lamp control.
Instrument Panel Brightness
The knob with this symbol
is located on the instrument
panel to the left of the
steering column.
Turn the knob clockwise or counterclockwise to brighten
or dim the lights.
Turn the knob completely clockwise to turn on the
interior lamps.
Entry Lighting
The entry lighting system turns on the reading and
dome lamps and the backlighting to the exterior lamp
control, when a door is opened or if the transmitter
unlock button is pressed. If activated by the transmitter,
the lighting stays on for about 25 seconds. The entry
lighting system uses the light sensor on the instrument
panel; so it must be dark outside in order for the
lamps to turn on. The lamps turn off about 25 seconds
after the last door is closed. They dim then turn
off if the ignition key is turned to ON/RUN. They
immediately turn off if the power locks are used.
Parade Dimming
This feature does not let the instrument panel backlight
dim during daylight hours while the key is in the
ignition and the headlamps are on. Parade dimming
automatically works with the light sensor, located on top
of the dashboard. If it is dark enough outside and the
parking lamps are on, the backlight on the instrument
panel can be adjusted by turning the instrument panel
brightness knob clockwise or counterclockwise to
brighten or dim the lighting. SeeInstrument Panel
Brightness on page 3-20.
3-20
Page 165 of 490

Ashtray(s) and Cigarette Lighter
Your vehicle may have two removable ashtrays and
cigarette lighters. One ashtray can be placed into
the instrument panel storage compartment and the other
into the center console rear compartment. To use the
lighter, push it in all the way and let go. When it is ready,
it will pop back out by itself.
To empty the ashtrays, grip the edges of the bin and
pull it straight out of the housing. To reinstall, push the
tray back into place.
Notice:Holding a cigarette lighter in while it is
heating does not let the lighter back away from the
heating element when it is hot. Damage from
overheating can occur to the lighter or heating
element, or a fuse could be blown. Do not hold a
cigarette lighter in while it is heating.
Notice:If papers, pins, or other �ammable items
are put in the ashtray, hot cigarettes or other
smoking materials could ignite them and possibly
damage your vehicle. Never put �ammable items in
the ashtray.
Analog Clock
The analog clock is located on the instrument panel
above the radio. The clock is not connected with
any other vehicle system and runs by itself. To adjust
the clock:
1. Locate the adjustment buttons directly below the
clock face.
2. Push and hold the right adjustment button to move
the clock hands forward or the left adjustment
button to make the clock hands go backward.
Holding either button down will cause the clock to
advance faster. Release the button before the
desired time is reached.
3. Push and release either button to adjust the time by
one minute increments until the desired time is
reached.
3-23
Page 167 of 490

The air-conditioning system removes moisture from the
air, so a small amount of water might drip underneath
the vehicle while it is idling or after the engine is turned
off is normal.
Do not cover the solar sensor located in the center of
the instrument panel, near the windshield. For more
information on the solar sensor, see “Sensors” later in
this section.
PASS (Passenger Climate Control):Press this button
to set a different temperature for the passenger.
Then press the passenger temperature adjustment
buttons to select a comfortable setting.
Pressing the PASS button again automatically sets the
passenger’s temperature to the driver’s setting.
Turning the passenger’s temperature display off does
not shut the climate control system for the passenger off.
Q/R(Temperature Adjustment):The temperature
can be adjusted separately for the driver and the
passenger. Press the up or down arrow buttons to
increase or decrease the automatic temperature
settings.
Manual Operation
HG(Mode):Press theHorGbuttons to change the
current air�ow mode. The current mode selection
appears in the display screen. Changing the mode
cancels the automatic operation and the system goes
into manual mode. Press AUTO to return to automatic
operation.
The outboard air outlets always receive some air�ow in
every mode, except defrost. SeeOutlet Adjustment
on page 3-28to change this air�ow from the outboard
outlets.
Y(Vent):This mode directs air to the instrument panel
outlets.
\(Bi-Level):This mode splits the air between
the instrument panel outlets and the �oor outlets.
In automatic operation, cooler air is directed to the
upper outlets and warmer air to the �oor outlets.
[(Floor):This mode directs most of the air to the
�oor outlets with some air directed to the outboard
outlets and a little air directed to the windshield.
The mode buttons can also be used to select the
defog and defrost modes. Information on defogging
and defrosting can be found later in this section.
3-25
Page 170 of 490

Sensors
There is a solar sensor,
located on the instrument
panel, near the windshield.
There is also an interior
temperature sensor,
located to the right of the
steering wheel, on the
instrument panel.By monitoring the solar radiation and the air inside the
vehicle, these sensors help maintain the selected
temperature by adjusting the fan speed, and the air
delivery system. In order to do this, the system can also
supply cooler air to the side of the vehicle facing the
sun. The recirculation mode will also be activated,
as necessary. Do not cover the sensors or the automatic
climate control system will not work properly.
Outlet Adjustment
Use the air outlets located in the center and on the side
of the instrument panel to direct the air�ow. Use the
thumbwheels near the air outlets to open or close off
the air�ow.
Operation Tips
Clear away any ice, snow, or leaves from air inlets
at the base of the windshield that could block the
�ow of air into the vehicle.
Keep the path under the front seats clear of objects
to help circulate the air inside of the vehicle more
effectively.
Use of non-GM approved hood de�ectors can
adversely affect the performance of the system.
Check with your dealer/retailer before adding
equipment to the outside of your vehicle.
3-28
Page 173 of 490

Instrument Panel Cluster
The instrument panel cluster is designed to let you know at a glance how your vehicle is running. You will know
how fast you are going, how much fuel you are using and many of the other things you will need to know to drive
safely and economically.
United States Automatic Cluster shown, Canada, and Manual similar
3-31
Page 175 of 490

Safety Belt Reminders
Safety Belt Reminder Light
When the engine is started, a chime comes on for
several seconds to remind people to fasten their safety
belts, unless the driver’s safety belt is already buckled.
The safety belt light will
also come on and stay on
for several seconds,
then it will �ash for
several more.
This chime and light is repeated if the driver remains
unbuckled and the vehicle is in motion. If the driver’s belt
is already buckled, neither the chime nor the light will
come on.
Passenger Safety Belt Reminder Light
Several seconds after the engine is started, a chime
sounds for several seconds to remind the front passenger
to buckle their safety belt. This would only occur if the
passenger airbag is enabled. SeePassenger Sensing
System on page 1-65for more information. The
passenger safety belt light, located on the instrument
panel, will come on and stay on for several seconds and
then �ash for several more.
This chime and light are
repeated if the passenger
remains unbuckled and
the vehicle is in motion.
If the passenger safety belt is buckled, neither the
chime nor the light comes on.
3-33