Page 104 of 132

Replacing components
102
Jacking points
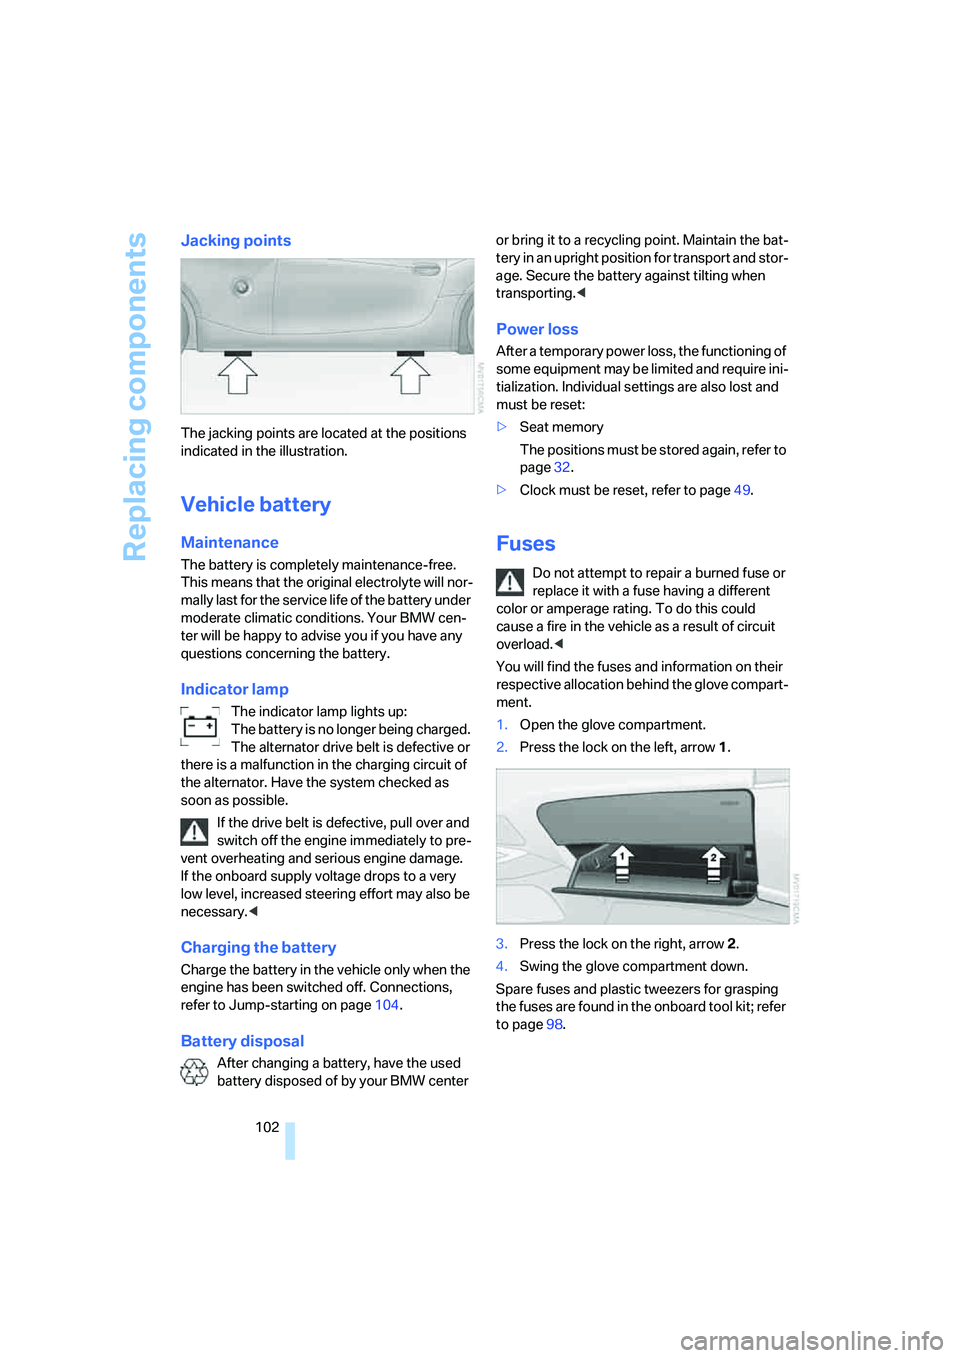
The jacking points are located at the positions
indicated in the illustration.
Vehicle battery
Maintenance
The battery is completely maintenance-free.
This means that the original electrolyte will nor-
mally last for the service life of the battery under
moderate climatic conditions. Your BMW cen-
ter will be happy to advise you if you have any
questions concerning the battery.
Indicator lamp
The indicator lamp lights up:
The battery is no longer being charged.
The alternator drive belt is defective or
there is a malfunction in the charging circuit of
the alternator. Have the system checked as
soon as possible.
If the drive belt is defective, pull over and
switch off the engine immediately to pre-
vent overheating and serious engine damage.
If the onboard supply voltage drops to a very
low level, increased steering effort may also be
necessary.<
Charging the battery
Charge the battery in the vehicle only when the
engine has been switched off. Connections,
refer to Jump-starting on page104.
Battery disposal
After changing a battery, have the used
battery disposed of by your BMW center or bring it to a recycling point. Maintain the bat-
tery in an upright position for transport and stor-
age. Secure the battery against tilting when
transporting.<
Power loss
After a temporary power loss, the functioning of
some equipment may be limited and require ini-
tialization. Individual settings are also lost and
must be reset:
>Seat memory
The positions must be stored again, refer to
page32.
>Clock must be reset, refer to page49.
Fuses
Do not attempt to repair a burned fuse or
replace it with a fuse having a different
color or amperage rating. To do this could
cause a fire in the vehicle as a result of circuit
overload.<
You will find the fuses and information on their
respective allocation behind the glove compart-
ment.
1.Open the glove compartment.
2.Press the lock on the left, arrow1.
3.Press the lock on the right, arrow2.
4.Swing the glove compartment down.
Spare fuses and plastic tweezers for grasping
the fuses are found in the onboard tool kit; refer
to page98.
Page 105 of 132

Reference
At a glance
Controls
Driving tips
Mobility
103
Giving and receiving assistance
Receiving assistance
If your vehicle has the necessary equipment,
you can use buttons in the center console to
contact Roadside Assistance or issue an emer-
gency call.
Requirements for initiating an emergency call or
contacting Roadside Assistance:
>The key must be in position 1 or higher.
>The car phone must be logged on to a
mobile phone network.
>The emergency calling system must be
operable.
Access to the buttons
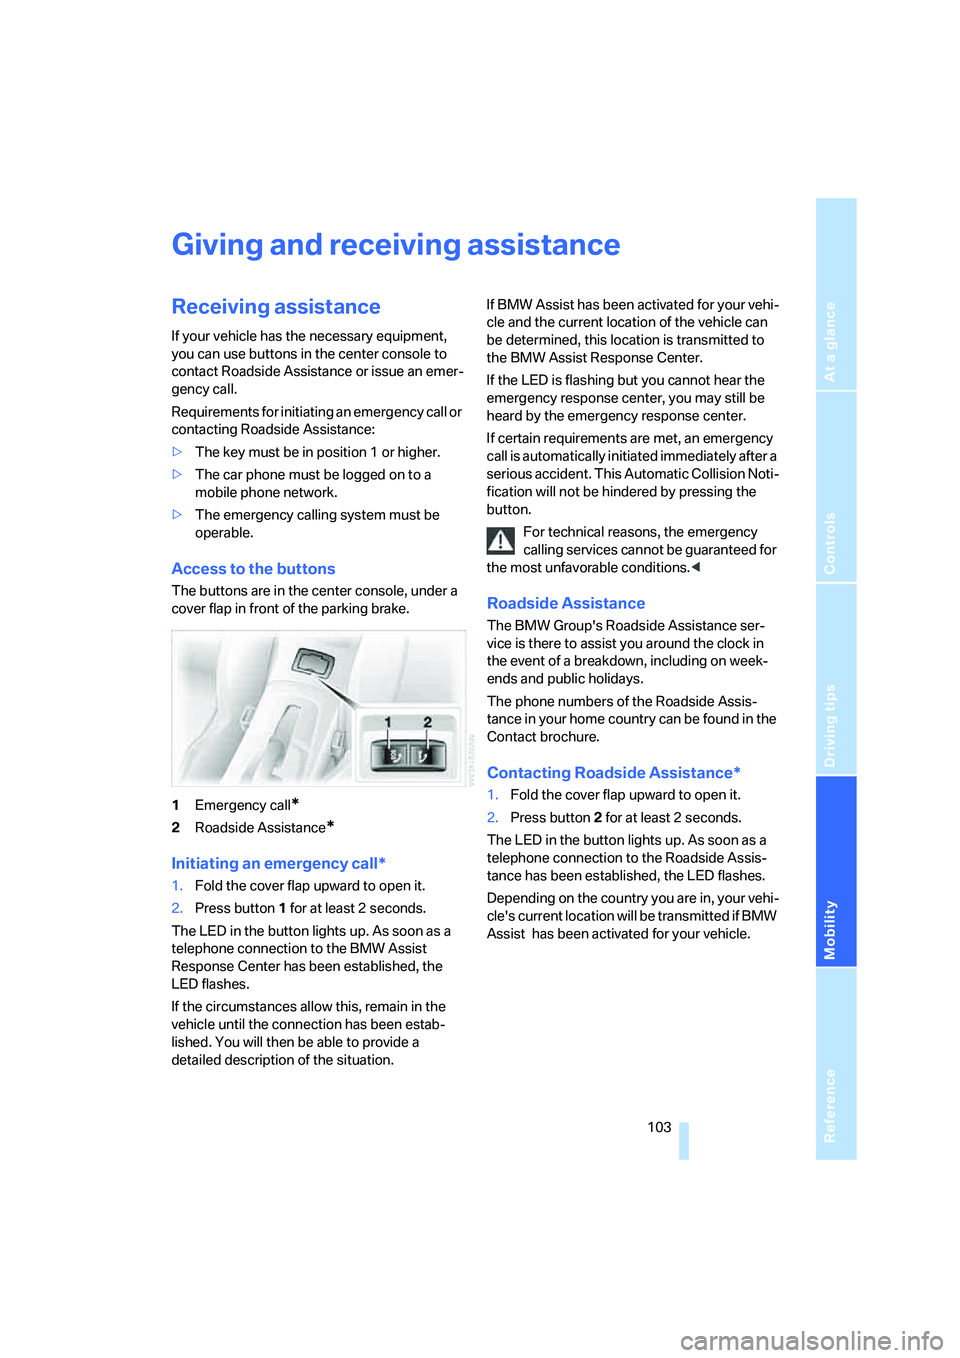
The buttons are in the center console, under a
cover flap in front of the parking brake.
1Emergency call
*
2Roadside Assistance*
Initiating an emergency call*
1.Fold the cover flap upward to open it.
2.Press button1 for at least 2 seconds.
The LED in the button lights up. As soon as a
telephone connection to the BMW Assist
Response Center has been established, the
LED flashes.
If the circumstances allow this, remain in the
vehicle until the connection has been estab-
lished. You will then be able to provide a
detailed description of the situation.If BMW Assist has been activated for your vehi-
cle and the current location of the vehicle can
be determined, this location is transmitted to
the BMW Assist Response Center.
If the LED is flashing but you cannot hear the
emergency response center, you may still be
heard by the emergency response center.
If certain requirements are met, an emergency
call is automatically initiated immediately after a
serious accident. This Automatic Collision Noti-
fication will not be hindered by pressing the
button.
For technical reasons, the emergency
calling services cannot be guaranteed for
the most unfavorable conditions.<
Roadside Assistance
The BMW Group's Roadside Assistance ser-
vice is there to assist you around the clock in
the event of a breakdown, including on week-
ends and public holidays.
The phone numbers of the Roadside Assis-
tance in your home country can be found in the
Contact brochure.
Contacting Roadside Assistance*
1.Fold the cover flap upward to open it.
2.Press button2 for at least 2 seconds.
The LED in the button lights up. As soon as a
telephone connection to the Roadside Assis-
tance has been established, the LED flashes.
Depending on the country you are in, your vehi-
cle's current location will be transmitted if BMW
Assist has been activated for your vehicle.
Page 122 of 132

Everything from A to Z
120 Equipment scope, refer to the
Service and Warranty
Information Booklet for US
models, Warranty and
Service Guide Booklet
ESP Electronic Stability
Program, refer to DSC
Dynamic Stability
Control51
Event Data Recorders97
Exhaust system, refer to Hot
exhaust system75
Exterior mirrors34
– adjusting34
– automatic dimming
feature34
– automatic heating34
– folding in and out34
External audio device68
Eyeglasses compartment69
Eyes, tow-starting and towing
away105
F
False alarm
– refer to Avoiding
unintentional alarms24
– refer to Switching off an
alarm24
Fasten safety belts, refer to
Safety belts33
Filter
– refer to Microfilter64
– refer to Microfilter/activated-
charcoal filter67
Fine wood, refer to the Caring
for your vehicle brochure
First aid, refer to First-aid
kit104
First-aid kit104
Flat tire
– Flat Tire Monitor53
– refer to Changing a
wheel101
– refer to Tire condition87
– Run-Flat Tires88
– Tire Pressure Monitor54Flat Tire Monitor FTM53
– flat tire warning53
– indicator/warning lamp53
– initializing the system53
– snow chains90
– system limits53
Floods, refer to Driving
through water76
Floor covers, carpets, refer to
the Caring for your vehicle
brochure
Floor mats, refer to the Caring
for your vehicle brochure
Fog lamps60
– indicator lamp13
Footbrake, refer to Braking
safely76
For your own safety5
Front airbags56
FTM, refer to Flat Tire
Monitor53
Fuel
– average consumption50
– capacity, refer to
Capacities114
– display48
– quality83
– refer to Average fuel
consumption50
– refer to Fuel
specifications83
– tank capacity83
Fuel display, refer to Fuel
gauge48
Fuel filler door, refer to Gas
cap82
Fuel level
– refer to Fuel tank capacity83
Fuel tank capacity, refer to
Capacities114
Fully automatic convertible
top
27
Fuses102
G
Gas cap82
Gasoline, refer to Fuel
specifications83Gasoline gauge, refer to Fuel
gauge48
Gear indicator, automatic
transmission with
Steptronic42
Gear lever
– automatic transmission with
Steptronic42
– manual transmission42
Gearshifts
– automatic transmission with
Steptronic42
– manual transmission42
Glove compartment68
Gross weight, refer to
Weights113
H
Halogen lamps
– replacing bulbs99
Handbrake, refer to Parking
brake41
Hands-free microphone71
Hardtop, refer to the separate
Owner's Manual
Hardtop preparation78
Hazard warning flashers14
Headlamp control,
automatic59
Headlamp flasher44
– indicator lamp12
Headlamps
– bulb replacement99
– care, refer to the Caring for
your vehicle brochure
– cleaning45
– cleaning system, washer
fluid46
– cover99
– glass, care, refer to the
Caring for your vehicle
brochure
– washer reservoir, refer to
Washer fluid reservoir46
– washer reservoir volume,
refer to Capacities114
Page 131 of 132
Refueling
So that you have important specifications avail-
able to you when you stop to refuel, we recom-
mend that you fill out this table with the data
that apply to your vehicle. Consult the index for
individual specifications.Fuel
Engine oil
Do not add engine oil until the corresponding
warning lamp comes on in the instrument clus-
ter or the oil lever monitor shows "+1.0", refer to
page93.
Tire inflation pressures
Specifications
Please enter your preferred fuel here.
Preferred oil grade
Summer tires
FrontRearWinter tires
FrontRear
Up to 2 persons
2 persons plus luggage