Page 121 of 288
Controls
119Reference
At a glance
Driving tips
Communications
Navigation
Entertainment
Mobility
In the rear console
Slide the cover back.
Access to socket:
Pull off the cover.
Rear center armrest
Pull on the loop and fold down the center arm-
rest.
Cargo bay
Cargo bay cover
Deploy cargo bay cover by pulling back.Do not place heavy or hard objects on the
cargo bay cover. If you do so, they may
pose a danger to vehicle occupants during
braking or evasive maneuvers.<
Removing
1.Grasp retracted cargo bay cover under-
neath the upper fold on both sides.
2.Pull the cover back out of the side brackets.
3.Depending on your vehicle's equipment
package, you can store the cover under the
floor panel in the cargo bay.
Installing
When installing, proceed in the opposite order
of removal.
1.Set the cargo bay cover into place on the
left and right sides.
2.Lift the back of the cover slightly and slide
forward until it snaps into the two side
brackets.
Page 122 of 288

Practical interior accessories
120
Expanding cargo bay
The rear seat backrest is divided. You can fold
down both sides separately in order to expand
the cargo bay.
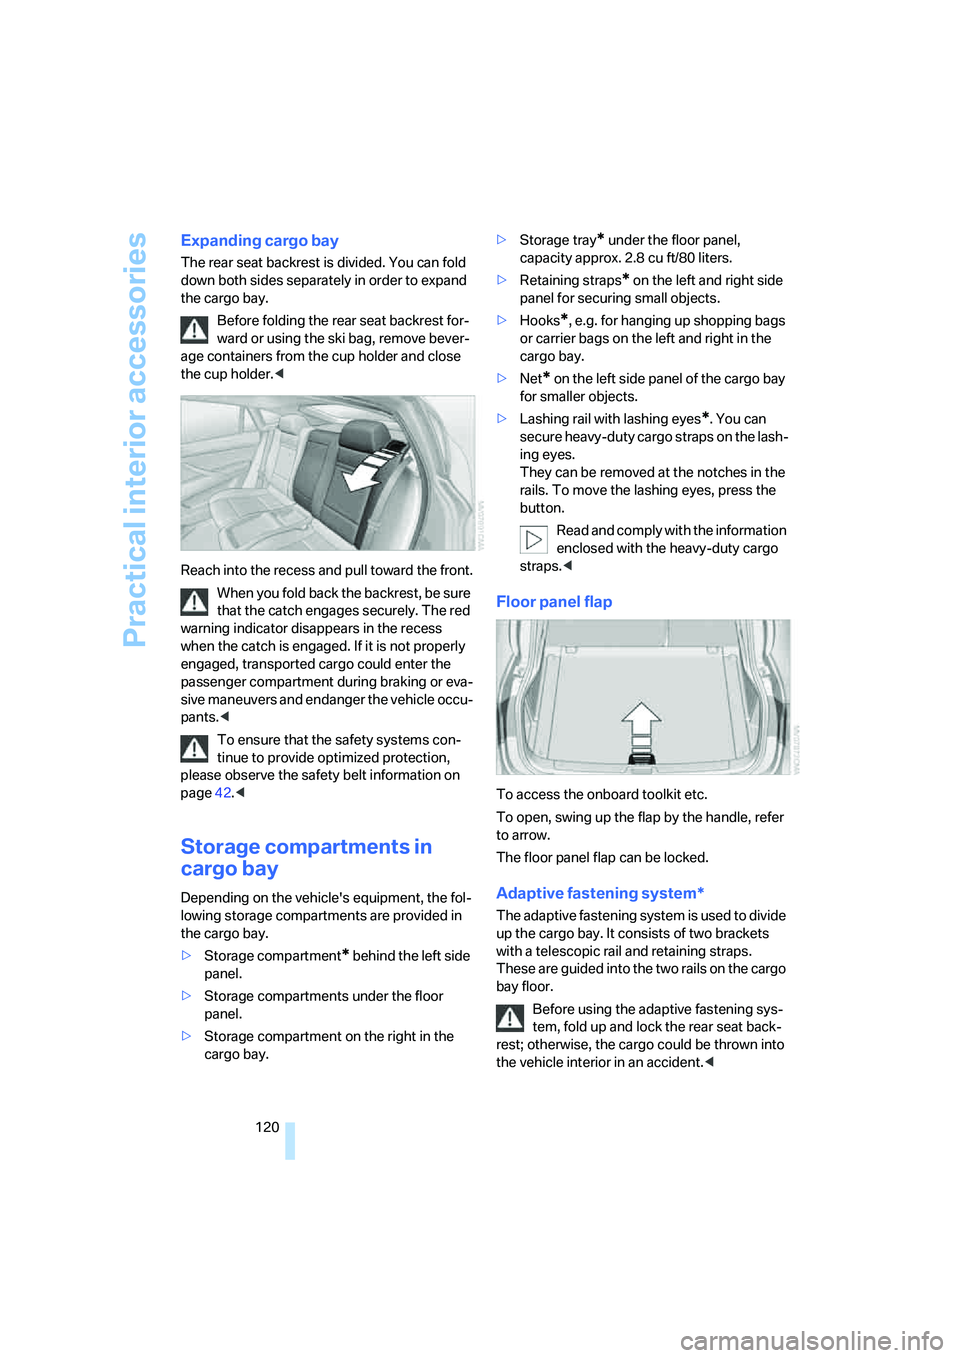
Before folding the rear seat backrest for-
ward or using the ski bag, remove bever-
age containers from the cup holder and close
the cup holder.<
Reach into the recess and pull toward the front.
When you fold back the backrest, be sure
that the catch engages securely. The red
warning indicator disappears in the recess
when the catch is engaged. If it is not properly
engaged, transported cargo could enter the
passenger compartment during braking or eva-
sive maneuvers and endanger the vehicle occu-
pants.<
To ensure that the safety systems con-
tinue to provide optimized protection,
please observe the safety belt information on
page42.<
Storage compartments in
cargo bay
Depending on the vehicle's equipment, the fol-
lowing storage compartments are provided in
the cargo bay.
>Storage compartment
* behind the left side
panel.
>Storage compartments under the floor
panel.
>Storage compartment on the right in the
cargo bay.>Storage tray
* under the floor panel,
capacity approx. 2.8 cu ft/80 liters.
>Retaining straps
* on the left and right side
panel for securing small objects.
>Hooks
*, e.g. for hanging up shopping bags
or carrier bags on the left and right in the
cargo bay.
>Net
* on the left side panel of the cargo bay
for smaller objects.
>Lashing rail with lashing eyes
*. You can
secure heavy-duty cargo straps on the lash-
ing eyes.
They can be removed at the notches in the
rails. To move the lashing eyes, press the
button.
Read and comply with the information
enclosed with the heavy-duty cargo
straps.<
Floor panel flap
To access the onboard toolkit etc.
To open, swing up the flap by the handle, refer
to arrow.
The floor panel flap can be locked.
Adaptive fastening system*
The adaptive fastening system is used to divide
up the cargo bay. It consists of two brackets
with a telescopic rail and retaining straps.
These are guided into the two rails on the cargo
bay floor.
Before using the adaptive fastening sys-
tem, fold up and lock the rear seat back-
rest; otherwise, the cargo could be thrown into
the vehicle interior in an accident.<
Page 123 of 288

Controls
121Reference
At a glance
Driving tips
Communications
Navigation
Entertainment
Mobility
1Brackets
2Telescopic rail
3Notch in the cargo bay rail
Mounting brackets
The two brackets are connected with a tele-
scopic rail.
1.Insert the brackets at the respective notch
in the rail on the cargo bay floor.
2.Press down the brackets to push them into
the desired position.
3.Check the firm seating of the brackets.
They must be clearly heard to engage.
Do not lay cargo on the brackets, as oth-
erwise they could be unlocked.<
Dividing up cargo bay
You can position the cargo as follows:
>between the rear seat backrest and the
telescopic rail
>between the telescopic rail and the retain-
ing strapPositioning cargo between telescopic rail and
retaining strap:
1.Lay the cargo on the telescopic rail. Press
the button, arrow1, and route the retaining
strap around the cargo, arrow2.
2.Hook the retaining strap into the mount3
on the telescopic rail.
3.Press the button of the bracket, arrow1.
The retaining strap is tensioned.
You can also hook both retaining straps
into each other.<
When you are finished using the adaptive fas-
tening system, unhook the retaining strap and
guide it back into the bracket in order to prevent
damage and injury.
Then slide the fastening system toward the
front in order to permit the best possible use of
the cargo bay.
Removing brackets
Press down the brackets, slide them up to the
notches of the rails and remove them.
Depending on your vehicle's equipment pack-
age, you can store the adaptive fastening sys-
tem under the floor panel in the cargo bay.
Ski bag*
The ski bag is designed for safe, clean transport
of up to 4 pa irs of s tandard s kis or up to 2 snow-
boards.
With the ski bag you can stow skis with a length
of up to 6.9 ft/2.10 m. When skis of 6.9 ft/
2.10 m in length are loaded, the ski bag will tend
to contract, reducing its overall capacity.
Before loading the ski bag, fold in the dis-
play screen of the DVD system in the
rear
*, as otherwise the display screen could be
damaged.<
Page 124 of 288

Practical interior accessories
122
Loading
1.Fold down the center armrest, press the
button and open the cover.
2.Press the button again; the cover in the
cargo bay opens. If you press the button
firmly the first time, this cover also opens.
3.Extend the ski bag between the front seats
and fill it. The zipper facilitates access to the
stowed items and drying of the ski bag.
4.Attach the hook of the ski bag retaining
strap to the eyelet on the rear seat backrest.
Only stow clean skis in the ski bag. Wrap sharp
edges to prevent damage.
Securing cargo
After loading, secure the ski bag and its con-
tents. Tighten the retaining strap on the ten-
sioning buckle for this purpose.Secure the ski bag in this way. If you fail to
do so, it could endanger occupants dur-
ing braking or evasive maneuvers.<
To store the ski bag, perform the above steps in
reverse order.
Removing ski bag
The ski bag can be completely removed, e.g. for
faster drying or to allow you to put it to other
uses.
1.Pull the handle toward the front, arrow1.
2.Take out the ski bag upward, arrow2.
3.Close the cover in the cargo bay.
Details on various inserts are available
from your BMW Sports Activity Vehicle
Center.<
Page 125 of 288
Controls
123Reference
At a glance
Driving tips
Communications
Navigation
Entertainment
Mobility
Page 126 of 288
Page 127 of 288
Driving tips
This section is designed to provide you
with extra support by supplying information
useful in dealing with specific driving
and operating conditions.
Driving tips
Page 128 of 288

Things to remember when driving
126
Things to remember when driving
Break-in period
Moving parts need breaking-in time to adjust to
each other. To ensure that your vehicle contin-
ues to provide optimized economy of operation
throughout an extended service life, we request
that you devote careful attention to the follow-
ing section.
Engine and differential
Always obey all official speed limits.
Up to 1,200 miles/2,000 km
Drive at changing engine and vehicle speeds,
however do not exceed 4,500 rpm or 100 mph/
160 km/h.
Avoid full-throttle operation and use of the
transmission's kick-down mode during these
initial miles.
From 1,200 miles/2,000 km
The engine and vehicle speed can gradually be
increased.
Tires
Due to technical factors associated with their
manufacture, tires do not achieve their full trac-
tion potential until after an initial break-in
period. Therefore, drive reservedly during the
first 200 miles/300 km.
Brake system
Brakes require an initial break-in period of
approx. 300 miles/500 km to achieve optimized
contact and wear patterns between brake pads
and rotors. Drive in a reserved manner during
this break-in period.
Following part replacement
Observe the break-in instructions again if com-
ponents mentioned above must be replaced
after subsequent driving operation.
Saving fuel
The fuel consumption of your vehicle depends
on various factors. Through a few simple steps,
your driving style, and regular maintenance, you
can have a positive influence on your fuel con-
sumption and environmental impact.
Removing unnecessary cargo
Additional weight increases fuel consumption.
Remove add-on parts after use
Remove unneeded auxiliary mirrors, roof or rear
luggage racks after use. Add-on parts attached
to the vehicle impede the aerodynamics and
increase the fuel consumption.
Close windows and glass sunroof
An open glass sunroof or open window likewise
increases the drag coefficient and therefore the
fuel consumption.
Check tire inflation pressures regularly
Check and correct the tire inflation pressure as
needed at least twice a month and before long
trips.
An insufficient tire inflation pressure increases
the rolling resistance and thus increases the
fuel consumption and tire wear.
Driving off immediately
Do not allow the engine to warm up by leaving it
running while the vehicle remains stationary.
Instead, begin to drive at a moderate engine
speed. This is the fastest way for the cold
engine to reach its operating temperature.
Thinking ahead when driving
Avoid unnecessary acceleration and braking.
To do so, maintain the appropriate distance
from the vehicle in front of you. An anticipatory
and smooth driving style reduces fuel con-
sumption.