2008 BMW X6 window
[x] Cancel search: windowPage 12 of 288

Cockpit
10
Cockpit
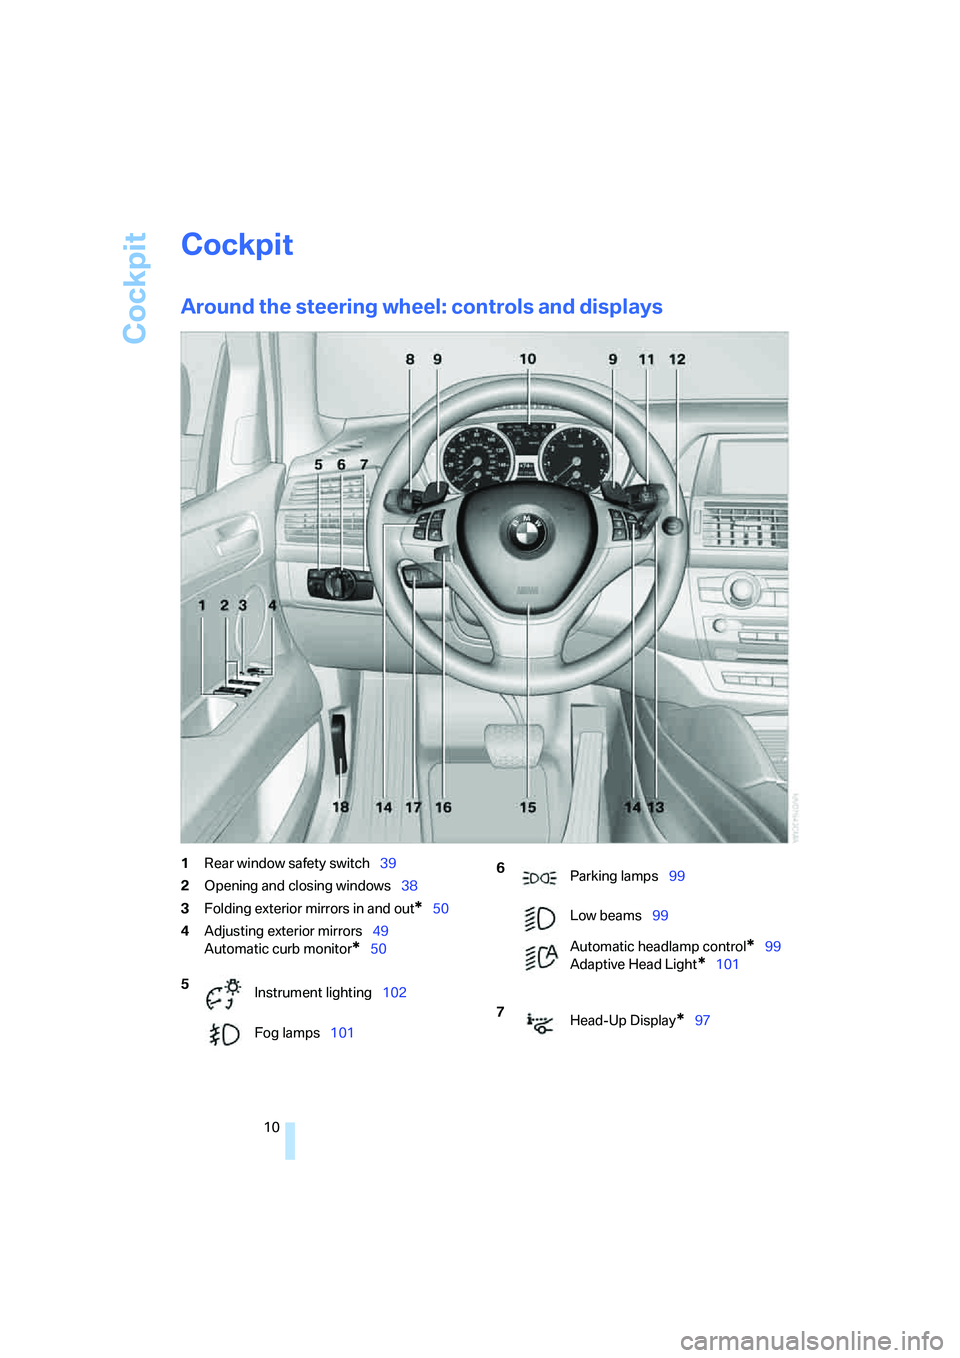
Around the steering wheel: controls and displays
1Rear window safety switch39
2Opening and closing windows38
3Folding exterior mirrors in and out
*50
4Adjusting exterior mirrors49
Automatic curb monitor
*50
5
Instrument lighting102
Fog lamps101
6
Parking lamps99
Low beams99
Automatic headlamp control
*99
Adaptive Head Light
*101
7
Head-Up Display
*97
Page 17 of 288

At a glance
15Reference
Controls
Driving tips
Communications
Navigation
Entertainment
Mobility
1Microphone for hands-free mode for
telephone
* and for voice command
system
*23
2Initiating
an emergency call252
3Reading lamps102
4Glass sunroof
*, electric39
5Interior lamps102
6Passenger airbag status lamp95
7Control Display16
Displays for menu navigation
8Hazard warning flashers
9Central locking system29
10Opening glove compartment115
11Automatic climate control104
12Ejecting audio CD
13Changing
>radio station160
>track160
14Selecting radio, CD and CD changer
15Selecting AM or FM waveband16Ejecting navigation DVD with navigation
system
*134
18Controller16
Turn, press or move horizontally
in four directions
19Opening start menu on Control Display17
20Automatic Hold58
21Parking brake57
22Adaptive Drive
*88
23Programmable memory/direct selection
buttons21
24Switching Entertainment sound output
on/off and adjusting volume160 Manual air distribution105
Automatic air distribution
and volume104
Cooling function106
AUC Automatic recirculated-air
control106
Maximum cooling106
Air volume105
Residual heat utilization107
Defrosting windows and
removing condensation105
Rear window defroster105
Seat heating
*48
Active seat ventilation
*48
17
Opening liftgate33
Active seat
*49
PDC Park Distance Control
*81
Rear view camera
*83
DTC Dynamic Traction Control86
HDC Hill Descent Control87
Page 22 of 288

iDrive
20
Status information
1Display for:
>Entertainment:
Radio, CD
>Telephone
* in "Communication":
Name of linked mobile phone, network
search or no network
>"BMW Assist"
*:
Existing voice connection with a service
from BMW Assist
2Entertainment sound output off
3Display for traffic information
*, TI:
Traffic information for the navigation sys-
tem can be received and transmission is
switched on
4Display for:
> New entries present in "Missed calls"
*
> Roaming active
5 Telephoning
* possible if the mobile
phone is logged-on in the vehicle
Mobile phone network reception
strength, display dependent on mobile
phone
6Time
Other displays:
The status information is temporarily hidden
when there are Check Control instructions or
inputs via the voice command system
*.
Assistance window*
Additional information can be displayed in the
assistance window:
>The computer or the trip computer
>The arrow or map view with a navigation
system
*
>The current position
Selecting display
1.Move the controller to the right to change to
the assistance window and press the con-
troller.
2.Select a menu item.
3.Press the controller.
Page 23 of 288

At a glance
21Reference
Controls
Driving tips
Communications
Navigation
Entertainment
Mobility
Switching assistance window off/on
1.Move the controller to the right to change to
the assistance window and press the con-
troller.
2.Select "Assist. window off" and press the
controller.
To switch on, change to the assistance window
and press the controller.
Switching Control Display
off/on
1.Press the button.
This opens the start menu.
2.Press the controller to open the menu.
3.Select "Display off" and press the control-
ler.
To switch on, press the controller.
Programmable memory/
direct selection buttons
You can store and run certain functions of iDrive
on the direct selection buttons:
>Destinations of navigation
>Telephone, phone numbers
*
>Entertainment:
>Radio station
>CD
>CD compartment of CD changer
*
>AUX
The assignment of the direct selection buttons
is stored for the remote control currently in use.
Saving function
Destinations of navigation
1.Select destination, e.g. in the destination
list or the address book.
2.Press the ... button longer
than 2 seconds.
Special features:
>With the destination guidance system and
the map view started, the current destina-
tion is stored.
>During destination entry via a map, the
coordinates at the cursor are stored, not the
current destination.
Telephone, phone numbers
1.Enter the phone number or select it in a list
of the stored phone numbers, e.g. of the
"A - Z" list.
2.Press the ... button longer
than 2 seconds.
If a name is assigned to the phone number, the
name will also be stored.
Page 27 of 288

At a glance
25Reference
Controls
Driving tips
Communications
Navigation
Entertainment
Mobility
Notes
The mobile phone can also be operated
with voice commands, refer to
page217.<
For voice commands, bear the following in
mind:
>Say the commands and numbers smoothly
and at normal volume, avoiding excessive
emphases and pauses. This also applies to
spelling when entering the destination.
>Always issue commands in the language of
the voice command system.
>When selecting a radio station, use the
common pronunciation of the station name.
>For entries in the voice-activated phone
book, only use names in the language of the
voice command system and no abbrevia-
tions.
>Keep the doors, windows and glass sun-
roof
* closed to prevent interference from
ambient noise.
>Avoid making other noise in the vehicle
while speaking.
Page 33 of 288

Controls
31Reference
At a glance
Driving tips
Communications
Navigation
Entertainment
Mobility
If pointed or sharp-edged objects could
strike the rear window while driving, be
sure to provide protection around all edges.
Failure to do so could result in damage to the
heating conductors of the rear window.<
Setting confirmation signals
You can activate or deactivate the confirmation
signals.
1.Press the button.
This opens the start menu.
2.Press the controller to open the menu.
3.Select "Settings" and press the controller.
4.Select "Vehicle / Tires" and press the con-
troller.
5.Change to upper field if necessary. Turn the
controller until "Door locks" is selected and
press the controller.
6.Select "Confirmation" and press the con-
troller.
7.Select the desired signal.
8.Press the controller.
The signal is activated.
Malfunctions
The remote control may malfunction due to
local radio waves. Should the remote control fail
to operate due to interference of this kind,
unlock and lock the vehicle via the door lock
using a key.
If it is no longer possible to lock the vehicle
using the remote control, then the battery is
discharged. Use this remote control during an
extended drive; this will recharge the battery,
refer to page28.
For US owners only
The transmitter and receiver units comply with
part 15 of the FCC/Federal Communication
Commission regulations. Operation is gov-
erned by the following:
FCC ID:
LX8766S
LX8766E
LX8CAS
LX8CAS2
Compliance statement:
This device complies with part 15 of the FCC
Rules. Operation is subject to the following two
conditions:
>This device must not cause harmful inter-
ference, and
>this device must accept any interference
received, including interference that may
cause undesired operation.
Any unauthorized modifications or
changes to these devices could void the
user's authority to operate this equipment.<
Opening and closing:
Using door lock
Do not lock the vehicle from the outside if
persons are inside because unlocking
from the inside is not possible without special
knowledge.<
When unlocking
1.Turning the key once unlocks the driver's
door and the fuel filler door.
2.Turning the key a second time unlocks the
remaining doors and the liftgate.
Page 34 of 288

Opening and closing
32
Convenience operation
You can also operate the windows and the glass
sunroof
* from the driver's door lock.
Turn and hold the key in the positions for
unlocking or locking.
Watch during the closing process to be
sure that no one is injured. Rotating the
key back into the initial position stops the
movement.<
Manual operation
In the event of an electrical malfunction, you can
turn a key all the way to the right or left in the
door lock to lock or unlock the driver's door.
Opening and closing:
From inside
With the front doors closed, this button serves
to unlock or lock doors and the liftgate, but does
not activate the anti-theft system. The fuel filler
door remains unlocked.
You can also set the situations in which the
vehicle is locked.
iDrive, for operating principle refer to page16.
1.Press the button.
This opens the start menu.
2.Press the controller to open the menu.
3.Select "Settings" and press the controller.
4.Select "Vehicle / Tires" and press the con-
troller.
5.Change to upper field if necessary. Turn the
controller until "Door locks" is selected and
press the controller.6.Select "Central locking" and press the con-
troller.
7.Select a menu item:
>"Relock door if not opened"
The central locking system automati-
cally locks the vehicle after a short time
when no door has been opened.
>"Lock after driving"
The central locking system automati-
cally locks the vehicle as soon as you
start to drive.
8.Press the controller.
The setting is selected.
The setting is stored for the remote control cur-
rently in use.
Unlocking and opening doors
>Either unlock the doors together with the
button for the central locking system and
then pull the door handle above the armrest
or
>pull on the door handle of each door twice:
the first time unlocks the door, the second
time opens it.
Locking
>Use the central locking button to lock all of
the doors simultaneously, or
>press down the lock button of a door.
To prevent you from being locked out, the
open driver's door cannot be locked using
the lock button.
Persons or animals left unattended in a
parked vehicle can lock the doors from
the inside. Always take along the remote control
Page 36 of 288

Opening and closing
34 2.Push the catch 2 in the direction of the
arrow.
3.Open the liftgate and press the cover back
into place.
The liftgate is locked again as soon as it is
closed.
Closing
Make sure that the closing path of the lift-
gate is clear, otherwise injuries may
result.<
The handle recesses on the interior trim of the
liftgate make it easier to pull down.
If pointed or sharp-edged objects could
strike the rear window while driving, be
sure to provide protection around all edges.
Failure to do so could result in damage to the
heating conductors of the rear window.<
Automatic liftgate operation*
Adjusting opening height
You can adjust how far the liftgate is to open.
iDrive, for operating principle refer to page16.
1.Press the button.
This opens the start menu.
2.Press the controller to open the menu.
3.Select "Settings" and press the controller.
4.Select "Vehicle / Tires" and press the con-
troller.
5.Change to upper field if necessary. Turn the
controller until "Door locks" is selected and
press the controller.6.Select "Tailgate" and press the controller.
7.Turn the controller. The adjustment is
applied; the field can be changed.
Opening liftgate
Before opening the liftgate, make sure
that it is not laden with additional weight
such as snow or ice; otherwise, the liftgate may
unexpectedly close.<
The liftgate opens automatically when you:
>Press the button on the outside of the lift-
gate when the vehicle is unlocked.
>Press the button in the center console.
>Press and hold the button on the remote
control.