2008 BMW M5 SEDAN remote control
[x] Cancel search: remote controlPage 65 of 260

Controls
63Reference
At a glance
Driving tips
Communications
Navigation
Entertainment
Mobility
Atypically rapid flashing of the indicator
lamp indicates that a turn signal bulb
needs to be replaced.<
Signaling briefly
Press lever to resistance point and hold for as
long as you wish to signal.
Triple turn signal activation
Press the lever to the resistance point; the turn
signal flashes three times.
You can activate or deactivate this function.
iDrive, for operating principle refer to page16.
1.Press the button.
This opens the start menu.
2.Press the controller to open the menu.
3.Select "Settings" and press the controller.
4.Select "Vehicle / Tires" and press the con-
troller.
5.Change to upper field if necessary. Turn the
controller until "Lighting" is selected and
press the controller.
6.Select "Triple turn signal" and press the
controller.
Triple turn signaling is activated.
The setting is stored for the remote control cur-
rently in use.
Wiper system
1Switching on wipers
2Switching off wipers or brief wipe
3Activating/deactivating rain sensor
4Cleaning windshield and headlamps
5Adjusting rain sensor
sensitivity level
Switching on wipers
Pull the lever upward, arrow1.
The lever automatically returns to its initial posi-
tion when released.
Normal wiper speed
Press once.
The system reverts to operation in the intermit-
tent mode when the vehicle is stationary.
Fast wiper speed
Press twice or press beyond the resistance
point.
The system reverts to normal speed when the
vehicle is stationary.
Rain sensor
The wiper operation is controlled automatically
as a function of the rain intensity. The rain sen-
sor is located on the windshield, directly in front
of the interior rearview mirror.
Page 72 of 260

Everything under control
70 Your BMW Service Advisor can deter-
mine your vehicle's current service
requirements by reading out the data stored in
the remote control.<
Additional information
You can select a display of more detailed infor-
mation on the maintenance scope on the Con-
trol Display. For operating principle refer to
page16.
1.Open the start menu.
2.Press the controller to open the menu.
3.Select "Info sources" and press the control-
ler.
4.Select "Service Info" and press the control-
ler.
5.Change to upper field if necessary. Turn the
controller until "Service requirements" is
selected and press the controller.
6.Select "Status" and press the controller.
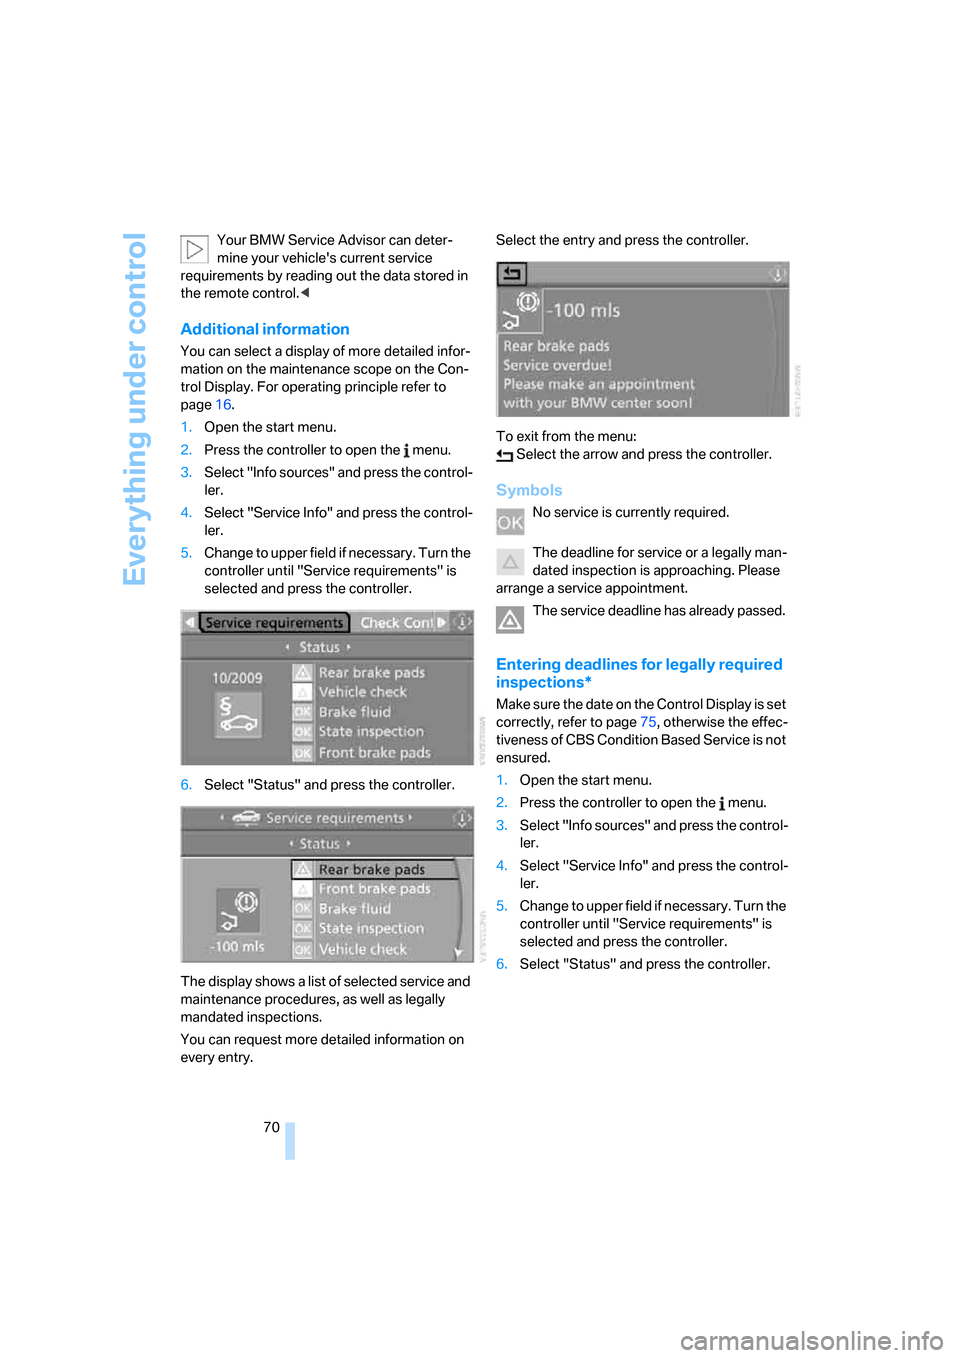
The display shows a list of selected service and
maintenance procedures, as well as legally
mandated inspections.
You can request more detailed information on
every entry.Select the entry and press the controller.
To exit from the menu:
Select the arrow and press the controller.
Symbols
No service is currently required.
The deadline for service or a legally man-
dated inspection is approaching. Please
arrange a service appointment.
The service deadline has already passed.
Entering deadlines for legally required
inspections*
Make sure the date on the Control Display is set
correctly, refer to page75, otherwise the effec-
tiveness of CBS Condition Based Service is not
ensured.
1.Open the start menu.
2.Press the controller to open the menu.
3.Select "Info sources" and press the control-
ler.
4.Select "Service Info" and press the control-
ler.
5.Change to upper field if necessary. Turn the
controller until "Service requirements" is
selected and press the controller.
6.Select "Status" and press the controller.
Page 77 of 260

Controls
75Reference
At a glance
Driving tips
Communications
Navigation
Entertainment
Mobility
Setting time
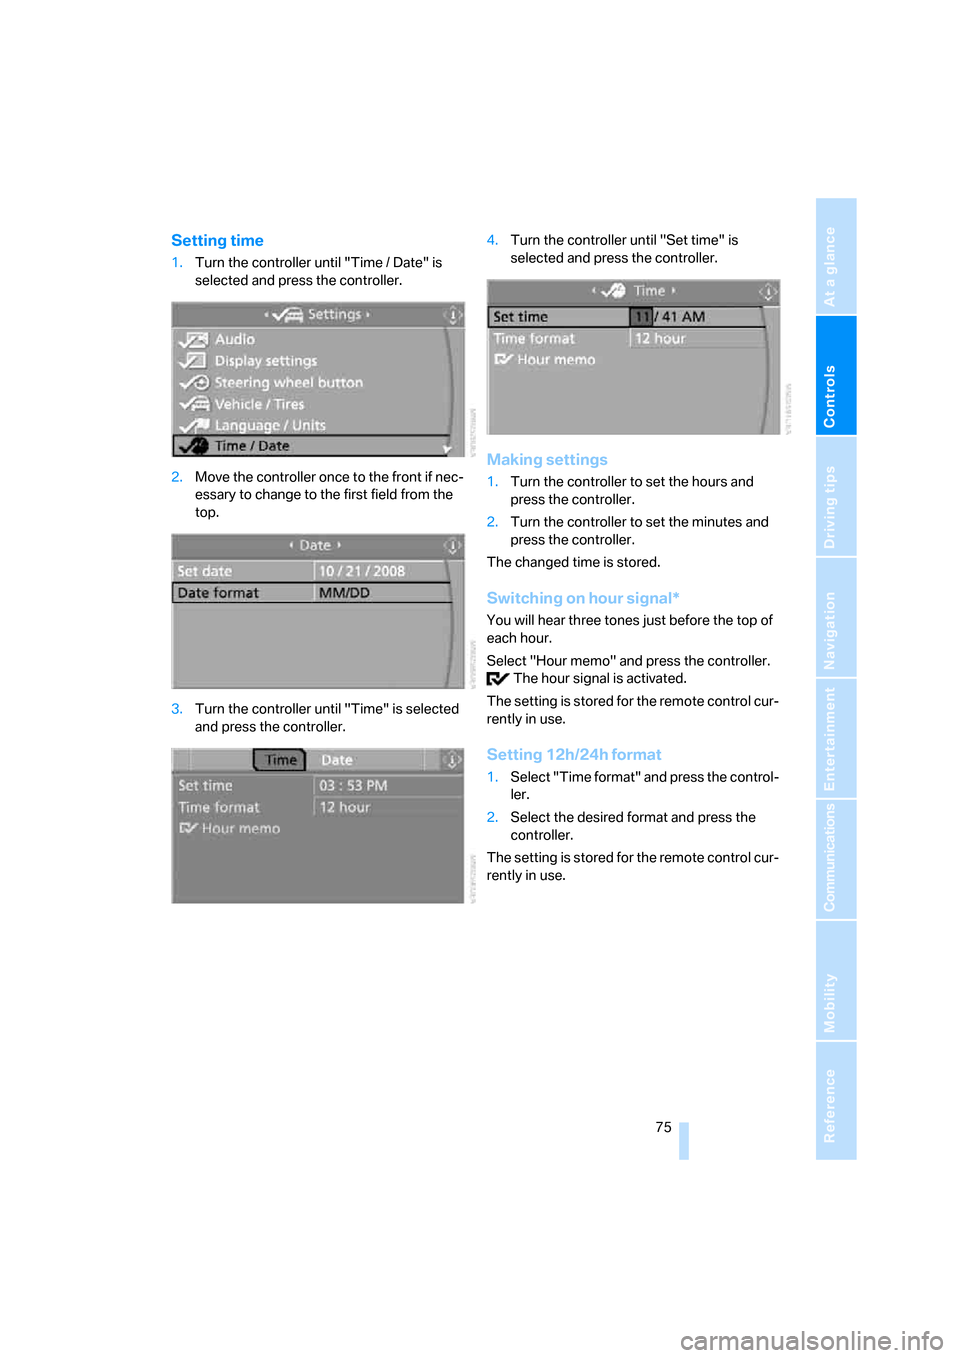
1.Turn the controller until "Time / Date" is
selected and press the controller.
2.Move the controller once to the front if nec-
essary to change to the first field from the
top.
3.Turn the controller until "Time" is selected
and press the controller.4.Turn the controller until "Set time" is
selected and press the controller.
Making settings
1.Turn the controller to set the hours and
press the controller.
2.Turn the controller to set the minutes and
press the controller.
The changed time is stored.
Switching on hour signal*
You will hear three tones just before the top of
each hour.
Select "Hour memo" and press the controller.
The hour signal is activated.
The setting is stored for the remote control cur-
rently in use.
Setting 12h/24h format
1.Select "Time format" and press the control-
ler.
2.Select the desired format and press the
controller.
The setting is stored for the remote control cur-
rently in use.
Page 78 of 260

Everything under control
76
Setting date
1.Select "Date" and press the controller.
2.Select "Set date" and press the controller.
The first section of the date display is
selected, in this case the month.
3.Turn the controller to make the adjustment.
4.Press the controller to apply the setting.
The next setting is selected.
5.Make the remaining adjustments. After the
last adjustment, the date is stored.
Setting date format
1.Select "Date format" and press the control-
ler.
2.Select the desired format and press the
controller.
The setting is stored for the remote control cur-
rently in use.
Brightness of Control Display
The brightness is automatically adapted to the
ambient lighting conditions. However, you can
change the basic setting.
iDrive, for operating principle refer to page16.
1.Press the button.
This opens the start menu.
2.Press the controller to open the menu.
3.Select "Settings" and press the controller.
4.Select "Display settings" and press the
controller.5.Change to upper field if necessary. Turn the
controller until "Brightness" is selected and
press the controller.
6.If necessary, move the controller to the right
to select "Display".
7.Turn the controller until the desired setting
is selected.
The setting is stored for the remote control cur-
rently in use.
Units of measure
You can change the units of measure for con-
sumption, distances, temperature and pres-
sure.
iDrive, for operating principle refer to page16.
1.Press the button.
This opens the start menu.
2.Press the controller to open the menu.
3.Select "Settings" and press the controller.
4.Select "Language / Units" and press the
controller.
5.Change to upper field if necessary. Turn the
controller until "Units" is selected and press
the controller.
Page 79 of 260

Controls
77Reference
At a glance
Driving tips
Communications
Navigation
Entertainment
Mobility
6.Select the menu item to be set and press
the controller.
7.Select the desired unit of measure and
press the controller.
The settings are stored for the remote key cur-
rently in use.
Language on Control Display
iDrive, for operating principle refer to page16.
1.Press the button.
This opens the start menu.
2.Press the controller to open the menu.
3.Select "Settings" and press the controller.
4.Select "Language / Units" and press the
controller.
5.Change to upper field if necessary. Turn the
controller until "Languages" is selected and
press the controller.
6.Select "Text language" and press the con-
troller. You can change the language of the
text displays.
7.Select and activate the desired language by
pressing the controller.
The setting is stored for the remote control cur-
rently in use.
Volume of warning tones*
On vehicles equipped with a single drive, you
can increase or decrease the volume of the
warning tones, e.g. for the safety belt reminder,
compared to the entertainment sound output.
The warning tones have a specified minimum
and maximum volume that cannot be dropped
below or exceeded.
1.Select "Tone / Volume" and press the con-
troller.
2.Select "Volume settings" and press the
controller.
3.Change to the second field from the top if
necessary. Select "Warning tones" and
press the controller.
4.If necessary, change the field and turn the
controller.
The setting is applied.
Page 81 of 260

Controls
79Reference
At a glance
Driving tips
Communications
Navigation
Entertainment
Mobility
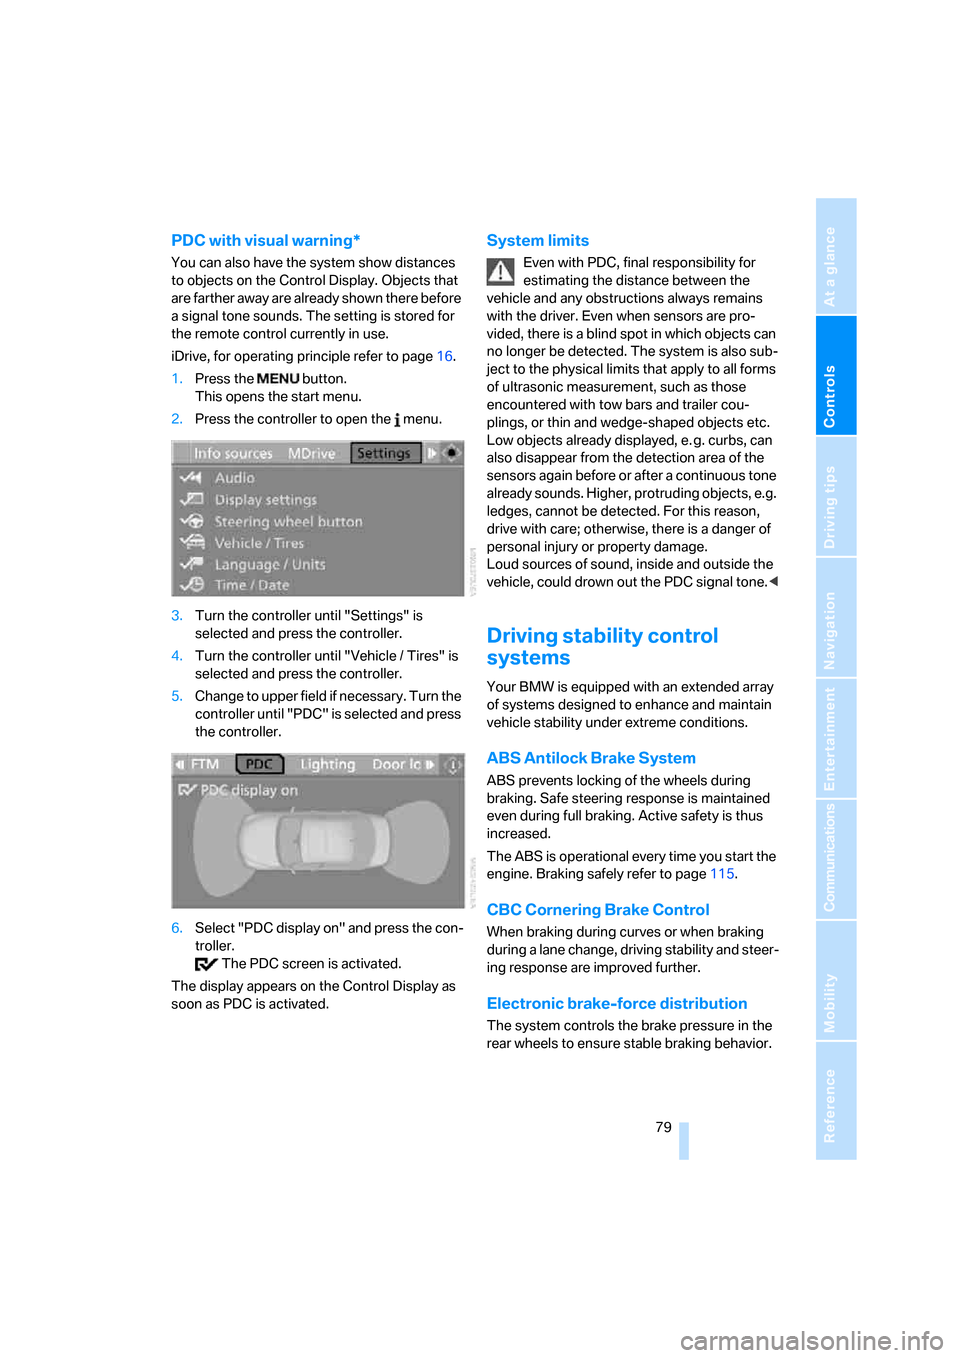
PDC with visual warning*
You can also have the system show distances
to objects on the Control Display. Objects that
are farther away are already shown there before
a signal tone sounds. The setting is stored for
the remote control currently in use.
iDrive, for operating principle refer to page16.
1.Press the button.
This opens the start menu.
2.Press the controller to open the menu.
3.Turn the controller until "Settings" is
selected and press the controller.
4.Turn the controller until "Vehicle / Tires" is
selected and press the controller.
5.Change to upper field if necessary. Turn the
controller until "PDC" is selected and press
the controller.
6.Select "PDC display on" and press the con-
troller.
The PDC screen is activated.
The display appears on the Control Display as
soon as PDC is activated.
System limits
Even with PDC, final responsibility for
estimating the distance between the
vehicle and any obstructions always remains
with the driver. Even when sensors are pro-
vided, there is a blind spot in which objects can
no longer be detected. The system is also sub-
ject to the physical limits that apply to all forms
of ultrasonic measurement, such as those
encountered with tow bars and trailer cou-
plings, or thin and wedge-shaped objects etc.
Low objects already displayed, e. g. curbs, can
also disappear from the detection area of the
sensors again before or after a continuous tone
already sounds. Higher, protruding objects, e.g.
ledges, cannot be detected. For this reason,
drive with care; otherwise, there is a danger of
personal injury or property damage.
Loud sources of sound, inside and outside the
vehicle, could drown out the PDC signal tone.<
Driving stability control
systems
Your BMW is equipped with an extended array
of systems designed to enhance and maintain
vehicle stability under extreme conditions.
ABS Antilock Brake System
ABS prevents locking of the wheels during
braking. Safe steering response is maintained
even during full braking. Active safety is thus
increased.
The ABS is operational every time you start the
engine. Braking safely refer to page115.
CBC Cornering Brake Control
When braking during curves or when braking
during a lane change, driving stability and steer-
ing response are improved further.
Electronic brake-force distribution
The system controls the brake pressure in the
rear wheels to ensure stable braking behavior.
Page 92 of 260

Technology for comfort, convenience and safety
90 7.Select desired information of Head-Up Dis-
play.
8.Press the controller.
The information appears in the Head-
Up Display.
"M View": the M view appears in the
Head-Up Display. Information unavailable in
the M view appears on the Control Display
in gray and cannot be selected.
"M View": the default view is displayed.
The M view for the Head-Up Display can also be
selected with the button on the steering
wheel, refer to MDrive on page50.
The settings are stored for the remote control
currently in use.
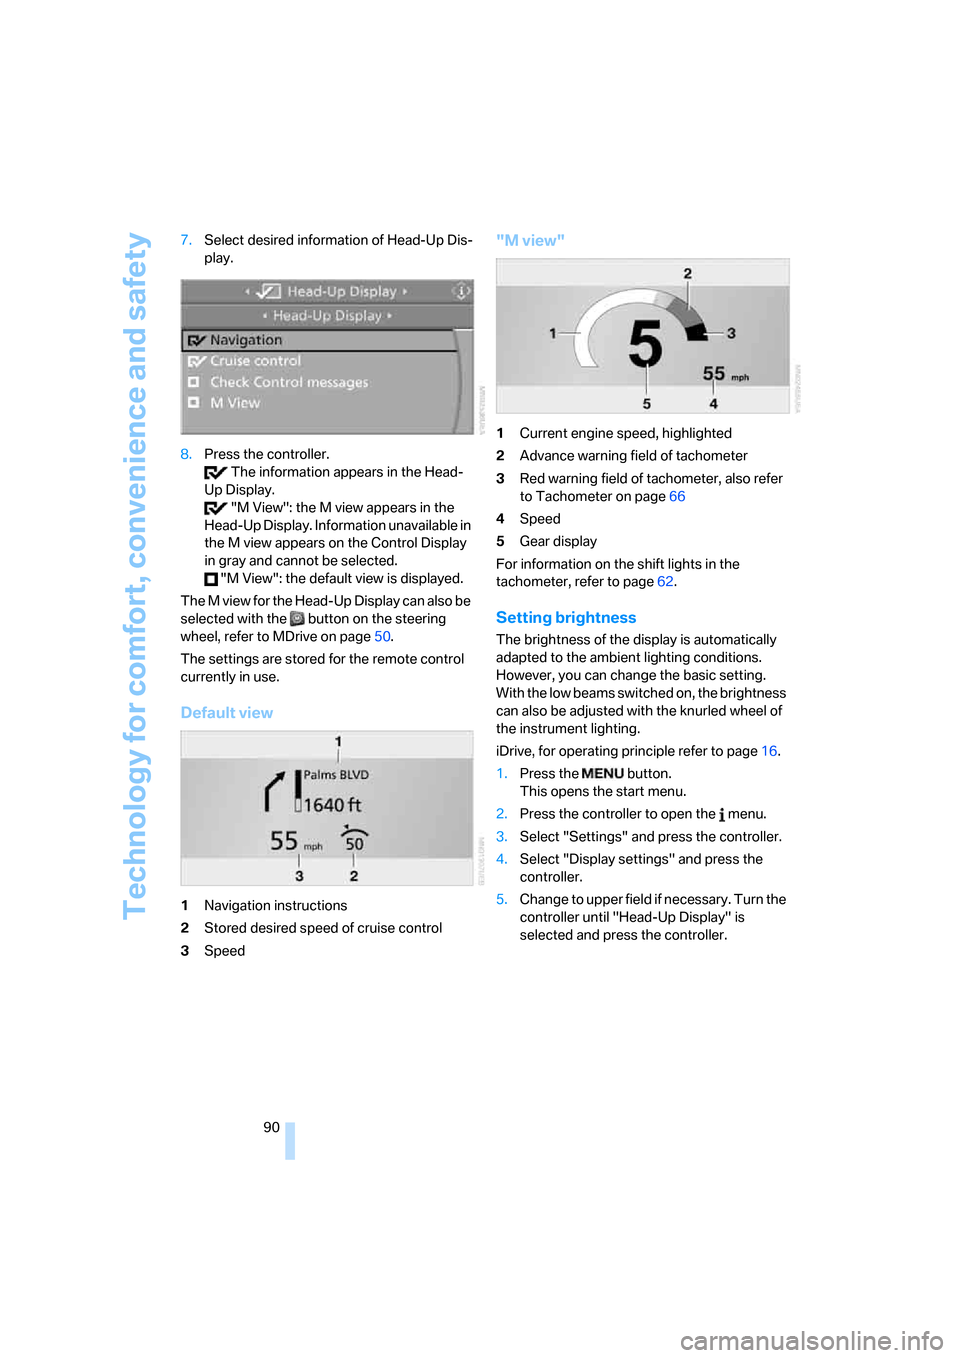
Default view
1Navigation instructions
2Stored desired speed of cruise control
3Speed
"M view"
1Current engine speed, highlighted
2Advance warning field of tachometer
3Red warning field of tachometer, also refer
to Tachometer on page66
4Speed
5Gear display
For information on the shift lights in the
tachometer, refer to page62.
Setting brightness
The brightness of the display is automatically
adapted to the ambient lighting conditions.
However, you can change the basic setting.
With the low beams switched on, the brightness
can also be adjusted with the knurled wheel of
the instrument lighting.
iDrive, for operating principle refer to page16.
1.Press the button.
This opens the start menu.
2.Press the controller to open the menu.
3.Select "Settings" and press the controller.
4.Select "Display settings" and press the
controller.
5.Change to upper field if necessary. Turn the
controller until "Head-Up Display" is
selected and press the controller.
Page 93 of 260

Controls
91Reference
At a glance
Driving tips
Communications
Navigation
Entertainment
Mobility
6.Change into the second field from the top.
Turn the controller until "Brightness" is
selected and press the controller.
7.Turn the controller until the desired setting
is selected.
The setting is stored for the remote control cur-
rently in use.
Notes
The visibility of the displays in the Head-Up Dis-
play is influenced by:
>Sunglasses with certain polarization filters
>Certain seating positions
>Objects on the cover of the Head-Up Dis-
play
>Wet road surface and unfavorable lighting
conditions
If the image is distorted, please have the basic
setting checked at a BMW center.
Special windshield
The windshield is part of the system. The shape
of the windshield complies with the require-
ments of the Head-Up Display to enable a pre-
cise display. A film in the windshield prevents
the double images from being displayed.
Windshield replacement should be carried out
by a BMW center or a workshop that works
according to BMW repair procedures with cor-
respondingly trained personnel.
Care instructions
You can find everything you need to know on
this topic by consulting the separate Caring for
your vehicle brochure.
Only clean the cover of the Head-Up Dis-
play with a soft, nonabrasive cloth or with
a display cleaning cloth; otherwise, you may
damage it.<