2008 BMW M5 SEDAN center console
[x] Cancel search: center consolePage 16 of 260

Cockpit
14
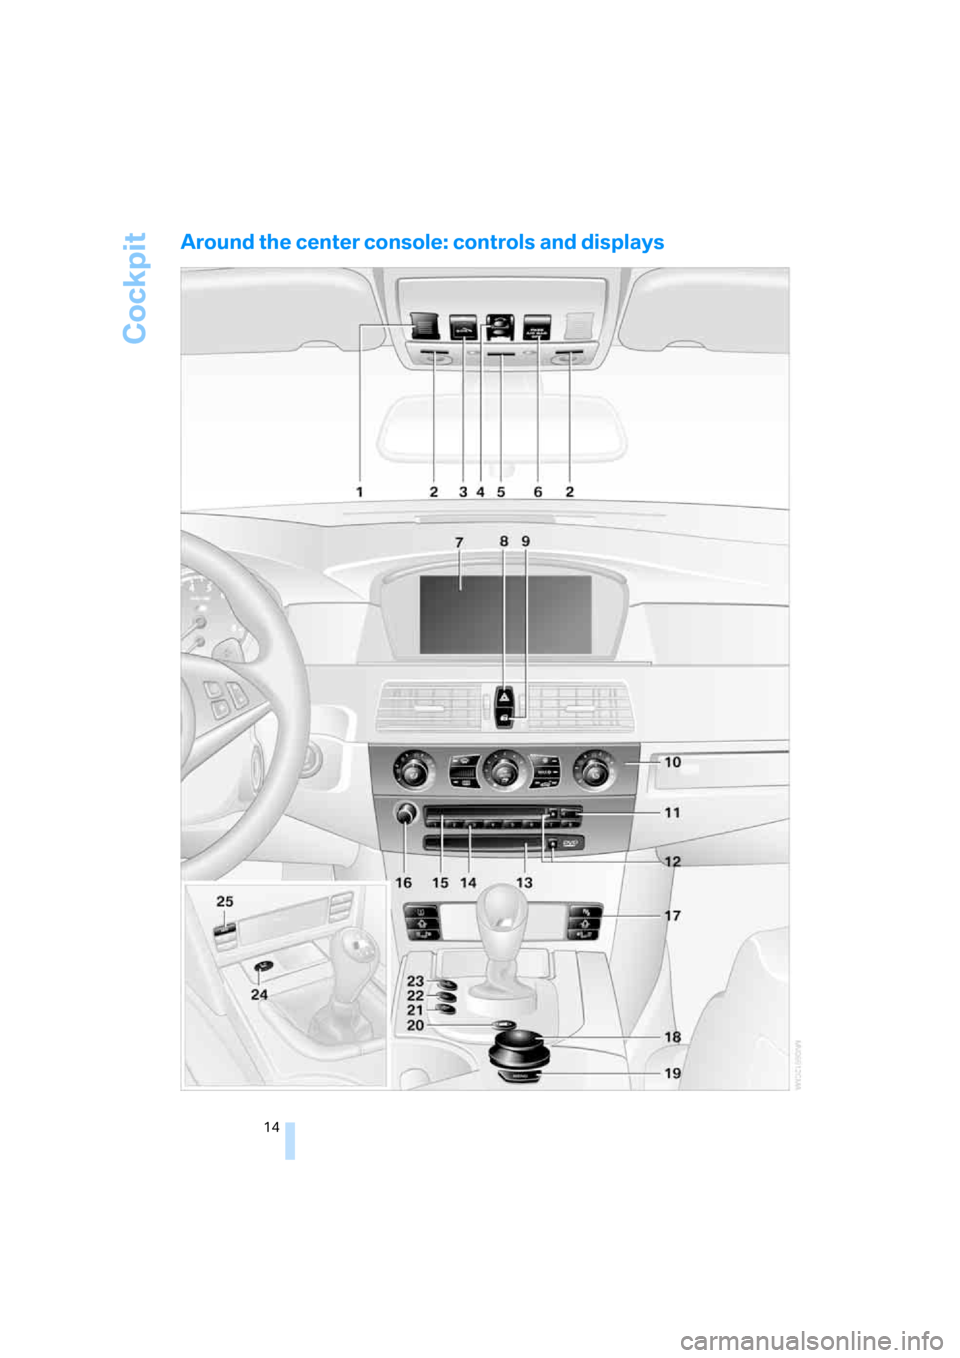
Around the center console: controls and displays
Page 54 of 260

Adjusting
52 again when the indicator lamp no longer
flashes.<
Even with MDrive activated, you can change
individual settings outside MDrive, e.g. with the
buttons in the center console. To reactivate all
settings made for MDrive on the Control Dis-
play: press the button twice.
Page 63 of 260

Controls
61Reference
At a glance
Driving tips
Communications
Navigation
Entertainment
Mobility
Displays in instrument cluster
1Gear 1 to 7, R, N engaged
2Selected driving program,
matches the number of illuminated fields,
refer to Drivelogic on page61
3In drive mode, the currently selected gear
followed by a D is displayed
The gear display flashes when you open
the driver's door with the engine running.
If you do not subsequently operate the pedals,
shift paddles, or selector lever, then the system
shifts into N.<
Gear changes
Using selector lever
>To upshift, pull the selector lever back.
>To downshift, push the selector lever for-
ward.
Using shift paddles on steering wheel
>To upshift, briefly pull the right shift
paddle +.
>To downshift, briefly pull the left shift
paddle –.
Drivelogic
With Drivelogic various driving programs are
available to you.
Each time you change between the Sequential
mode and the Drive mode, the respective last
program is active. Exception: after the first
change from the Sequential to the Drive mode,
driving program 3 is active.
In Drive mode
There are five different driving programs, rang-
ing from relaxed 1 to sporty/highly dynamic 5.
In Sequential mode
You can choose from six driving programs rang-
ing from balanced/dynamic 1 to sporty/purist 6.
Each time the engine is started, driving
program 3 is activated.
Program 6 is only available when the DSC
Dynamic Stability Control is deactivated, refer
to page80. If DSC is activated, then the system
switches from program 6 to program 5
To maintain vehicle stability, always acti-
vate DSC whenever possible.<
Selecting driving program with button
in center console
Press the button repeatedly until the desired
driving program is displayed in the instrument
cluster, refer to page.61
Page 85 of 260

Controls
83Reference
At a glance
Driving tips
Communications
Navigation
Entertainment
Mobility
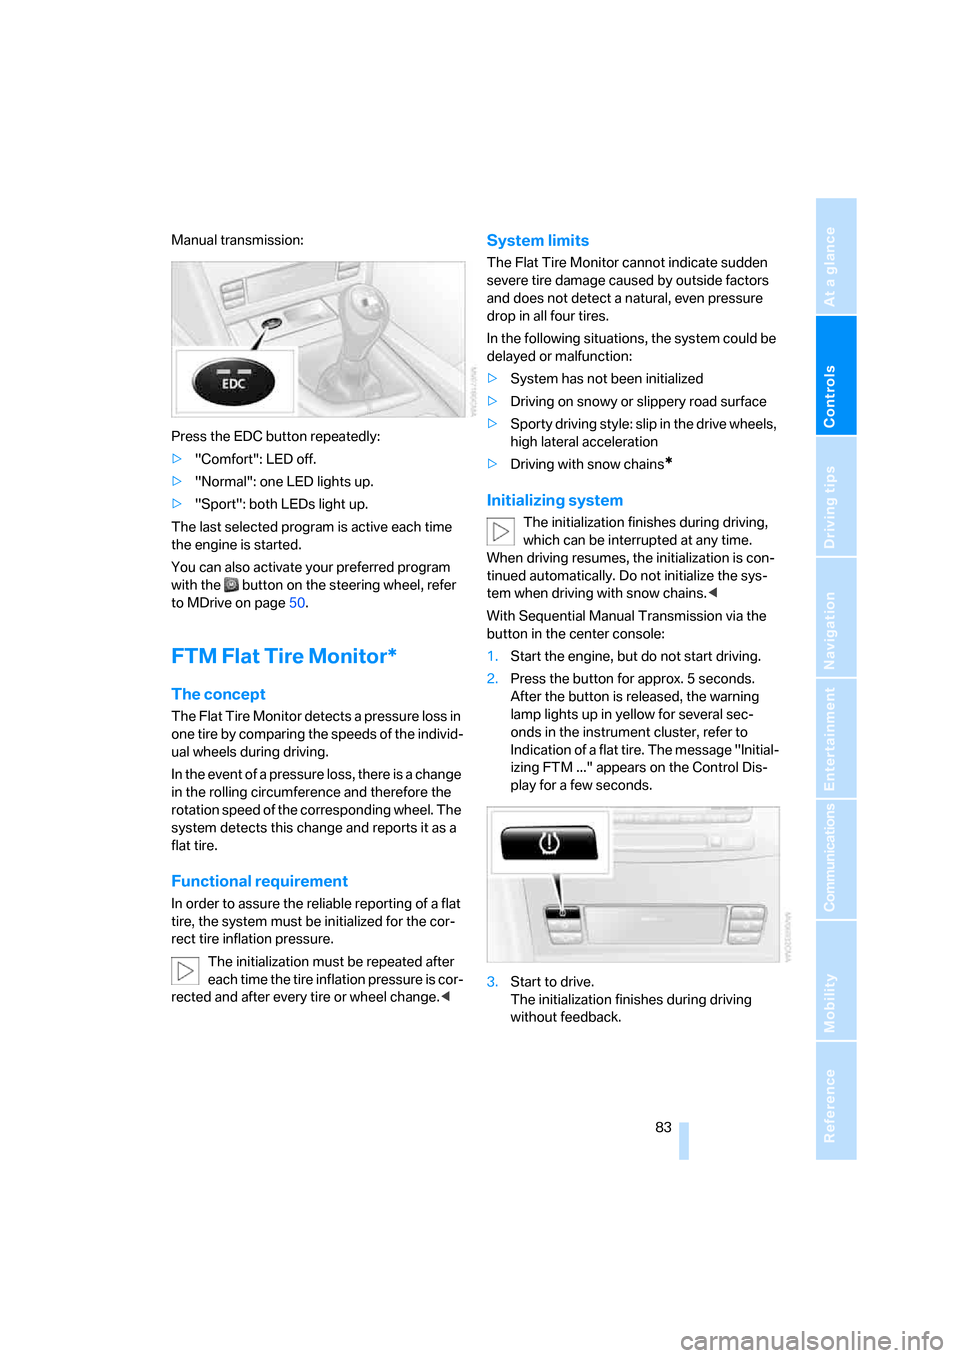
Manual transmission:
Press the EDC button repeatedly:
>"Comfort": LED off.
>"Normal": one LED lights up.
>"Sport": both LEDs light up.
The last selected program is active each time
the engine is started.
You can also activate your preferred program
with the button on the steering wheel, refer
to MDrive on page50.
FTM Flat Tire Monitor*
The concept
The Flat Tire Monitor detects a pressure loss in
one tire by comparing the speeds of the individ-
ual wheels during driving.
In the event of a pressure loss, there is a change
in the rolling circumference and therefore the
rotation speed of the corresponding wheel. The
system detects this change and reports it as a
flat tire.
Functional requirement
In order to assure the reliable reporting of a flat
tire, the system must be initialized for the cor-
rect tire inflation pressure.
The initialization must be repeated after
each time the tire inflation pressure is cor-
rected and after every tire or wheel change.<
System limits
The Flat Tire Monitor cannot indicate sudden
severe tire damage caused by outside factors
and does not detect a natural, even pressure
drop in all four tires.
In the following situations, the system could be
delayed or malfunction:
>System has not been initialized
>Driving on snowy or slippery road surface
>Sporty driving style: slip in the drive wheels,
high lateral acceleration
>Driving with snow chains
*
Initializing system
The initialization finishes during driving,
which can be interrupted at any time.
When driving resumes, the initialization is con-
tinued automatically. Do not initialize the sys-
tem when driving with snow chains.<
With Sequential Manual Transmission via the
button in the center console:
1.Start the engine, but do not start driving.
2.Press the button for approx. 5 seconds.
After the button is released, the warning
lamp lights up in yellow for several sec-
onds in the instrument cluster, refer to
Indication of a flat tire. The message "Initial-
izing FTM ..." appears on the Control Dis-
play for a few seconds.
3.Start to drive.
The initialization finishes during driving
without feedback.
Page 109 of 260

Controls
107Reference
At a glance
Driving tips
Communications
Navigation
Entertainment
Mobility
Opening upper compartment
Press button and fold cover upward.
Accessing lower compartment
Press the button at the front and fold the upper
compartment or the telephone cradle upward.
Ventilating lower compartment*
Push the slide in the lower compartment
upward.
Depending on the automatic climate con-
trol setting, the temperature inside the
ventilated compartment may be higher than in
the rest of the interior. Should this be the case,
push the slide downward to close off the venti-
lation.<
Adjusting
Push the illustrated section of the center arm-
rest into the desired position.
Connection for external audio device
You can connect an external audio device such
as a CD or MP3 player and play audio tracks
over the vehicle's loudspeaker system:
>AUX-In connection, refer to page168.
>USB/audio interface
*, refer to page169.
Storage compartments
Storage compartments are located in the cen-
ter console and in the rear.
Storage nets are located on the backrests of the
front seats, and a net
* is provided in the front
passenger footwell.
Do not stow hard or sharp-edged objects
in the storage nets or the net, otherwise
there is an increased risk of injury in an acci-
dent.<
Page 111 of 260

Controls
109Reference
At a glance
Driving tips
Communications
Navigation
Entertainment
Mobility
Always take along the remote control when you
leave the vehicle, otherwise children could, for
example, use the lighter and burn themselves.<
Ashtray, rear*
Emptying
Press the entire cover down. The ashtray rises
and can be removed.
Cigarette lighter, rear
Refer to Cigarette lighter, front.
Connecting electrical devices
Sockets
With the engine running or the ignition switched
on, the cigarette lighter socket can be used as a
power outlet for hand flashlights, car vacuum
cleaners, etc., with power ratings of up to
approx. 200 W at 12 V. Avoid damaging the
socket due to inserting plugs of different
shapes or sizes. The same is true for all power
outlets in the vehicle.
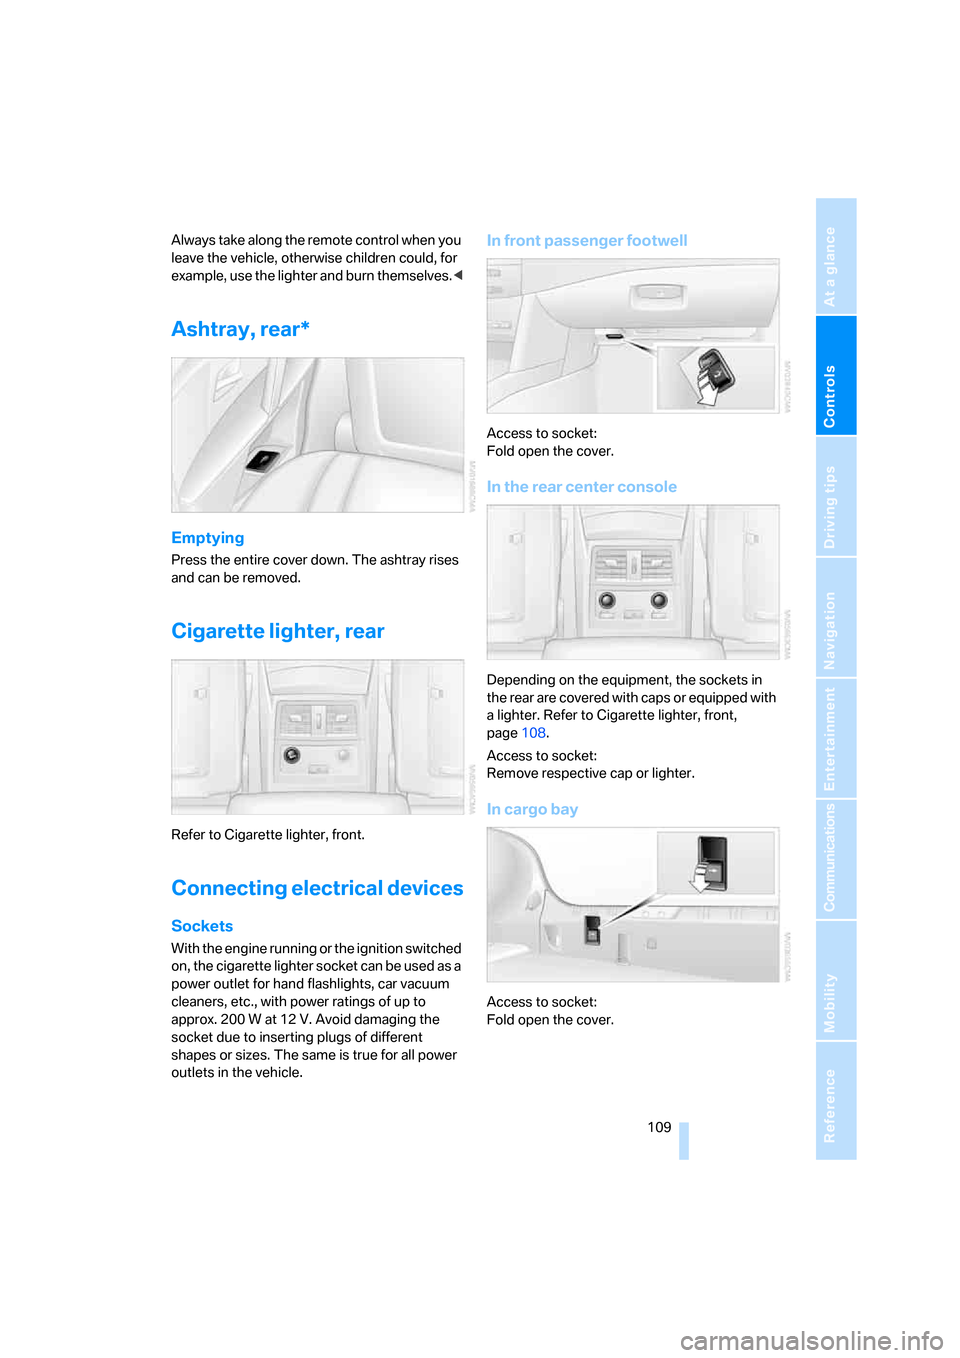
In front passenger footwell
Access to socket:
Fold open the cover.
In the rear center console
Depending on the equipment, the sockets in
the rear are covered with caps or equipped with
a lighter. Refer to Cigarette lighter, front,
page108.
Access to socket:
Remove respective cap or lighter.
In cargo bay
Access to socket:
Fold open the cover.
Page 240 of 260

Everything from A to Z
238
Everything from A to Z
Index
"..." Identifies Control Display
texts used to select
individual functions, and
indicates where to find them
in the text.
A
ABS Antilock Brake
System79
– indicator lamp81
Accepted calls182
Accessories6
Accident, refer to Emergency
request223
Acoustic signal, refer to Check
Control71
Activated-charcoal filter for
automatic climate
control101
"Activation time" for parked-
car ventilation102
Active front head restraints44
Active seat ventilation47
Adapter for spare key28
Adaptive brake lamps, refer to
Brake force display87
Adaptive Head Light94
"Add digits" for mobile
phone182
Additives
– coolant211
– engine oil, refer to Approved
engine oils210
"Address book" for navigation
system131
Address for navigation
– deleting133
– entering124,127
– selecting132
– storing131
– storing current position132"Add to address book"131
"Add to destination
list"127,128
Adjusting active backrest
width43
Adjusting interior
temperature98
Adjusting the tone during
audio operation, refer to
Tone control149
Adjusting thigh support42
"After door opened"44
"After unlocking"44
Airbags87
– indicator/warning lamp89
– indicator lamp for front
passenger airbags88
– sitting safely41
Air distribution
– automatic98
– manual99
Airing, refer to Ventilation101
Air recirculation
– AUC Automatic
recirculated-air control100
– recirculated-air mode100
"Air recirculation on / off"50
Air supply, automatic climate
control97
Air volume99
AKI, refer to Fuel quality199
Alarm system35
– avoiding unintentional
alarms36
– interior motion sensor35
– switching off alarm35
– switching off tilt alarm
sensor and interior motion
sensor36
– tilt alarm sensor35
"All channels"160
"All doors"30All-season tires, refer to
Winter tires204
"All stations", calling up with
radio152,156
Alterations, technical, refer to
For your own safety5
Altering stretch of road140
"AM", reception
range149,152
Antenna, refer to Caring for
your vehicle brochure
Antenna for mobile phone174
Antifreeze
– coolant211
– washer fluid64
Antilock Brake System
ABS79
Anti-theft alarm system, refer
to Alarm system35
Anti-theft system, refer to
Central locking system29
Approved axle loads, refer to
Weights232
Approved engine oils210
Approved gross vehicle
weight, refer to Weights232
Armrest, refer to Center
armrest, rear110
Around the center console14
Around the steering wheel10
Arrival time
– refer to Computer68
– refer to Starting destination
guidance136
"Arrow display" for navigation
system137
"Arrow display pop-up
instructions"123
Ashtray
– front108
– rear109
Page 243 of 260

Reference 241
At a glance
Controls
Driving tips
Communications
Navigation
Entertainment
Mobility
Center armrest
– front106
– rear110
Center brake lamp216
Center console14
"Central locking"30
Central locking
– from inside32
– from outside30
Central locking system29
– comfort access36
Changes, technical
– refer to For your own
safety5
– refer to Parts and
accessories6
Changing language on
Control Display77
Changing scale for
navigation138
Changing units of measure on
Control Display76
Changing wheels203,219
CHECK button72
Check Control71
"Check Control
messages"73
Check Gas Cap198
Checking the air pressure,
refer to Tire inflation
pressure200
Child restraint fixing system
LATCH54
Child restraint systems53
Child-safety lock55
Child seats, refer to
Transporting children
safely53
Chime, refer to Check
Control71
Chock220
Chrome parts, refer to Caring
for your vehicle brochure
Cigarette lighter108
Cigarette lighter socket, refer
to Connecting electrical
devices109Cleaning, refer to Caring for
your vehicle brochure
"Climate"47,98
Clock67
– 12h/24h format75
– hour signal75
– setting time and date75
Closing
– from inside32
– from outside30
Closing fuel filler cap198
Clothes hooks108
Cockpit10
Cold start, refer to Starting
engine57
Comfort access36
– replacing battery, remote
control37
Comfort area, refer to Around
the center console14
"Comfort" with EDC82
"Communication"180,190
Compact Disc
– refer to CD changer162
– refer to CD player162
Compartment for remote
control, refer to Ignition
lock56
Compartments, refer to
Storage compartments107
Compressed audio files162
Computer67
– clock67
– displays on Control
Display68
– hour signal75
"Concert hall", refer to Tone
control151
"Concierge"192
Concierge service192
Condensation, refer to When
vehicle is parked116
Condition Based Service
CBS212
"Confirmation"31
Confirmation signals for
locking and unlocking31Connecting car vacuum
cleaner, refer to Connecting
electrical devices109
Consumption, refer to
Average fuel
consumption68
Consumption statistics, refer
to Average fuel
consumption68
"Continue guidance to
destination?"137
Control Center, refer to
iDrive16
Control Display, refer to
iDrive16
– setting brightness76
– switching off/on21
Controller, refer to iDrive16
Controls, refer to Cockpit10
Convenient operation
– glass sunroof30
– windows30
– windows and glass sunroof
with comfort access37
Coolant211
– checking level211
– temperature66
Cooling, maximum100
Cooling fluid, refer to
Coolant211
Cooling function, automatic
climate control100
Cooling system, refer to
Coolant211
Copyright2
Cornering Brake Control
CBC79
Country of destination for
navigation125
Courtesy lamps96
Cradle for telephone or mobile
phone106
Cruise control65
Cruising range68
Cup holders108
Curb weight, refer to
Weights232