2008 BMW M3 COUPE tow
[x] Cancel search: towPage 9 of 172

Reference
At a glance
Controls
Driving tips
Mobility
7
For Canadian customers
Canadian customers who wish to report a
safety-related defect to Transport Canada,
Defect Investigations and Recalls, may call
1-800-333-0510 toll-free from anywhere in
Canada or 1-613-993-9851 from the Ottawa
region and from other countries, or contact
Transport Canada by mail at: Transport Can-
ada, ASFAD, Place de Ville, Tower C,
330 Sparks Street, Ottawa, ON, K1A 0N5.
You can also obtain other information about
motor vehicle safety from http://www.tc.gc.ca
Page 23 of 172

Reference
At a glance
Controls
Driving tips
Mobility
21
The luggage compartment lid swings
backwards and up when opened. Ensure
that there is sufficient clearance. To avoid lock-
ing yourself out by accident, do not place the
remote control in the cargo bay. A previously
locked luggage compartment lid is locked again
after closing.
Before and after each trip, check that the lug-
gage compartment lid has not been inadvert-
ently unlocked.<
Convertible: convenient loading*
Within a range of approx. 13ft/4m from the vehi-
cle you can use the remote control to half close
the retractable hardtop when it is open to ease
loading of the cargo bay.
1.Briefly press the button and, within one
second, press again and hold until the
retractable hardtop stops in an intermediate
position. The luggage compartment lid
opens slightly.
2.Open the luggage compartment lid, press
the cargo bay partition upward and stow the
cargo in the cargo bay.
3.Press down the cargo bay partition until it
engages on both sides and close the lug-
gage compartment lid.
4.Press the button for a longer period to
fold the retractable hardtop back in.
Setting confirmation signals
You can activate or deactivate the confirmation
signals.
For operating principle, refer to page61.
1.Switch on the ignition, refer to page46.
2.Lightly push button1 in the turn indicator
lever up or down repeatedly until the sym-bol appears in the display accompanied by
the word "SET".
3.Press button 2.
4.Lightly push button1 in the turn indicator
lever down repeatedly until the desired
symbol appears in the display.
> Confirmation signal during unlocking
> Confirmation signal during locking
5.Press button 2.
6.Use button 1 to select:
>
The hazard warning flashers light up
during unlocking/locking.
>
An acoustic signal
* sounds during
unlocking/locking.
>
The hazard warning flashers light up and
an acoustic signal
* sounds during
unlocking/locking.
>
The function is deactivated.
7.Press button 2.
The setting is stored.
Page 27 of 172

Reference
At a glance
Controls
Driving tips
Mobility
25
Locking or unlocking separately
The switch is located in the glove compartment.
1Locking the luggage compartment lid
2Unlocking the luggage compartment lid
Locking separately
Push the switch in the direction of arrow 1.
The luggage compartment lid is locked and
cannot be unlocked using the central locking
system.
If you give the remote control without the inte-
grated key to someone else while the glove
compartment is locked, the luggage compart-
ment lid cannot be opened. This is an advan-
tage when valet parking, for example. Locking
the glove compartment, refer to page87.
Unlocking separately
Push the switch in the direction of arrow 2.
Emergency release
Pull the lever in the cargo bay. The luggage
compartment lid is unlocked.
Closing
The handle recesses on the interior trim of the
luggage compartment lid make it easier to pull
down.Make sure that the closing path of the
luggage compartment lid is clear, other-
wise injuries may result.<
Coupe
Convertible
To close the luggage compartment lid,
press it down lightly. The lid is closed
automatically.<
Alarm system*
The concept
The vehicle alarm system responds:
>When a door, the hood or the luggage com-
partment lid is opened
>To movements inside the vehicle: Interior
motion sensor, refer to page26
>When the car's inclination changes, for
instance if an attempt is made to jack it up
and steal the wheels or to raise it prior to
towing away
>When there is an interruption in the power
supply from the battery
The alarm system signals unauthorized entry
attempts for a short time by means of:
Page 28 of 172

Opening and closing
26 >An acoustic alarm
>Switching on the hazard warning flashers
>Flashing the high beams
Arming and disarming
When you lock or unlock the vehicle, either with
the remote control or at the door lock, the alarm
system is armed or disarmed at the same time.
You can open the luggage compartment lid
using the button of the remote control even
if the alarm system is armed, refer to page20.
The lid is locked and monitored again as soon
as it is closed.
Panic mode*
You can trigger the alarm system if you find
yourself in a dangerous situation:
Press the button for at least three seconds.
To switch off the alarm: press any button.
Switching off an alarm
>Unlock the car with the remote control, refer
to page19.
>Insert the remote control all the way into the
ignition lock.
Indicator lamp displays
>The indicator lamp under the inside rear-
view mirror flashes continuously: the sys-
tem is armed.
>The indicator lamp flashes after locking:
doors, hood or luggage compartment lid are
not properly closed. Even if you do not close
the alerted area, the system begins to mon-
itor the remaining areas, and the indicator
lamp flashes continuously after approx. 10 seconds. The interior motion sensor and
the tilt alarm sensor are not activated.
>The indicator lamp goes out after unlocking:
your vehicle has not been disturbed while
you were away.
>If the indicator lamp flashes after unlocking
until the remote control is inserted in the
ignition, but for no longer than approx.
5 minutes: your vehicle has been disturbed
while you were away.
Tilt alarm sensor
The tilt of the vehicle is monitored. The alarm
system reacts, e.g. to attempts to steal a wheel
or tow the vehicle.
Interior motion sensor
Coupe
In order for the interior motion sensor to func-
tion properly, the windows and glass roof must
be completely closed
*.
Convertible
The interior of the car is monitored up to the
height of the seat cushions. Thus the alarm sys-
tem is activated together with the interior
motion sensor even if the hardtop is open. The
alarm can be triggered unintentionally by falling
objects such as leaves, refer to Avoiding unin-
tentional alarms.
Avoiding unintentional alarms
The tilt alarm sensor and interior motion sensor
may be switched off at the same time. This pre-
vents unintentional alarms, e.g. in the following
situations:
>In duplex garages
>During transport on car-carrying trains,
boats/ships or on a trailer
>When animals are to remain in the vehicle
Switching off tilt alarm sensor and
interior motion sensor
Press the button on the remote control
again as soon as the vehicle is locked.
Page 36 of 172

Opening and closing
34
Removing the wind deflector
Proceed in the reverse order as used for instal-
lation.
Protective caps are provided in the vehicle for
the holders of the wind deflector.
Folding
Slide the red release lever towards the middle of
the wind deflector and push the two halves
apart.
Loading function
Cargo can still be loaded on the rear seat of the
vehicle even if the wind deflector has been
installed.
1.Lower all windows.
2.Fold down the top section of the wind
deflector, arrow1.3.Turn the rotary handle to position ,
arrow2.
Fold both sections of the wind deflector forward
and rest them against the front seats, arrow3.
To protect the seat cushions or to use the bag
holders, you can fold the rear backrest down,
refer to page92.
Page 53 of 172

Reference
At a glance
Controls
Driving tips
Mobility
51
P Park
P engages automatically when you switch
off the engine unless N is engaged and
the remote control remains in the ignition lock,
refer to page46. As soon as you remove the
remote control from the ignition lock, P
engages regardless of the position of the selec-
tor lever.<
Displays in the instrument cluster
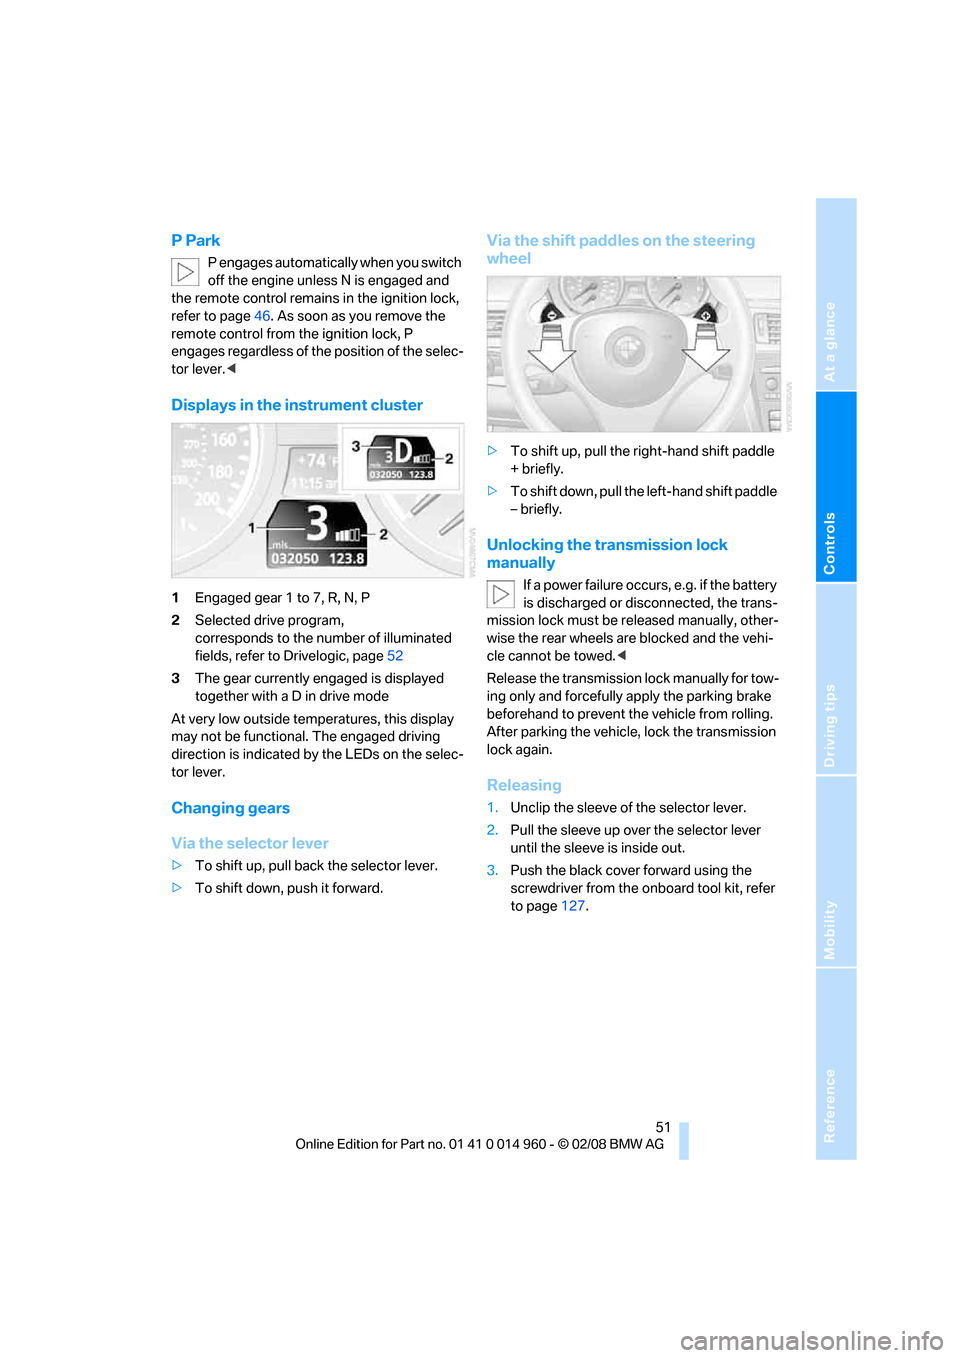
1Engaged gear 1 to 7, R, N, P
2Selected drive program,
corresponds to the number of illuminated
fields, refer to Drivelogic, page52
3The gear currently engaged is displayed
together with a D in drive mode
At very low outside temperatures, this display
may not be functional. The engaged driving
direction is indicated by the LEDs on the selec-
tor lever.
Changing gears
Via the selector lever
>To shift up, pull back the selector lever.
>To shift down, push it forward.
Via the shift paddles on the steering
wheel
>To shift up, pull the right-hand shift paddle
+ briefly.
>To shift down, pull the left-hand shift paddle
– briefly.
Unlocking the transmission lock
manually
If a power failure occurs, e.g. if the battery
is discharged or disconnected, the trans-
mission lock must be released manually, other-
wise the rear wheels are blocked and the vehi-
cle cannot be towed.<
Release the transmission lock manually for tow-
ing only and forcefully apply the parking brake
beforehand to prevent the vehicle from rolling.
After parking the vehicle, lock the transmission
lock again.
Releasing
1.Unclip the sleeve of the selector lever.
2.Pull the sleeve up over the selector lever
until the sleeve is inside out.
3.Push the black cover forward using the
screwdriver from the onboard tool kit, refer
to page127.
Page 54 of 172

Driving
52 4.Insert the screwdriver into the opening of
the white lever, arrow 1.
5.Pull the screwdriver back all the way, arrow
2. The transmission lock is released.
6.Carefully remove the screwdriver, for exam-
ple to avoid accidentally engaging the
transmission lock during towing.
After parking the vehicle, lock the trans-
mission lock again. Otherwise there is a
danger of the vehicle rolling.<
Locking
1.Insert the screwdriver into the opening of
the white lever and press forward.
The transmission lock is locked again.
2.Fold back the black cover until it engages
audibly.
3.Clip the sleeve of the selector lever back
into place.
Jump-starting and towing, refer to page137.
Drivelogic
Various drive programs are available to you via
Drivelogic.
After every change between sequential and
drive mode, the program selected last in each
case is active. Exception: after the first change from sequential to drive mode, drive program 3
is active.
In drive mode
Five drive programs are available for selection,
from winter program/balanced 1 to sporting and
highly dynamic 5.
In sequential mode
You can choose between six drive programs,
from winter program/balanced 1 to sporty
puristic 6.
Program 6 is available when Dynamic Stability
Control is deactivated, refer to page68. If DSC
is activated, the program changes from 6 to 5.
To maintain driving stability, activate DSC
whenever possible.<
Selecting the drive program via the
button in the center console
Press the button repeatedly until the desired
drive program is displayed in the instrument
cluster, refer to page51.
Shift Lights
To achieve the best possible acceleration in
sequential mode when using a sporty driving
style, the Shift Lights in the instrument cluster
indicate the best shift point just before the max-
imum engine speed is reached.
Page 69 of 172

Reference
At a glance
Controls
Driving tips
Mobility
67
Technology for driving comfort and safety
Park Distance Control PDC*
The concept
The PDC assists you with maneuvering in tight
parking spaces. Acoustic signals warn you of
the presence of an object behind your vehicle.
To measure the distance, there are four ultra-
sonic sensors in the bumpers.
An acoustic warning does not sound until an
object is closer than approx. 24 in/60 cm to the
corner sensors, or closer than approx. 5 ft/
1.50 m to the center sensors.
PDC is a parking aid that can indicate
objects when they are approached
slowly, as is usually the case when parking.
Avoid approaching an object at high speed, oth-
erwise physical circumstances may lead to the
system warning being issued too late.<
Switching on automatically
With the engine running or the ignition switched
on, the system is activated after approx. 1 sec-
ond when you engage reverse gear. Wait this
short period before driving.
Switching off automatically
After approx. 165 ft/50 m of driving or over
approx. 20 mph/30 km/h, the system switches
off and the LED goes out.
Signal tones
When nearing an object, its position is indicated
correspondingly by an interval tone. As the dis-
tance between vehicle and object decreases,
the intervals between the tones become
shorter. If the distance to the nearest object
falls to below roughly 1 ft/30 cm, then a contin-
uous tone sounds.
An interval tone is interrupted after approx.
3seconds
>if you stop in front of an object that has been
detected by only one of the corner sensors>if you are driving parallel to a wall.
Malfunction
The indicator lamp in the instrument
cluster comes on. PDC is malfunc-
tioning. Have the system checked.
To avoid this problem, keep the sensors clean
and free of ice or snow in order to ensure that
they will continue to operate effectively. When
using a high-pressure cleaner, do not spray the
sensors for extended periods of time and only
from a distance of at least 4 in/10 cm.
System limitations
Even with PDC, final responsibility for
estimating the distance between the
vehicle and any obstructions always remains
with the driver. Even when sensors are pro-
vided, there is a blind spot in which objects can
no longer be detected. The system is also sub-
ject to the physical limits that apply to all forms
of ultrasonic measurement, such as those
encountered with trailer towbars and hitches,
thin or wedge-shaped objects, etc. Low objects
that have already been displayed, e. g. curbs,
can disappear again from the detection area of
the sensors before or after a continuous tone
sounds. Higher, protruding objects, e.g. ledges,
cannot be detected. Therefore, always drive
cautiously, otherwise there is a risk of personal
injury or property damage. Loud sound sources
outside or inside the car can drown out the PDC
signal. Therefore, always drive cautiously, oth-
erwise there is a risk of personal injury or prop-
erty damage.<
Driving stability control
systems
Your BMW has a number of systems that help
to maintain the vehicle's stability even in
adverse driving conditions.