2008 BMW 760LI SEDAN steering wheel adjustment
[x] Cancel search: steering wheel adjustmentPage 13 of 254
At a glance
11Reference
Controls
Driving tips
Communications
Navigation
Entertainment
Mobility
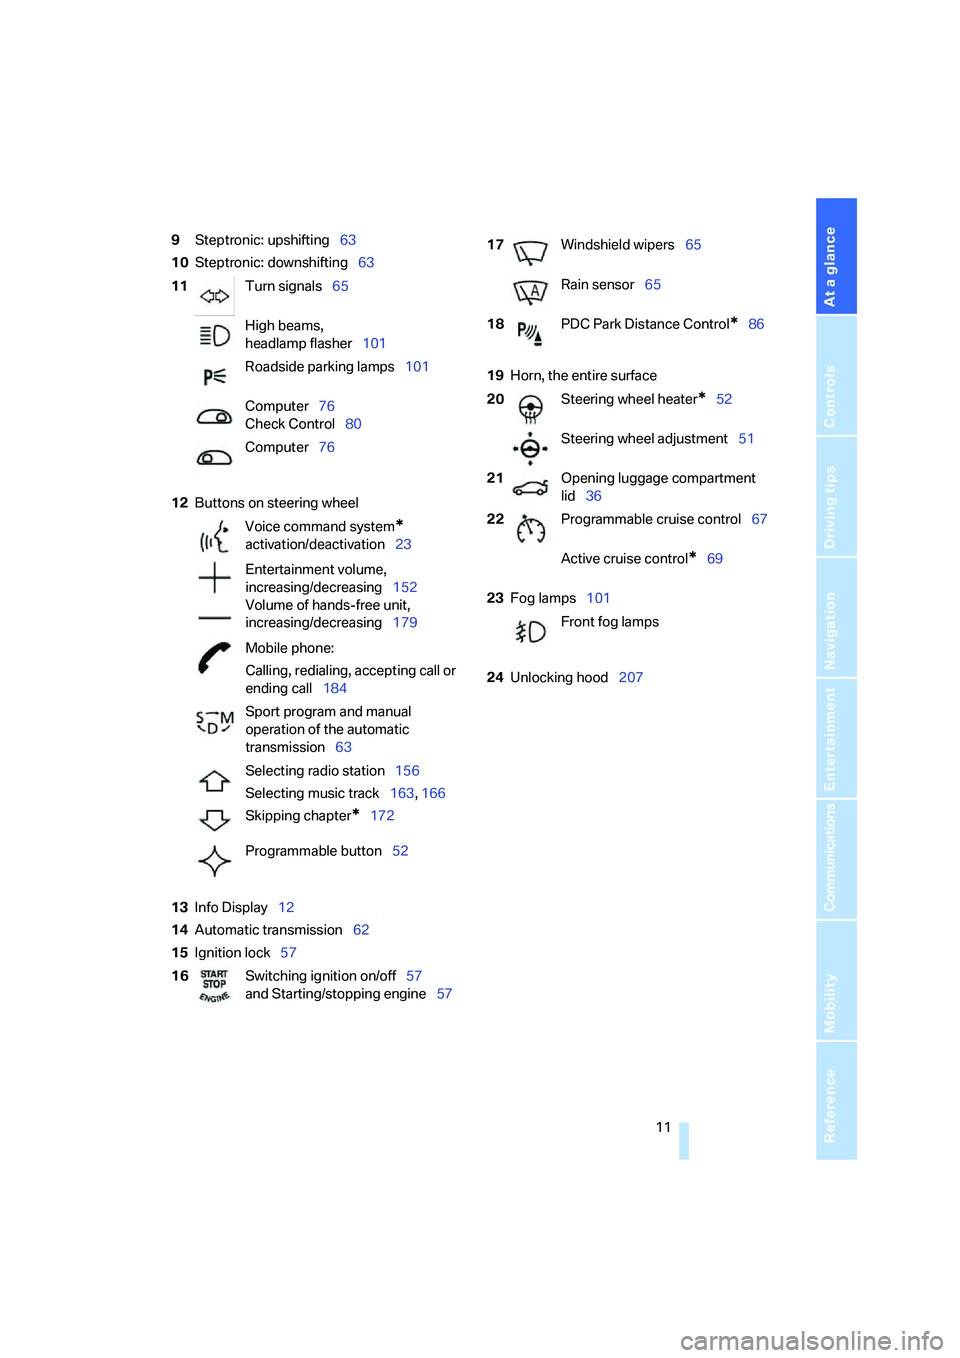
9Steptronic: upshifting63
10Steptronic: downshifting63
12Buttons on steering wheel
13Info Display12
14Automatic transmission62
15Ignition lock5719Horn, the entire surface
23Fog lamps101
24Unlocking hood207 11Turn signals65
High beams,
headlamp flasher101
Roadside parking lamps101
Computer76
Check Control80
Computer76
Voice command system
*
activation/deactivation23
Entertainment volume,
increasing/decreasing152
Volume of hands-free unit,
increasing/decreasing179
Mobile phone:
Calling, redialing, accepting call or
ending call184
Sport program and manual
operation of the automatic
transmission63
Selecting radio station156
Selecting music track163, 166
Skipping chapter
*172
Programmable button52
16Switching ignition on/off57
and Starting/stopping engine57
17Windshield wipers65
Rain sensor65
18PDC Park Distance Control
*86
20Steering wheel heater
*52
Steering wheel adjustment51
21Opening luggage compartment
lid36
22Programmable cruise control67
Active cruise control
*69
Front fog lamps
Page 17 of 254
At a glance
15Reference
Controls
Driving tips
Communications
Navigation
Entertainment
Mobility
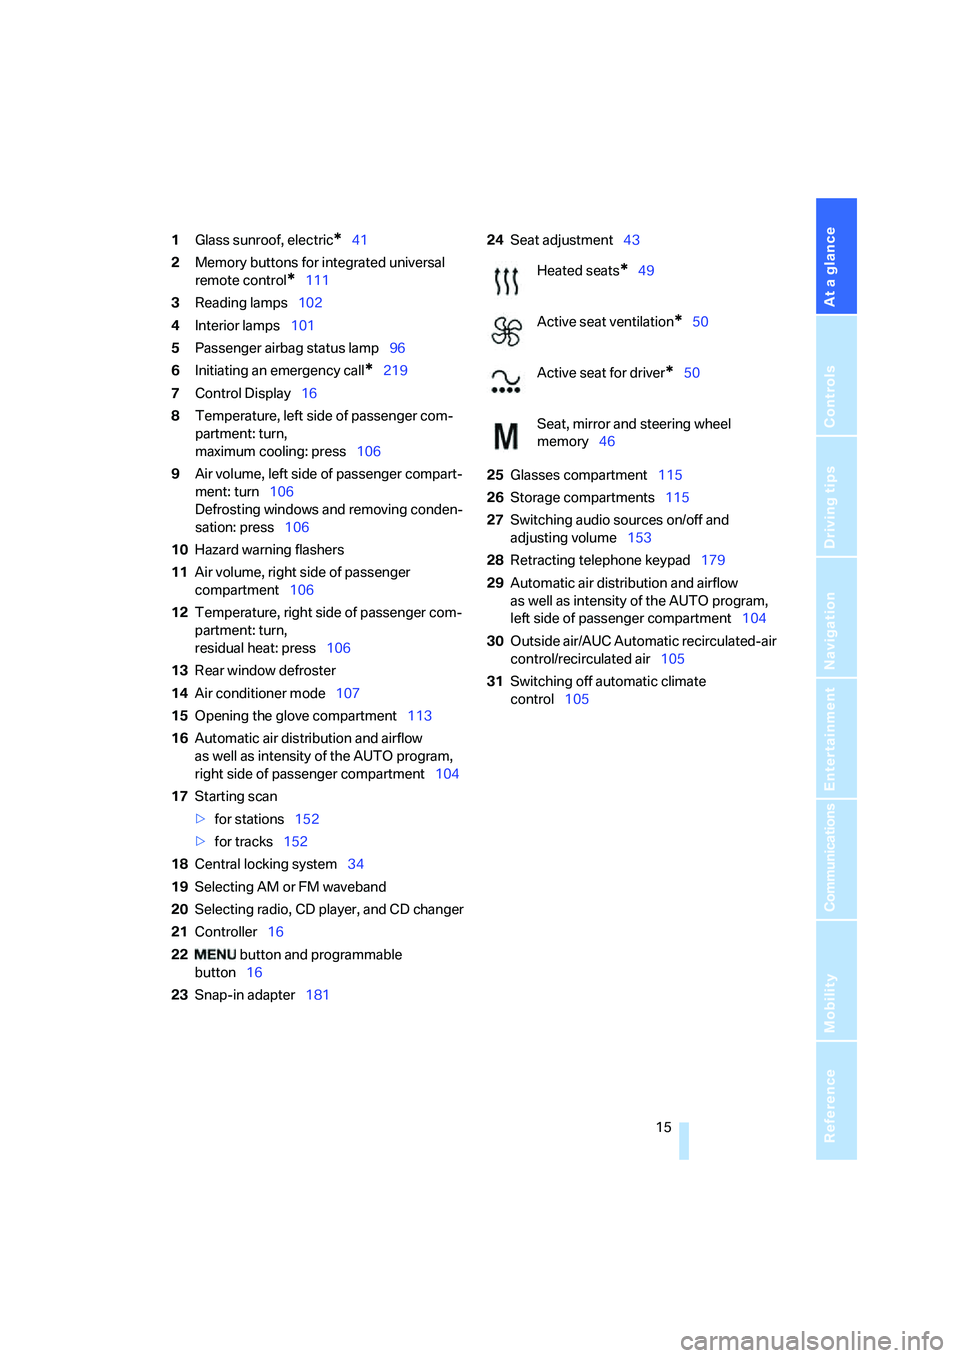
1Glass sunroof, electric*41
2Memory buttons for integrated universal
remote control
*111
3Reading lamps102
4Interior lamps101
5Passenger airbag status lamp96
6Initiating an emergency call
*219
7Control Display16
8Temperature, left side of passenger com-
partment: turn,
maximum cooling: press106
9Air volume, left side of passenger compart-
ment: turn106
Defrosting windows and removing conden-
sation: press106
10Hazard warning flashers
11Air volume, right side of passenger
compartment106
12Temperature, right side of passenger com-
partment: turn,
residual heat: press106
13Rear window defroster
14Air conditioner mode107
15Opening the glove compartment113
16Automatic air distribution and airflow
as well as intensity of the AUTO program,
right side of passenger compartment104
17Starting scan
>for stations152
>for tracks152
18Central locking system34
19Selecting AM or FM waveband
20Selecting radio, CD player, and CD changer
21Controller16
22 button and programmable
button16
23Snap-in adapter18124Seat adjustment43
25Glasses compartment115
26Storage compartments115
27Switching audio sources on/off and
adjusting volume153
28Retracting telephone keypad179
29Automatic air distribution and airflow
as well as intensity of the AUTO program,
left side of passenger compartment104
30Outside air/AUC Automatic recirculated-air
control/recirculated air105
31Switching off automatic climate
control105
Heated seats*49
Active seat ventilation
*50
Active seat for driver
*50
Seat, mirror and steering wheel
memory46
Page 48 of 254
Adjusting
46
Seat, mirror and steering
wheel memory
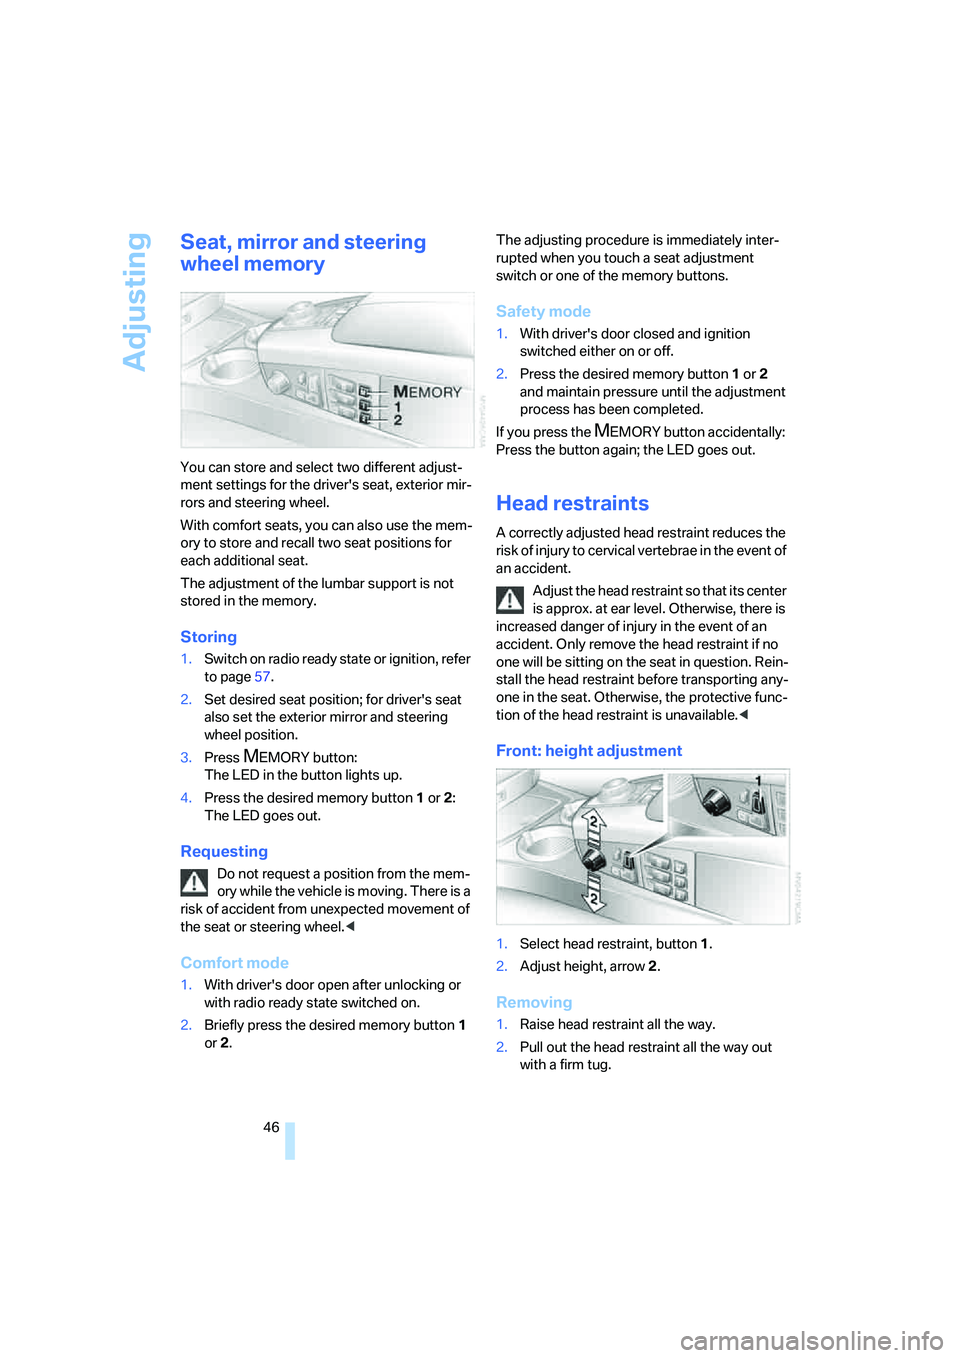
You can store and select two different adjust-
ment settings for the driver's seat, exterior mir-
rors and steering wheel.
With comfort seats, you can also use the mem-
ory to store and recall two seat positions for
each additional seat.
The adjustment of the lumbar support is not
stored in the memory.
Storing
1.Switch on radio ready state or ignition, refer
to page57.
2.Set desired seat position; for driver's seat
also set the exterior mirror and steering
wheel position.
3.Press
MEMORY button:
The LED in the button lights up.
4.Press the desired memory button1 or2:
The LED goes out.
Requesting
Do not request a position from the mem-
ory while the vehicle is moving. There is a
risk of accident from unexpected movement of
the seat or steering wheel.<
Comfort mode
1.With driver's door open after unlocking or
with radio ready state switched on.
2.Briefly press the desired memory button 1
or2.The adjusting procedure is immediately inter-
rupted when you touch a seat adjustment
switch or one of the memory buttons.
Safety mode
1.With driver's door closed and ignition
switched either on or off.
2.Press the desired memory button 1or2
and maintain pressure until the adjustment
process has been completed.
If you press the
MEMORY button accidentally:
Press the button again; the LED goes out.
Head restraints
A correctly adjusted head restraint reduces the
risk of injury to cervical vertebrae in the event of
an accident.
Adjust the head restraint so that its center
is approx. at ear level. Otherwise, there is
increased danger of injury in the event of an
accident. Only remove the head restraint if no
one will be sitting on the seat in question. Rein-
stall the head restraint before transporting any-
one in the seat. Otherwise, the protective func-
tion of the head restraint is unavailable.<
Front: height adjustment
1.Select head restraint, button1.
2.Adjust height, arrow2.
Removing
1.Raise head restraint all the way.
2.Pull out the head restraint all the way out
with a firm tug.
Page 52 of 254
Adjusting
50
Active seat ventilation*
Front
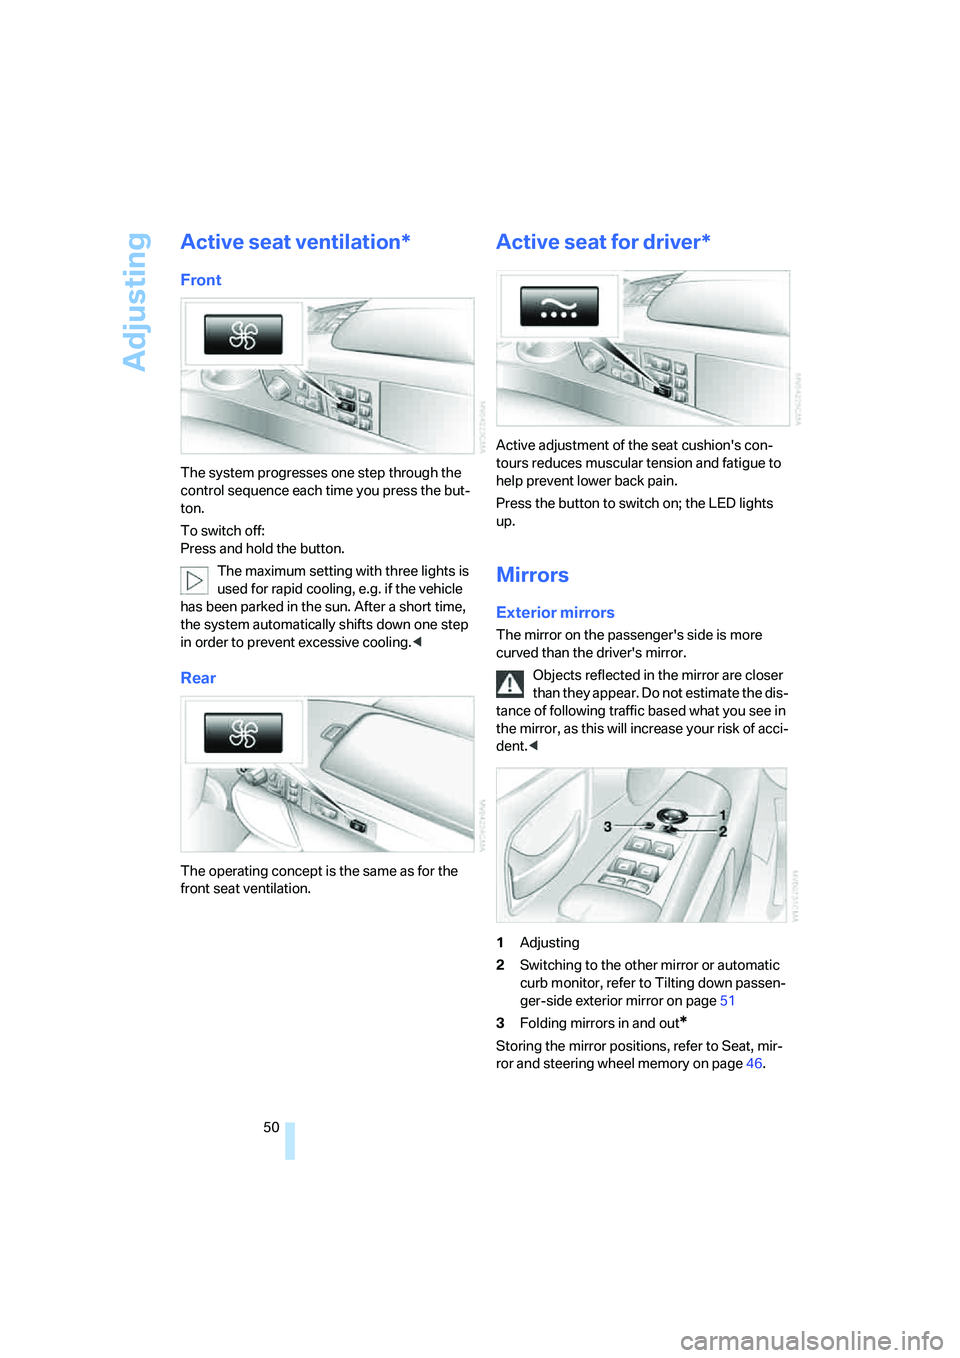
The system progresses one step through the
control sequence each time you press the but-
ton.
To switch off:
Press and hold the button.
The maximum setting with three lights is
used for rapid cooling, e.g. if the vehicle
has been parked in the sun. After a short time,
the system automatically shifts down one step
in order to prevent excessive cooling.<
Rear
The operating concept is the same as for the
front seat ventilation.
Active seat for driver*
Active adjustment of the seat cushion's con-
tours reduces muscular tension and fatigue to
help prevent lower back pain.
Press the button to switch on; the LED lights
up.
Mirrors
Exterior mirrors
The mirror on the passenger's side is more
curved than the driver's mirror.
Objects reflected in the mirror are closer
than they appear. Do not estimate the dis-
tance of following traffic based what you see in
the mirror, as this will increase your risk of acci-
dent.<
1Adjusting
2Switching to the other mirror or automatic
curb monitor, refer to Tilting down passen-
ger-side exterior mirror on page51
3Folding mirrors in and out
*
Storing the mirror positions, refer to Seat, mir-
ror and steering wheel memory on page46.
Page 53 of 254
Controls
51Reference
At a glance
Driving tips
Communications
Navigation
Entertainment
Mobility
Adjusting manually
You can also adjust the mirrors manually by
pressing against the outer edges of their mirror
glass.
Folding mirrors in and out*
At driving speeds up to approx. 15 mph/
20 km/h, you can fold the mirrors in and out by
pressing button3. This is an advantage, e.g. in
car washes and narrow streets, or for moving
mirrors that were manually folded in back into
the correct position.
Before entering an automatic car wash,
fold in the exterior mirrors by hand or with
button3, to prevent them from being damaged
due to the width of the vehicle.<
Automatic heating
Both exterior mirrors are automatically heated
whenever the ignition is switched on.
Tilting down passenger-side exterior
mirror – automatic curb monitor
Activating
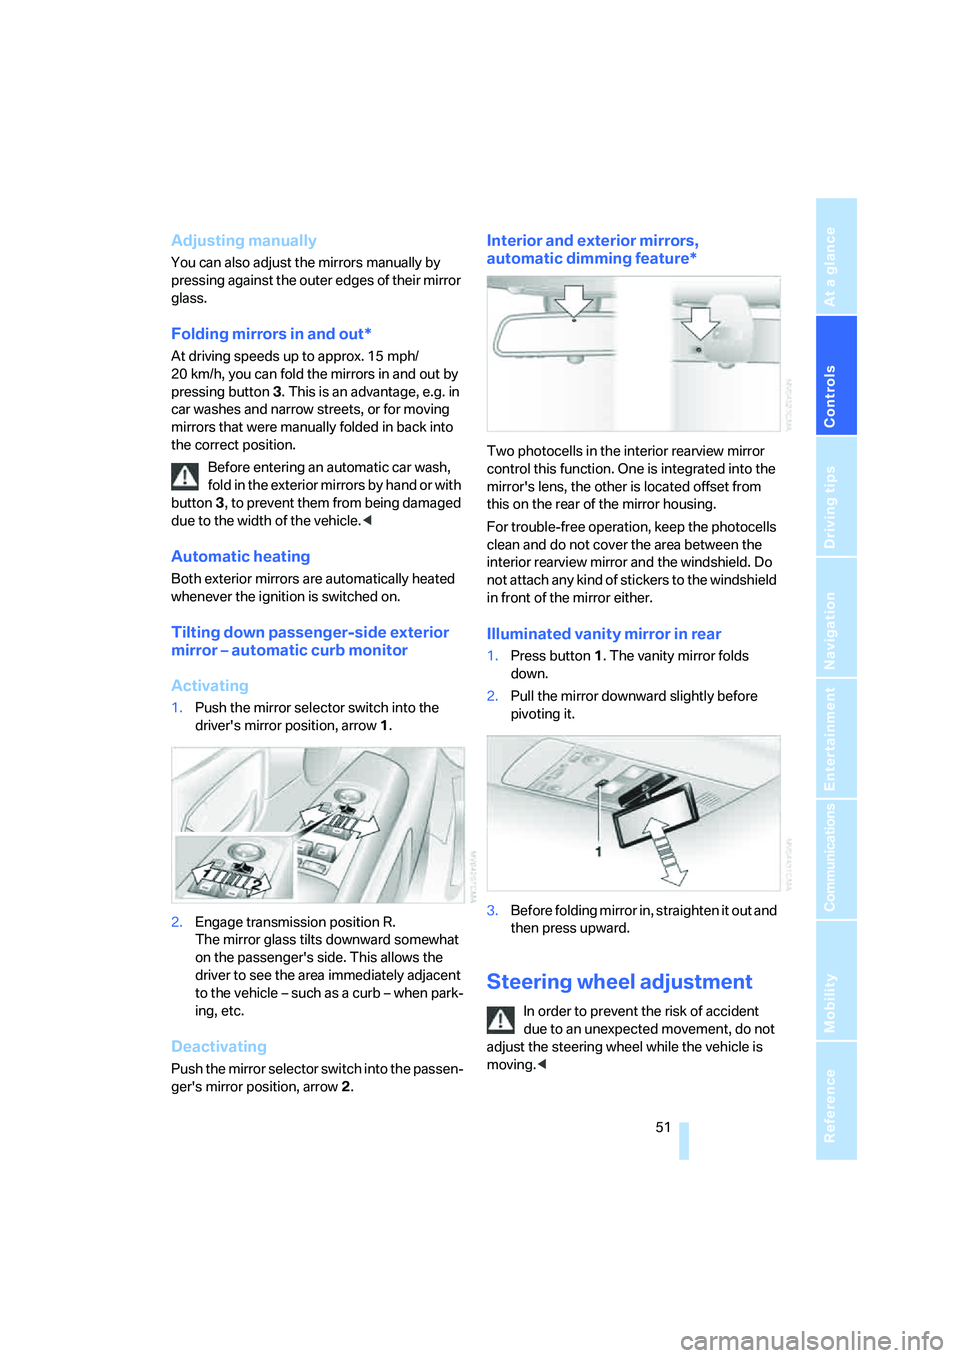
1.Push the mirror selector switch into the
driver's mirror position, arrow1.
2.Engage transmission position R.
The mirror glass tilts downward somewhat
on the passenger's side. This allows the
driver to see the area immediately adjacent
to the vehicle – such as a curb – when park-
ing, etc.
Deactivating
Push the mirror selector switch into the passen-
ger's mirror position, arrow2.
Interior and exterior mirrors,
automatic dimming feature*
Two photocells in the interior rearview mirror
control this function. One is integrated into the
mirror's lens, the other is located offset from
this on the rear of the mirror housing.
For trouble-free operation, keep the photocells
clean and do not cover the area between the
interior rearview mirror and the windshield. Do
not attach any kind of stickers to the windshield
in front of the mirror either.
Illuminated vanity mirror in rear
1.Press button1. The vanity mirror folds
down.
2.Pull the mirror downward slightly before
pivoting it.
3.Before folding mirror in, straighten it out and
then press upward.
Steering wheel adjustment
In order to prevent the risk of accident
due to an unexpected movement, do not
adjust the steering wheel while the vehicle is
moving.<
Page 97 of 254
Controls
95Reference
At a glance
Driving tips
Communications
Navigation
Entertainment
Mobility
Airbags
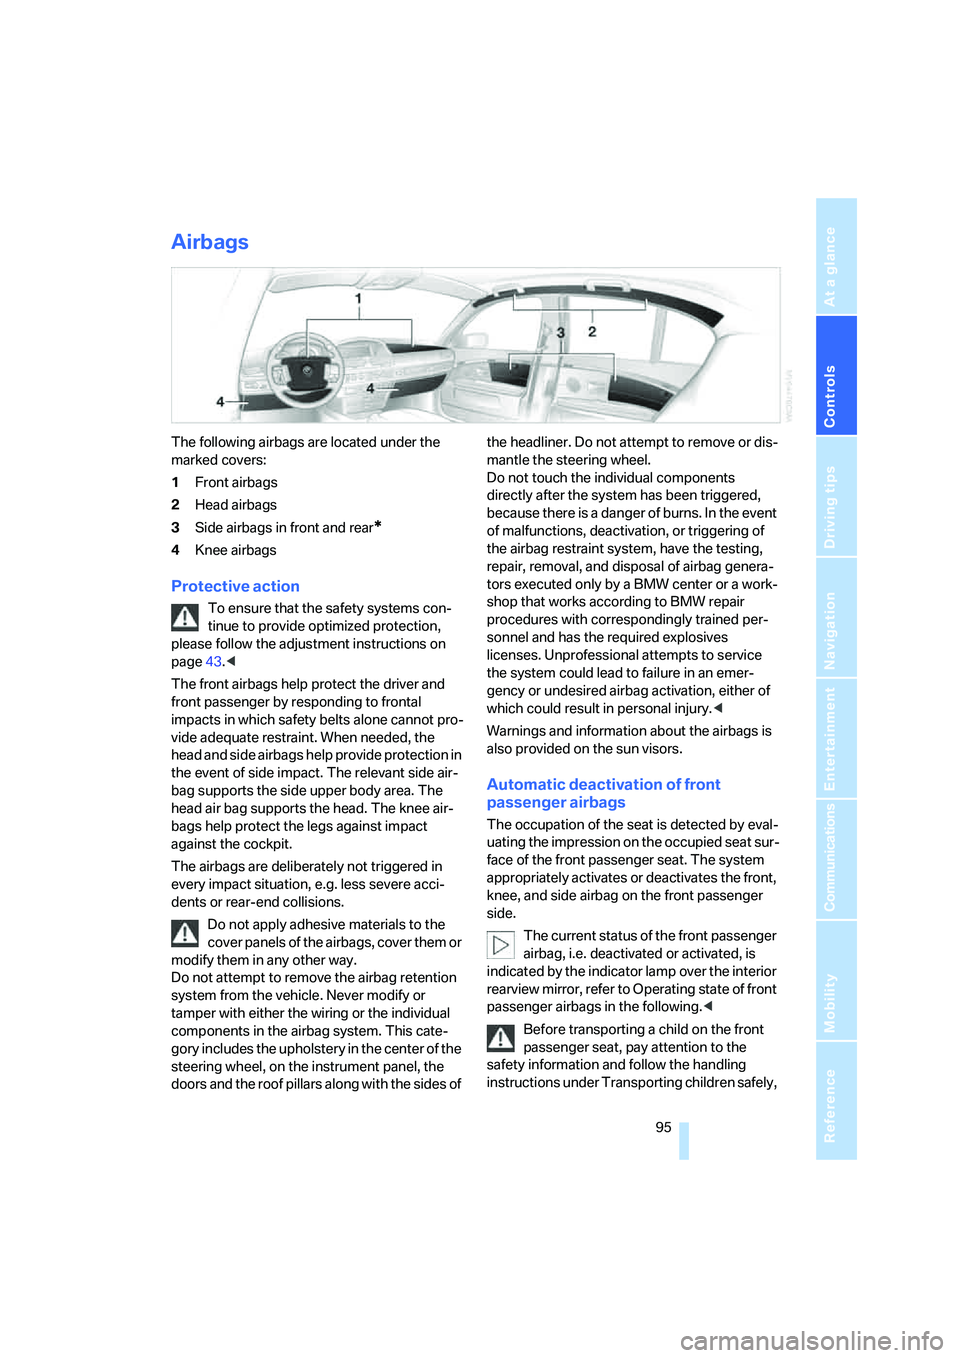
The following airbags are located under the
marked covers:
1Front airbags
2Head airbags
3Side airbags in front and rear
*
4Knee airbags
Protective action
To ensure that the safety systems con-
tinue to provide optimized protection,
please follow the adjustment instructions on
page43.<
The front airbags help protect the driver and
front passenger by responding to frontal
impacts in which safety belts alone cannot pro-
vide adequate restraint. When needed, the
head and side airbags help provide protection in
the event of side impact. The relevant side air-
bag supports the side upper body area. The
head air bag supports the head. The knee air-
bags help protect the legs against impact
against the cockpit.
The airbags are deliberately not triggered in
every impact situation, e.g. less severe acci-
dents or rear-end collisions.
Do not apply adhesive materials to the
cover panels of the airbags, cover them or
modify them in any other way.
Do not attempt to remove the airbag retention
system from the vehicle. Never modify or
tamper with either the wiring or the individual
components in the airbag system. This cate-
gory includes the upholstery in the center of the
steering wheel, on the instrument panel, the
doors and the roof pillars along with the sides of the headliner. Do not attempt to remove or dis-
mantle the steering wheel.
Do not touch the individual components
directly after the system has been triggered,
because there is a danger of burns. In the event
of malfunctions, deactivation, or triggering of
the airbag restraint system, have the testing,
repair, removal, and disposal of airbag genera-
tors executed only by a BMW center or a work-
shop that works according to BMW repair
procedures with correspondingly trained per-
sonnel and has the required explosives
licenses. Unprofessional attempts to service
the system could lead to failure in an emer-
gency or undesired airbag activation, either of
which could result in personal injury.<
Warnings and information about the airbags is
also provided on the sun visors.
Automatic deactivation of front
passenger airbags
The occupation of the seat is detected by eval-
uating the impression on the occupied seat sur-
face of the front passenger seat. The system
appropriately activates or deactivates the front,
knee, and side airbag on the front passenger
side.
The current status of the front passenger
airbag, i.e. deactivated or activated, is
indicated by the indicator lamp over the interior
rearview mirror, refer to Operating state of front
passenger airbags in the following.<
Before transporting a child on the front
passenger seat, pay attention to the
safety information and follow the handling
instructions under Transporting children safely,
Page 154 of 254
On/off and settings
152
On/off and settings
The following audio and video sources share
the same controls and adjustment options.
>Radio
>CD player
*
>CD changer*
>DVD changer*
The CD changer can play CDs with com-
pressed audio files, such as MP3s.<
Controls
The audio and video sources can be operated
using:
>Buttons on the CD player
>iDrive
>Buttons on steering wheel, refer to page11
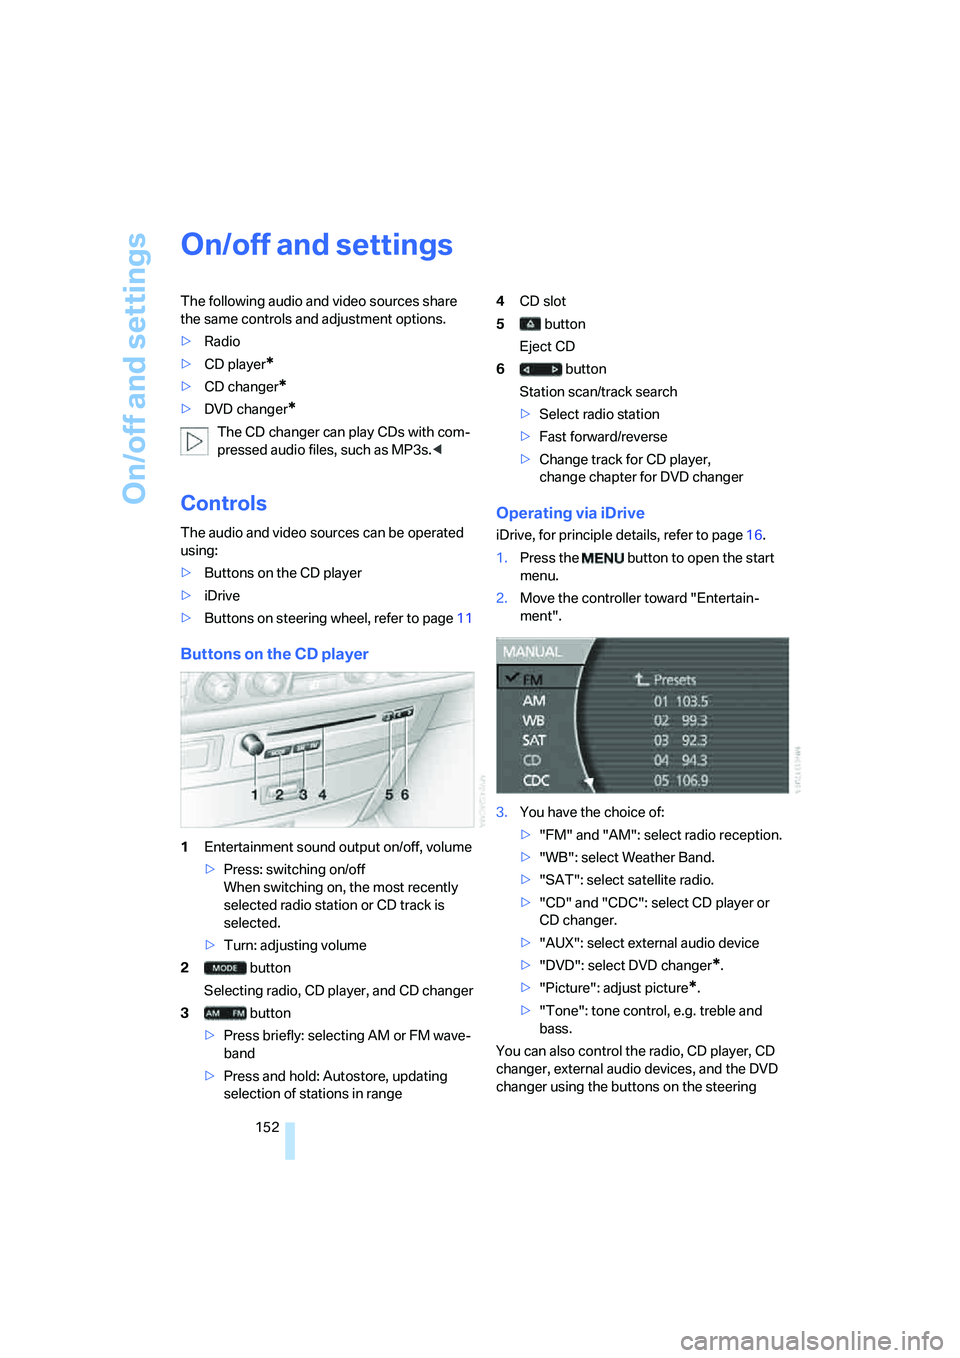
Buttons on the CD player
1Entertainment sound output on/off, volume
>Press: switching on/off
When switching on, the most recently
selected radio station or CD track is
selected.
>Turn: adjusting volume
2 button
Selecting radio, CD player, and CD changer
3 button
>Press briefly: selecting AM or FM wave-
band
>Press and hold: Autostore, updating
selection of stations in range4CD slot
5 button
Eject CD
6 button
Station scan/track search
>Select radio station
>Fast forward/reverse
>Change track for CD player,
change chapter for DVD changer
Operating via iDrive
iDrive, for principle details, refer to page16.
1.Press the button to open the start
menu.
2.Move the controller toward "Entertain-
ment".
3.You have the choice of:
>"FM" and "AM": select radio reception.
>"WB": select Weather Band.
>"SAT": select satellite radio.
>"CD" and "CDC": select CD player or
CD changer.
>"AUX": select external audio device
>"DVD": select DVD changer
*.
>"Picture": adjust picture
*.
>"Tone": tone control, e.g. treble and
bass.
You can also control the radio, CD player, CD
changer, external audio devices, and the DVD
changer using the buttons on the steering
Page 181 of 254
179
Entertainment
Reference
At a glance
Controls
Driving tips Communications
Navigation
Mobility
Hands-free system
The hands-free microphone is located on the
left-hand side on the headliner.
The hands-free system is activated whenever
you establish or receive a call using the follow-
ing:
>the button on the steering wheel, refer to
page11
>the retracting telephone keypad
>iDrive, refer to Initiating communication,
page184
>the voice command system
*, refer to
page23, except for incoming calls
Volume adjustment
You can set the volume for the hands-free sys-
tem and the ring tone separately:
>Turn knob during a call.
>Turn knob during an incoming call.
The volume can also be adjusted using
the buttons on the steering wheel.<
This volume is maintained, even if the other
audio sources are set to minimum volume.
The setting is stored for the remote control cur-
rently in use.
Retracting telephone keypad
The telephone keypad allows you to use all of
the basic mobile phone functions without ever
picking up the handset.
Calls are automatically routed through the
hands-free system.
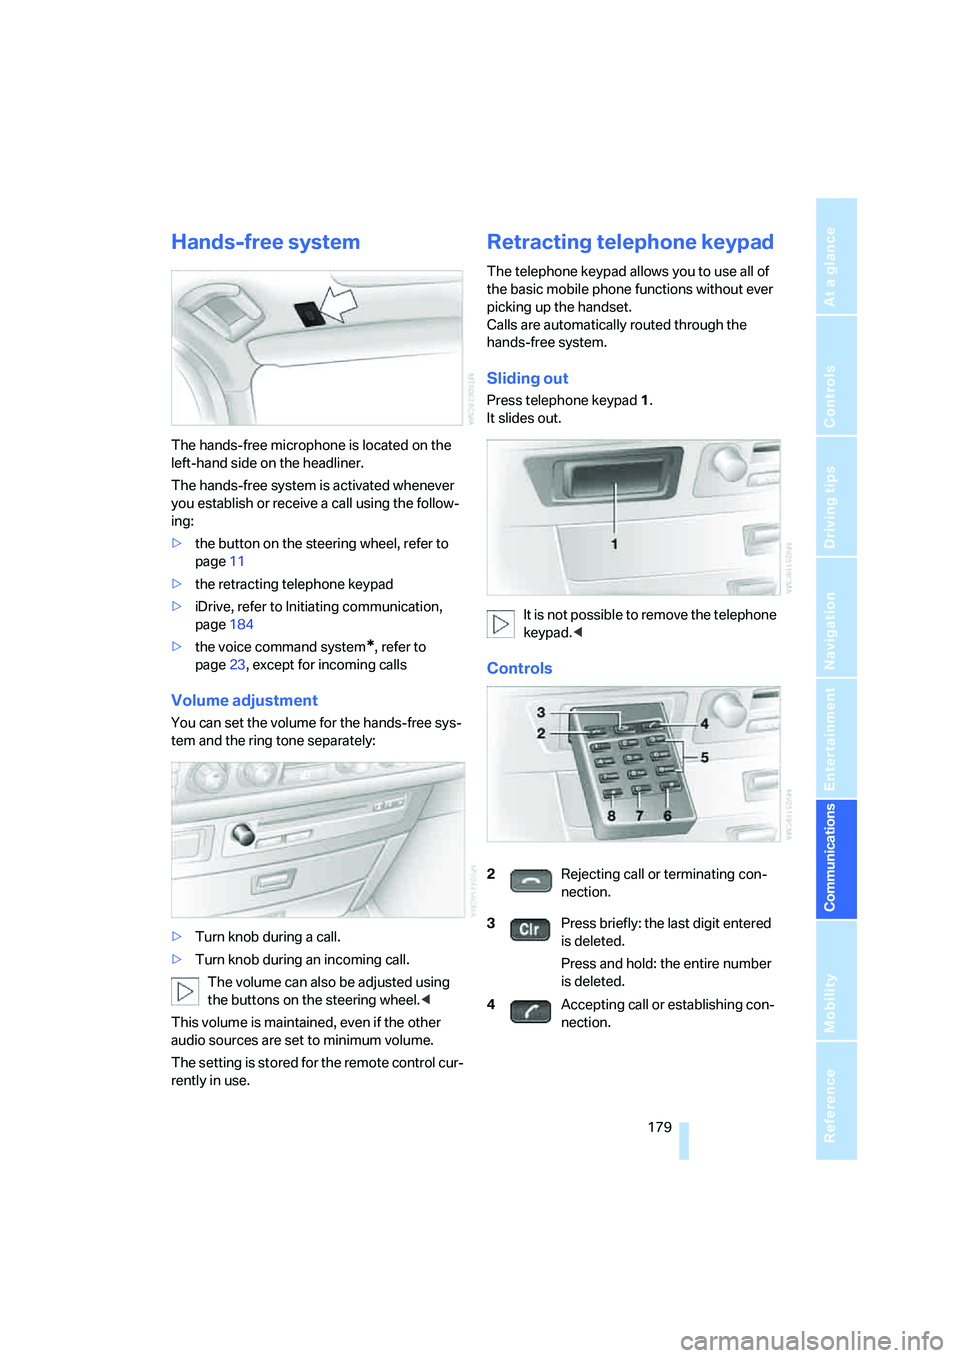
Sliding out
Press telephone keypad1.
It slides out.
It is not possible to remove the telephone
keypad.<
Controls
2Rejecting call or terminating con-
nection.
3Press briefly: the last digit entered
is deleted.
Press and hold: the entire number
is deleted.
4Accepting call or establishing con-
nection.