2008 BMW 650I COUPE change time
[x] Cancel search: change timePage 104 of 264

Lamps
102
Lamps
Parking lamps/low beams
0Lights off and daytime running lamps*
1Parking lamps and daytime running lamps*
2Low beams and welcome lamps
3Automatic headlamp control, daytime run-
ning lamps
*, welcome lamps, Adaptive
Head Light
* and high-beam assistant*
If you open the driver's door with the ignition
switched off, the exterior lighting is automati-
cally switched off when the light switch is in
position2 or 3.
Parking lamps
In switch position1, the front, rear and side
vehicle lighting is switched on. You can use the
parking lamps for parking.
The parking lamps drain the battery. Do
not leave them switched on for long peri-
ods of time, otherwise it may no longer be pos-
sible to start the engine. It is preferable to
switch on the roadside parking lamps on one
side, refer to page104.<
Low beams
The low beams light up when the light switch is
in position 2 and the ignition is on.
Automatic headlamp control
In switch position3, the system activates the
low beams and switches them on or off in
response to changes in ambient light condi-
tions, for instance, in a tunnel, at dawn and dusk
and in case of precipitation. Adaptive Head
Light
* is active. The LED next to the symbol is
illuminated when the low beams are on.
You can activate the daytime running lamps,
refer to page103. In the situations named
above, the system then automatically switches
over to the low beams.
A blue sky with the sun low on the horizon can
cause the lights to be switched on.
The low beams remain on independent of
the ambient lighting conditions when you
switch on the fog lamps.<
The automatic headlamp control cannot
serve as a substitute for your personal
judgment in determining when the lamps
should be switched on in response to ambient
lighting conditions. For example, the sensors
cannot detect fog of hazy weather. To avoid
safety risks, you should always switch on the
low beams manually under these conditions.<
Welcome lamps
If you leave the light switch in position2 or 3
when parking the vehicle, then when you unlock
the vehicle, the parking lamps and interior light-
ing remain illuminated for a brief time.
Activating/deactivating welcome
lamps
iDrive, for operating principle refer to page16.
1.Press the button.
This opens the start menu.
2.Press the controller to open the menu.
3.Select "Settings" and press the controller.
4.Select "Vehicle / Tires" and press the con-
troller.
Page 105 of 264
Controls
103Reference
At a glance
Driving tips
Communications
Navigation
Entertainment
Mobility
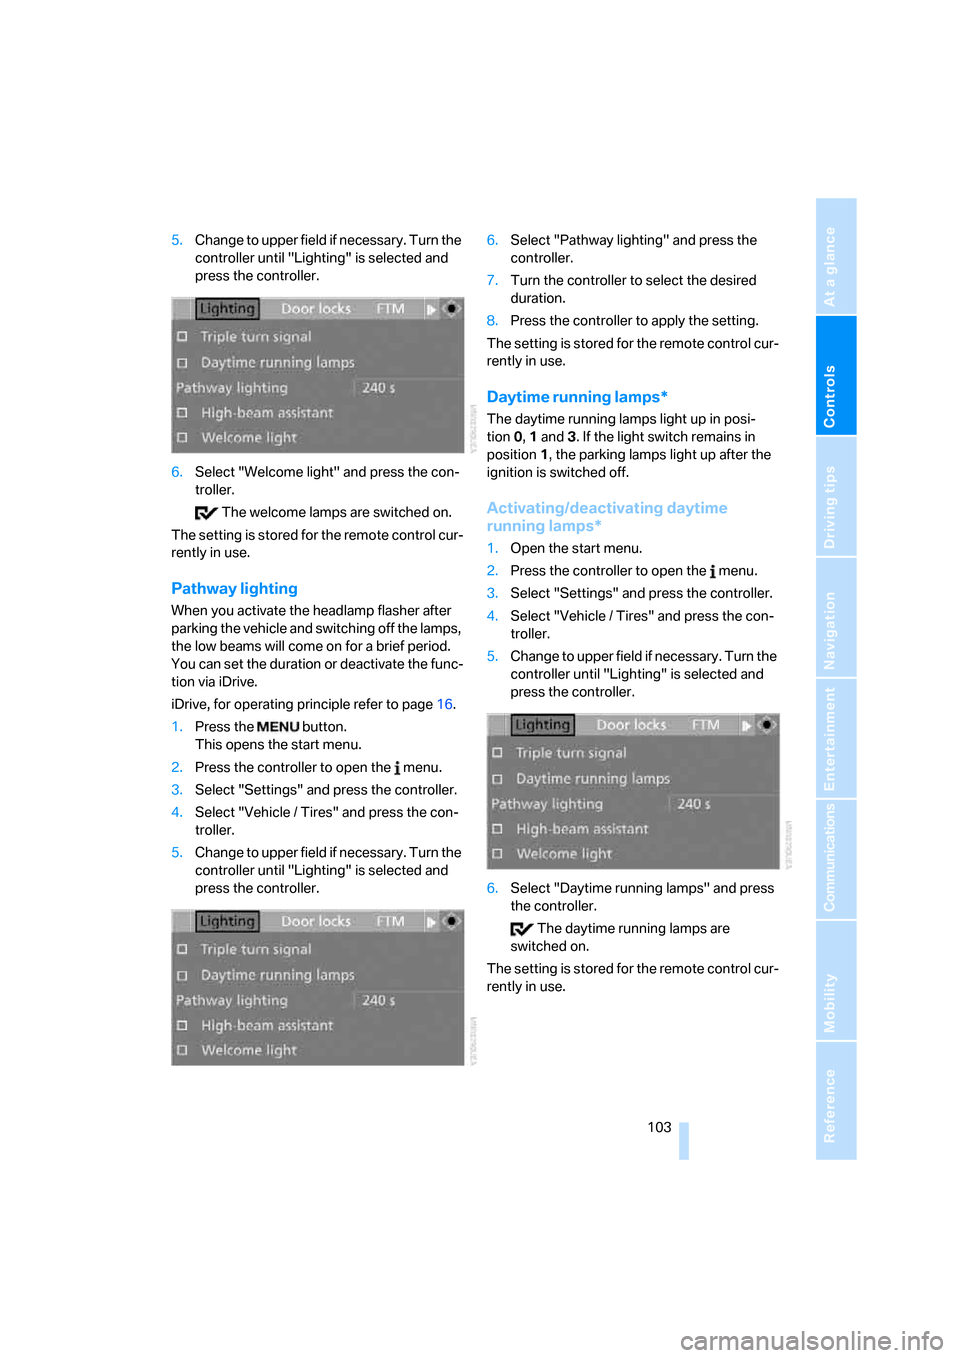
5.Change to upper field if necessary. Turn the
controller until "Lighting" is selected and
press the controller.
6.Select "Welcome light" and press the con-
troller.
The welcome lamps are switched on.
The setting is stored for the remote control cur-
rently in use.
Pathway lighting
When you activate the headlamp flasher after
parking the vehicle and switching off the lamps,
the low beams will come on for a brief period.
You can set the duration or deactivate the func-
tion via iDrive.
iDrive, for operating principle refer to page16.
1.Press the button.
This opens the start menu.
2.Press the controller to open the menu.
3.Select "Settings" and press the controller.
4.Select "Vehicle / Tires" and press the con-
troller.
5.Change to upper field if necessary. Turn the
controller until "Lighting" is selected and
press the controller.6.Select "Pathway lighting" and press the
controller.
7.Turn the controller to select the desired
duration.
8.Press the controller to apply the setting.
The setting is stored for the remote control cur-
rently in use.
Daytime running lamps*
The daytime running lamps light up in posi-
tion0, 1 and 3. If the light switch remains in
position1, the parking lamps light up after the
ignition is switched off.
Activating/deactivating daytime
running lamps*
1.Open the start menu.
2.Press the controller to open the menu.
3.Select "Settings" and press the controller.
4.Select "Vehicle / Tires" and press the con-
troller.
5.Change to upper field if necessary. Turn the
controller until "Lighting" is selected and
press the controller.
6.Select "Daytime running lamps" and press
the controller.
The daytime running lamps are
switched on.
The setting is stored for the remote control cur-
rently in use.
Page 137 of 264
Navigation
Driving tips
135Reference
At a glance
Controls
Communications
Entertainment
Mobility
Selecting country
1.Select "State / Province" or the displayed
country and press the controller.
The list of available countries appears on
the display.
2.Select the country of destination and press
the controller.
In order to be able to start the destination guid-
ance, at least the town/city of the destination or
its zip code must be entered.
Entering destination via town/city
name
1.Select "Town / City" or the displayed town/
city and press the controller.
2.Select the first letter and press the control-
ler.
A list of all towns/cities starting with this let-
ter appears on the Control Display.
3.To delete the letter entered if necessary:
>Delete individual numbers or letters:
Move the controller toward the right to
select and press the controller.
>Delete all digits or letters:
Move the controller toward the right to
select and press the controller
longer.4.Enter additional letters if necessary.
The list gradually grows smaller each time
you enter a new letter.
>Enter a blank space if necessary:
Select the symbol and press the con-
troller.
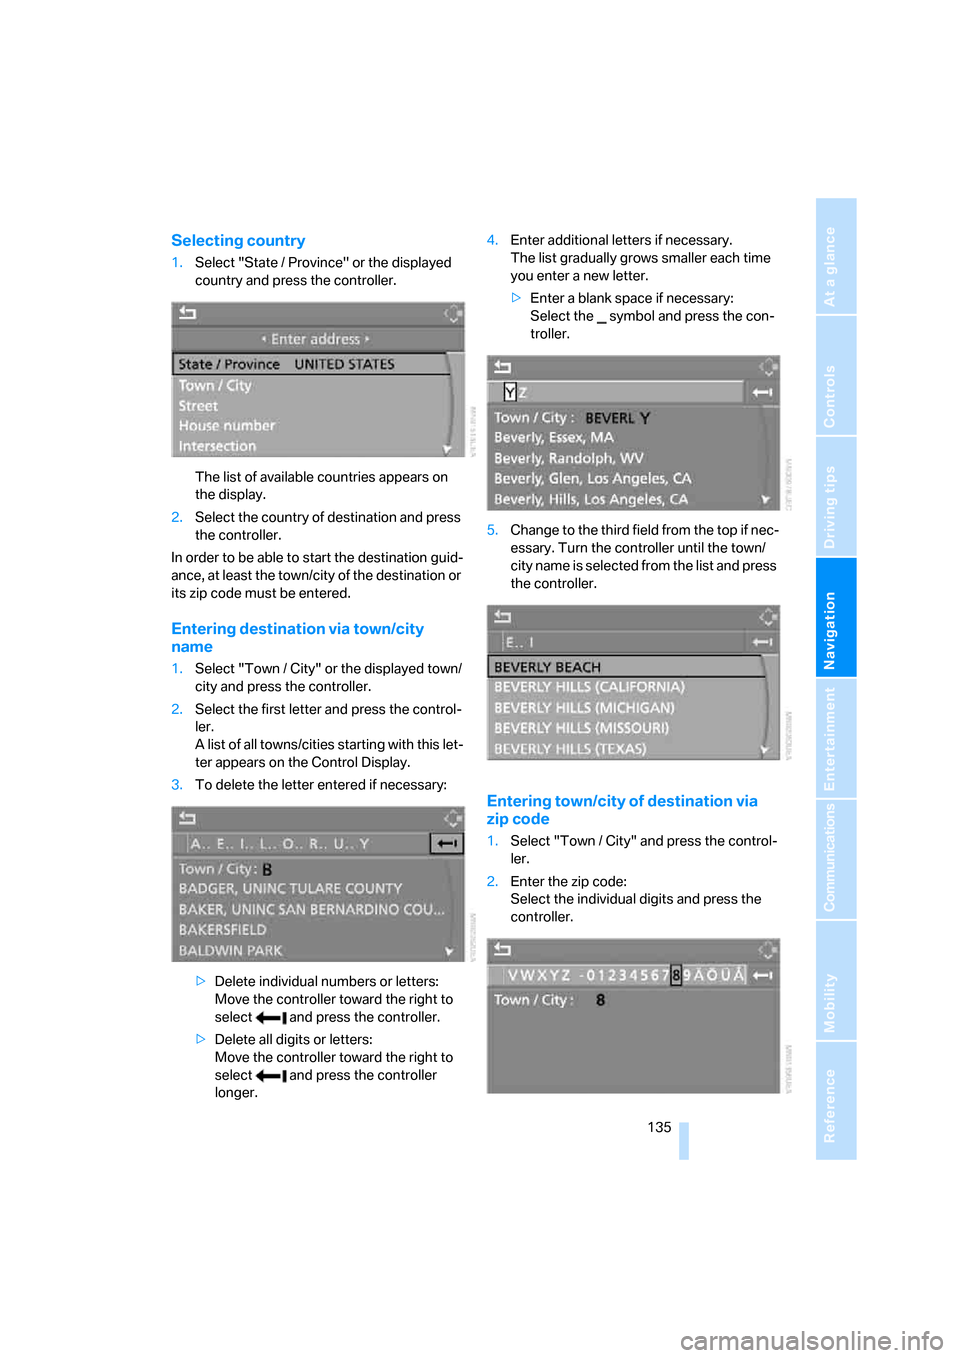
5.Change to the third field from the top if nec-
essary. Turn the controller until the town/
city name is selected from the list and press
the controller.
Entering town/city of destination via
zip code
1.Select "Town / City" and press the control-
ler.
2.Enter the zip code:
Select the individual digits and press the
controller.
Page 139 of 264
Navigation
Driving tips
137Reference
At a glance
Controls
Communications
Entertainment
Mobility
Entering house number
All house numbers stored for the street on the
navigation DVD can be entered.
1.Select "House number" and press the con-
troller.
2.Enter the house number:
Select the individual digits and press the
controller.
3.Change into the third field from the top.
Turn the controller until the house number
is selected and press the controller.
Starting destination guidance with
manual destination entry
>Select "Start guidance" and press the con-
troller.
Destination guidance starts immediately.
>If destination guidance is not to be started
immediately:
Select "Add to destination list" and press
the controller.
The destination is stored in the destination
list, refer to page141.
Entering destination via
voice*
You can enter a desired destination via the
voice command system. When entering the
destination, it is possible to change between
voice command and iDrive at any time. Reacti-
vate the voice command function for this pur-
pose if necessary.
With {Options} you can have the possible
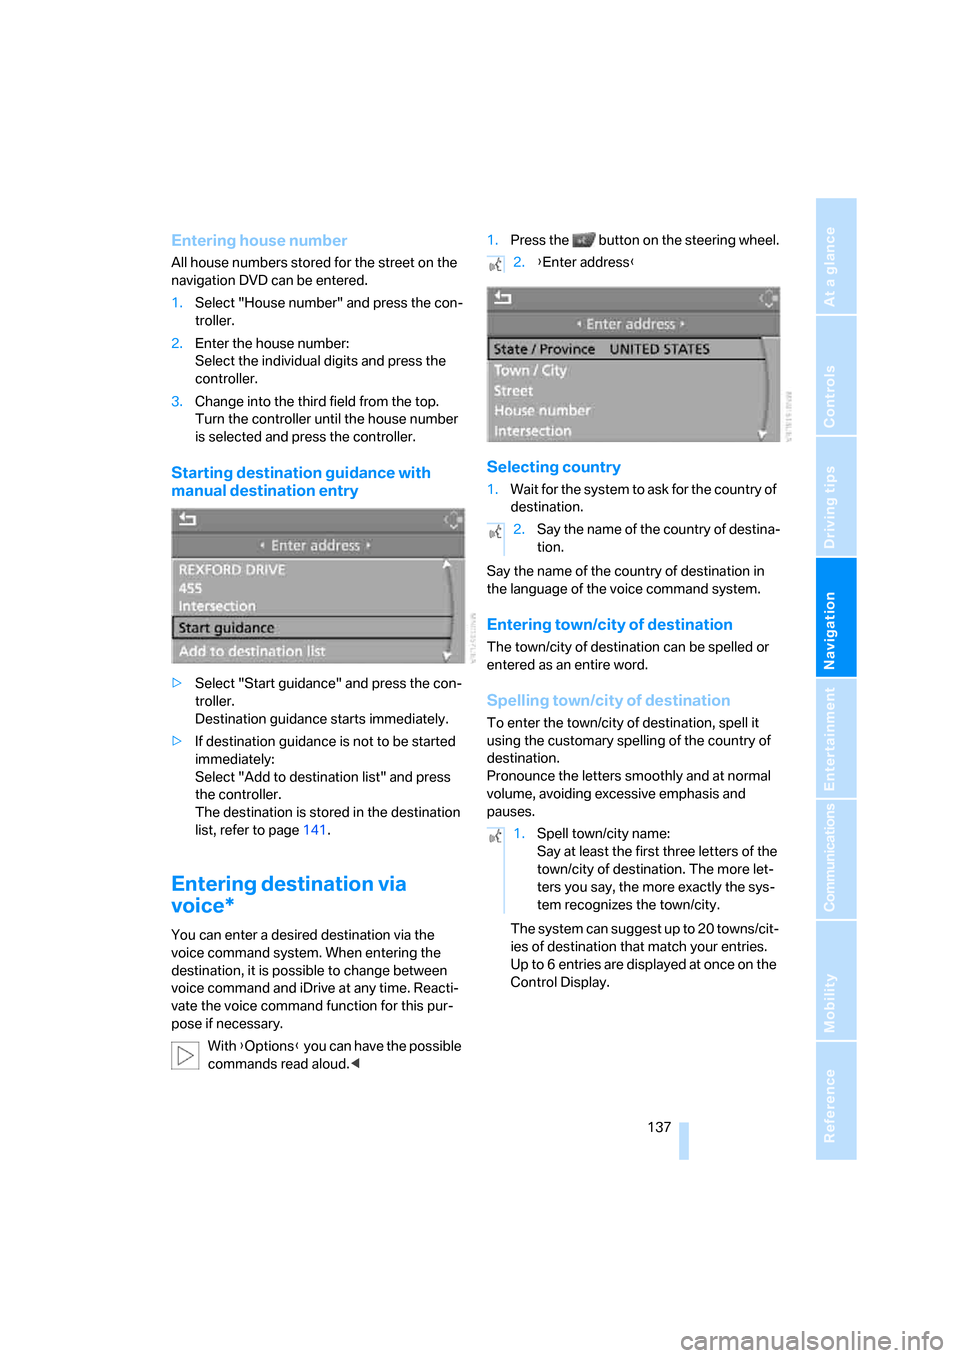
commands read aloud.<1.Press the button on the steering wheel.
Selecting country
1.Wait for the system to ask for the country of
destination.
Say the name of the country of destination in
the language of the voice command system.
Entering town/city of destination
The town/city of destination can be spelled or
entered as an entire word.
Spelling town/city of destination
To enter the town/city of destination, spell it
using the customary spelling of the country of
destination.
Pronounce the letters smoothly and at normal
volume, avoiding excessive emphasis and
pauses.
The system can suggest up to 20 towns/cit-
ies of destination that match your entries.
Up to 6 entries are displayed at once on the
Control Display.
2.{Enter address}
2.Say the name of the country of destina-
tion.
1.Spell town/city name:
Say at least the first three letters of the
town/city of destination. The more let-
ters you say, the more exactly the sys-
tem recognizes the town/city.
Page 146 of 264
Destination entry
144
Storing home address
You can store your current position or the cur-
rent destination as a home address in the
address book. This entry is in the second posi-
tion in the address book.
1.Select "Address book" and press the con-
troller.
2.Change into the third field from the top.
Turn the controller until "Home address" is
selected and press the controller.
3.Select "Use current location as address", or
"Save current destination" during the desti-
nation guidance, and press the controller.
4.Select "Store in address book" and press
the controller.
Adopting home address as destination
1.Select "Home address" and press the con-
troller.
2.Select "Start guidance" and press the con-
troller.
Changing home address
1.Select "Home address" and press the con-
troller.
2.Select "Edit address" and press the con-
troller. For operation, refer to Entering a
destination manually, page134.
Selecting route
You can influence the calculated route by
choosing certain route criteria. You can change
the route criteria as often as you like when
entering the destination and whenever the des-
tination guidance is active.
The route is planned according to fixed rules,
taking the road type into account, e.g. whether
it involves freeways or winding roads. The road
types are stored on the navigation DVD. As a
result, the routes recommended by the naviga-
tion system may not always be the same ones
that you would choose based on personal expe-
rience.
Changing route criteria
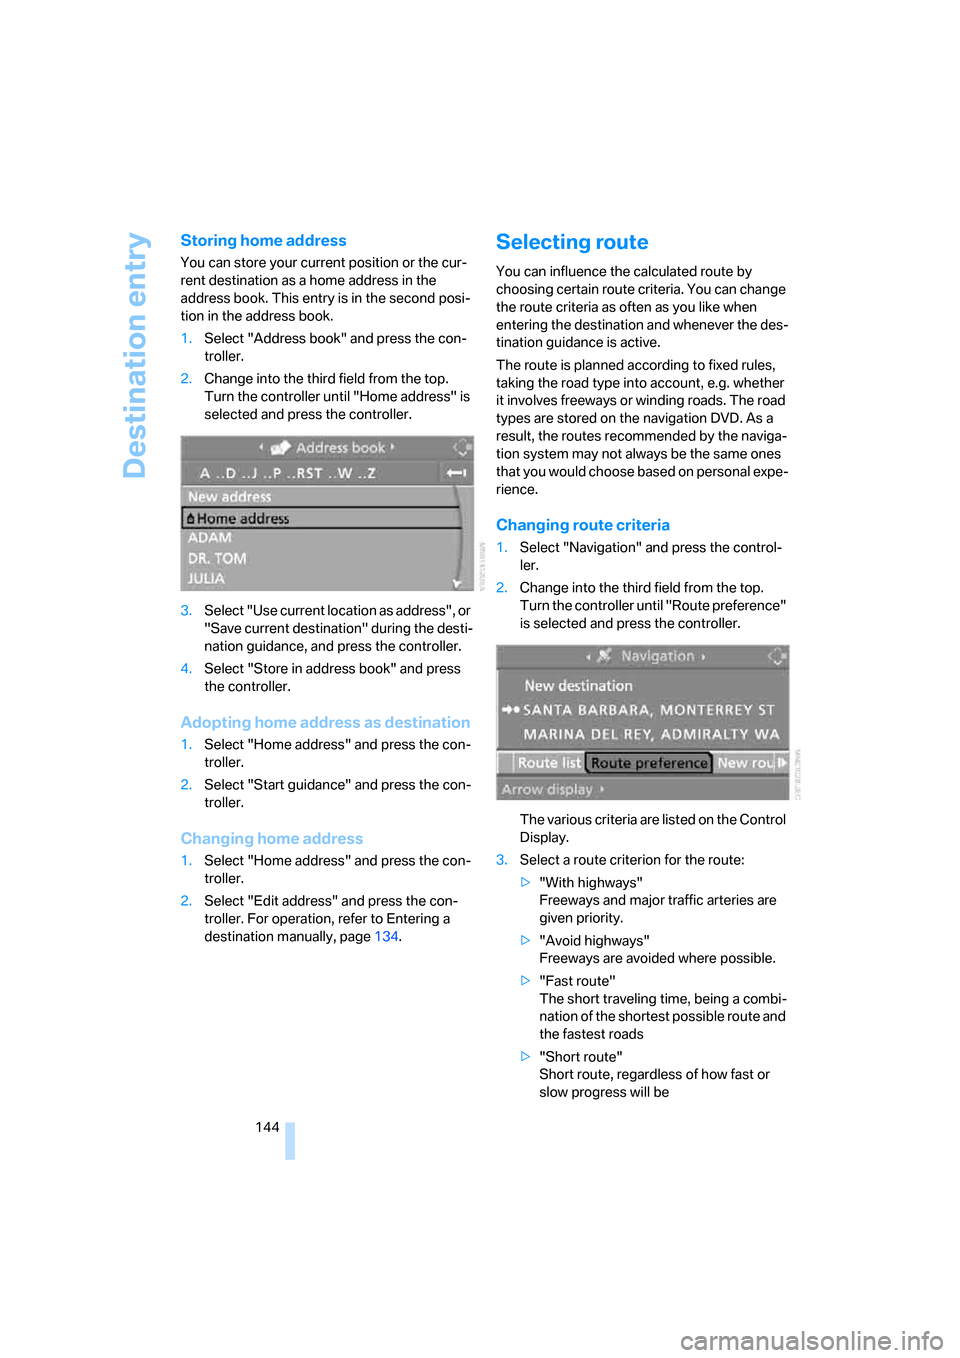
1.Select "Navigation" and press the control-
ler.
2.Change into the third field from the top.
Turn the controller until "Route preference"
is selected and press the controller.
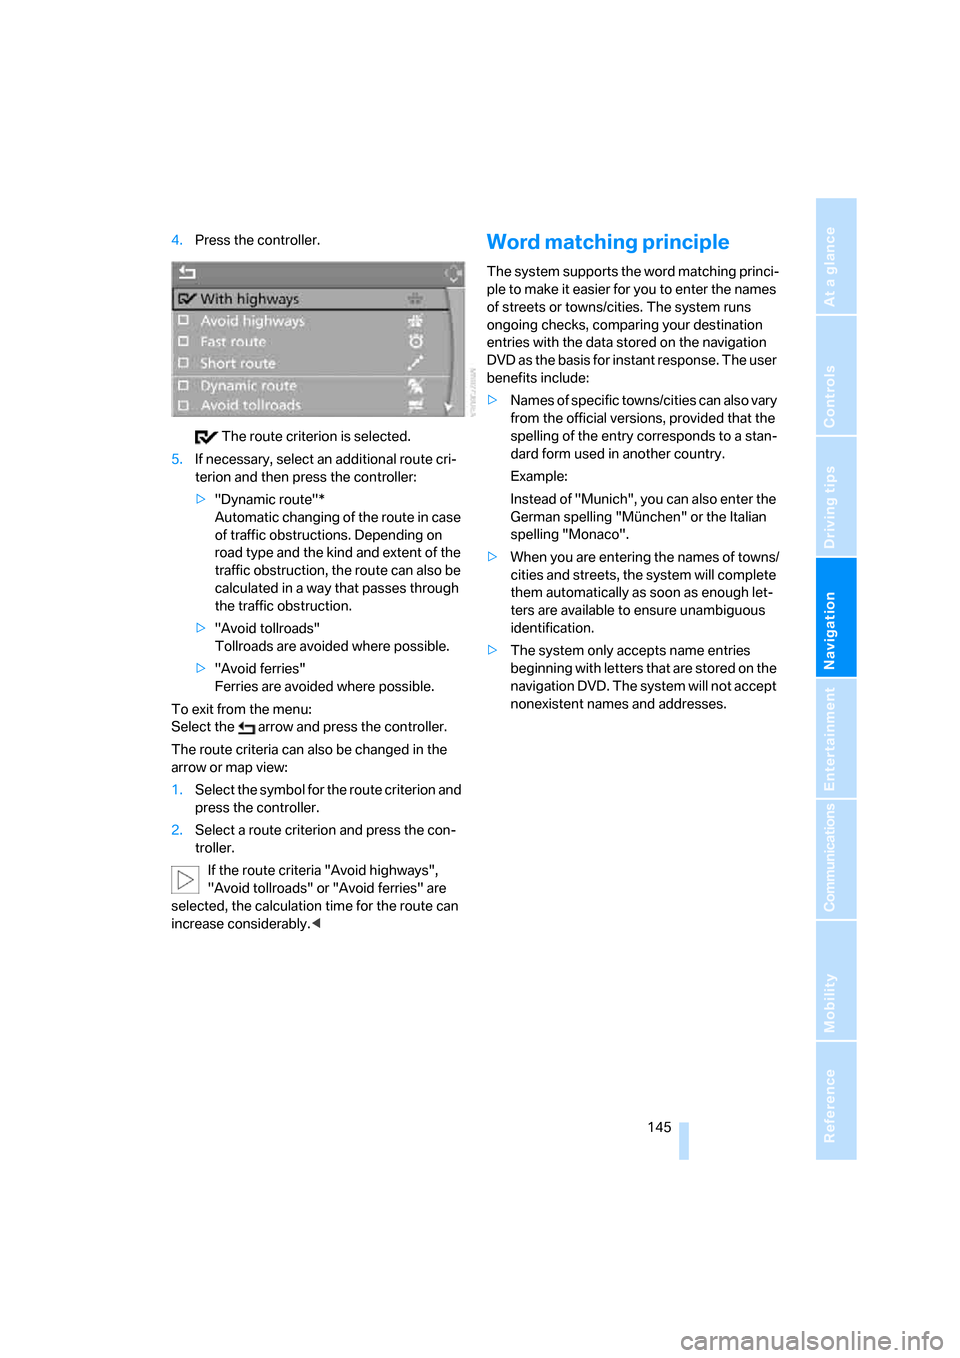
The various criteria are listed on the Control
Display.
3.Select a route criterion for the route:
>"With highways"
Freeways and major traffic arteries are
given priority.
>"Avoid highways"
Freeways are avoided where possible.
>"Fast route"
The short traveling time, being a combi-
nation of the shortest possible route and
the fastest roads
>"Short route"
Short route, regardless of how fast or
slow progress will be
Page 147 of 264
Navigation
Driving tips
145Reference
At a glance
Controls
Communications
Entertainment
Mobility
4.Press the controller.
The route criterion is selected.
5.If necessary, select an additional route cri-
terion and then press the controller:
>"Dynamic route"*
Automatic changing of the route in case
of traffic obstructions. Depending on
road type and the kind and extent of the
traffic obstruction, the route can also be
calculated in a way that passes through
the traffic obstruction.
>"Avoid tollroads"
Tollroads are avoided where possible.
>"Avoid ferries"
Ferries are avoided where possible.
To exit from the menu:
Select the arrow and press the controller.
The route criteria can also be changed in the
arrow or map view:
1.Select the symbol for the route criterion and
press the controller.
2.Select a route criterion and press the con-
troller.
If the route criteria "Avoid highways",
"Avoid tollroads" or "Avoid ferries" are
selected, the calculation time for the route can
increase considerably.
ple to make it easier for you to enter the names
of streets or towns/cities. The system runs
ongoing checks, comparing your destination
entries with the data stored on the navigation
DVD as the basis for instant response. The user
benefits include:
>Names of specific towns/cities can also vary
from the official versions, provided that the
spelling of the entry corresponds to a stan-
dard form used in another country.
Example:
Instead of "Munich", you can also enter the
German spelling "München" or the Italian
spelling "Monaco".
>When you are entering the names of towns/
cities and streets, the system will complete
them automatically as soon as enough let-
ters are available to ensure unambiguous
identification.
>The system only accepts name entries
beginning with letters that are stored on the
navigation DVD. The system will not accept
nonexistent names and addresses.
Page 148 of 264
Destination guidance
146
Destination guidance
Starting destination
guidance
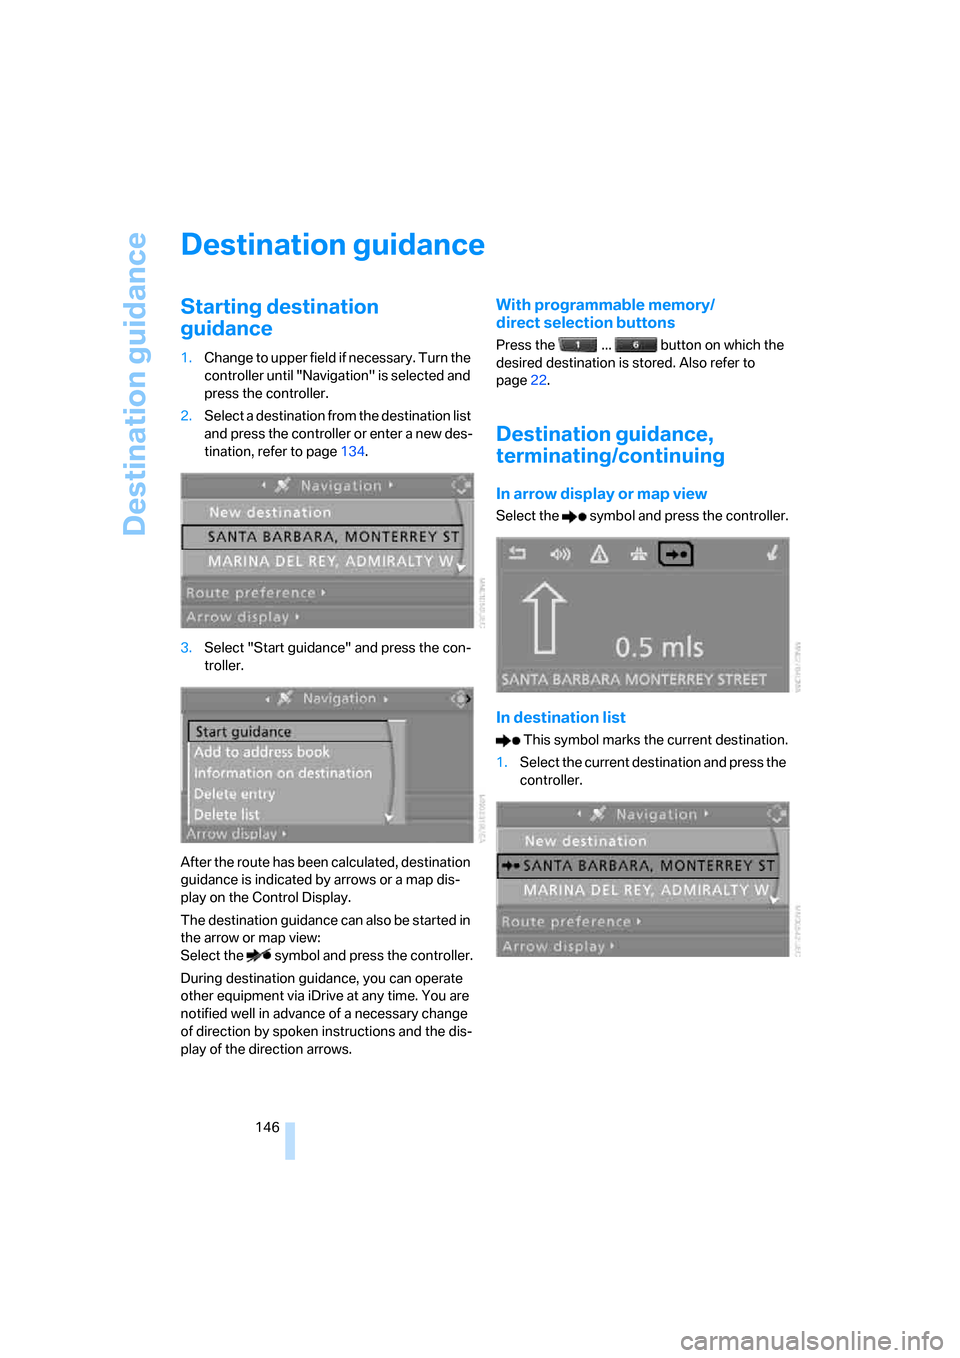
1.Change to upper field if necessary. Turn the
controller until "Navigation" is selected and
press the controller.
2.Select a destination from the destination list
and press the controller or enter a new des-
tination, refer to page134.
3.Select "Start guidance" and press the con-
troller.
After the route has been calculated, destination
guidance is indicated by arrows or a map dis-
play on the Control Display.
The destination guidance can also be started in
the arrow or map view:
Select the symbol and press the controller.
During destination guidance, you can operate
other equipment via iDrive at any time. You are
notified well in advance of a necessary change
of direction by spoken instructions and the dis-
play of the direction arrows.
With programmable memory/
direct selection buttons
Press the ... button on which the
desired destination is stored. Also refer to
page22.
Destination guidance,
terminating/continuing
In arrow display or map view
Select the symbol and press the controller.
In destination list
This symbol marks the current destination.
1.Select the current destination and press the
controller.
Page 149 of 264
Navigation
Driving tips
147Reference
At a glance
Controls
Communications
Entertainment
Mobility
2.Select "Stop guidance" and press the con-
troller.
If the destination was not reached before the
end of the last trip, upon restarting you will
see the question:
"Continue guidance to destination?".
The destination guidance starts automatically
after a short time.
To start destination guidance immediately:
Select "Yes" and press the controller.
Displaying route
You have the option of displaying various views
of the route during destination guidance.
From another menu, you can change
directly to the screen last displayed,
refer to Comfort opening of menu items,
page18.<
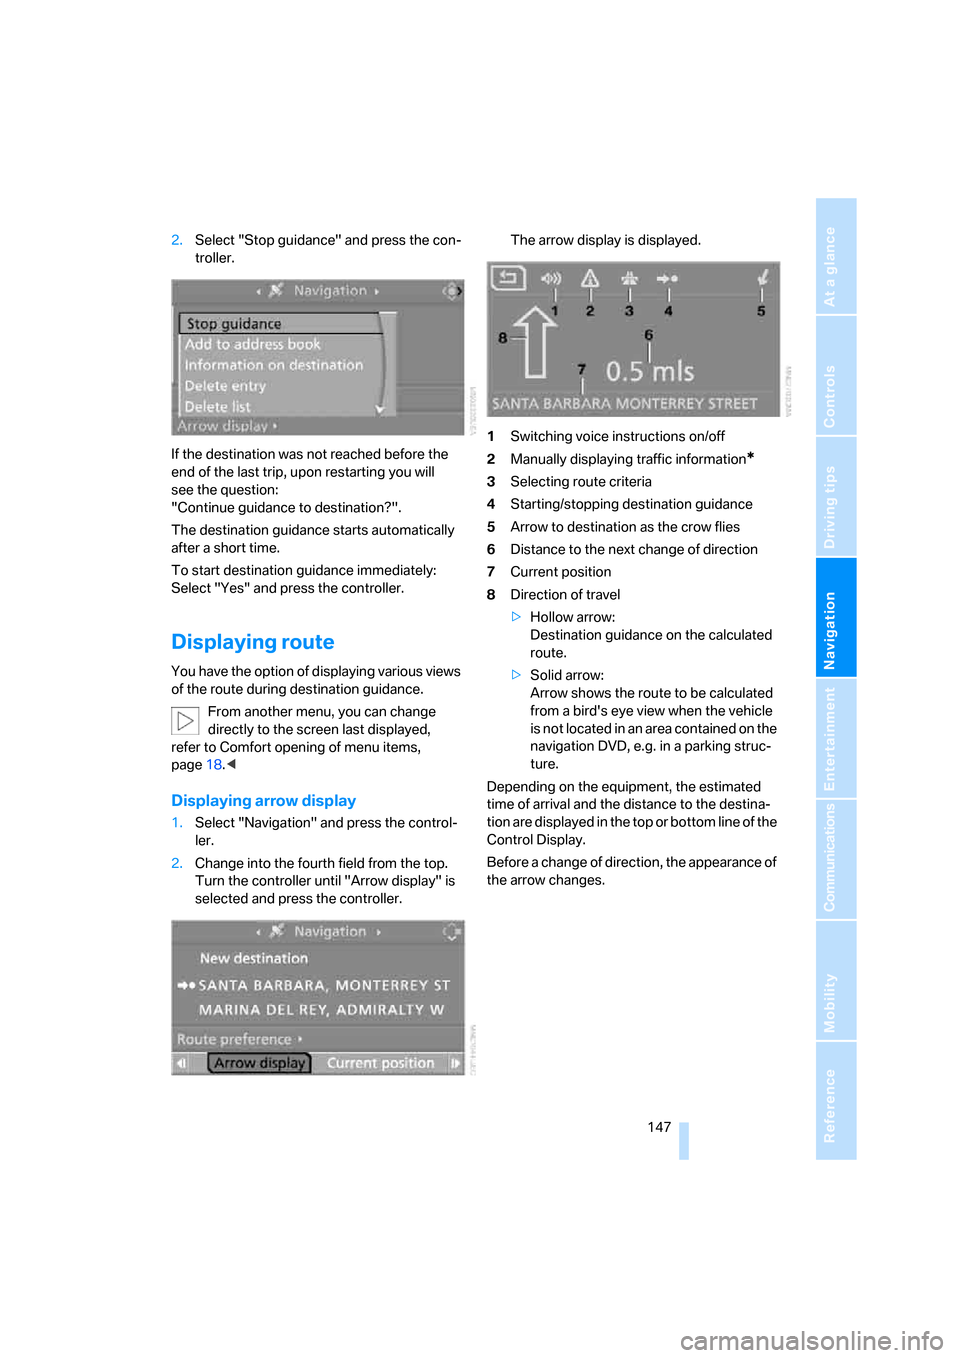
Displaying arrow display
1.Select "Navigation" and press the control-
ler.
2.Change into the fourth field from the top.
Turn the controller until "Arrow display" is
selected and press the controller.The arrow display is displayed.
1Switching voice instructions on/off
2Manually displaying traffic information
*
3Selecting route criteria
4Starting/stopping destination guidance
5Arrow to destination as the crow flies
6Distance to the next change of direction
7Current position
8Direction of travel
>Hollow arrow:
Destination guidance on the calculated
route.
>Solid arrow:
Arrow shows the route to be calculated
from a bird's eye view when the vehicle
is not located in an area contained on the
navigation DVD, e.g. in a parking struc-
ture.
Depending on the equipment, the estimated
time of arrival and the distance to the destina-
tion are displayed in the top or bottom line of the
Control Display.
Before a change of direction, the appearance of
the arrow changes.