Page 173 of 264
Navigation
Entertainment
Driving tips
171Reference
At a glance
Controls
Communications
Mobility
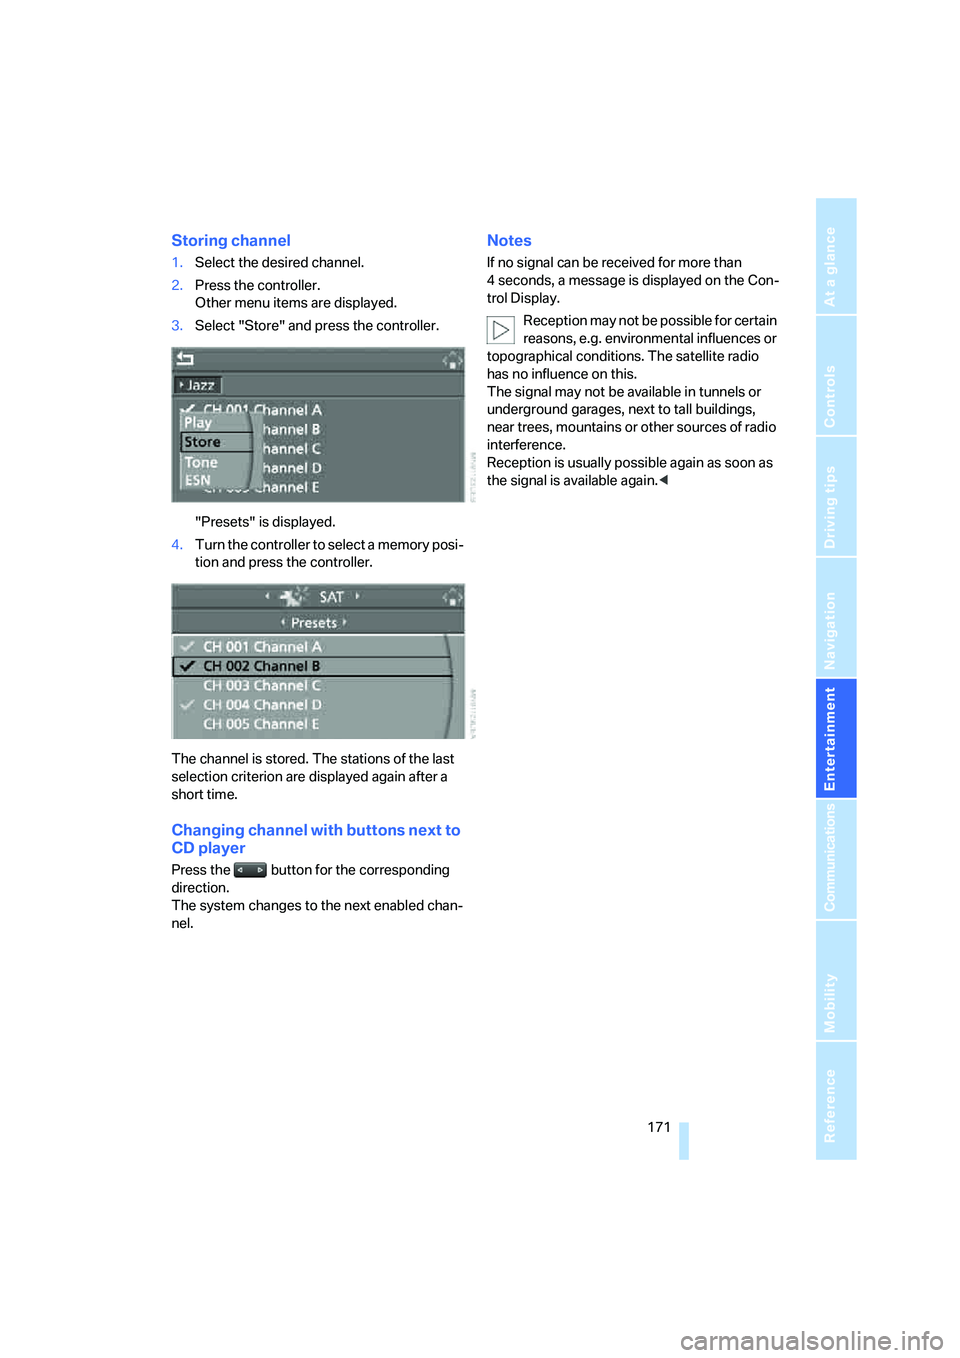
Storing channel
1.Select the desired channel.
2.Press the controller.
Other menu items are displayed.
3.Select "Store" and press the controller.
"Presets" is displayed.
4.Turn the controller to select a memory posi-
tion and press the controller.
The channel is stored. The stations of the last
selection criterion are displayed again after a
short time.
Changing channel with buttons next to
CD player
Press the button for the corresponding
direction.
The system changes to the next enabled chan-
nel.
Notes
If no signal can be received for more than
4 seconds, a message is displayed on the Con-
trol Display.
Reception may not be possible for certain
reasons, e.g. environmental influences or
topographical conditions. The satellite radio
has no influence on this.
The signal may not be available in tunnels or
underground garages, next to tall buildings,
near trees, mountains or other sources of radio
interference.
Reception is usually possible again as soon as
the signal is available again.<
Page 174 of 264
CD player and CD changer
172
CD player and CD changer
Listening to CDs
Compressed audio files*
CDs with compressed audio files, i.e. MP3,
can be played by the CD player, but not by the
CD changer.
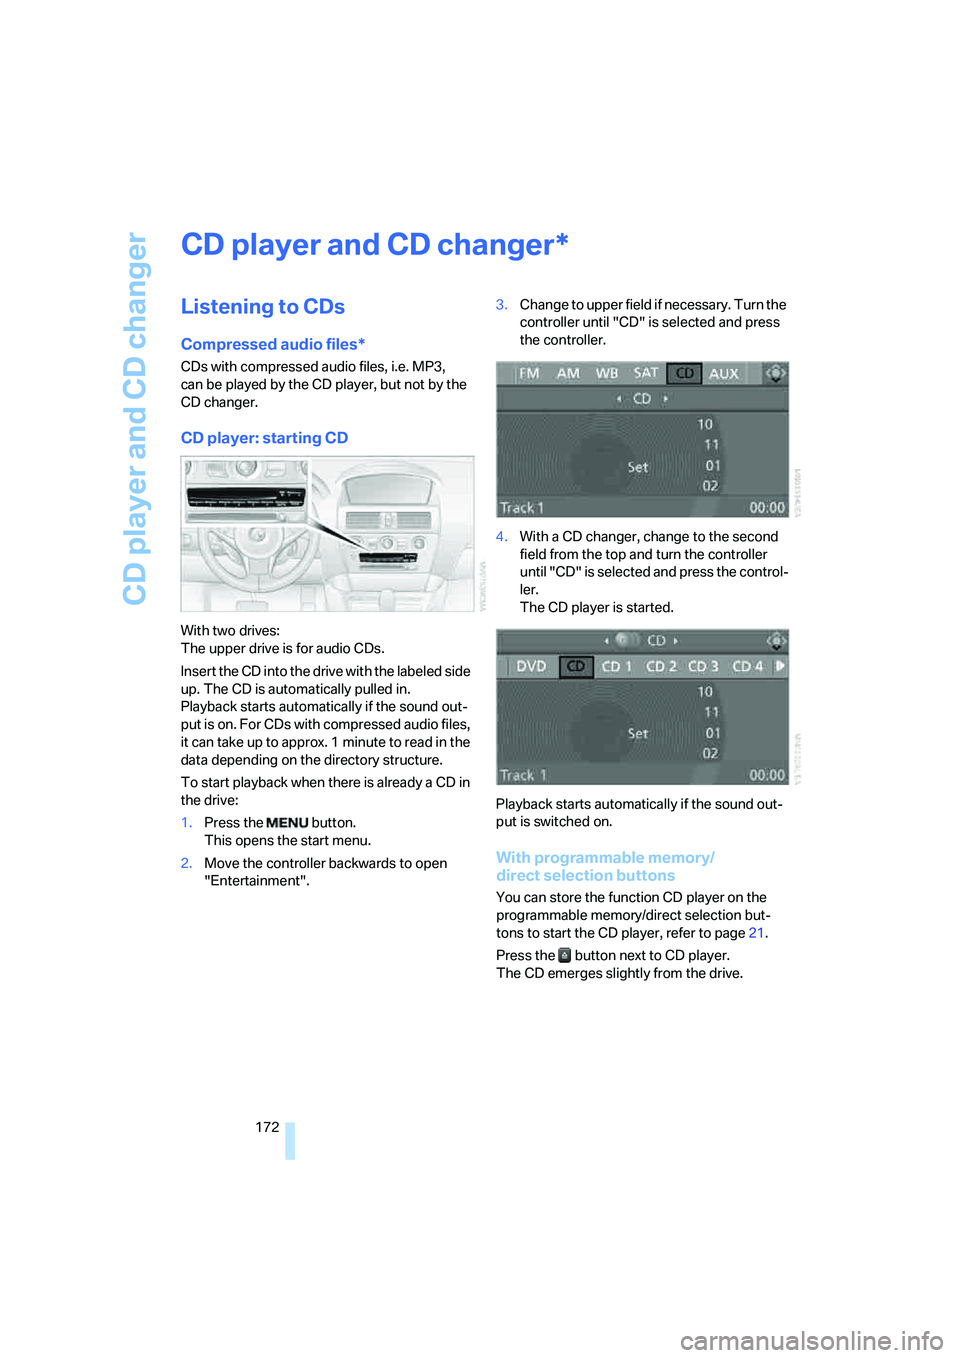
CD player: starting CD
With two drives:
The upper drive is for audio CDs.
Insert the CD into the drive with the labeled side
up. The CD is automatically pulled in.
Playback starts automatically if the sound out-
put is on. For CDs with compressed audio files,
it can take up to approx. 1 minute to read in the
data depending on the directory structure.
To start playback when there is already a CD in
the drive:
1.Press the button.
This opens the start menu.
2.Move the controller backwards to open
"Entertainment".3.Change to upper field if necessary. Turn the
controller until "CD" is selected and press
the controller.
4.With a CD changer, change to the second
field from the top and turn the controller
until "CD" is selected and press the control-
ler.
The CD player is started.
Playback starts automatically if the sound out-
put is switched on.
With programmable memory/
direct selection buttons
You can store the function CD player on the
programmable memory/direct selection but-
tons to start the CD player, refer to page21.
Press the button next to CD player.
The CD emerges slightly from the drive.
*
Page 175 of 264
Navigation
Entertainment
Driving tips
173Reference
At a glance
Controls
Communications
Mobility
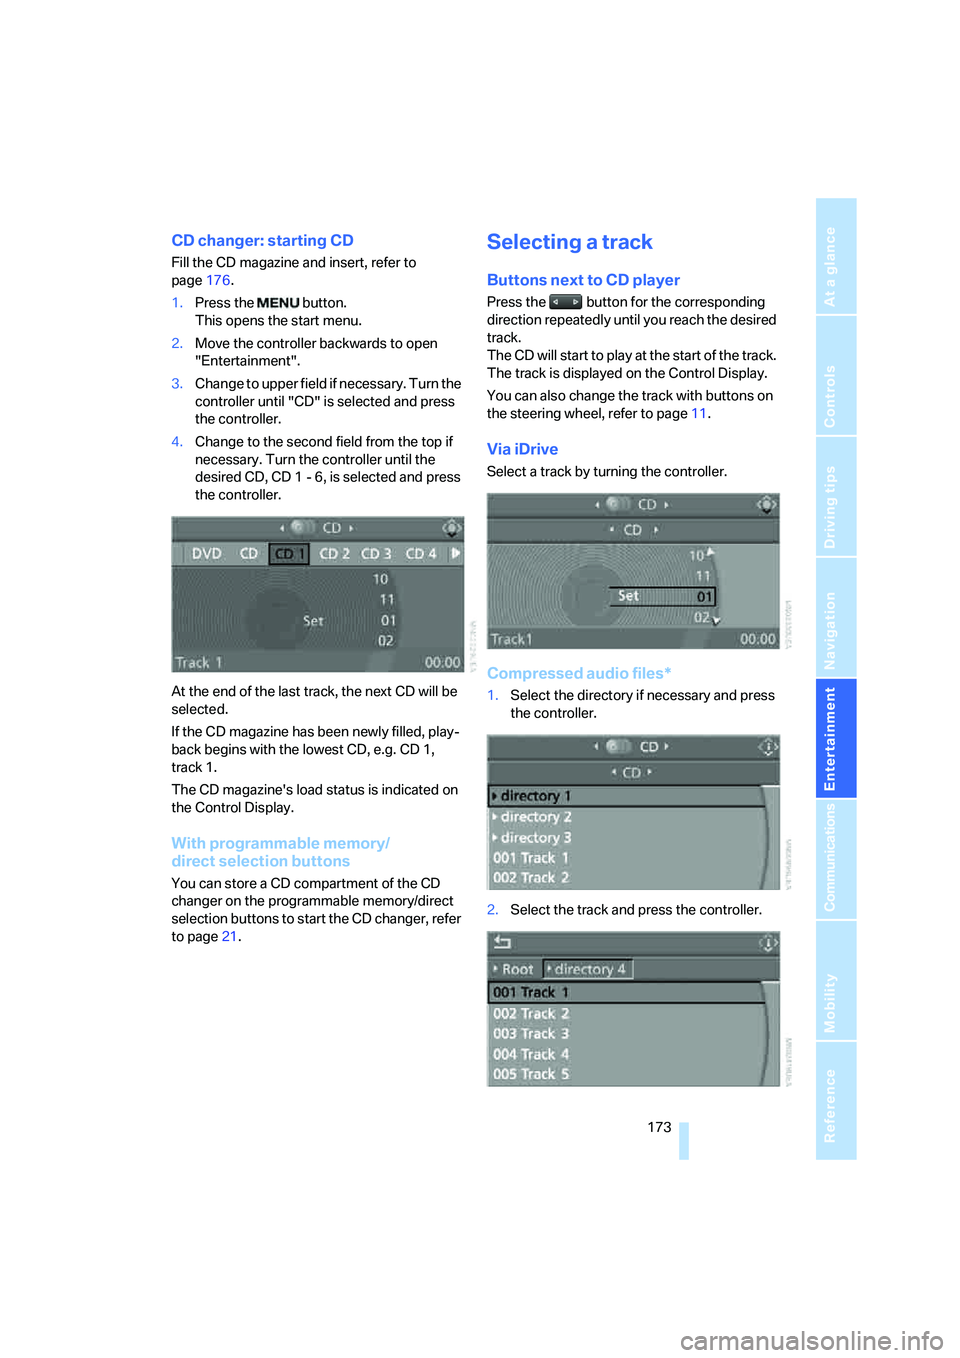
CD changer: starting CD
Fill the CD magazine and insert, refer to
page176.
1.Press the button.
This opens the start menu.
2.Move the controller backwards to open
"Entertainment".
3.Change to upper field if necessary. Turn the
controller until "CD" is selected and press
the controller.
4.Change to the second field from the top if
necessary. Turn the controller until the
desired CD, CD 1 - 6, is selected and press
the controller.
At the end of the last track, the next CD will be
selected.
If the CD magazine has been newly filled, play-
back begins with the lowest CD, e.g. CD 1,
track 1.
The CD magazine's load status is indicated on
the Control Display.
With programmable memory/
direct selection buttons
You can store a CD compartment of the CD
changer on the programmable memory/direct
selection buttons to start the CD changer, refer
to page21.
Selecting a track
Buttons next to CD player
Press the button for the corresponding
direction repeatedly until you reach the desired
track.
The CD will start to play at the start of the track.
The track is displayed on the Control Display.
You can also change the track with buttons on
the steering wheel, refer to page11.
Via iDrive
Select a track by turning the controller.
Compressed audio files*
1.Select the directory if necessary and press
the controller.
2.Select the track and press the controller.
Page 176 of 264
CD player and CD changer
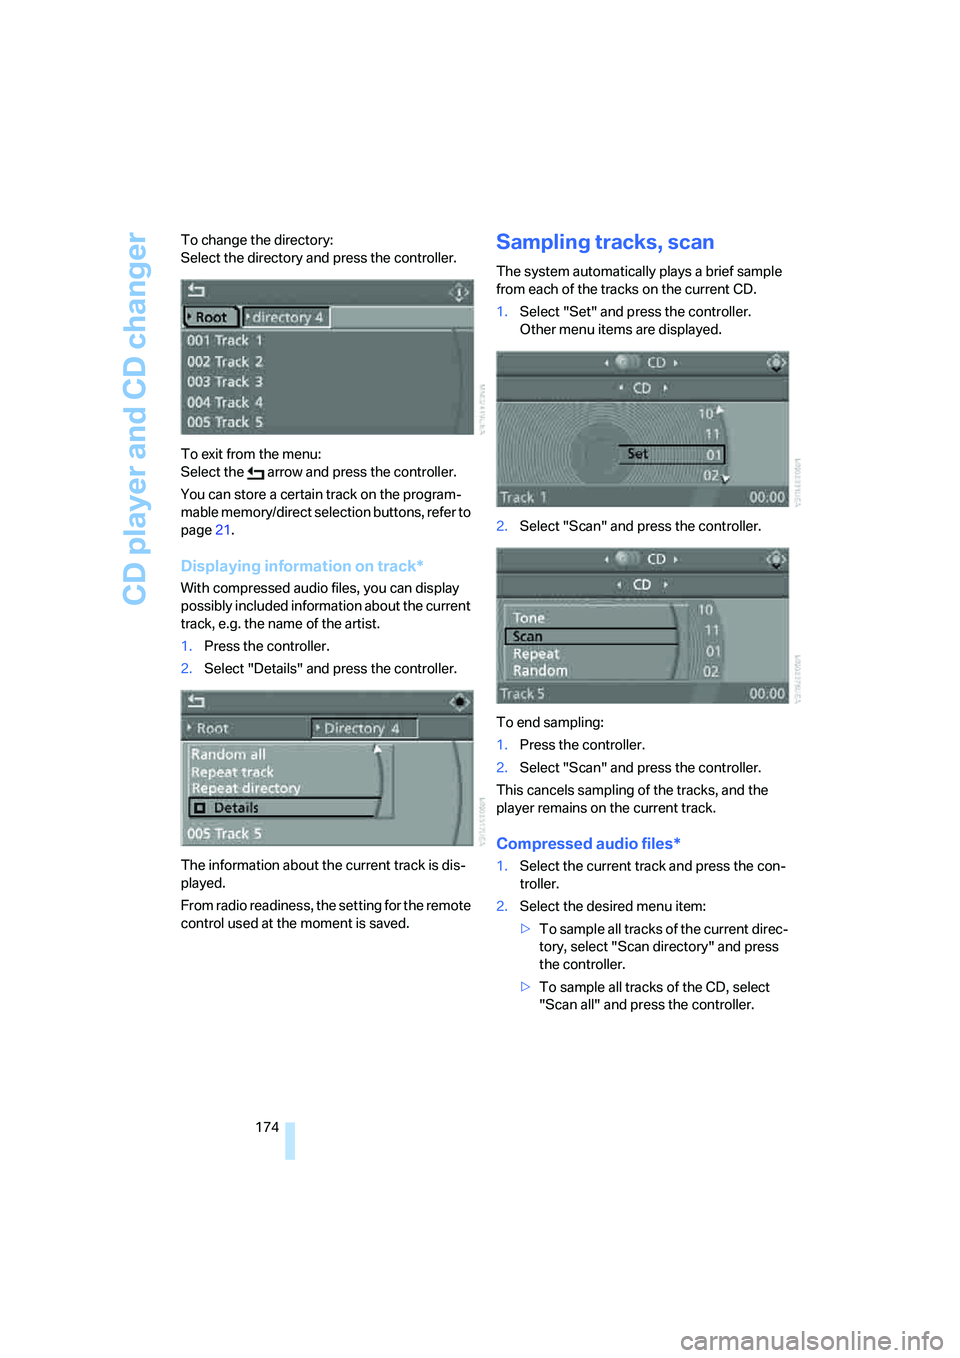
174 To change the directory:
Select the directory and press the controller.
To exit from the menu:
Select the arrow and press the controller.
You can store a certain track on the program-
mable memory/direct selection buttons, refer to
page21.
Displaying information on track*
With compressed audio files, you can display
possibly included information about the current
track, e.g. the name of the artist.
1.Press the controller.
2.Select "Details" and press the controller.
The information about the current track is dis-
played.
From radio readiness, the setting for the remote
control used at the moment is saved.
Sampling tracks, scan
The system automatically plays a brief sample
from each of the tracks on the current CD.
1.Select "Set" and press the controller.
Other menu items are displayed.
2.Select "Scan" and press the controller.
To end sampling:
1.Press the controller.
2.Select "Scan" and press the controller.
This cancels sampling of the tracks, and the
player remains on the current track.
Compressed audio files*
1.Select the current track and press the con-
troller.
2.Select the desired menu item:
>To sample all tracks of the current direc-
tory, select "Scan directory" and press
the controller.
>To sample all tracks of the CD, select
"Scan all" and press the controller.
Page 178 of 264
CD player and CD changer
176 >To play all tracks of the CD in random
order, select "Random all" and press the
controller.
To cancel random mode:
1.Press the controller.
2.Select "Random directory" or "Random all"
and press the controller.
Fast forward/reverse
Buttons next to CD player:
Press and hold the button for the corre-
sponding direction.
CD magazine
The BMW CD changer for six CDs is installed in
the glove compartment.
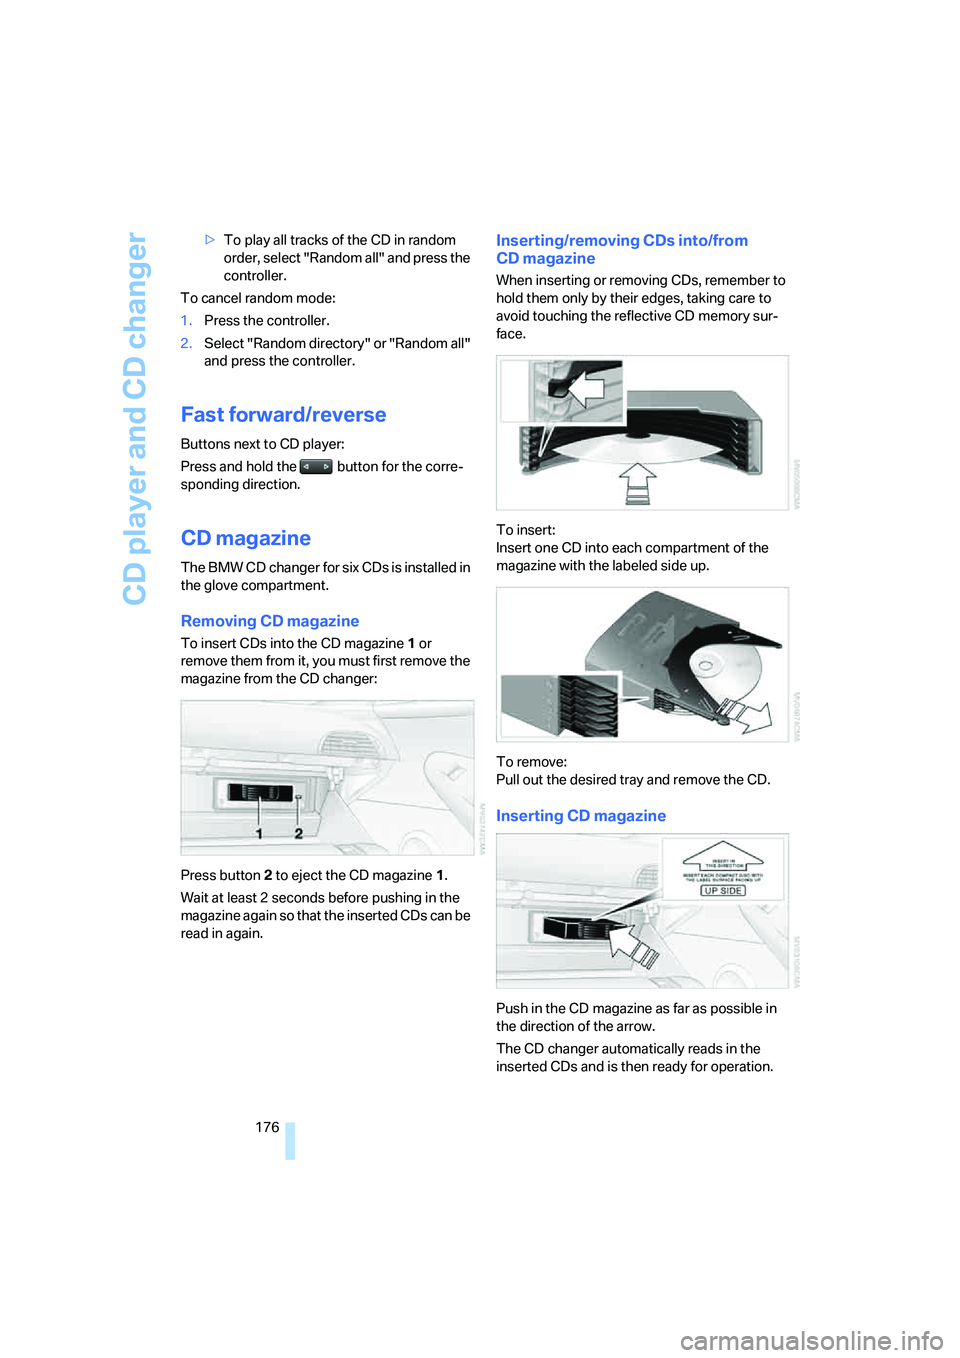
Removing CD magazine
To insert CDs into the CD magazine 1 or
remove them from it, you must first remove the
magazine from the CD changer:
Press button2 to eject the CD magazine1.
Wait at least 2 seconds before pushing in the
magazine again so that the inserted CDs can be
read in again.
Inserting/removing CDs into/from
CD magazine
When inserting or removing CDs, remember to
hold them only by their edges, taking care to
avoid touching the reflective CD memory sur-
face.
To insert:
Insert one CD into each compartment of the
magazine with the labeled side up.
To remove:
Pull out the desired tray and remove the CD.
Inserting CD magazine
Push in the CD magazine as far as possible in
the direction of the arrow.
The CD changer automatically reads in the
inserted CDs and is then ready for operation.
Page 180 of 264
AUX-In connection
178
AUX-In connection
You can connect an external audio device, e.g.
an MP3 player, and play the sound via the vehi-
cle loudspeakers. The sound can be adjusted
via iDrive.
Connecting
For audio playback via the vehicle loudspeak-
ers, connect the headphones or the line-out
connection of the device to the socket1 with a
1/8 in/3,5 mm jack plug.
Starting audio playback
The audio device must be switched on.
1.Press the button.
This opens the start menu.
2.Move the controller backwards to open
"Entertainment".
3.Change to upper field if necessary. Turn the
controller until "AUX" is selected and press
the controller.
4.Select "AUX" and press the controller.
5.Adjust volume and sound if necessary.
With programmable memory/
direct selection buttons
You can save the function audio AUX on the
programmable memory/direct selection but-
tons to start audio playback, refer to page21.
Page 182 of 264
USB/audio interface
180
Starting audio playback
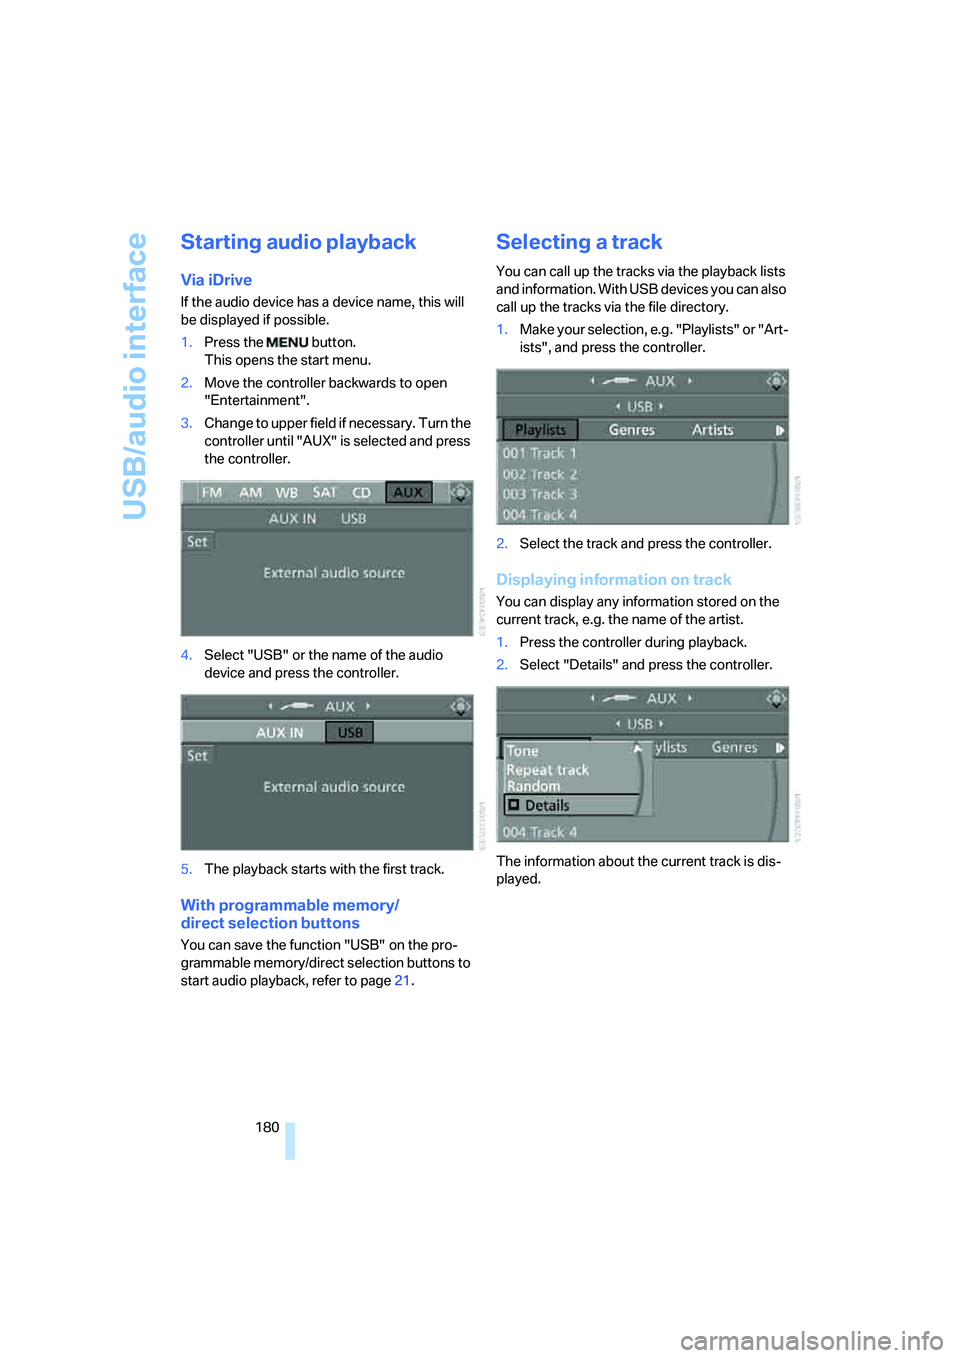
Via iDrive
If the audio device has a device name, this will
be displayed if possible.
1.Press the button.
This opens the start menu.
2.Move the controller backwards to open
"Entertainment".
3.Change to upper field if necessary. Turn the
controller until "AUX" is selected and press
the controller.
4.Select "USB" or the name of the audio
device and press the controller.
5.The playback starts with the first track.
With programmable memory/
direct selection buttons
You can save the function "USB" on the pro-
grammable memory/direct selection buttons to
start audio playback, refer to page21.
Selecting a track
You can call up the tracks via the playback lists
and information. With USB devices you can also
call up the tracks via the file directory.
1.Make your selection, e.g. "Playlists" or "Art-
ists", and press the controller.
2.Select the track and press the controller.
Displaying information on track
You can display any information stored on the
current track, e.g. the name of the artist.
1.Press the controller during playback.
2.Select "Details" and press the controller.
The information about the current track is dis-
played.
Page 183 of 264
Navigation
Entertainment
Driving tips
181Reference
At a glance
Controls
Communications
Mobility
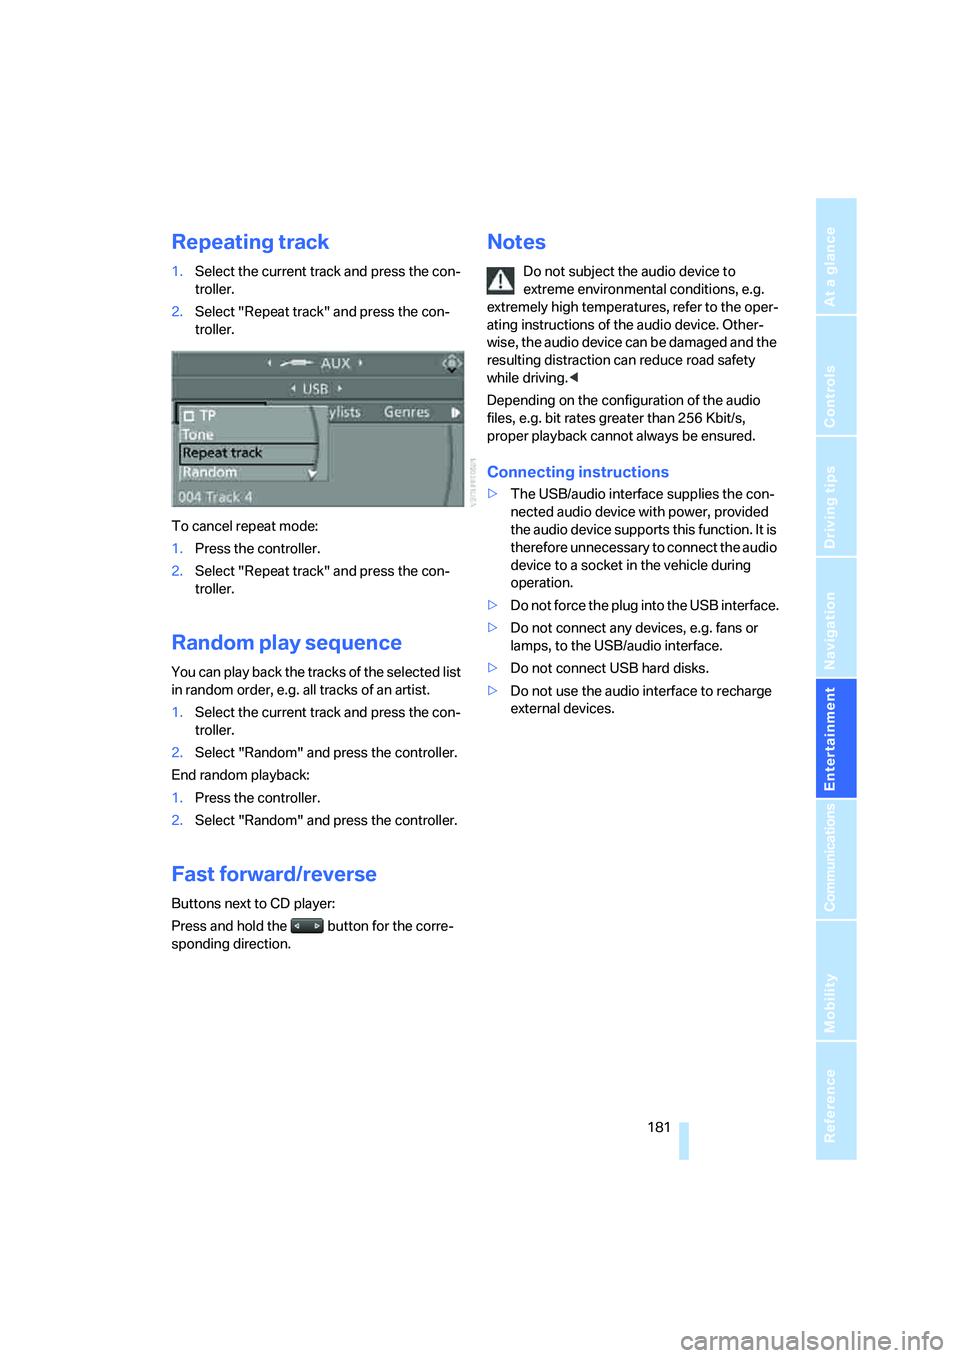
Repeating track
1.Select the current track and press the con-
troller.
2.Select "Repeat track" and press the con-
troller.
To cancel repeat mode:
1.Press the controller.
2.Select "Repeat track" and press the con-
troller.
Random play sequence
You can play back the tracks of the selected list
in random order, e.g. all tracks of an artist.
1.Select the current track and press the con-
troller.
2.Select "Random" and press the controller.
End random playback:
1.Press the controller.
2.Select "Random" and press the controller.
Fast forward/reverse
Buttons next to CD player:
Press and hold the button for the corre-
sponding direction.
Notes
Do not subject the audio device to
extreme environmental conditions, e.g.
extremely high temperatures, refer to the oper-
ating instructions of the audio device. Other-
wise, the audio device can be damaged and the
resulting distraction can reduce road safety
while driving.<
Depending on the configuration of the audio
files, e.g. bit rates greater than 256 Kbit/s,
proper playback cannot always be ensured.
Connecting instructions
>The USB/audio interface supplies the con-
nected audio device with power, provided
the audio device supports this function. It is
therefore unnecessary to connect the audio
device to a socket in the vehicle during
operation.
>Do not force the plug into the USB interface.
>Do not connect any devices, e.g. fans or
lamps, to the USB/audio interface.
>Do not connect USB hard disks.
>Do not use the audio interface to recharge
external devices.