2008 BMW 650I CONVERTIBLE rear entertainment
[x] Cancel search: rear entertainmentPage 17 of 264
At a glance
15Reference
Controls
Driving tips
Communications
Navigation
Entertainment
Mobility
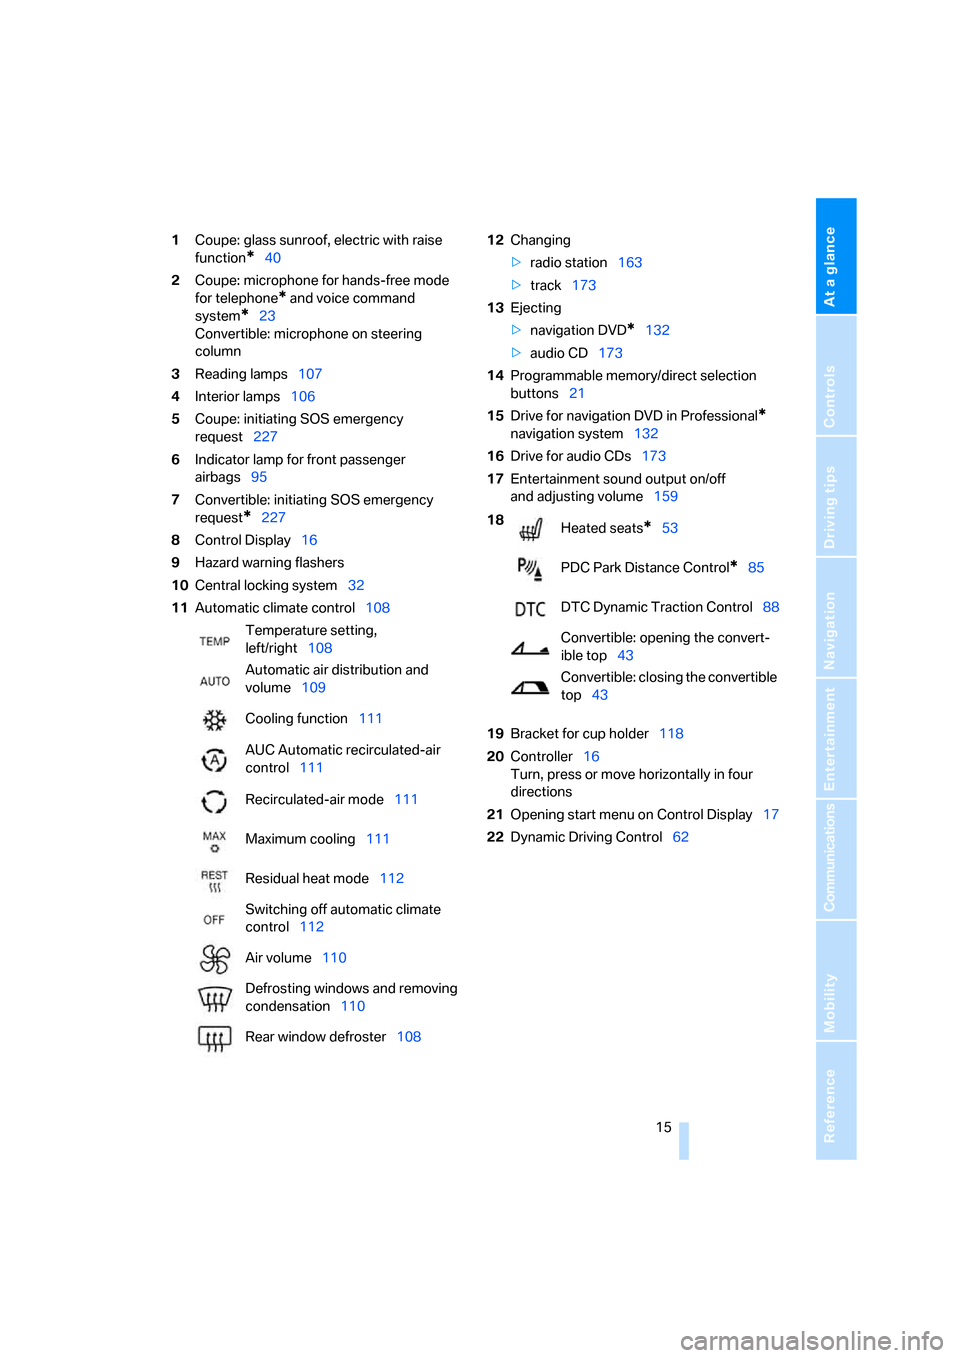
1Coupe: glass sunroof, electric with raise
function
*40
2Coupe: microphone for hands-free mode
for telephone
* and voice command
system
*23
Convertible: microphone on steering
column
3Reading lamps107
4Interior lamps106
5Coupe: initiating SOS emergency
request227
6Indicator lamp
for front passenger
airbags95
7Convertible: initiating SOS emergency
request
*227
8Control Display16
9Hazard warning flashers
10Central locking system32
11Automatic climate control10812Changing
>radio station163
>track173
13Ejecting
>navigation DVD
*132
>audio CD173
14Programmable memory/direct selection
buttons21
15Drive for navigation DVD in Professional
*
navigation system132
16Drive for audio CDs173
17Entertainment sound output on/off
and adjusting volume159
19Bracket for cup holder118
20Controller16
Turn, press or move horizontally in four
directions
21Opening start menu on Control Display17
22Dynamic Driving Control62 Temperature setting,
left/right108
Automatic air distribution and
volume109
Cooling function111
AUC Automatic recirculated-air
control111
Recirculated-air mode111
Maximum cooling111
Residual heat mode112
Switching off automatic climate
control112
Air volume110
Defrosting windows and removing
condensation110
Rear window defroster108
18
Heated seats*53
PDC Park Distance Control
*85
DTC Dynamic Traction Control88
Convertible: opening the convert-
ible top43
Convertible: closing the convertible
top43
Page 25 of 264
At a glance
23Reference
Controls
Driving tips
Communications
Navigation
Entertainment
Mobility
Voice command system
The concept
The voice command system allows you to con-
trol operation of various vehicle systems with-
out taking your hands off the steering wheel.
Individual menu items on the Control Display
can be spoken as commands. This frees you of
having to use the controller.
The voice command system transforms your
spoken commands into control signals for the
selected systems and provides support in the
form of instructions or questions.
The voice command system includes a special
microphone.
The microphone is located:
>Near the interior rearview mirror in the
Coupe, refer to page14
>On the steering column in the Convertible
Prerequisite
In order to enable identification of the com-
mands to be spoken, use iDrive to set the lan-
guage for the voice command system. Setting
iDrive language, refer to page84.
Symbols in Owner's Manual
Voice commands
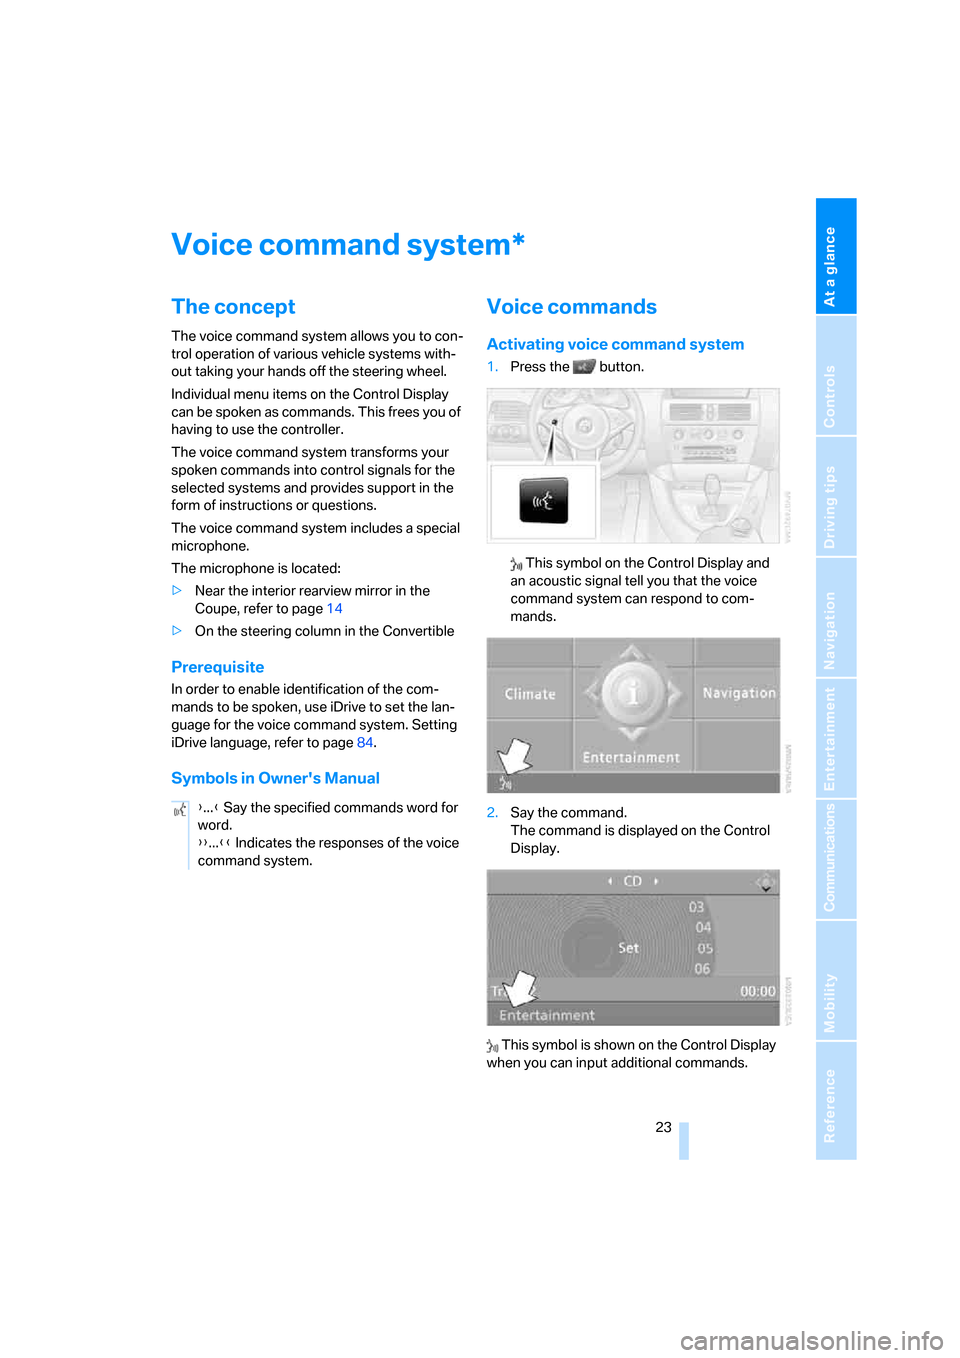
Activating voice command system
1.Press the button.
This symbol on the Control Display and
an acoustic signal tell you that the voice
command system can respond to com-
mands.
2.Say the command.
The command is displayed on the Control
Display.
This symbol is shown on the Control Display
when you can input additional commands.
*
{...} Say the specified commands word for
word.
{{...}} Indicates the responses of the voice
command system.
Page 41 of 264
Controls
39Reference
At a glance
Driving tips
Communications
Navigation
Entertainment
Mobility
>Press the switch beyond the resistance
point:
The window opens automatically. Pressing
the switch again stops the opening move-
ment.
You can close the windows in the same manner
by pulling the switch.
Convertible: opening, closing
For information on window operation with com-
fort access, also refer to page37.
To close the side windows while the vehi-
cle is being driven, always close the rear
windows first or all four windows simulta-
neously; otherwise, the windows cannot close
tightly at higher speeds.<
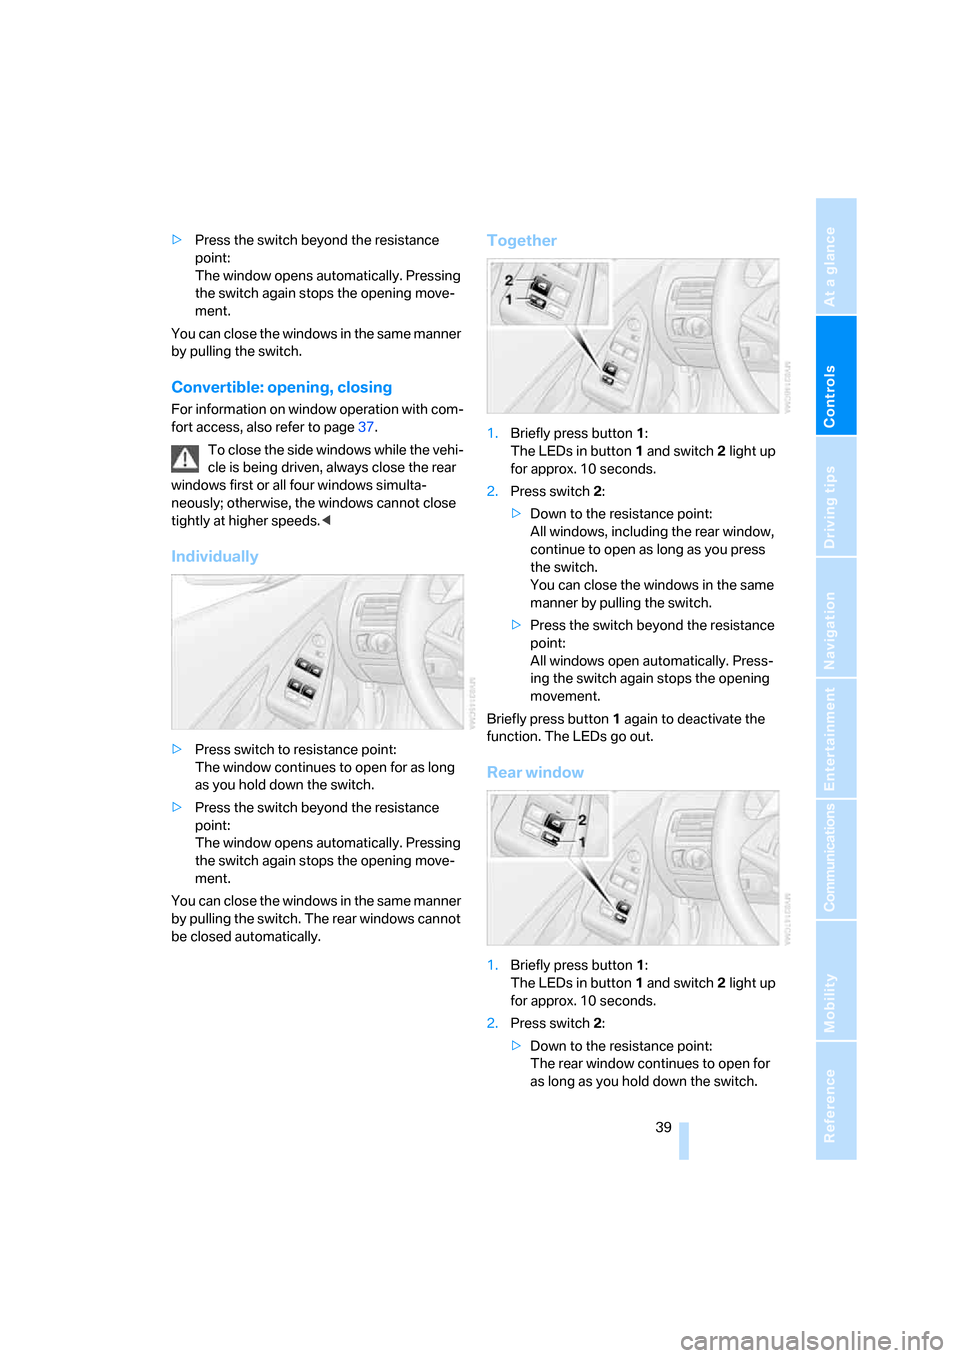
Individually
>Press switch to resistance point:
The window continues to open for as long
as you hold down the switch.
>Press the switch beyond the resistance
point:
The window opens automatically. Pressing
the switch again stops the opening move-
ment.
You can close the windows in the same manner
by pulling the switch. The rear windows cannot
be closed automatically.
Together
1.Briefly press button1:
The LEDs in button1 and switch2 light up
for approx. 10 seconds.
2.Press switch 2:
>Down to the resistance point:
All windows, including the rear window,
continue to open as long as you press
the switch.
You can close the windows in the same
manner by pulling the switch.
>Press the switch beyond the resistance
point:
All windows open automatically. Press-
ing the switch again stops the opening
movement.
Briefly press button 1 again to deactivate the
function. The LEDs go out.
Rear window
1.Briefly press button1:
The LEDs in button1 and switch2 light up
for approx. 10 seconds.
2.Press switch 2:
>Down to the resistance point:
The rear window continues to open for
as long as you hold down the switch.
Page 43 of 264
Controls
41Reference
At a glance
Driving tips
Communications
Navigation
Entertainment
Mobility
>To close, briefly press the switch or push it
twice beyond the resistance point toward
the front:
The sunroof and sliding visor close.
Opening and closing sliding visor
>Push the switch up to the resistance point in
the desired direction:
The sliding visor continues to move for as
long as you hold the switch.
>Push the switch beyond the resistance
point in the desired direction:
The sliding visor moves automatically.
Briefly press the switch again in any direc-
tion to stop the movement.
For information on using the convenient opera-
tion mode at the door lock or with the remote
control, refer to page31 or32.
for information on comfort closing with comfort
access, refer to page37.
Pinch protection system
If the glass sunroof encounters resistance when
closing, the closing action is interrupted and the
glass sunroof opens.
If the sliding visor encounters resistance when
closing within the last approx. 8 in/20 cm, the
closing action is interrupted and the sliding
visor opens again slightly.
Despite the pinch protection system, you
should inspect the sunroof's travel range
prior to closing it, as the safety feature might fail
to detect certain kinds of obstructions, such as
very thin objects, and the sunroof would con-
tinue closing.<
Closing without pinch protection
system
In case of danger from outside, slide the switch
forward beyond the resistance point and hold.
The roof closes without the pinch protection
system.
Following interruptions in electrical
power supply
After an interruption in the power supply the
glass sunroof may not move. Then have the
system initialized. Should this occur, please
have the sunroof initialized at your BMW center.
Moving manually*
In the event of an electrical malfunction, you can
move the glass sunroof and the sliding visor
manually.
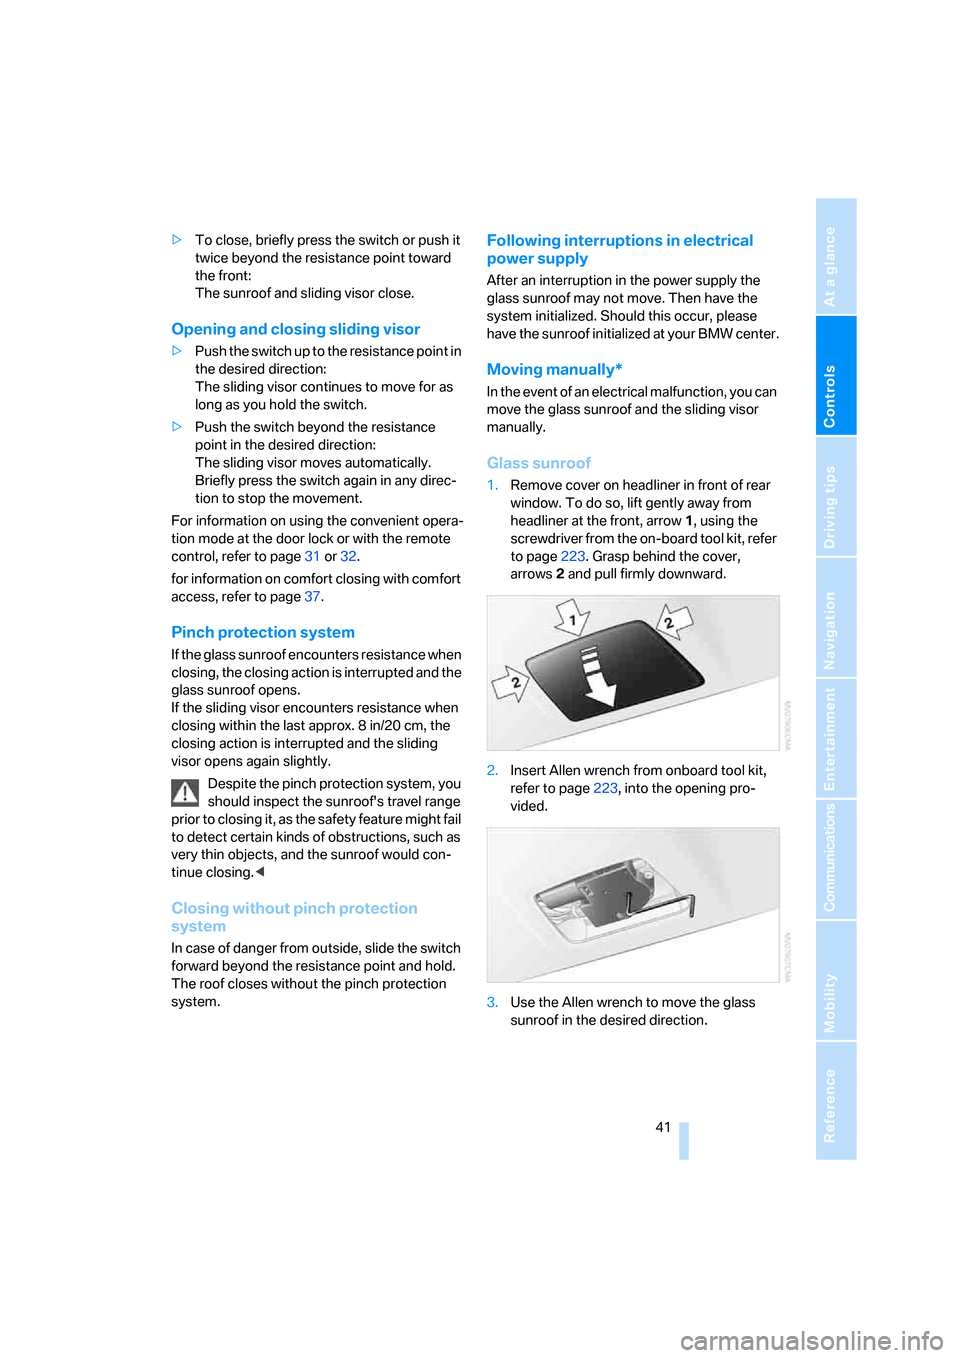
Glass sunroof
1.Remove cover on headliner in front of rear
window. To do so, lift gently away from
headliner at the front, arrow1, using the
screwdriver from the on-board tool kit, refer
to page223. Grasp behind the cover,
arrows2 and pull firmly downward.
2.Insert Allen wrench from onboard tool kit,
refer to page223, into the opening pro-
vided.
3.Use the Allen wrench to move the glass
sunroof in the desired direction.
Page 45 of 264

Controls
43Reference
At a glance
Driving tips
Communications
Navigation
Entertainment
Mobility
Opening and closing
For information on top operation with comfort
access, also refer to page37.
From radio readiness, refer to page58, with the
vehicle stationary:
To avoid putting excessive strain on the
battery, only move the convertible top
when the engine is running if possible.
Before closing the convertible top, remove for-
eign objects from the windshield frame, as
these might inhibit closing of the convertible
top.<
1Closing
2LED
3Opening
When the button for operating the con-
vertible top is pressed, the side windows
move downward slightly and the rear window is
lowered completely.
If you hold down the button after the LED2
goes out, then the windows travel upward
again.
If the convertible top is not completely open or
closed, then the luggage compartment lid can-
not be opened.<
LED
In the following situations, in addition to the
LED, a message is displayed on the Control
Display and an acoustic signal may sound:
>During convertible top operation, the LED
lights up green. It goes out as soon as the
opening or closing action is finished.
>If the LED flashes red when you release the
button, the opening or closing action has
not yet finished.>If the LED lights up red when the button is
pressed, either the convertible top com-
partment floor in the luggage compartment
is in the raised position or a malfunction has
occurred. The convertible top cannot be
moved.
Interruption
The automatic sequence of movements is
interrupted if the button for top operation is
released. The sequence can be continued in
the desired direction by pressing the appropri-
ate button.
If the opening or closing action is interrupted for
a longer period, the convertible top remains in
that position for approx. 15 minutes before it
slowly moves to a stable position.
A convertible top which is not completely
opened or closed presents a danger.
Do not interrupt and continue the closing action
several times in succession; otherwise, the top
mechanism can be damaged.<
If the convertible top is not completely
open or closed, then the luggage com-
partment lid cannot be opened.<
Convenient operation with remote
control and via door lock
Refer to pages31 and32.
Closing manually
Only close the convertible top manually if
absolutely necessary; never open it man-
ually. The convertible top compartment lid can-
not be locked in the event of an electrical mal-
function and would open while the vehicle is
being driven.
Improper handling can lead to damage.<
Before closing
1.Open luggage compartment lid.
2.Take the Allen wrench and the screwdriver
from the onboard tool kit, refer to page223.
3.Pry out the two buttons in the luggage com-
partment with the screwdriver and then pull
firmly. This unlocks the convertible top
compartment lid.
Page 47 of 264
Controls
45Reference
At a glance
Driving tips
Communications
Navigation
Entertainment
Mobility
Do not carry out the next operation,
raising top ends, until the top has
been swung forward, otherwise damage
can occur.<
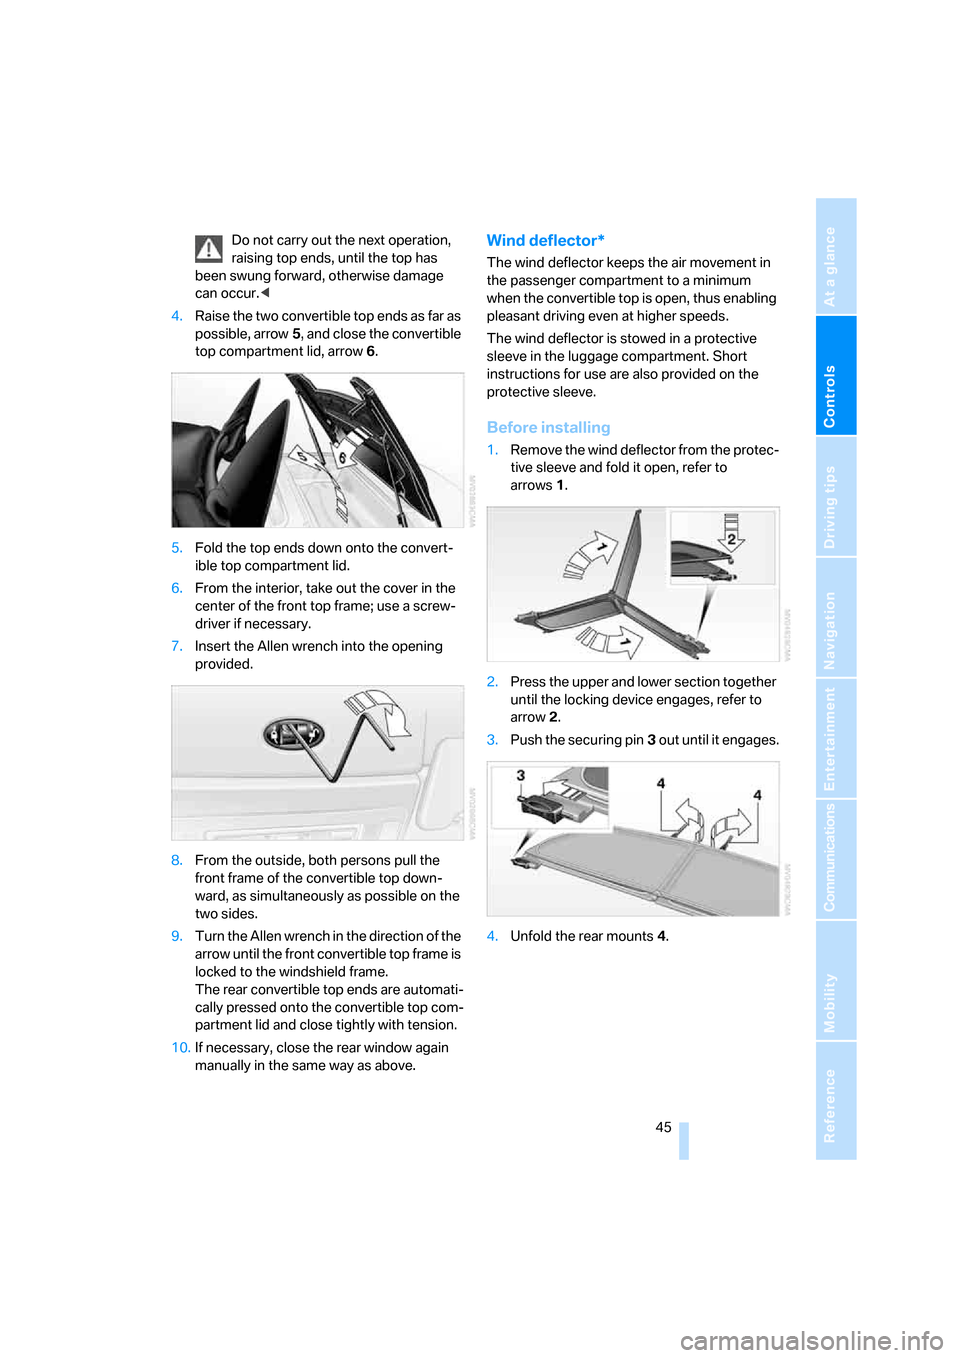
4.Raise the two convertible top ends as far as
possible, arrow5, and close the convertible
top compartment lid, arrow6.
5.Fold the top ends down onto the convert-
ible top compartment lid.
6.From the interior, take out the cover in the
center of the front top frame; use a screw-
driver if necessary.
7.Insert the Allen wrench into the opening
provided.
8.From the outside, both persons pull the
front frame of the convertible top down-
ward, as simultaneously as possible on the
two sides.
9.Turn the Allen wrench in the direction of the
arrow until the front convertible top frame is
locked to the windshield frame.
The rear convertible top ends are automati-
cally pressed onto the convertible top com-
partment lid and close tightly with tension.
10.If necessary, close the rear window again
manually in the same way as above.Wind deflector*
The wind deflector keeps the air movement in
the passenger compartment to a minimum
when the convertible top is open, thus enabling
pleasant driving even at higher speeds.
The wind deflector is stowed in a protective
sleeve in the luggage compartment. Short
instructions for use are also provided on the
protective sleeve.
Before installing
1.Remove the wind deflector from the protec-
tive sleeve and fold it open, refer to
arrows1.
2.Press the upper and lower section together
until the locking device engages, refer to
arrow2.
3.Push the securing pin3 out until it engages.
4.Unfold the rear mounts4.
Page 51 of 264

Controls
49Reference
At a glance
Driving tips
Communications
Navigation
Entertainment
Mobility
Seat, mirror and steering
wheel memory
You can store and select three different adjust-
ment settings for the driver's seat, exterior mir-
rors and steering wheel.
The adjustment of the lumbar support is not
stored in the memory.
Storing
1.Switch on radio readiness or ignition, refer
to page58.
2.Adjust the desired seat, exterior mirror and
steering-wheel positions.
3.Press the button:
The LED in the button lights up.
4.Press the desired memory button 1, 2 or3:
The LED goes out.
Requesting
Do not request a position from the mem-
ory while the vehicle is moving. There is a
risk of accident from unexpected movement of
the seat or steering wheel.<
Comfort mode
1.Open the driver's door after unlocking or
switch on radio readiness, refer to page58.
2.Briefly press the desired memory button1,
2 or3.
The system cancels the adjustment procedure
when you briefly press one of the seat adjust-
ment switches or one of the memory buttons.The adjusting procedure for the steering wheel
is interrupted if you briefly press the switch for
the steering wheel adjustment in any direction,
refer to page54.
Safety feature
1.Close the driver's door and switch ignition
on or off, refer to page58.
2.Press the desired memory button 1, 2 or3
and maintain pressure until the adjustment
process has been completed.
If the button was pressed inadvertently:
press the button again; the LED goes out.
Activating with remote control
The last positions of the driver's seat, external
rearview mirrors, and steering wheel are stored
for the remote key currently in use.
You can choose when the position is requested:
>Request when unlocking vehicle
>Request when opening driver's door
When using this feature, always make
sure that the footwell behind the driver's
seat is empty and unobstructed. If you fail to do
so, any persons or objects behind the seat
could be injured or damaged by a rearward
movement of the seat.<
The system cancels the adjustment procedure
when you briefly press one of the seat adjust-
ment switches or one of the memory buttons.
iDrive, for operating principle refer to page16.
1.Open the start menu.
2.Press the controller to open the menu.
3.Select "Settings" and press the controller.
4.Select "Vehicle / Tires" and press the con-
troller.
Page 53 of 264
Controls
51Reference
At a glance
Driving tips
Communications
Navigation
Entertainment
Mobility
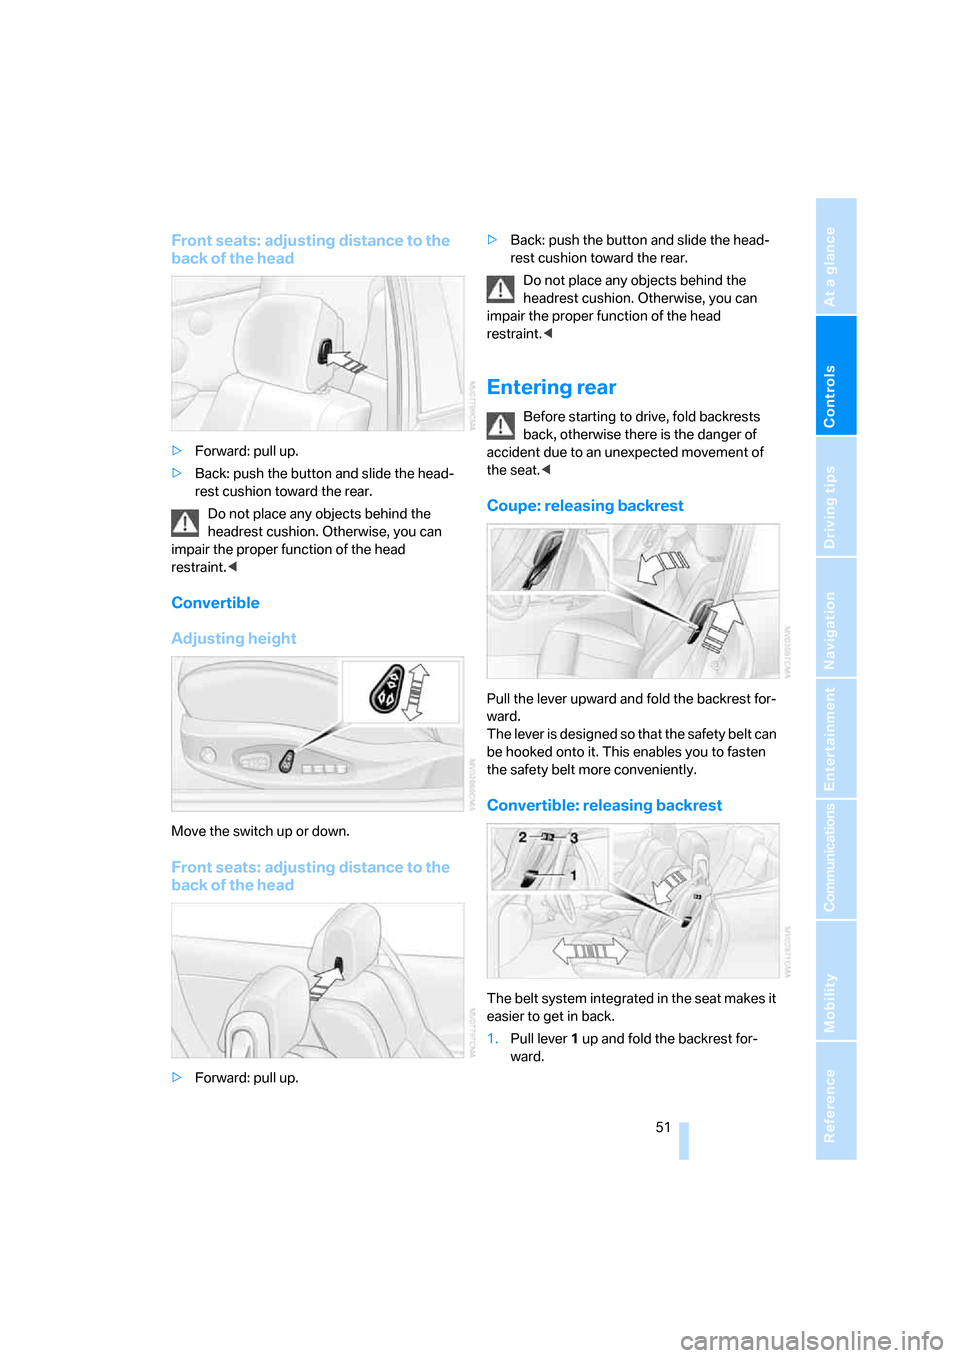
Front seats: adjusting distance to the
back of the head
>Forward: pull up.
>Back: push the button and slide the head-
rest cushion toward the rear.
Do not place any objects behind the
headrest cushion. Otherwise, you can
impair the proper function of the head
restraint.<
Convertible
Adjusting height
Move the switch up or down.
Front seats: adjusting distance to the
back of the head
>Forward: pull up.>Back: push the button and slide the head-
rest cushion toward the rear.
Do not place any objects behind the
headrest cushion. Otherwise, you can
impair the proper function of the head
restraint.<
Entering rear
Before starting to drive, fold backrests
back, otherwise there is the danger of
accident due to an unexpected movement of
the seat.<
Coupe: releasing backrest
Pull the lever upward and fold the backrest for-
ward.
The lever is designed so that the safety belt can
be hooked onto it. This enables you to fasten
the safety belt more conveniently.
Convertible: releasing backrest
The belt system integrated in the seat makes it
easier to get in back.
1.Pull lever 1 up and fold the backrest for-
ward.