2008 BMW 650I CONVERTIBLE dynamic
[x] Cancel search: dynamicPage 14 of 264

Cockpit
12
Instrument cluster
1Indicator lamps for turn signals
2Speedometer
3Indicator and warning lamps13
4Displays for
>Active cruise control
*66
>Leaving lane warning
*101
5Tachometer74
6Engine oil temperature
*75
7Display for
>Time/date74
>Outside temperature74
>Indicator and warning lamps79
>Speed for cruise control66
>Desired speed for active cruise
control
*708Display for
>Odometer and trip odometer74
>Computer75
>Date and remaining travel distance
for service requirements77
>Sport automatic transmission60
>Dynamic Driving Control62
>High-beam assistant
*104
> Check Control message present79
9Fuel gauge75
10Resetting trip odometer74
Page 15 of 264

At a glance
13Reference
Controls
Driving tips
Communications
Navigation
Entertainment
Mobility
Indicator and warning lamps
The concept
The indicator and warning lamps can light up in
different combinations and colors.
When the engine is started or the ignition is
switched on, some lamps are checked for
proper operation and light up briefly in the pro-
cess.
Explanatory text messages
Text messages at the bottom edge of the
Control Display explain the meaning of the
displayed indicator and warning lamps.
You can consult Check Control for additional
information, e.g. regarding the cause of a mal-
function or the appropriate actions to take, refer
to page79.In urgent cases, this information will be shown
as soon as the corresponding lamp lights up.
Indicator lamps without text messages
The following indicator lamps signal particular
functions:
High beams/headlamp flasher104
Fog lamps106
Handbrake applied60
Handbrake for Canadian models
Lamp flashes:
DSC or DTC is controlling the drive
and braking forces to maintain vehicle
stability87
DTC Dynamic Traction Control88
Engine malfunction with deteriorating
emissions levels222
Engine malfunction with deteriorating
emissions levels for Canadian
models222
Page 17 of 264

At a glance
15Reference
Controls
Driving tips
Communications
Navigation
Entertainment
Mobility
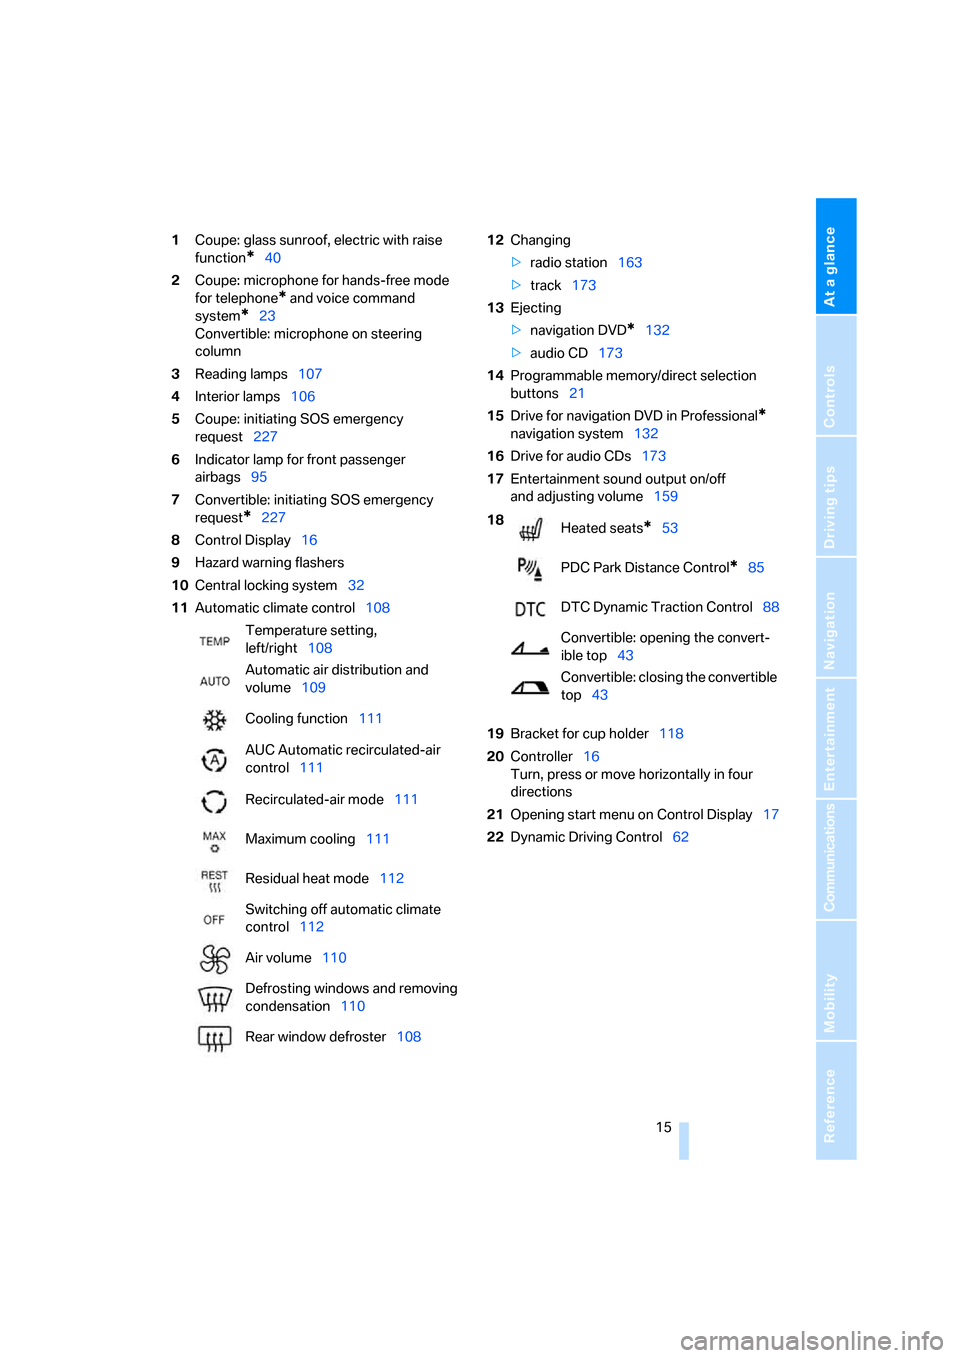
1Coupe: glass sunroof, electric with raise
function
*40
2Coupe: microphone for hands-free mode
for telephone
* and voice command
system
*23
Convertible: microphone on steering
column
3Reading lamps107
4Interior lamps106
5Coupe: initiating SOS emergency
request227
6Indicator lamp
for front passenger
airbags95
7Convertible: initiating SOS emergency
request
*227
8Control Display16
9Hazard warning flashers
10Central locking system32
11Automatic climate control10812Changing
>radio station163
>track173
13Ejecting
>navigation DVD
*132
>audio CD173
14Programmable memory/direct selection
buttons21
15Drive for navigation DVD in Professional
*
navigation system132
16Drive for audio CDs173
17Entertainment sound output on/off
and adjusting volume159
19Bracket for cup holder118
20Controller16
Turn, press or move horizontally in four
directions
21Opening start menu on Control Display17
22Dynamic Driving Control62 Temperature setting,
left/right108
Automatic air distribution and
volume109
Cooling function111
AUC Automatic recirculated-air
control111
Recirculated-air mode111
Maximum cooling111
Residual heat mode112
Switching off automatic climate
control112
Air volume110
Defrosting windows and removing
condensation110
Rear window defroster108
18
Heated seats*53
PDC Park Distance Control
*85
DTC Dynamic Traction Control88
Convertible: opening the convert-
ible top43
Convertible: closing the convertible
top43
Page 62 of 264

Driving
60
Handbrake
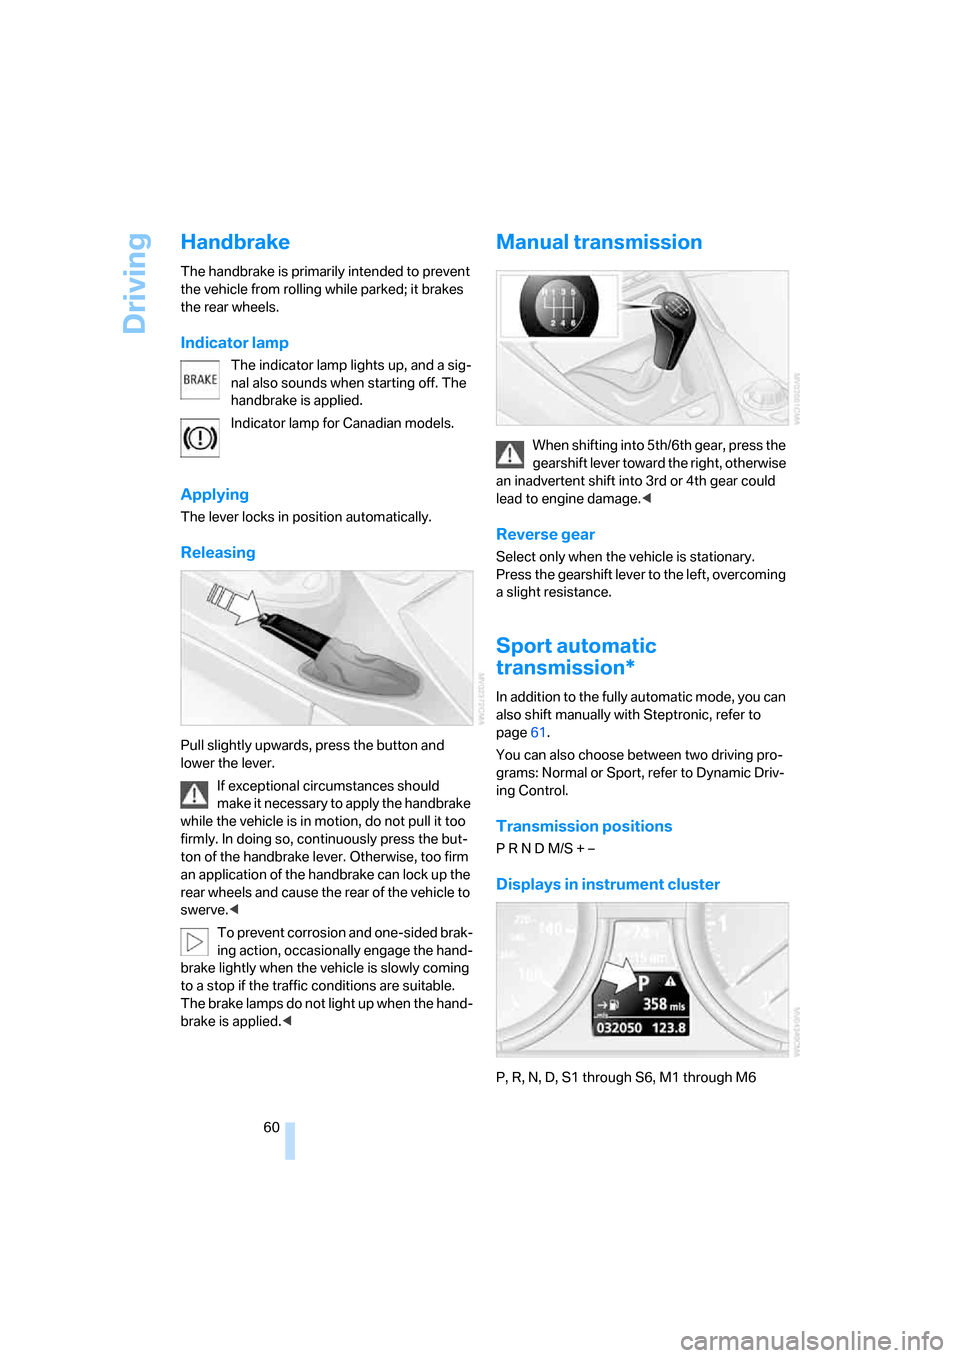
The handbrake is primarily intended to prevent
the vehicle from rolling while parked; it brakes
the rear wheels.
Indicator lamp
The indicator lamp lights up, and a sig-
nal also sounds when starting off. The
handbrake is applied.
Indicator lamp for Canadian models.
Applying
The lever locks in position automatically.
Releasing
Pull slightly upwards, press the button and
lower the lever.
If exceptional circumstances should
make it necessary to apply the handbrake
while the vehicle is in motion, do not pull it too
firmly. In doing so, continuously press the but-
ton of the handbrake lever. Otherwise, too firm
an application of the handbrake can lock up the
rear wheels and cause the rear of the vehicle to
swerve.<
To prevent corrosion and one-sided brak-
ing action, occasionally engage the hand-
brake lightly when the vehicle is slowly coming
to a stop if the traffic conditions are suitable.
The brake lamps do not light up when the hand-
brake is applied.<
Manual transmission
When shifting into 5th/6th gear, press the
gearshift lever toward the right, otherwise
an inadvertent shift into 3rd or 4th gear could
lead to engine damage.<
Reverse gear
Select only when the vehicle is stationary.
Press the gearshift lever to the left, overcoming
a slight resistance.
Sport automatic
transmission*
In addition to the fully automatic mode, you can
also shift manually with Steptronic, refer to
page61.
You can also choose between two driving pro-
grams: Normal or Sport, refer to Dynamic Driv-
ing Control.
Transmission positions
P R N D M/S + –
Displays in instrument cluster
P, R, N, D, S1 through S6, M1 through M6
Page 64 of 264

Driving
62 This position is recommended for a perfor-
mance-oriented driving style.
When the selector lever is briefly moved for-
ward or back, the manual mode is activated and
the Steptronic shifts gear. The instrument clus-
ter shows M1 through M6.
Upshifts and downshifts are only carried out at a
suitable engine and vehicle speed, e.g. a down-
shift is not carried out at excessively high
engine speeds. The selected gear is briefly dis-
played in the instrument cluster, followed by the
current gear.
To resume automatic mode, press the selector
lever to the right.
Shift paddles on steering wheel
You can also shift manually with two shift pad-
dles on the steering wheel. The shift paddles
allow you to shift gears quickly, as both hands
can remain on the steering wheel.
>When you use the shift paddles on the
steering wheel to shift gears in automatic
mode, the gearshift system switches into
the manual mode.
>If you do not shift with the shift paddles and
do not accelerate for a certain time, the sys-
tem switches into the automatic mode
again when the selector lever is in D.
>To shift up: pull one of the shift paddles.
>To shift down: press one of the shift pad-
dles.
Dynamic Driving Control
The Dynamic Driving Control makes it possible
for your BMW to react in an even more perfor-
mance-oriented manner at the push of a button:
>The speed range of the engine is optimally
utilized.
>Gearshifts are faster.
>The engine responds more spontaneously
to accelerator pedal movements.
>The steering will operate in an even sportier
mode.
>In the automatic mode, the 6th gear is not
engaged.
Activating system
Press the SPORT button.
The LED in the button lights up and SPORT is
displayed in the instrument cluster.
Deactivating system
>Press the SPORT button again
>Engage reverse gear
>Switch off engine
The LED in the button and SPORT in the instru-
ment cluster go out.
Manually unlocking and locking
transmission lock
In case of a power failure, e.g. when the battery
is drained or disconnected, or an electrical fault,
manually release the transmission lock, as oth-
erwise the rear wheels are blocked and the
vehicle cannot be towed.
Only manually release the transmission lock for
towing and firmly apply the handbrake before-
hand so that the vehicle cannot roll. Reengage
Page 89 of 264

Controls
87Reference
At a glance
Driving tips
Communications
Navigation
Entertainment
Mobility
Electronic brake-force distribution
This system controls the brake system's appli-
cation pressure at the rear wheels to ensure
stable deceleration.
Brake assistant
When you apply the brakes rapidly, this system
automatically produces the maximum braking
force boost and thus helps to achieve the short-
est possible braking distance during full brak-
ing. This system exploits all of the benefits pro-
vided by ABS.
Do not reduce the pressure on the brake pedal
for the duration of the full braking.
Adaptive brake assistant*
In conjunction with the active cruise control
with the stop-and-go function, the adaptive
brake assistant ensures that the brake
responds even more quickly during braking
with the brake assistant.
DSC Dynamic Stability Control
DSC prevents traction loss in the driving wheels
when starting off and accelerating. The system
also identifies unstable driving conditions, such
as a loss of traction at the rear of the vehicle or
sliding of the vehicle in its front wheels. In these
cases, DSC helps the vehicle safely stay on
course within the physical limits by reducing the
engine output and by applying the brakes differ-
ently in the individual wheels.
The laws of physics cannot be repealed,
even with DSC. An appropriate driving
style always remains the responsibility of the
driver. Therefore, do not restrict the additional
safety margin with a risky driving style, as other-
wise there is a risk of an accident.<
Deactivating DSC
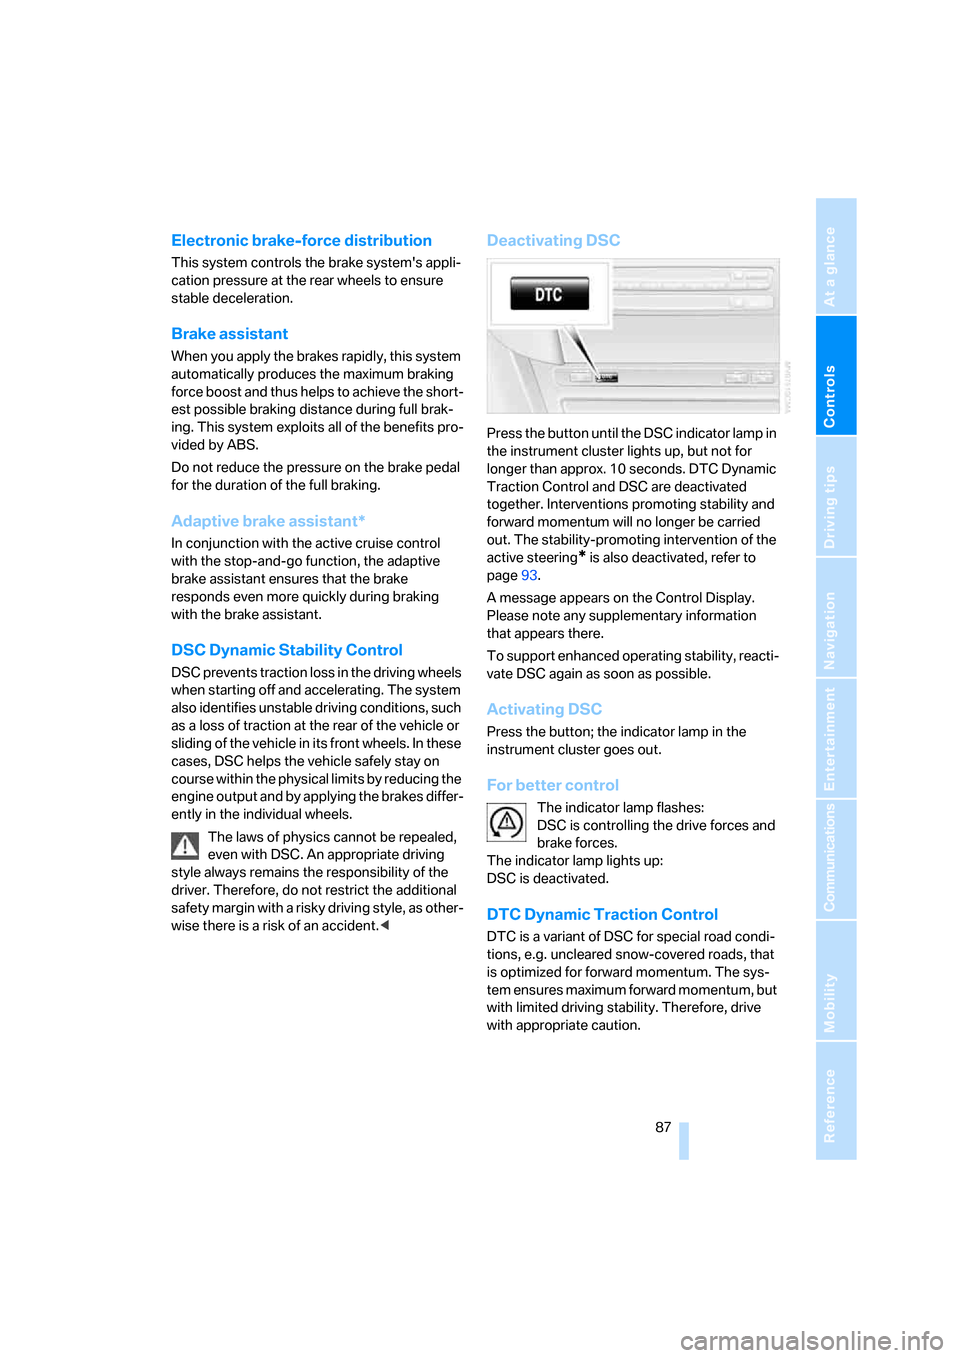
Press the button until the DSC indicator lamp in
the instrument cluster lights up, but not for
longer than approx. 10 seconds. DTC Dynamic
Traction Control and DSC are deactivated
together. Interventions promoting stability and
forward momentum will no longer be carried
out. The stability-promoting intervention of the
active steering
* is also deactivated, refer to
page93.
A message appears on the Control Display.
Please note any supplementary information
that appears there.
To support enhanced operating stability, reacti-
vate DSC again as soon as possible.
Activating DSC
Press the button; the indicator lamp in the
instrument cluster goes out.
For better control
The indicator lamp flashes:
DSC is controlling the drive forces and
brake forces.
The indicator lamp lights up:
DSC is deactivated.
DTC Dynamic Traction Control
DTC is a variant of DSC for special road condi-
tions, e.g. uncleared snow-covered roads, that
is optimized for forward momentum. The sys-
tem ensures maximum forward momentum, but
with limited driving stability. Therefore, drive
with appropriate caution.
Page 91 of 264

Controls
89Reference
At a glance
Driving tips
Communications
Navigation
Entertainment
Mobility
Dynamic Drive*
The concept
Dynamic Drive minimizes body roll and opti-
mizes vehicle stability during cornering and
evasive maneuvers.
Dynamic Drive is based on active stabilizers on
the front and rear axles. Suspension compli-
ance adapts to suit driving conditions, varying
from performance-oriented during cornering to
smooth and comfort-oriented when the vehicle
is proceeding in a straight line. During vehicle
operation, the system continuously runs
through closed-loop control cycles lasting only
fractions of a second.
The system assumes operational status each
time you start the engine.
FTM Flat Tire Monitor*
The concept
The Flat Tire Monitor detects a pressure loss in
one tire by comparing the speeds of the individ-
ual wheels during driving.
In the event of a pressure loss, there is a change
in the rolling circumference and therefore the
rotation speed of the corresponding wheel. The
system detects this change and reports it as a
flat tire.
Functional requirement
To ensure the reliable signaling of a flat tire, the
system must be initialized at the correct tire
inflation pressure.
The initialization must be repeated after
every correction of the tire inflation pres-
sure and after every tire or wheel change.<
System limits
The Flat Tire Monitor cannot indicate sudden
severe tire damage caused by outside factors
and does not detect a natural, even pressure
drop in all four tires.In the following situations, the system could be
delayed or malfunction:
>System has not been initialized
>Driving on snow-covered or slippery roads
>Sporty driving style: slip in the drive wheels,
high lateral acceleration
>Driving with snow chains
*
Initializing system
The initialization finishes during driving,
which can be interrupted at any time.
When driving resumes, the initialization is auto-
matically continued.
Do not initialize the system when driving with
snow chains
*.<
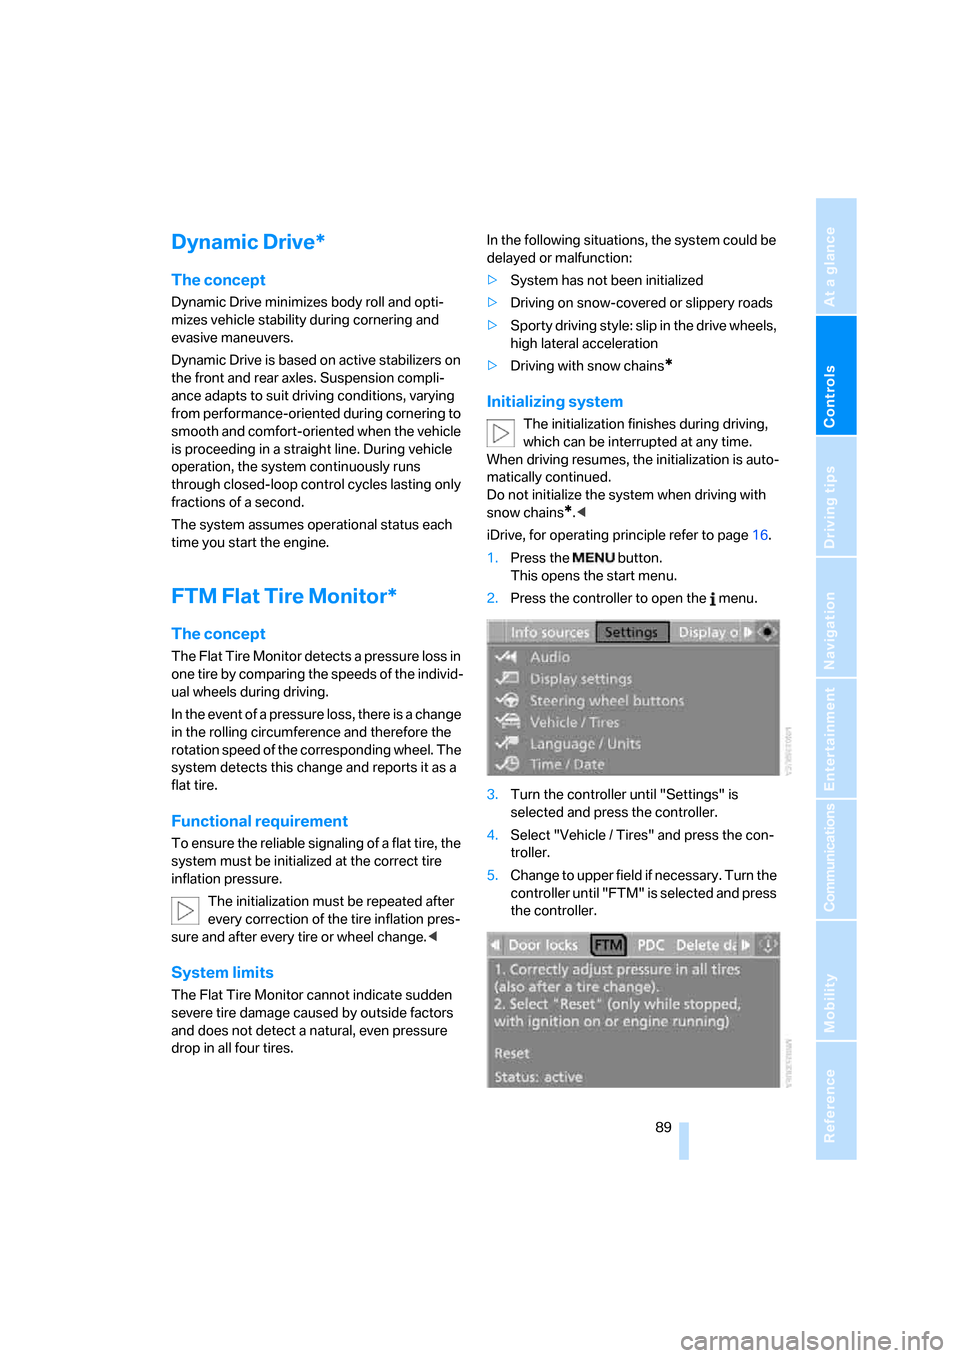
iDrive, for operating principle refer to page16.
1.Press the button.
This opens the start menu.
2.Press the controller to open the menu.
3.Turn the controller until "Settings" is
selected and press the controller.
4.Select "Vehicle / Tires" and press the con-
troller.
5.Change to upper field if necessary. Turn the
controller until "FTM" is selected and press
the controller.
Page 126 of 264

Things to remember when driving
124
Things to remember when driving
Breaking-in
Moving parts need time to adjust to one
another. To ensure that your vehicle continues
to provide optimized economy of operation
throughout an extended service life, we request
that you devote careful attention to the follow-
ing section.
Engine and differential
Always obey all official speed limits.
Up to 1,200 miles/2,000 km
Drive at changing engine and driving speeds,
however do not exceed 4,500 rpm or 100 mph/
160 km/h.
Avoid full-throttle operation and use of the
transmission's kick-down mode during these
initial miles.
From 1,200 miles/2,000 km
The engine and vehicle speed can gradually be
increased.
Tires
Due to technical factors associated with their
manufacture, tires do not achieve their full trac-
tion potential until after an initial break-in
period. Therefore, drive reservedly during the
first 200 miles/300 km.
Brake system
Brakes require an initial break-in period of
approx. 300 miles/500 km to achieve optimized
contact and wear patterns between brake pads
and rotors. Drive in a reserved manner during
this break-in period.
Clutch
The function of the clutch is only at its opti-
mized level after a distance driven of approx.
300 miles/500 km. During this break-in period,
engage the clutch gently.
Following part replacement
Observe the break-in instructions again if com-
ponents mentioned above must be replaced
after subsequent driving operation.
Saving fuel
The fuel consumption of your vehicle depends
on various factors. Through a few simple steps,
your driving style, and regular maintenance, you
can have a positive influence on your fuel con-
sumption and environmental impact.
Removing unnecessary cargo
Additional weight increases fuel consumption.
Removing add-on parts after use
Remove unneeded auxiliary mirrors, roof or rear
luggage racks after use. Add-on parts attached
to the vehicle impede the aerodynamics and
increase the fuel consumption.
Closing windows and the glass sunroof
An open glass sunroof or open windows like-
wise increase the drag coefficient and therefore
the fuel consumption.
Checking tire inflation pressures
regularly
Check and correct the tire inflation pressure as
needed at least twice a month and before long
trips.
An insufficient tire inflation pressure increases
the rolling resistance and thus increases the
fuel consumption and tire wear.
Driving off immediately
Do not allow the engine to warm up by leaving it
running while the vehicle remains stationary.
Instead, begin to drive at a moderate engine
speed. This is the fastest way for the cold
engine to reach its operating temperature.