2008 BMW 525XI TOURING radio
[x] Cancel search: radioPage 177 of 292
Navigation
Entertainment
Driving tips
175Reference
At a glance
Controls
Communications
Mobility
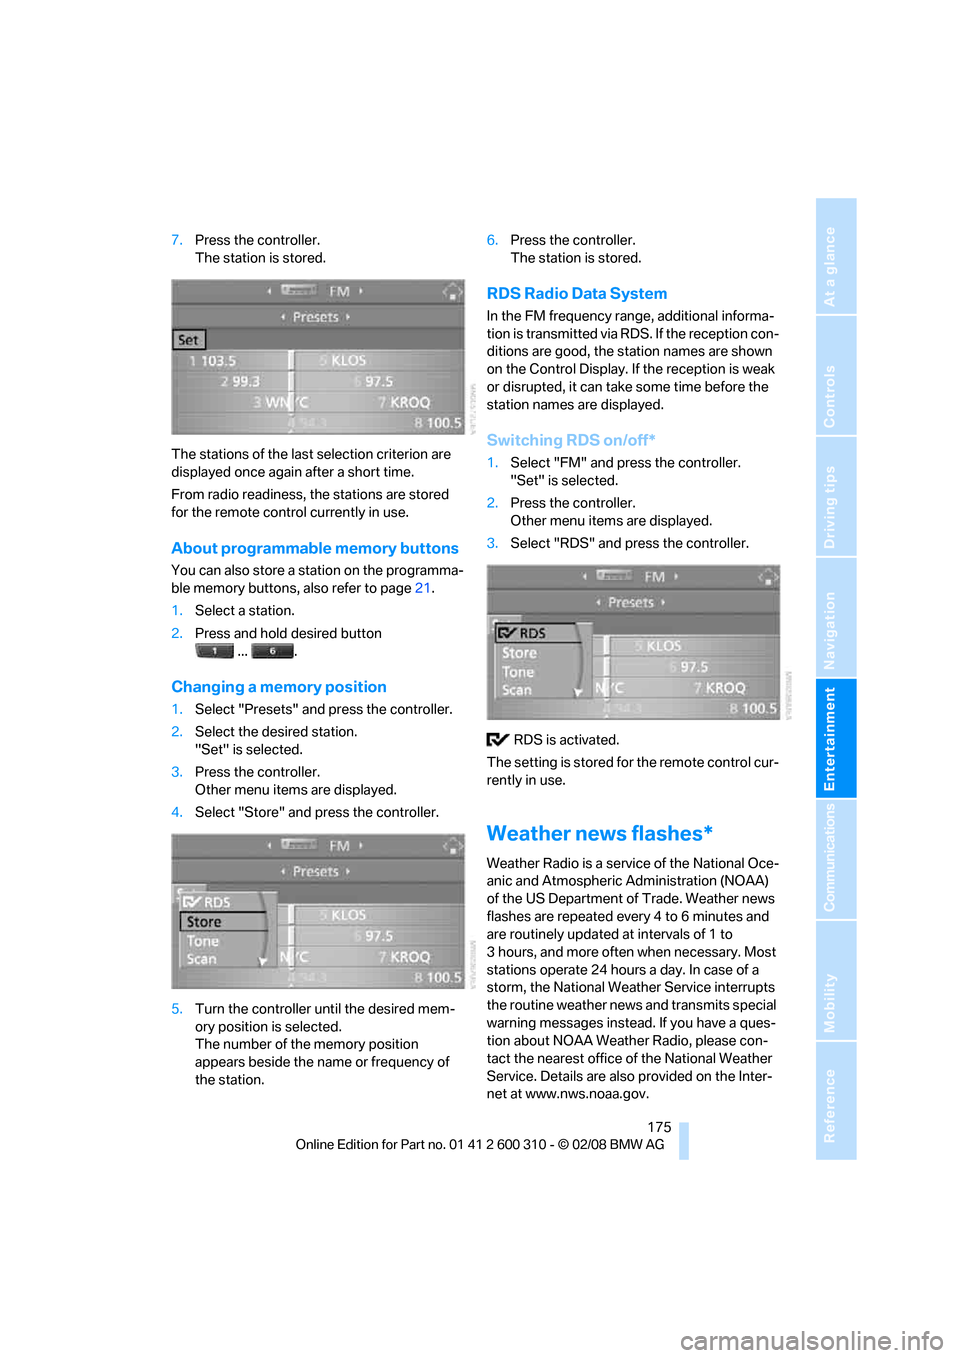
7.Press the controller.
The station is stored.
The stations of the last selection criterion are
displayed once again after a short time.
From radio readiness, the stations are stored
for the remote control currently in use.
About programmable memory buttons
You can also store a station on the programma-
ble memory buttons, also refer to page21.
1.Select a station.
2.Press and hold desired button
... .
Changing a memory position
1.Select "Presets" and press the controller.
2.Select the desired station.
"Set" is selected.
3.Press the controller.
Other menu items are displayed.
4.Select "Store" and press the controller.
5.Turn the controller until the desired mem-
ory position is selected.
The number of the memory position
appears beside the name or frequency of
the station.6.Press the controller.
The station is stored.
RDS Radio Data System
In the FM frequency range, additional informa-
tion is transmitted via RDS. If the reception con-
ditions are good, the station names are shown
on the Control Display. If the reception is weak
or disrupted, it can take some time before the
station names are displayed.
Switching RDS on/off*
1.Select "FM" and press the controller.
"Set" is selected.
2.Press the controller.
Other menu items are displayed.
3.Select "RDS" and press the controller.
RDS is activated.
The setting is stored for the remote control cur-
rently in use.
Weather news flashes*
Weather Radio is a service of the National Oce-
anic and Atmospheric Administration (NOAA)
of the US Department of Trade. Weather news
flashes are repeated every 4 to 6 minutes and
are routinely updated at intervals of 1 to
3 hours, and more often when necessary. Most
stations operate 24 hours a day. In case of a
storm, the National Weather Service interrupts
the routine weather news and transmits special
warning messages instead. If you have a ques-
tion about NOAA Weather Radio, please con-
tact the nearest office of the National Weather
Service. Details are also provided on the Inter-
net at www.nws.noaa.gov.
Page 178 of 292
Radio
176
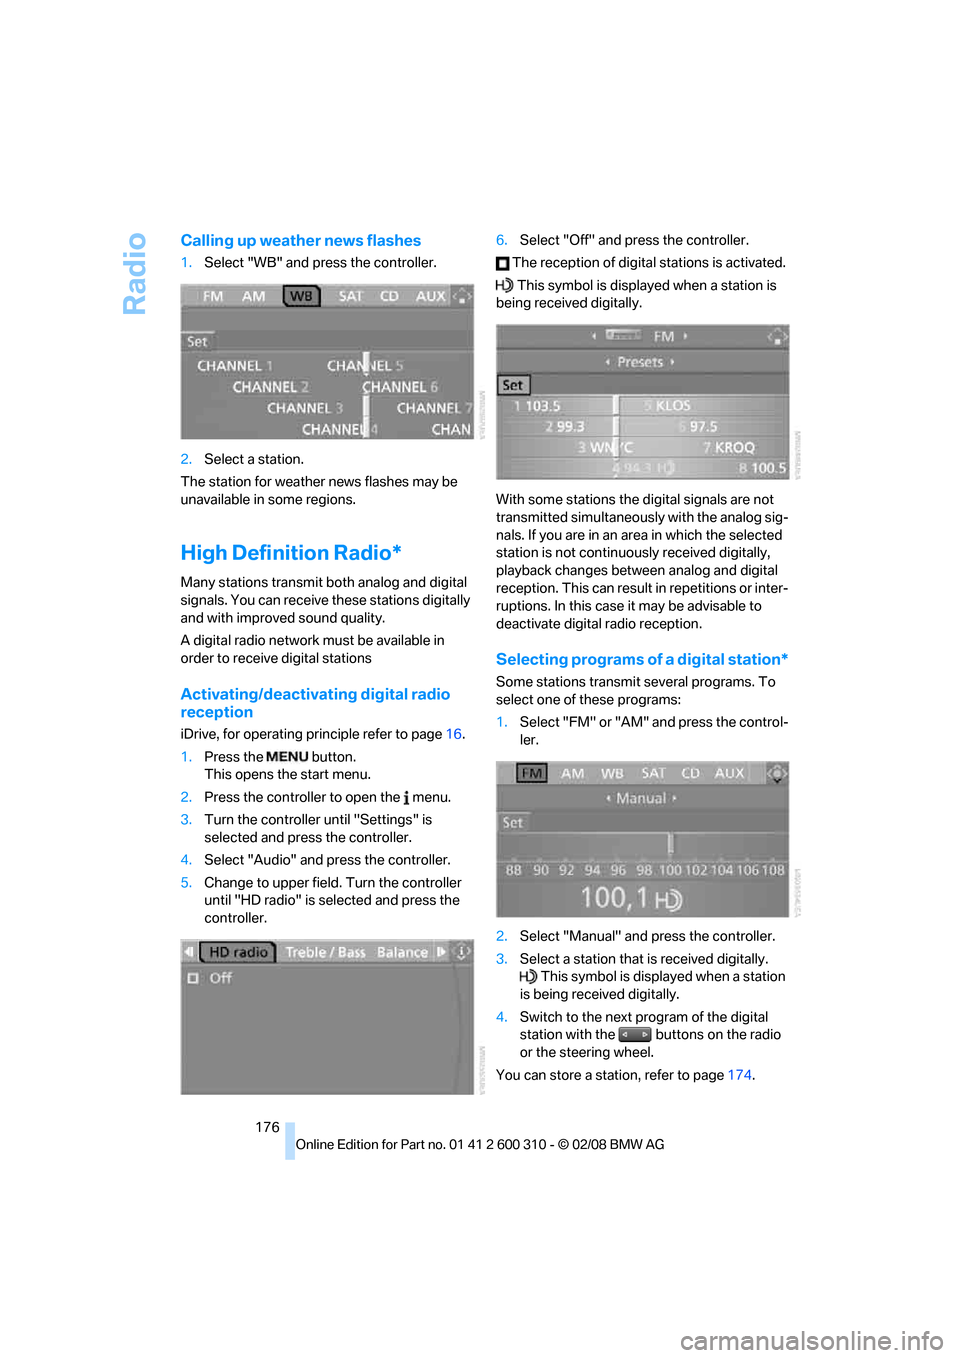
Calling up weather news flashes
1.Select "WB" and press the controller.
2.Select a station.
The station for weather news flashes may be
unavailable in some regions.
High Definition Radio*
Many stations transmit both analog and digital
signals. You can receive these stations digitally
and with improved sound quality.
A digital radio network must be available in
order to receive digital stations
Activating/deactivating digital radio
reception
iDrive, for operating principle refer to page16.
1.Press the button.
This opens the start menu.
2.Press the controller to open the menu.
3.Turn the controller until "Settings" is
selected and press the controller.
4.Select "Audio" and press the controller.
5.Change to upper field. Turn the controller
until "HD radio" is selected and press the
controller.6.Select "Off" and press the controller.
The reception of digital stations is activated.
This symbol is displayed when a station is
being received digitally.
With some stations the digital signals are not
transmitted simultaneously with the analog sig-
nals. If you are in an area in which the selected
station is not continuously received digitally,
playback changes between analog and digital
reception. This can result in repetitions or inter-
ruptions. In this case it may be advisable to
deactivate digital radio reception.
Selecting programs of a digital station*
Some stations transmit several programs. To
select one of these programs:
1.Select "FM" or "AM" and press the control-
ler.
2.Select "Manual" and press the controller.
3.Select a station that is received digitally.
This symbol is displayed when a station
is being received digitally.
4.Switch to the next program of the digital
station with the buttons on the radio
or the steering wheel.
You can store a station, refer to page174.
Page 180 of 292
Satellite radio
178
Satellite radio
You can receive over 100 different channels
with high sound quality.
The channels are offered to you in predefined
packages. To receive the channels of your
choice, you must have this package enabled.
With this new technology the signal may
fail, causing interruptions in reception.<
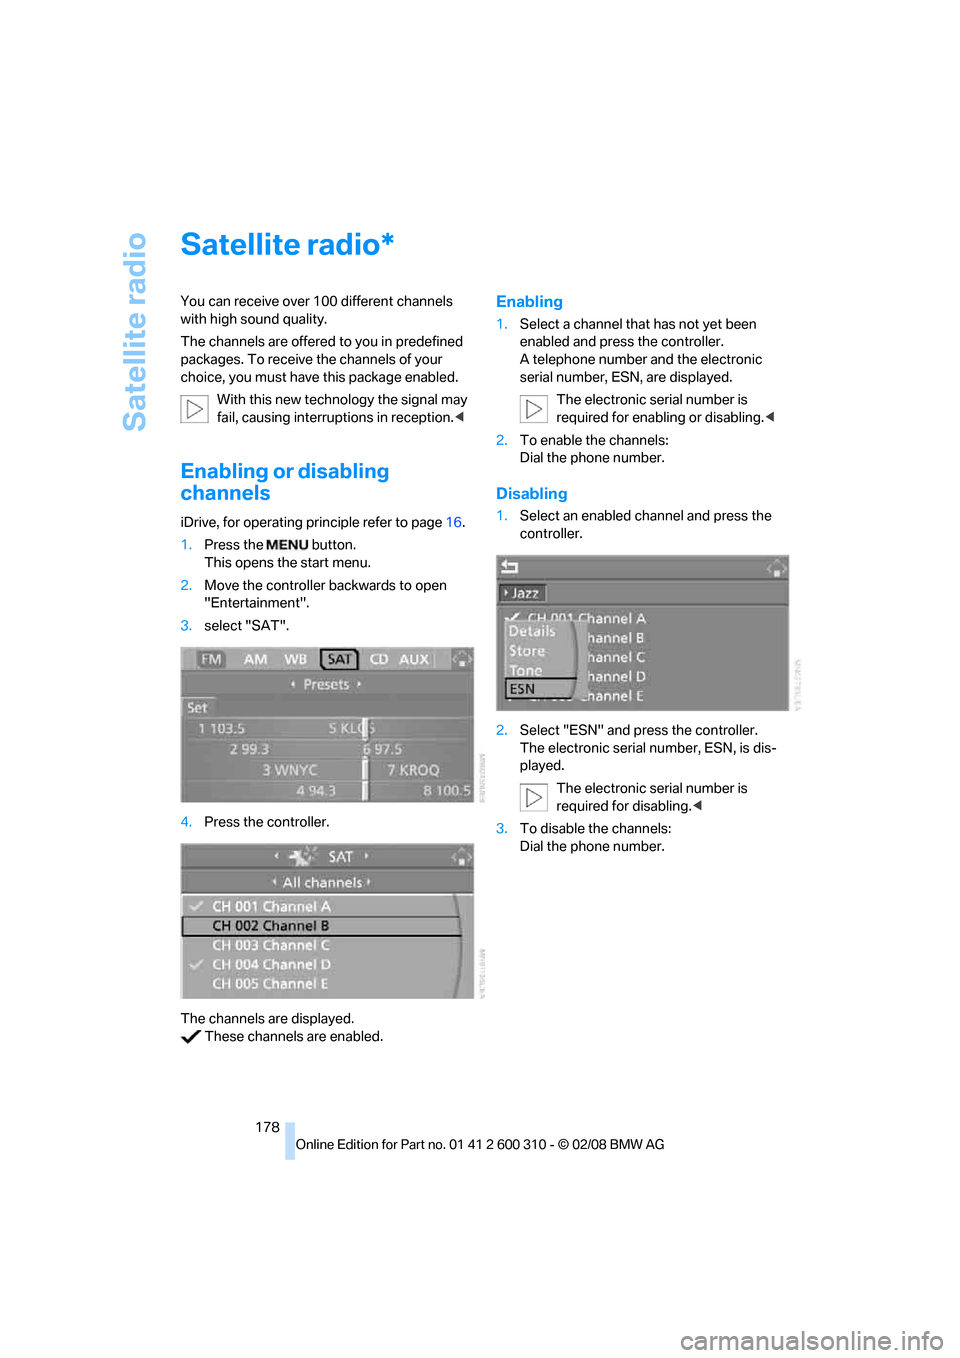
Enabling or disabling
channels
iDrive, for operating principle refer to page16.
1.Press the button.
This opens the start menu.
2.Move the controller backwards to open
"Entertainment".
3.select "SAT".
4.Press the controller.
The channels are displayed.
These channels are enabled.
Enabling
1.Select a channel that has not yet been
enabled and press the controller.
A telephone number and the electronic
serial number, ESN, are displayed.
The electronic serial number is
required for enabling or disabling.<
2.To enable the channels:
Dial the phone number.
Disabling
1.Select an enabled channel and press the
controller.
2.Select "ESN" and press the controller.
The electronic serial number, ESN, is dis-
played.
The electronic serial number is
required for disabling.<
3.To disable the channels:
Dial the phone number.
*
Page 182 of 292

Satellite radio
180
Storing channel
1.Select desired channel.
2.Press the controller.
Other menu items are displayed.
3.Select "Store" and press the controller.
"Presets" is displayed.
4.Turn the controller to select a memory loca-
tion and press the controller.
The channel is stored. The channels of the last
selection criterion are displayed once again
after a short time.
Changing channel with buttons next to
CD player
Press the button for the corresponding
direction.
The system changes to the next enabled chan-
nel.
Notes
If no signal can be received for more than 4 sec-
onds, a message is displayed on the Control
Display.
Reception may not be possible for certain
reasons, e.g. environmental influences or
topographical conditions. The satellite radio
has no influence on this.
The signal may not be available in tunnels or
underground garages, next to tall buildings,
near trees, mountains or other sources of radio
interference.
Reception is usually possible again as soon as
the signal is available again.<
Page 185 of 292
Navigation
Entertainment
Driving tips
183Reference
At a glance
Controls
Communications
Mobility
To exit from the menu:
Select the arrow and press the controller.
You can also store a particular track on the pro-
grammable memory buttons, refer to page21.
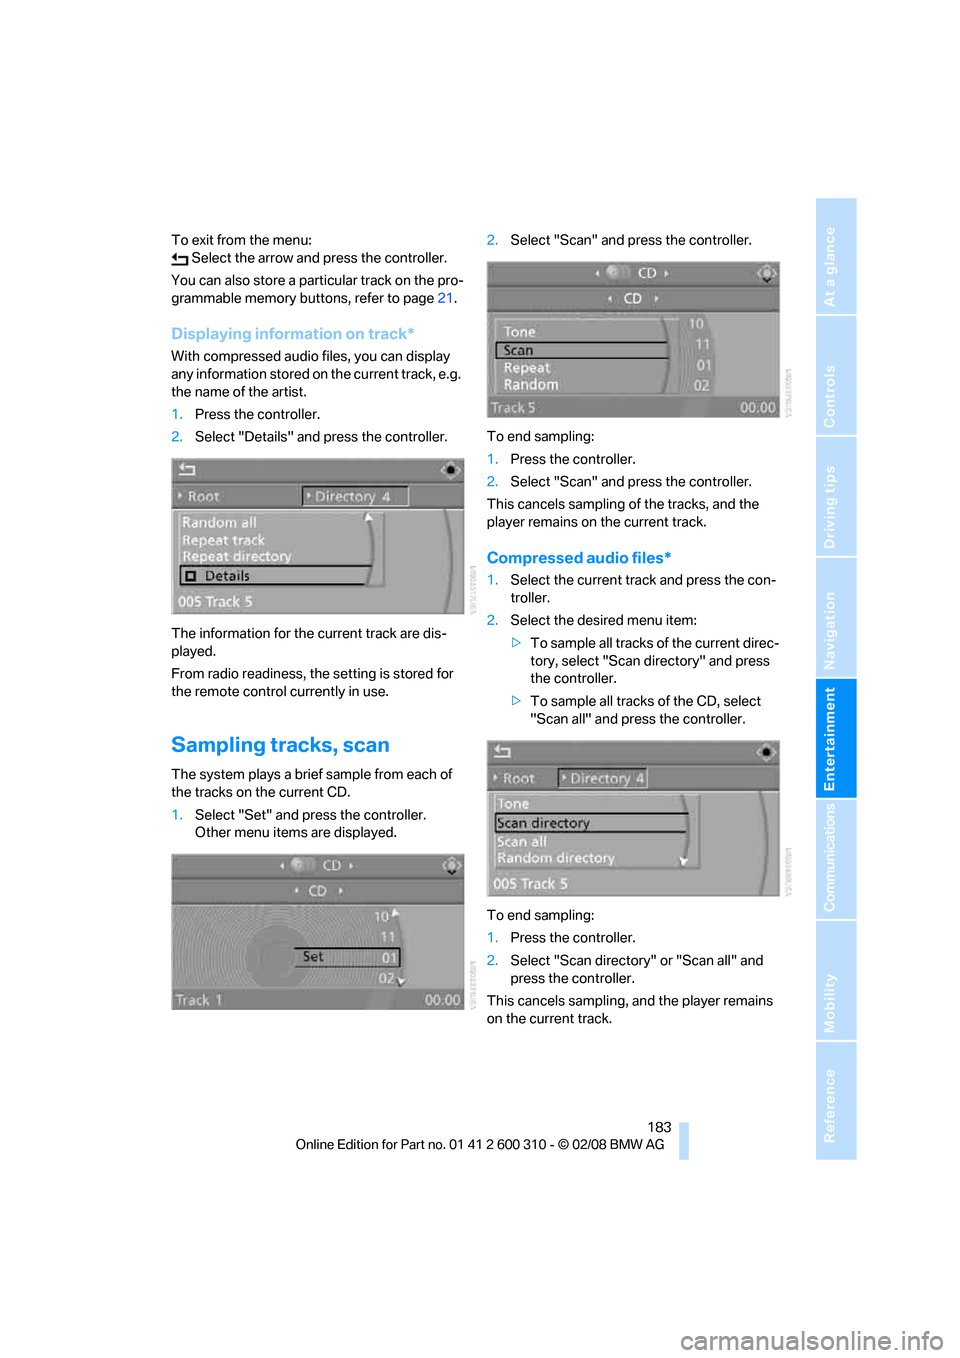
Displaying information on track*
With compressed audio files, you can display
any information stored on the current track, e.g.
the name of the artist.
1.Press the controller.
2.Select "Details" and press the controller.
The information for the current track are dis-
played.
From radio readiness, the setting is stored for
the remote control currently in use.
Sampling tracks, scan
The system plays a brief sample from each of
the tracks on the current CD.
1.Select "Set" and press the controller.
Other menu items are displayed.2.Select "Scan" and press the controller.
To end sampling:
1.Press the controller.
2.Select "Scan" and press the controller.
This cancels sampling of the tracks, and the
player remains on the current track.
Compressed audio files*
1.Select the current track and press the con-
troller.
2.Select the desired menu item:
>To sample all tracks of the current direc-
tory, select "Scan directory" and press
the controller.
>To sample all tracks of the CD, select
"Scan all" and press the controller.
To end sampling:
1.Press the controller.
2.Select "Scan directory" or "Scan all" and
press the controller.
This cancels sampling, and the player remains
on the current track.
Page 202 of 292
Telephoning
200
Adjusting volume
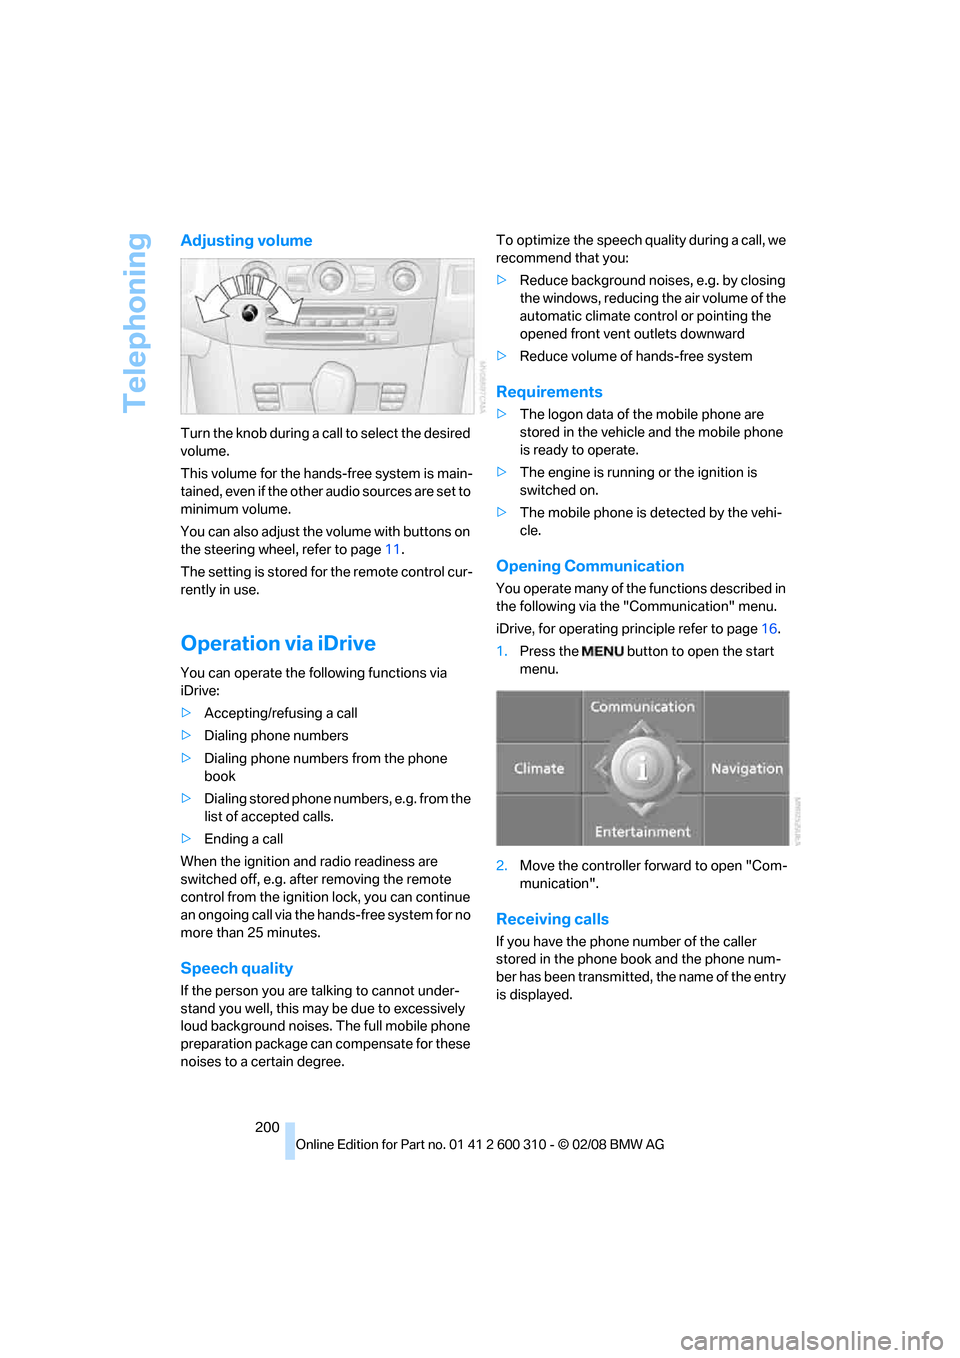
Turn the knob during a call to select the desired
volume.
This volume for the hands-free system is main-
tained, even if the other audio sources are set to
minimum volume.
You can also adjust the volume with buttons on
the steering wheel, refer to page11.
The setting is stored for the remote control cur-
rently in use.
Operation via iDrive
You can operate the following functions via
iDrive:
>Accepting/refusing a call
>Dialing phone numbers
>Dialing phone numbers from the phone
book
>Dialing stored phone numbers, e.g. from the
list of accepted calls.
>Ending a call
When the ignition and radio readiness are
switched off, e.g. after removing the remote
control from the ignition lock, you can continue
an ongoing call via the hands-free system for no
more than 25 minutes.
Speech quality
If the person you are talking to cannot under-
stand you well, this may be due to excessively
loud background noises. The full mobile phone
preparation package can compensate for these
noises to a certain degree. To optimize the speech quality during a call, we
recommend that you:
>Reduce background noises, e.g. by closing
the windows, reducing the air volume of the
automatic climate control or pointing the
opened front vent outlets downward
>Reduce volume of hands-free system
Requirements
>The logon data of the mobile phone are
stored in the vehicle and the mobile phone
is ready to operate.
>The engine is running or the ignition is
switched on.
>The mobile phone is detected by the vehi-
cle.
Opening Communication
You operate many of the functions described in
the following via the "Communication" menu.
iDrive, for operating principle refer to page16.
1.Press the button to open the start
menu.
2.Move the controller forward to open "Com-
munication".
Receiving calls
If you have the phone number of the caller
stored in the phone book and the phone num-
ber has been transmitted, the name of the entry
is displayed.
Page 210 of 292
Telephoning
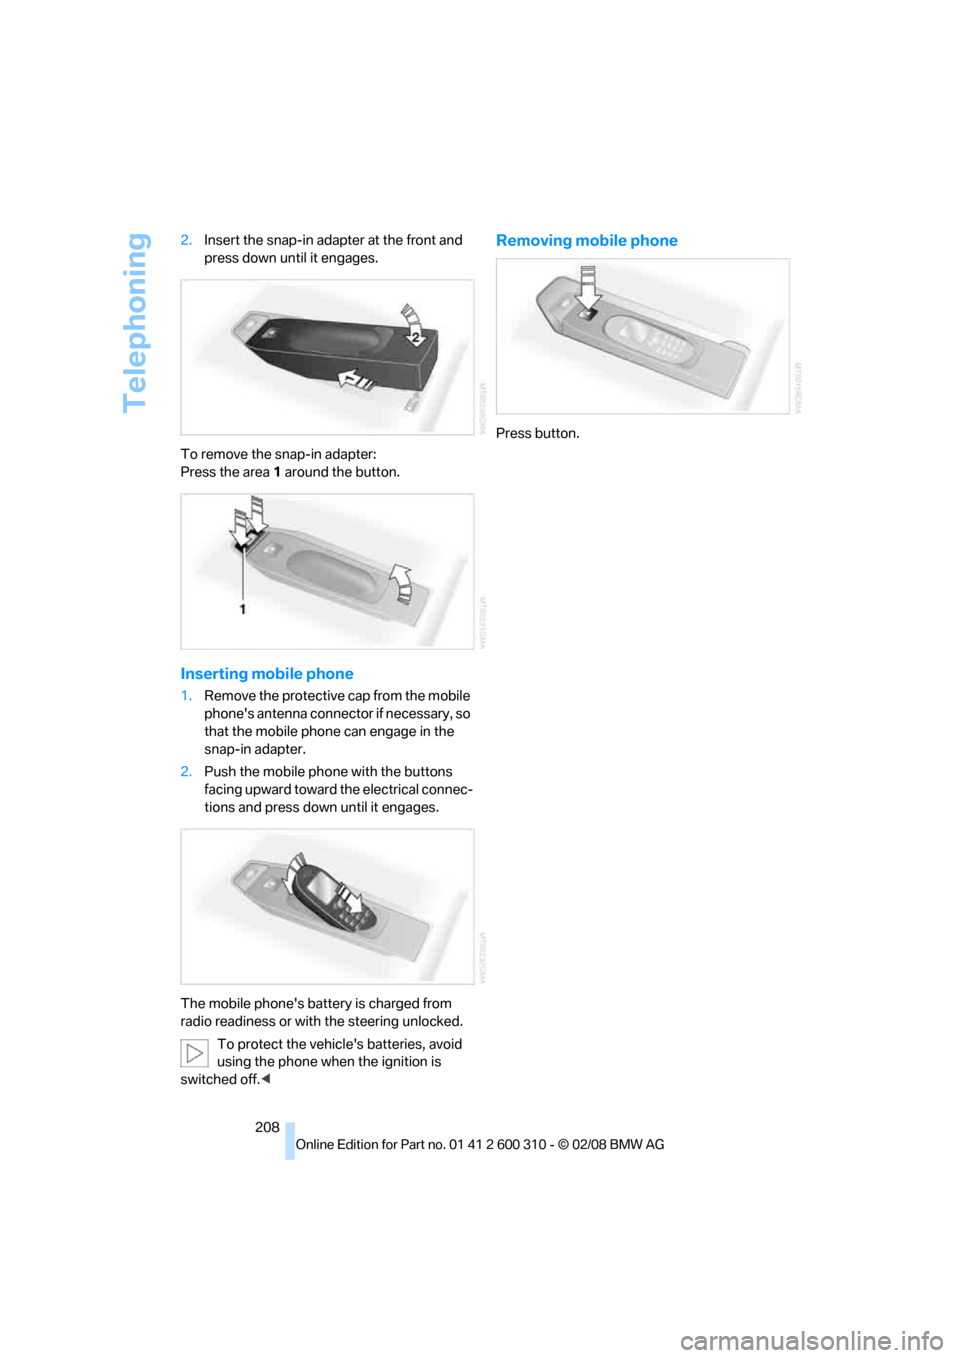
208 2.Insert the snap-in adapter at the front and
press down until it engages.
To remove the snap-in adapter:
Press the area 1 around the button.
Inserting mobile phone
1.Remove the protective cap from the mobile
phone's antenna connector if necessary, so
that the mobile phone can engage in the
snap-in adapter.
2.Push the mobile phone with the buttons
facing upward toward the electrical connec-
tions and press down until it engages.
The mobile phone's battery is charged from
radio readiness or with the steering unlocked.
To protect the vehicle's batteries, avoid
using the phone when the ignition is
switched off.<
Removing mobile phone
Press button.
Page 243 of 292

Mobility
241Reference
At a glance
Controls
Driving tips
Communications
Navigation
Entertainment
Do not use aggressive, acid-containing,
strongly alkaline, or coarse cleansers and
do not use steam cleaners at temperatures
greater than 1407/606; otherwise you may
damage your vehicle.<
Outside sensors
Sensors outside the vehicle, such as Park
Distance Control sensors or radar sen-
sors, should be kept clean and free of ice to
maintain their full function.<
Interior care
Upholstery materials/cloth-covered
paneling
Clean regularly with a vacuum cleaner in order
to remove surface dirt.
In the event of more serious soiling such as bev-
erage stains, use a soft sponge or a lint-free
microfiber cloth in combination with suitable
interior cleaners. Follow the instructions on the
packaging.
Clean upholstery material over a large
area extending out to the seams. Avoid
intense friction.<
Open Velcro fasteners on pants or other
items of clothing can cause damage to
the seat covering. Make sure that the Velcro
fasteners are closed.<
Leather/leather-covered paneling
The leather used by BMW is a high quality
natural product. Slight patterns in the
grain are part of the typical properties of a natu-
ral leather.<
Dust and dirt from the road chafe in pores and
folds and result in considerable wear and cause
the leather surface to become prematurely brit-
tle. We therefore suggest that you clean the
leather with a dust cloth or vacuum cleaner at
regular intervals.
Particularly with light-colored leather, make
sure to clean it regularly since it has a greater
tendency to become soiled.Treat the leather twice a year with a leather
lotion since dirt and grease harm the protective
layer of the leather.
Carpets/luggage compartment
Carpeting, floor mats, and luggage compart-
ment rugs and paneling can be cleaned with a
vacuum or in the event of more serious soiling,
cleansed with an interior cleaner.
Floor mats and luggage compartment rugs can
be removed for cleaning. When inserting into
place, make sure that the seat rails do not pro-
trude over the floor mats; otherwise floor mats
can be damaged.
Fluff on new floor mats is a result of the produc-
tion process and can be removed by repeated
vacuuming.
Plastic components inside
Clean the glass cover of the instrument panel,
imitation leather surfaces, lamp lenses, and
matte components with water and, if necessary,
a solvent-free plastic cleaner.
Fine wooden components
Use a damp cloth to clean fine wooden trim
panels and components. Follow up by drying
with a soft cloth.
Safety belts
Do not use cleansers to clean the safety
belts since this can destroy the web-
bing.<
Inside sensors
Clean inside sensors such as those of the high-
beam assistant using a lint-free cloth moist-
ened with glass cleaner.
Displays
Clean displays like the radio or the Control Dis-
play using a display-cleaning cloth or a soft,
nonabrasive lint-free cloth.
Avoid using excessive pressure when
cleaning displays; otherwise, you could
damage them.<