2008 BMW 4.8I ECU
[x] Cancel search: ECUPage 67 of 292
Controls
65Reference
At a glance
Driving tips
Communications
Navigation
Entertainment
Mobility
P Park
Select only when the vehicle is stationary.
The rear wheels are locked.
P is engaged automatically as soon as
you switch off the engine unless N is
engaged and on vehicles with comfort access
the remote control is inserted in the ignition
lock, refer to page59.<
N Neutral
Can, for example, be engaged in automatic car
washes. The vehicle can roll.
N remains engaged even after the engine
is switched off whenever you leave the
remote control in the ignition lock. This function
is used, for example, in a car wash, refer to
page60. After approx. 30 minutes P is auto-
matically engaged.<
D Drive, automatic position
Position for normal vehicle operation. All for-
ward gears are available.
Under normal operating conditions, the fuel
consumption is lowest when driving in posi-
tion D.
Kick-down
The kick-down mode provides maximum accel-
eration.
Press the accelerator pedal beyond the
increased resistance at full throttle.
Sport program and manual mode M/S
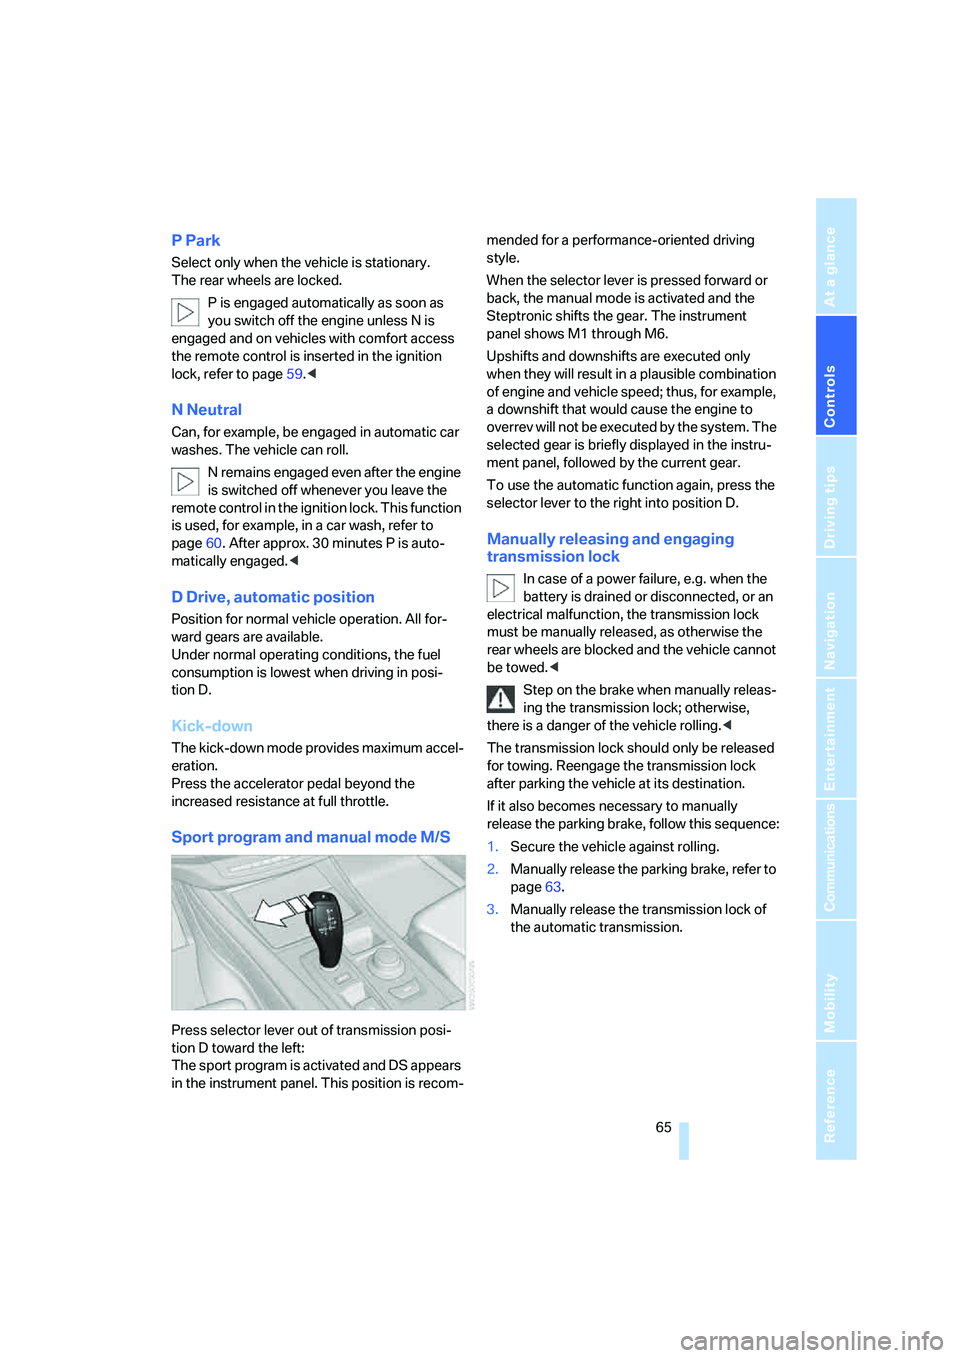
Press selector lever out of transmission posi-
tion D toward the left:
The sport program is activated and DS appears
in the instrument panel. This position is recom-mended for a performance-oriented driving
style.
When the selector lever is pressed forward or
back, the manual mode is activated and the
Steptronic shifts the gear. The instrument
panel shows M1 through M6.
Upshifts and downshifts are executed only
when they will result in a plausible combination
of engine and vehicle speed; thus, for example,
a downshift that would cause the engine to
overrev will not be executed by the system. The
selected gear is briefly displayed in the instru-
ment panel, followed by the current gear.
To use the automatic function again, press the
selector lever to the right into position D.
Manually releasing and engaging
transmission lock
In case of a power failure, e.g. when the
battery is drained or disconnected, or an
electrical malfunction, the transmission lock
must be manually released, as otherwise the
rear wheels are blocked and the vehicle cannot
be towed.<
Step on the brake when manually releas-
ing the transmission lock; otherwise,
there is a danger of the vehicle rolling.<
The transmission lock should only be released
for towing. Reengage the transmission lock
after parking the vehicle at its destination.
If it also becomes necessary to manually
release the parking brake, follow this sequence:
1.Secure the vehicle against rolling.
2.Manually release the parking brake, refer to
page63.
3.Manually release the transmission lock of
the automatic transmission.
Page 99 of 292
Controls
97Reference
At a glance
Driving tips
Communications
Navigation
Entertainment
Mobility
Brake force display
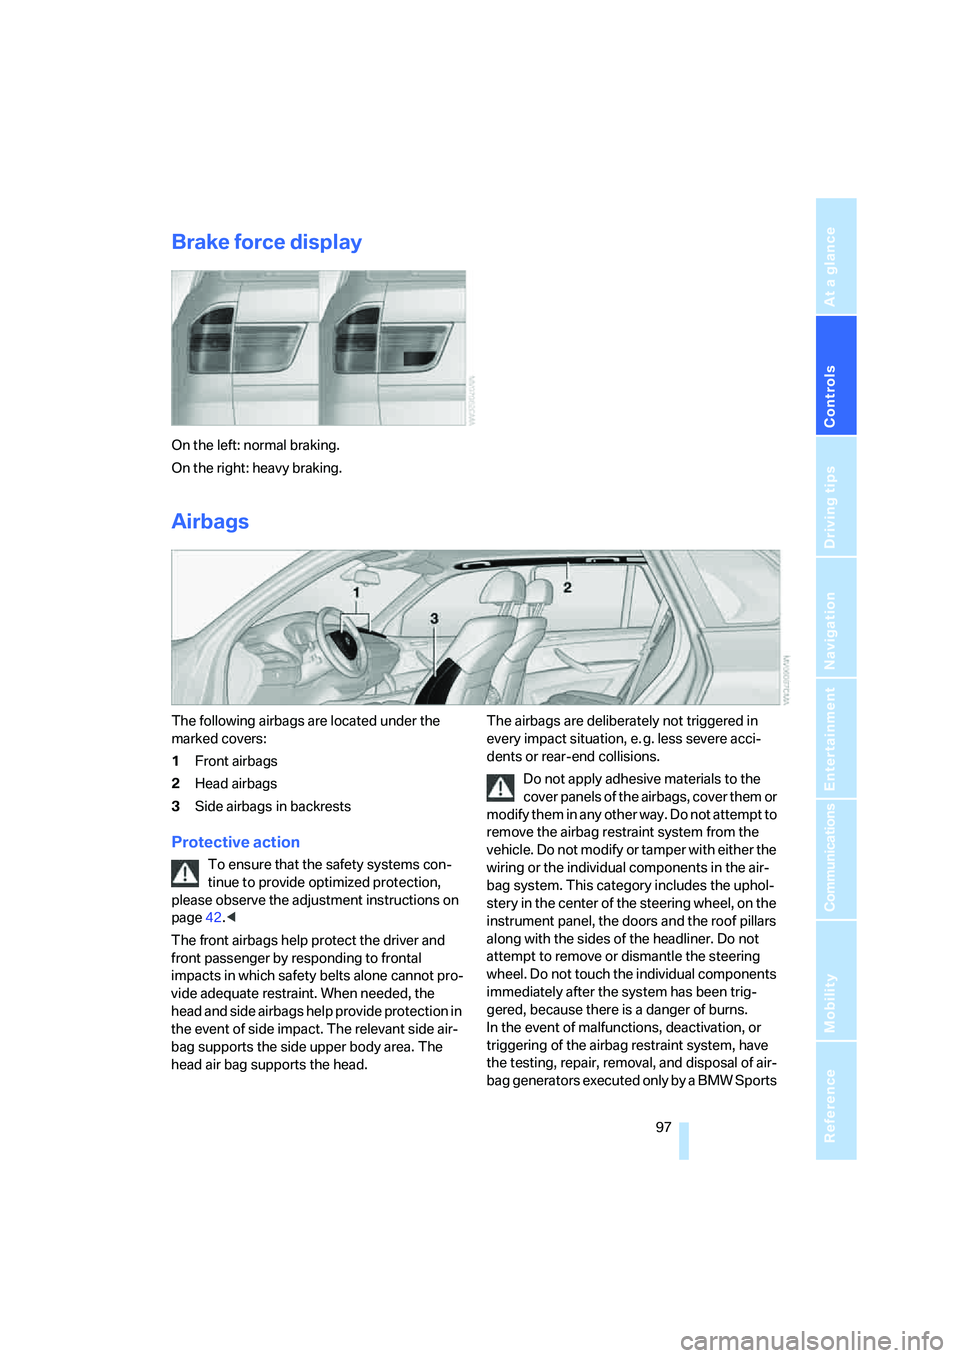
On the left: normal braking.
On the right: heavy braking.
Airbags
The following airbags are located under the
marked covers:
1Front airbags
2Head airbags
3Side airbags
in backrests
Protective action
To ensure that the safety systems con-
tinue to provide optimized protection,
please observe the adjustment instructions on
page42.<
The front airbags help protect the driver and
front passenger by responding to frontal
impacts in which safety belts alone cannot pro-
vide adequate restraint. When needed, the
head and side airbags help provide protection in
the event of side impact. The relevant side air-
bag supports the side upper body area. The
head air bag supports the head.The airbags are deliberately not triggered in
every impact situation, e. g. less severe acci-
dents or rear-end collisions.
Do not apply adhesive materials to the
cover panels of the airbags, cover them or
modify them in any other way. Do not attempt to
remove the airbag restraint system from the
vehicle. Do not modify or tamper with either the
wiring or the individual components in the air-
bag system. This category includes the uphol-
stery in the center of the steering wheel, on the
instrument panel, the doors and the roof pillars
along with the sides of the headliner. Do not
attempt to remove or dismantle the steering
wheel. Do not touch the individual components
immediately after the system has been trig-
gered, because there is a danger of burns.
In the event of malfunctions, deactivation, or
triggering of the airbag restraint system, have
the testing, repair, removal, and disposal of air-
bag generators executed only by a BMW Sports
Page 119 of 292
Controls
117Reference
At a glance
Driving tips
Communications
Navigation
Entertainment
Mobility
Digital compass*
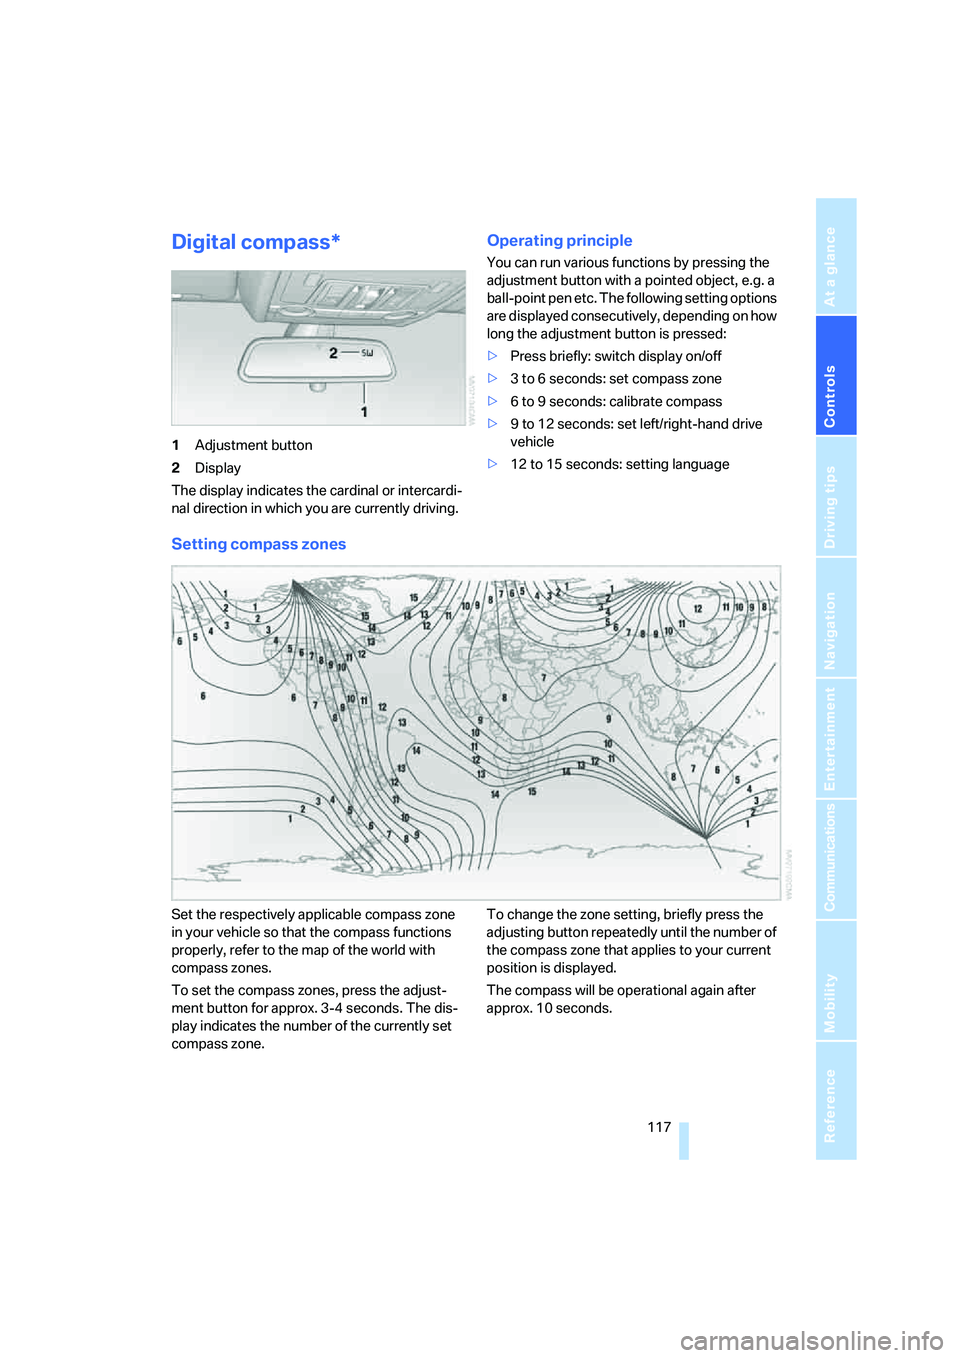
1Adjustment button
2Display
The display indicates the cardinal or intercardi-
nal direction in which you are currently driving.
Operating principle
You can run various functions by pressing the
adjustment button with a pointed object, e.g. a
ball-point pen etc. The following setting options
are displayed consecutively, depending on how
long the adjustment button is pressed:
>Press briefly: switch display on/off
>3 to 6 seconds: set compass zone
>6 to 9 seconds: calibrate compass
>9 to 12 seconds: set left/right-hand drive
vehicle
>12 to 15 seconds: setting language
Setting compass zones
Set the respectively applicable compass zone
in your vehicle so that the compass functions
properly, refer to the map of the world with
compass zones.
To set the compass zones, press the adjust-
ment button for approx. 3-4 seconds. The dis-
play indicates the number of the currently set
compass zone.To change the zone setting, briefly press the
adjusting button repeatedly until the number of
the compass zone that applies to your current
position is displayed.
The compass will be operational again after
approx. 10 seconds.
Page 125 of 292
Controls
123Reference
At a glance
Driving tips
Communications
Navigation
Entertainment
Mobility
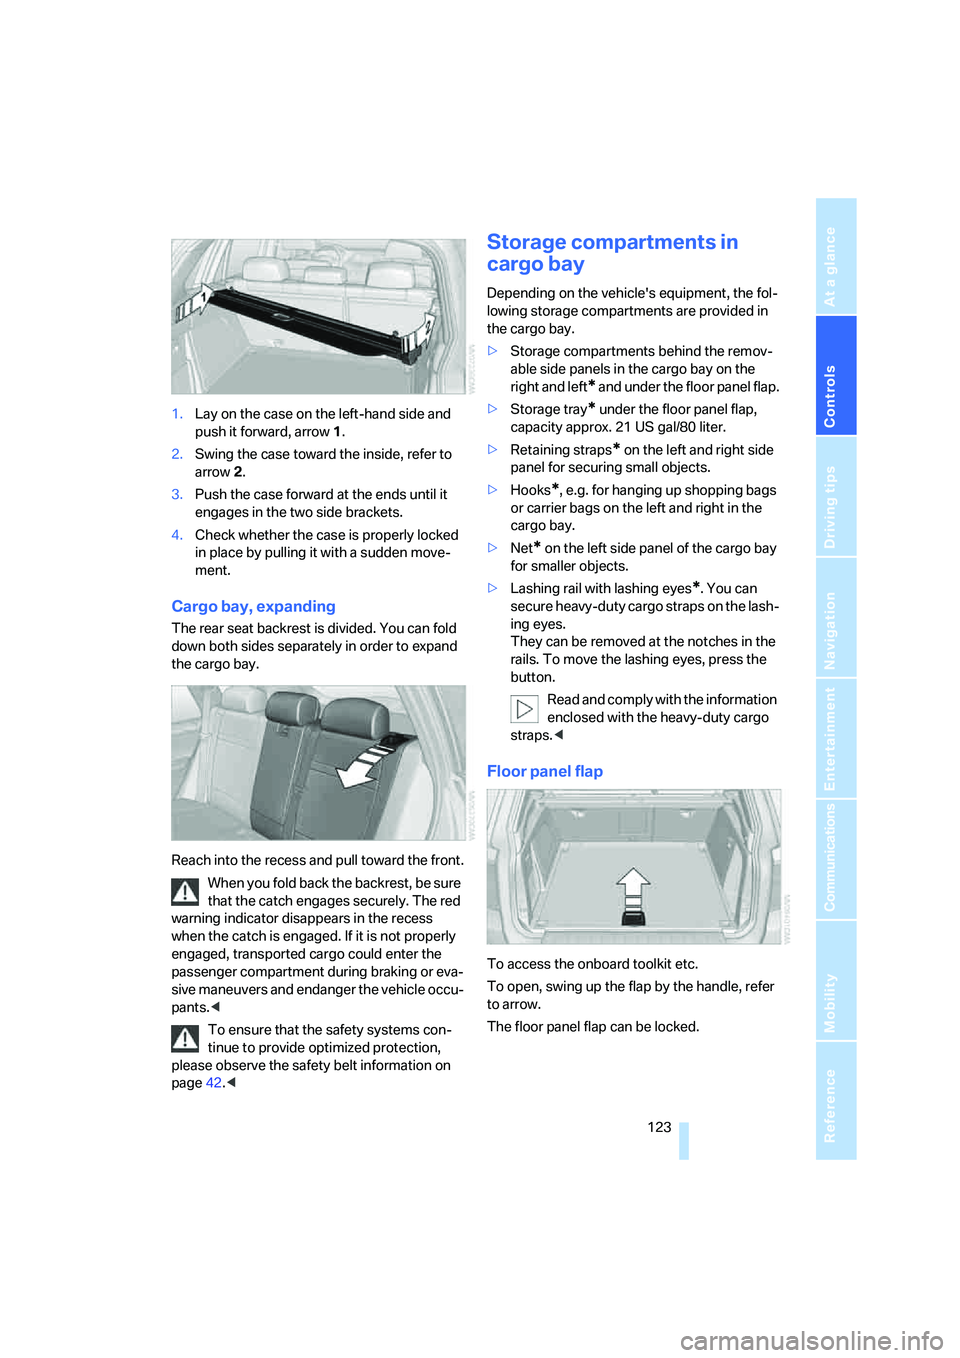
1.Lay on the case on the left-hand side and
push it forward, arrow1.
2.Swing the case toward the inside, refer to
arrow2.
3.Push the case forward at the ends until it
engages in the two side brackets.
4.Check whether the case is properly locked
in place by pulling it with a sudden move-
ment.
Cargo bay, expanding
The rear seat backrest is divided. You can fold
down both sides separately in order to expand
the cargo bay.
Reach into the recess and pull toward the front.
When you fold back the backrest, be sure
that the catch engages securely. The red
warning indicator disappears in the recess
when the catch is engaged. If it is not properly
engaged, transported cargo could enter the
passenger compartment during braking or eva-
sive maneuvers and endanger the vehicle occu-
pants.<
To ensure that the safety systems con-
tinue to provide optimized protection,
please observe the safety belt information on
page42.<
Storage compartments in
cargo bay
Depending on the vehicle's equipment, the fol-
lowing storage compartments are provided in
the cargo bay.
>Storage compartments behind the remov-
able side panels in the cargo bay on the
right and left
* and under the floor panel flap.
>Storage tray
* under the floor panel flap,
capacity approx. 21 US gal/80 liter.
>Retaining straps
* on the left and right side
panel for securing small objects.
>Hooks
*, e.g. for hanging up shopping bags
or carrier bags on the left and right in the
cargo bay.
>Net
* on the left side panel of the cargo bay
for smaller objects.
>Lashing rail with lashing eyes
*. You can
secure heavy-duty cargo straps on the lash-
ing eyes.
They can be removed at the notches in the
rails. To move the lashing eyes, press the
button.
Read and comply with the information
enclosed with the heavy-duty cargo
straps.<
Floor panel flap
To access the onboard toolkit etc.
To open, swing up the flap by the handle, refer
to arrow.
The floor panel flap can be locked.
Page 127 of 292
Controls
125Reference
At a glance
Driving tips
Communications
Navigation
Entertainment
Mobility
Ski bag*
The ski bag is designed for safe, clean transport
of up to 4 pa irs of s tandard s kis or up to 2 snow-
boards.
With the ski bag you can stow skis with a length
of up to 6.9 ft/2.10 m. When skis of 6.9 ft/2.10 m
in length are loaded, the ski bag will tend to con-
tract, reducing its overall capacity.
Before loading the ski bag, fold in the dis-
play screen of the DVD system in the
rear
*, as otherwise the display screen could be
damaged.<
Loading
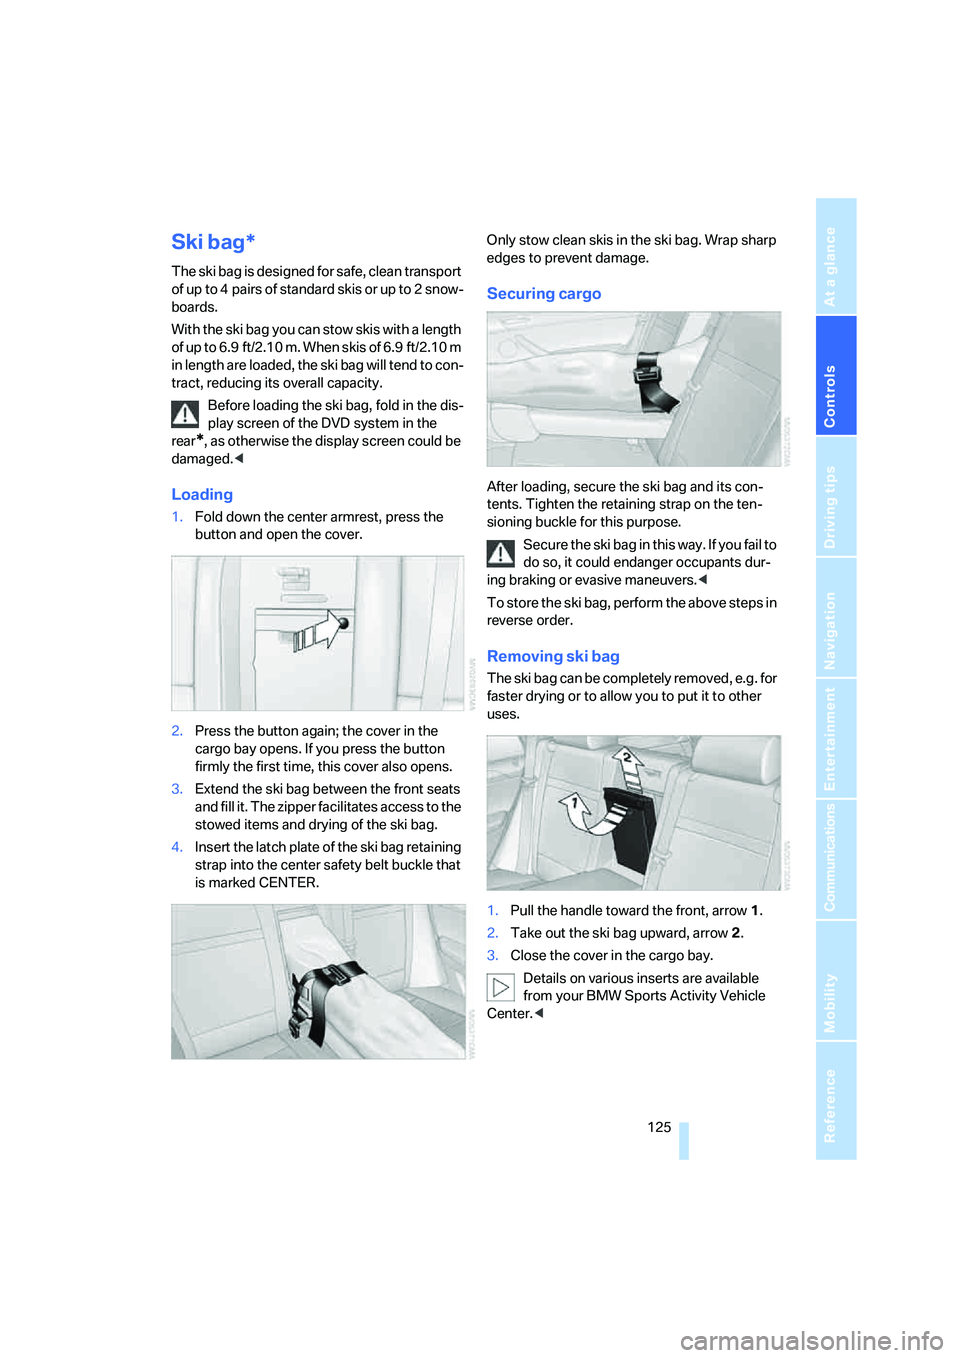
1.Fold down the center armrest, press the
button and open the cover.
2.Press the button again; the cover in the
cargo bay opens. If you press the button
firmly the first time, this cover also opens.
3.Extend the ski bag between the front seats
and fill it. The zipper facilitates access to the
stowed items and drying of the ski bag.
4.Insert the latch plate of the ski bag retaining
strap into the center safety belt buckle that
is marked CENTER.Only stow clean skis in the ski bag. Wrap sharp
edges to prevent damage.
Securing cargo
After loading, secure the ski bag and its con-
tents. Tighten the retaining strap on the ten-
sioning buckle for this purpose.
Secure the ski bag in this way. If you fail to
do so, it could endanger occupants dur-
ing braking or evasive maneuvers.<
To store the ski bag, perform the above steps in
reverse order.
Removing ski bag
The ski bag can be completely removed, e.g. for
faster drying or to allow you to put it to other
uses.
1.Pull the handle toward the front, arrow1.
2.Take out the ski bag upward, arrow2.
3.Close the cover in the cargo bay.
Details on various inserts are available
from your BMW Sports Activity Vehicle
Center.<
Page 134 of 292
Things to remember when driving
132 >Cover sharp edges and corners.
>For very heavy cargo when the rear seat is
not occupied, secure each safety belt in the
opposite buckle.
>Do not pile objects higher than the top edge
of the backrest.
>Wrap sharp-edged or pointed objects
which could strike the rear window while
driving.
Securing cargo
>Use the luggage net*, retaining straps*, or
securing straps to hold down small and
lightweight luggage and cargo.
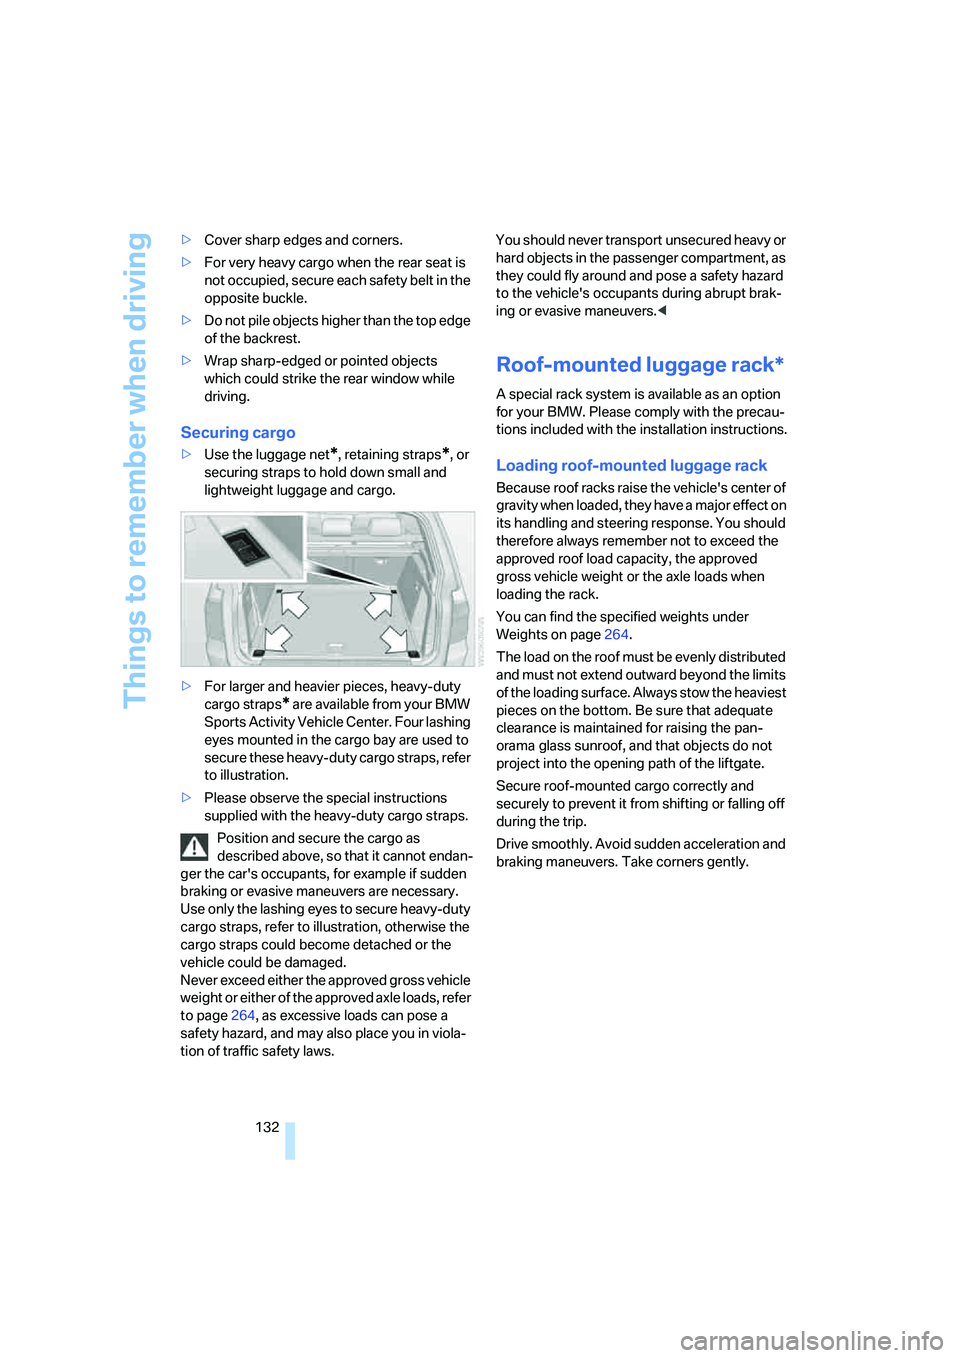
>For larger and heavier pieces, heavy-duty
cargo straps
* are available from your BMW
Sports Activity Vehicle Center. Four lashing
eyes mounted in the cargo bay are used to
secure these heavy-duty cargo straps, refer
to illustration.
>Please observe the special instructions
supplied with the heavy-duty cargo straps.
Position and secure the cargo as
described above, so that it cannot endan-
ger the car's occupants, for example if sudden
braking or evasive maneuvers are necessary.
Use only the lashing eyes to secure heavy-duty
cargo straps, refer to illustration, otherwise the
cargo straps could become detached or the
vehicle could be damaged.
Never exceed either the approved gross vehicle
weight or either of the approved axle loads, refer
to page264, as excessive loads can pose a
safety hazard, and may also place you in viola-
tion of traffic safety laws. You should never transport unsecured heavy or
hard objects in the passenger compartment, as
they could fly around and pose a safety hazard
to the vehicle's occupants during abrupt brak-
ing or evasive maneuvers.<
Roof-mounted luggage rack*
A special rack system is available as an option
for your BMW. Please comply with the precau-
tions included with the installation instructions.
Loading roof-mounted luggage rack
Because roof racks raise the vehicle's center of
gravity when loaded, they have a major effect on
its handling and steering response. You should
therefore always remember not to exceed the
approved roof load capacity, the approved
gross vehicle weight or the axle loads when
loading the rack.
You can find the specified weights under
Weights on page264.
The load on the roof must be evenly distributed
and must not extend outward beyond the limits
of the loading surface. Always stow the heaviest
pieces on the bottom. Be sure that adequate
clearance is maintained for raising the pan-
orama glass sunroof, and that objects do not
project into the opening path of the liftgate.
Secure roof-mounted cargo correctly and
securely to prevent it from shifting or falling off
during the trip.
Drive smoothly. Avoid sudden acceleration and
braking maneuvers. Take corners gently.
Page 201 of 292
Navigation
Entertainment
Driving tips
199Reference
At a glance
Controls
Communications
Mobility
Selecting a track
Buttons on CD/DVD player
Press the button for the corresponding
direction repeatedly until you reach the desired
track.
Playback begins at the start of the track.
Via the remote control
Press the button for the corresponding
direction repeatedly or turn the knurled wheel
until you reach the desired track.
Playback begins at the start of the track.
Settings and playback functions for
audio CDs/DVDs
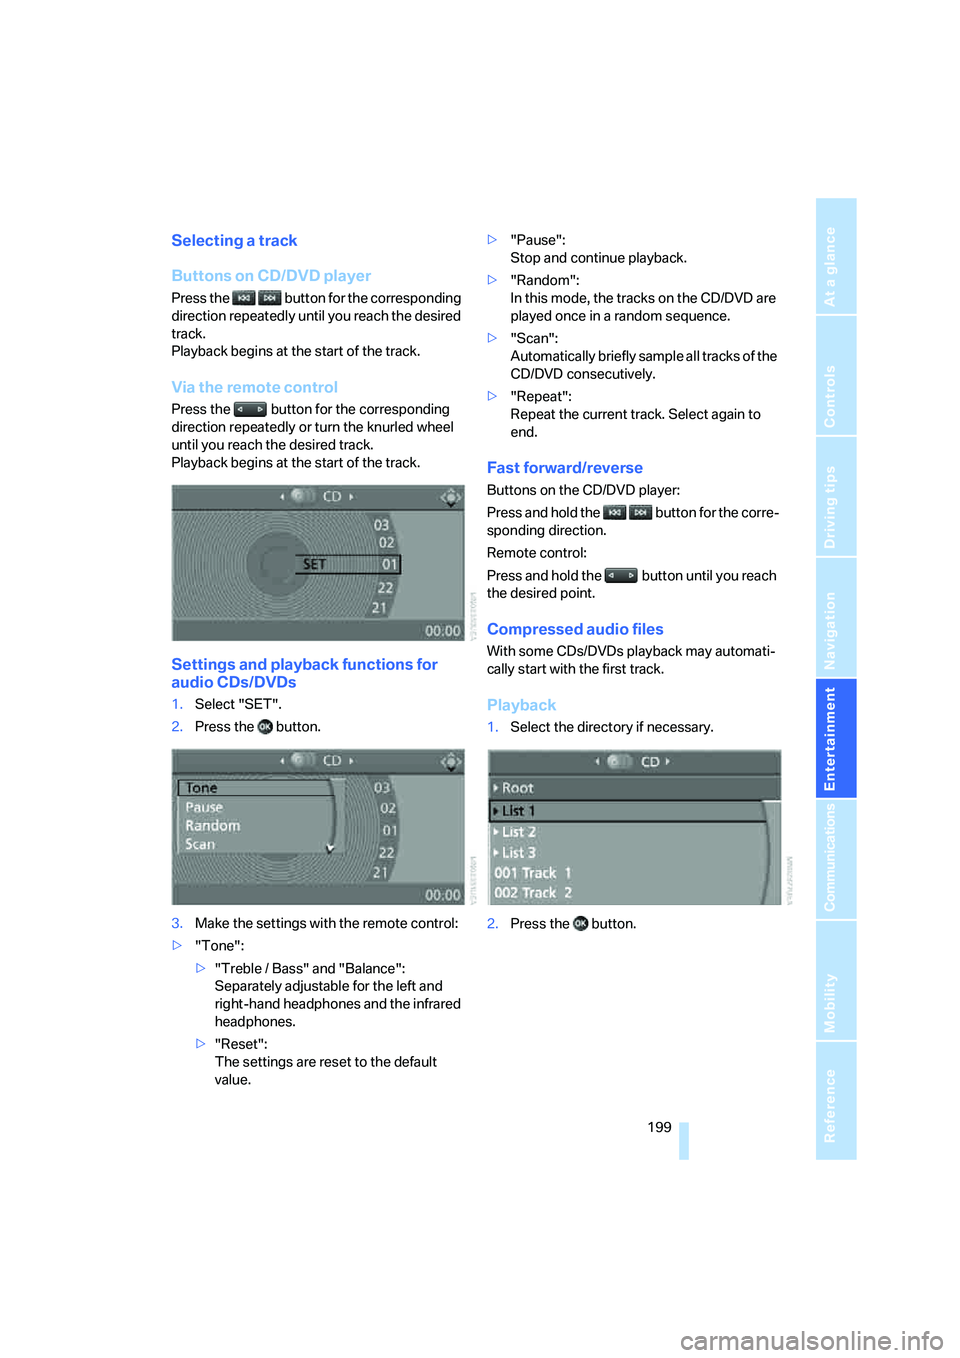
1.Select "SET".
2.Press the button.
3.Make the settings with the remote control:
>"Tone":
>"Treble / Bass" and "Balance":
Separately adjustable for the left and
right-hand headphones and the infrared
headphones.
>"Reset":
The settings are reset to the default
value.>"Pause":
Stop and continue playback.
>"Random":
In this mode, the tracks on the CD/DVD are
played once in a random sequence.
>"Scan":
Automatically briefly sample all tracks of the
CD/DVD consecutively.
>"Repeat":
Repeat the current track. Select again to
end.
Fast forward/reverse
Buttons on the CD/DVD player:
Press and hold the button for the corre-
sponding direction.
Remote control:
Press and hold the button until you reach
the desired point.
Compressed audio files
With some CDs/DVDs playback may automati-
cally start with the first track.
Playback
1.Select the directory if necessary.
2.Press the button.
Page 212 of 292

Telephoning
210 7.Change into the second field from the top,
select "Phone" and press the controller.
8.Select "Pair new phone" and press the con-
troller.
9.Select "Start pairing" and press the control-
ler.
The Bluetooth name of the vehicle is dis-
played.
Preparation with mobile phone
10.Additional operations must be carried out
on the mobile phone and differ depending
on the model, refer to the operating instruc-
tions of your mobile phone, e.g. find, con-
nect or pair under Bluetooth device.
The Bluetooth name of the vehicle is also
shown on the mobile phone display.
11.Select the Bluetooth name of the vehicle on
the mobile phone display.
Pairing
Depending on your mobile phone, you will first
be requested consecutively via the display of
your mobile phone or iDrive to enter the Blue-
tooth passkey you specified.
12.Enter the Bluetooth passkey.
Depending on the mobile phone, approx.
30 seconds are available for entering the
Bluetooth passkey on the mobile phone
and on the Control Display.
13.Change into the third field from the top,
select "Confirm passkey" and press the
controller.
14.Wait a few seconds until the "Communica-
tion" menu appears.
The next time you use the mobile phone in the
vehicle interior, it will be detected within a max-
imum of 2 minutes with the engine running or
the ignition switched on.
With some mobile phone models it may
be necessary to make certain settings for
a permanent Bluetooth link, e.g. via the menu
item Authorization or Secure connection, refer
to the operating instructions of your mobile
phone.<