2008 BMW 335XI SEDAN check engine
[x] Cancel search: check enginePage 232 of 274

Replacing components
230 There are separate headlamp covers for low-
beam headlamps and high-beam headlamps.
Be careful when installing the covers, oth-
erwise leaks could occur and cause dam-
age to the headlamp system.<
For checking and adjusting headlamp
aim, please contact your BMW center.<
Access to the lamps
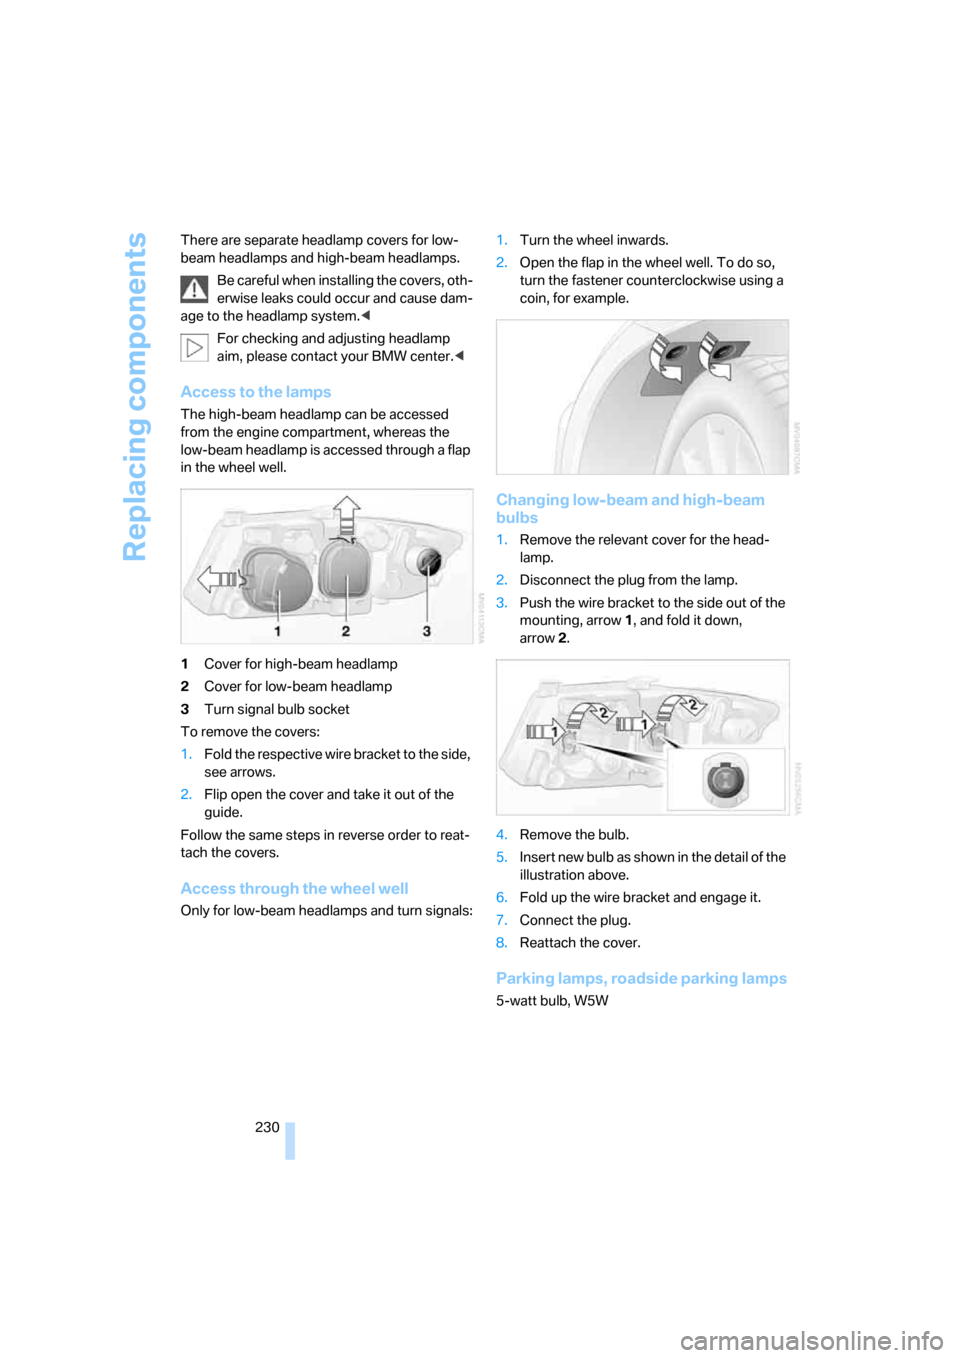
The high-beam headlamp can be accessed
from the engine compartment, whereas the
low-beam headlamp is accessed through a flap
in the wheel well.
1Cover for high-beam headlamp
2Cover for low-beam headlamp
3Turn signal bulb socket
To remove the covers:
1.Fold the respective wire bracket to the side,
see arrows.
2.Flip open the cover and take it out of the
guide.
Follow the same steps in reverse order to reat-
tach the covers.
Access through the wheel well
Only for low-beam headlamps and turn signals:1.Turn the wheel inwards.
2.Open the flap in the wheel well. To do so,
turn the fastener counterclockwise using a
coin, for example.
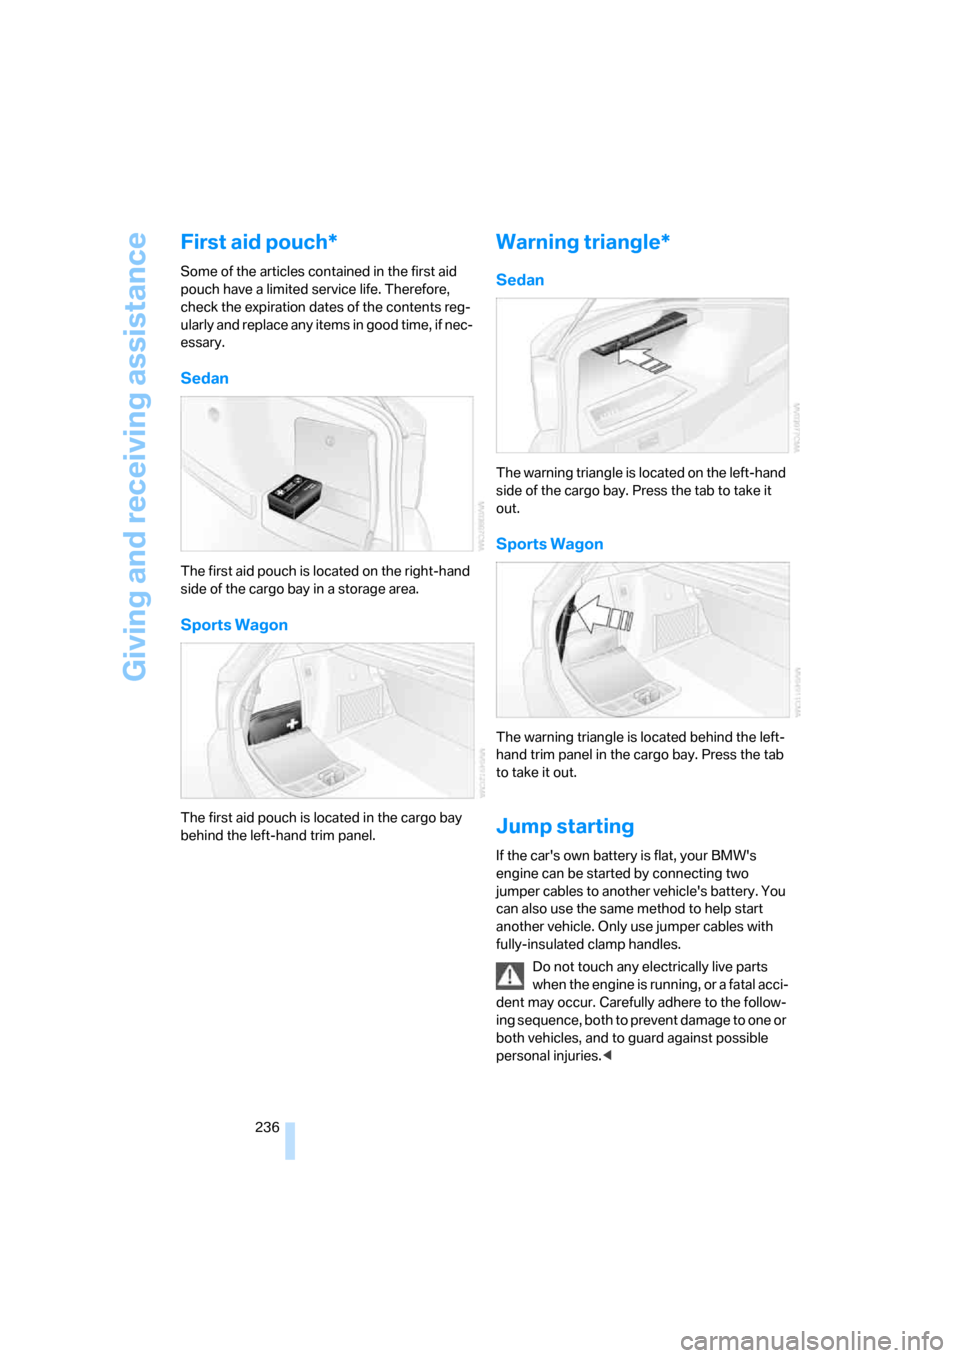
Changing low-beam and high-beam
bulbs
1.Remove the relevant cover for the head-
lamp.
2.Disconnect the plug from the lamp.
3.Push the wire bracket to the side out of the
mounting, arrow1, and fold it down,
arrow2.
4.Remove the bulb.
5.Insert new bulb as shown in the detail of the
illustration above.
6.Fold up the wire bracket and engage it.
7.Connect the plug.
8.Reattach the cover.
Parking lamps, roadside parking lamps
5-watt bulb, W5W
Page 238 of 274

Giving and receiving assistance
236
First aid pouch*
Some of the articles contained in the first aid
pouch have a limited service life. Therefore,
check the expiration dates of the contents reg-
ularly and replace any items in good time, if nec-
essary.
Sedan
The first aid pouch is located on the right-hand
side of the cargo bay in a storage area.
Sports Wagon
The first aid pouch is located in the cargo bay
behind the left-hand trim panel.
Warning triangle*
Sedan
The warning triangle is located on the left-hand
side of the cargo bay. Press the tab to take it
out.
Sports Wagon
The warning triangle is located behind the left-
hand trim panel in the cargo bay. Press the tab
to take it out.
Jump starting
If the car's own battery is flat, your BMW's
engine can be started by connecting two
jumper cables to another vehicle's battery. You
can also use the same method to help start
another vehicle. Only use jumper cables with
fully-insulated clamp handles.
Do not touch any electrically live parts
when the engine is running, or a fatal acci-
dent may occur. Carefully adhere to the follow-
ing sequence, both to prevent damage to one or
both vehicles, and to guard against possible
personal injuries.<
Page 239 of 274

Mobility
237Reference
At a glance
Controls
Driving tips
Communications
Navigation
Entertainment
Preparation
1.Check whether the battery of the other
vehicle has a voltage of 12 volts and
approximately the same capacitance in Ah.
This information can be found on the bat-
tery.
2.Switch off the engine of the assisting vehi-
cle.
3.Switch off any consumers in both vehicles.
There must not be any contact between
the bodies of the two vehicles, otherwise
there is a danger of shorting.<
Connecting jumper cables
Connect the jumper cables in the correct
order, so that no sparks which could
cause injury occur.<
Your BMW has a jump-starting connection in
the engine compartment which acts as the bat-
tery's positive terminal, refer also to the Engine
compartment overview on page222. The cap is
marked with +.
1.Pull the cap of the BMW jump-starting con-
nection up to remove.
2.Attach one terminal clamp of the plus/+
jumper cable to the positive terminal of the
battery or a starting-aid terminal of the vehi-
cle providing assistance.
3.Attach the second terminal clamp of the
plus/+ jumper cable to the positive terminal
of the battery or a starting-aid terminal of
the vehicle to be started.
4.Attach one terminal clamp of the minus/–
jumper cable to the negative terminal of the
battery or to an engine or body ground of
the assisting vehicle. Your BMW has a special nut as body ground
or negative pole.
5.Attach the second terminal clamp of the
minus/– jumper cable to the negative termi-
nal of the battery or to the engine or body
ground of the vehicle to be started.
Starting the engine
1.Start the engine of the donor vehicle and
allow it to run for a few minutes at slightly
increased idle speed.
2.Start the engine on the other vehicle in the
usual way.
If the first start attempt is not successful,
wait a few minutes before another attempt
in order to allow the discharged battery to
recharge.
3.Let the engines run for a few minutes.
4.Disconnect the jumper cables by reversing
the above connecting sequence.
If necessary, have the battery checked and
recharged.
Never use spray fluids to start the
engine.<
Tow-starting, towing away
Observe the applicable laws and regula-
tions for tow-starting and towing vehi-
cles.<
Do not transport any passengers other
than the driver in a vehicle that is being
towed.<
Page 241 of 274

Mobility
239Reference
At a glance
Controls
Driving tips
Communications
Navigation
Entertainment
With a tow rope
When starting off in the towing vehicle, make
sure that the tow rope is taut.
To avoid jerking and the associated
stresses on vehicle components when
towing, always use nylon ropes or nylon straps.
Attach the tow rope to the tow fittings only, as
attaching it to other parts of the vehicle could
result in damage.<
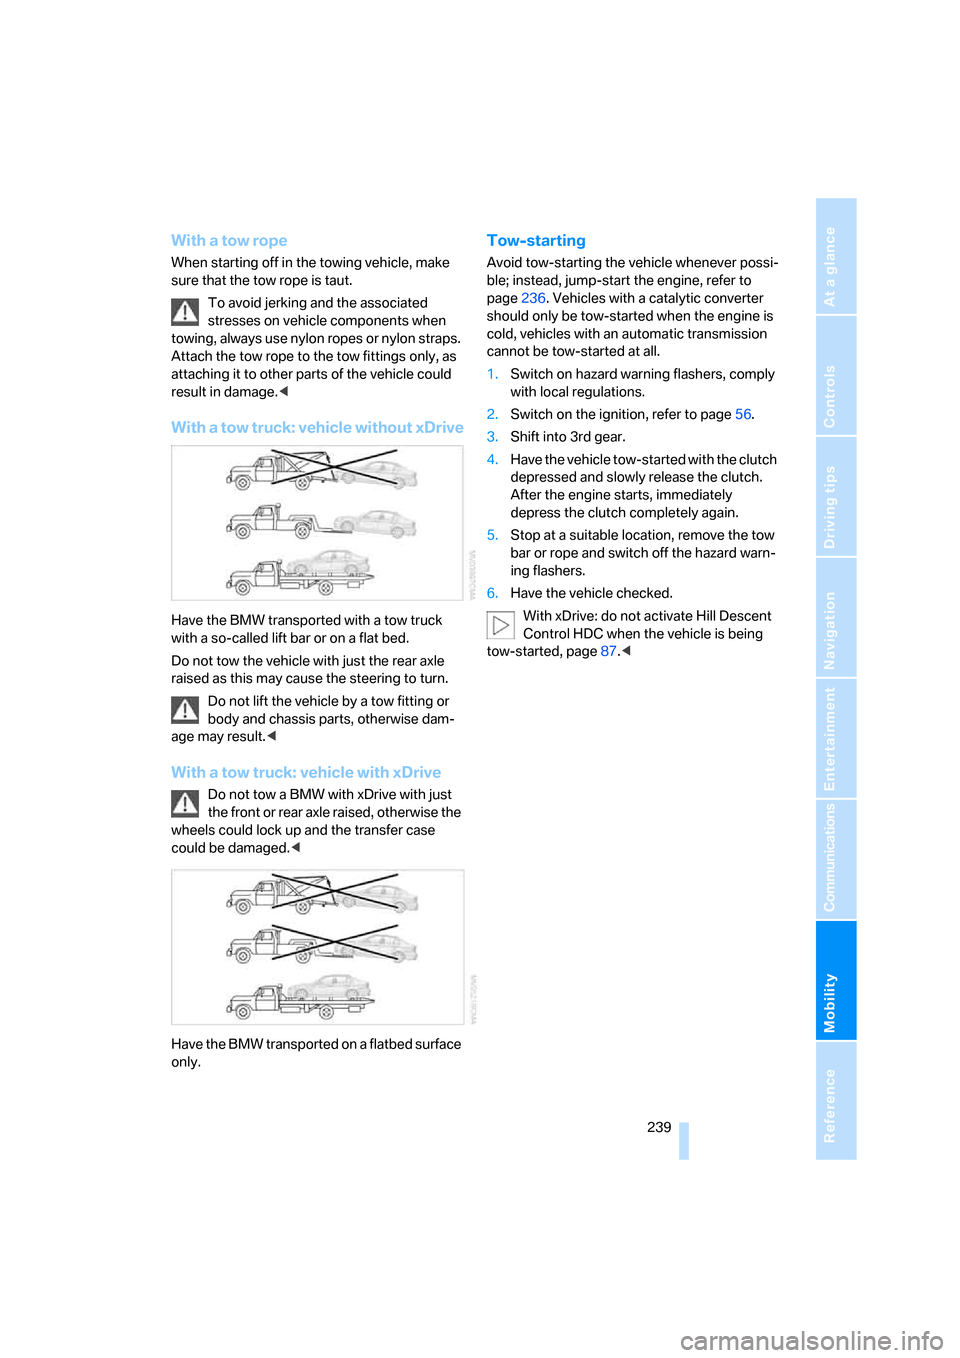
With a tow truck: vehicle without xDrive
Have the BMW transported with a tow truck
with a so-called lift bar or on a flat bed.
Do not tow the vehicle with just the rear axle
raised as this may cause the steering to turn.
Do not lift the vehicle by a tow fitting or
body and chassis parts, otherwise dam-
age may result.<
With a tow truck: vehicle with xDrive
Do not tow a BMW with xDrive with just
the front or rear axle raised, otherwise the
wheels could lock up and the transfer case
could be damaged.<
Have the BMW transported on a flatbed surface
only.
Tow-starting
Avoid tow-starting the vehicle whenever possi-
ble; instead, jump-start the engine, refer to
page236. Vehicles with a catalytic converter
should only be tow-started when the engine is
cold, vehicles with an automatic transmission
cannot be tow-started at all.
1.Switch on hazard warning flashers, comply
with local regulations.
2.Switch on the ignition, refer to page56.
3.Shift into 3rd gear.
4.Have the vehicle tow-started with the clutch
depressed and slowly release the clutch.
After the engine starts, immediately
depress the clutch completely again.
5.Stop at a suitable location, remove the tow
bar or rope and switch off the hazard warn-
ing flashers.
6.Have the vehicle checked.
With xDrive: do not activate Hill Descent
Control HDC when the vehicle is being
tow-started, page87.<
Page 257 of 274

Reference 255
At a glance
Controls
Driving tips
Communications
Navigation
Entertainment
Mobility
Changes, technical, refer to
For your own safety5
Changing bulbs, refer to
Lamps and bulbs229
Changing the language on the
Control Display84
Changing the measurement
units on the Control
Display76
Changing wheels233
Chassis number, refer to
Engine compartment222
Check Control81
"Check Control
messages"83
Check Gas Cap206
Child-restraint fixing system
LATCH53
Child-restraint systems52
Child-safety lock55
Child seats, refer to
Transporting children
safely52
Chrome parts, care, refer to
Caring for your vehicle
brochure
Cigarette lighter, refer to
Lighter111
Cleaning, refer to Caring for
your vehicle brochure
Cleaning headlamps62
– washer fluid62
"Climate"101
Clock71
– 12h/24h mode80
– setting time79
Closing
– from inside32
– from outside29
Clothes hooks110
Cockpit10
Cold start, refer to Starting the
engine57
Combined instrument, refer to
Instrument cluster12
Comfort access, refer to
Convenient access36
Comfort area, refer to Around
the center console14"Communication"188,198,1
99,200
Compact disc, refer to
– CD changer169
– CD player169
Compartment for remote
control, refer to Ignition
lock56
Compass108
Computer73
– displays on Control
Display73
– hour signal80
Computer, refer to iDrive16
"Concert hall" for Tone
control158
"Concierge"200
Concierge service200
Condensation, refer to When
the vehicle is parked122
Condition Based Service
CBS226
Configuring settings, refer to
Personal Profile28
Confirmation signals for
locking/unlocking the
vehicle31
Connecting vacuum cleaner,
refer to Connecting
electrical appliances112
Consumption, refer to
Average consumption73
Consumption display
– average consumption73
– Energy Control72
"Continue guidance to
destination?"144
Control Center, refer to
iDrive16
Control Display
– brightness84
– changing the language84
– switching off/on21
Control Display, refer to
iDrive16
Controller, refer to iDrive16
Controls and displays10
Control unit, refer to iDrive16Convenient access36
– replacing the battery38
– what to observe before
entering a car wash37
Convenient operation
– glass roof30
– windows30
Coolant224
– checking level225
Coolant temperature72
Cooling, maximum102
Cooling fluid, refer to
Coolant224
Cooling system, refer to
Coolant224
Copyright2
Corner-illuminating lamps,
refer to Adaptive Head
Light98
Cornering lamps, refer to
Adaptive Head Light98
Correct tires219
Courtesy lamps, refer to
Interior lamps99
Cross-hairs in navigation135
Cruise control63
– active64
– malfunction64
Cruising range73
Cup holders111
Curb weight, refer to
Weights245
Current fuel consumption,
refer to Energy Control72
"Current position"151
Current position
– displaying151
– entering139
– storing139
"Customer
Relations"192,200
D
Dashboard, refer to
Cockpit10
Dashboard, refer to
Instrument cluster12
Page 259 of 274

Reference 257
At a glance
Controls
Driving tips
Communications
Navigation
Entertainment
Mobility
DSC Dynamic Stability
Control86
DTC Dynamic Traction
Control87
– indicator/warning lamp87
DVD for navigation128
Dynamic Brake Control
DBC86
"Dynamic route" in
navigation141
Dynamic Stability Control
DSC
– indicator/warning lamp87
Dynamic Traction Control
DTC
– indicator/warning lamp87
E
EBV Electronic brake-force
distribution86
Eject button, refer to Buttons
on the CD player156
Electrical malfunction
– door lock31
– driver's door31
– fuel filler door206
– glass roof40
– luggage compartment lid/
tailgate33
– panorama glass roof42
Electric seat adjustment44
Electric steering wheel lock
– with convenient access37
Electronic oil level check222
Emergency actuation,
automatic transmission,
refer to Overriding selector
lever lock60
Emergency operation
– fuel filler door, manual
release206
Emergency operation, refer to
Closing manually
– glass roof40
– panorama glass roof42
Emergency operation, refer to
Manual operation
– door lock31Emergency release
– luggage compartment lid
from inside34
Emergency Request235
Emergency services, refer to
Roadside Assistance235
"Enabled services"202
"Enable services"203
"End call"189
Energy, saving
– saving fuel120
Energy-conscious driving,
refer to Energy Control72
Energy Control72
Engine
– breaking in120
– data242
– overheated, refer to Coolant
temperature72
– speed242
– starting57
– starting, convenient
access36
– switching off57
Engine compartment222
Engine coolant, refer to
Coolant224
Engine oil
– adding224
– BMW Maintenance
System226
– capacity246
– checking level222
– intervals between changes,
refer to Service
requirements76
"Engine oil level"223
Engine output, refer to Engine
data242
Engine speed, refer to Engine
data242
Engine starting, refer to
Starting the engine57
"Enter address"131
Entering a destination131
Entering a destination
country131
Entering a house number or
intersection133Entering an intersection132
Entering a street132
"Entertainment"156
Entry lamps, refer to Interior
lamps99
Environmentally friendly
driving, refer to Energy
Control72
"Equalizer", refer to Tone
control159
Equalizer, refer to Tone
control158
Error messages, refer to
Check Control81
"ESN"166
ESP Electronic Stability
Program, refer to DSC
Dynamic Stability
Control86
Event data recorders227
Exhaust system, refer to Hot
exhaust system121
Expanding the cargo bay114
Exterior mirrors49
– adjusting49
– automatic dimming
feature50
– automatic heating49
– folding in and out49
External audio device110
External audio device, refer to
AUX-In port175
Eyes
– for tow-starting and towing
away238
– for tying down loads124
F
Fader, tone control157
Failure messages, refer to
Check Control81
Failure of an electrical
consumer234
False alarm
– avoiding unintentional
alarm36
– switching off an alarm36
Page 270 of 274

Everything from A - Z
268
U
Underbody protection, refer to
Caring for your vehicle
brochure
Uniform Tire Quality Grading/
UTQR217
"Units"76
Units
– average consumption76
– temperature76
Universal garage door opener,
refer to Integrated universal
remote control106
Universal mobile phone
preparation package, refer
to separate Owner's Manual
Universal remote control106
Unlatching, refer to
Unlocking36
"Unlock button"30
Unlocking
– from inside32
– from outside29
– luggage compartment lid37
– tailgate37
– without remote control, refer
to Convenient access36
"Update services"201
USB-audio interface176
"USB" for audio
mode175,177
V
Vehicle
– battery233
– breaking in120
– care, refer to Caring for your
vehicle brochure
– cargo loading123
– Identification Number, refer
to Engine compartment222
– measurements, refer to
Dimensions243
– parking57
– washing, refer to Caring for
your vehicle brochure
– weight245"Vehicle / Tires" for
unlocking30
Vehicle decommissioning
– refer to Caring for your
vehicle brochure
Vehicle jack233
Vehicle position, refer to
Displaying current
position151
Ventilation103
– draft-free103
– in the rear104
Ventilation, refer to
Climate100
Ventilation while at a
standstill104
Vents, refer to Ventilation103
"Vent settings"101
Voice commands
– overview23
– short commands247
Voice instructions from
navigation system146
– muting51,147
– repeating51,147
– switching on/off146
– volume147
Voice phone book194
Volume156
– audio sources156
– fuel tank, refer to
Capacities246
– mobile phone187
– speed-dependent
control157
– voice instructions147
Volume distribution
– front/rear157
– left/right157
W
Warning and indicator
lamps13
Warning messages, refer to
Check Control81
Warning triangle236
Washer fluid62
– content of the reservoir63Washer fluid reservoir62
Washing the car, refer to
Caring for your vehicle
brochure
Waste tray, refer to
Ashtray111
Water on roads, refer to
Driving through water122
Waveband with the radio160
Wear indicators in tires, refer
to Minimum tread depth218
Weights245
Welcome lamps96
"Welcome light"97
Wheel/tire combination, refer
to Correct wheels and
tires219
Wheelbase, refer to
Dimensions243
Wheels, new219
Wheels and tires208
Width, refer to
Dimensions243
Windows38
– convenient operation30
– opening, closing38
– pinch protection system39
– rear window35
– safety switch39
Windows, indicator on Control
Display16
Windshield
– cleaning62
Windshield wash61
– filling capacity, reservoir246
– nozzles62
– rear window62
– reservoir for washer fluid62
– washer fluid62
Windshield wiper blades,
changing228
Windshield wipers, blades,
care, refer to Caring for your
vehicle brochure
Windshield wipers, refer to
Wiper system61
Winter tires220
– setting speed limit83
– storage220