2008 BMW 335XI SEDAN rear view mirror
[x] Cancel search: rear view mirrorPage 25 of 274

At a glance
23Reference
Controls
Driving tips
Communications
Navigation
Entertainment
Mobility
Voice command system
The concept
The voice command system allows you to con-
trol operation of various vehicle systems with-
out removing your hands from the steering
wheel.
Individual menu items on the Control Display
can be spoken as commands. It is not neces-
sary to use the controller.
The voice command system transforms your
oral commands into control signals for the
selected systems and provides support in the
form of instructions or questions.
The voice command system uses a special
microphone located in the area of the interior
rearview mirror, refer to page14.
Precondition
Via iDrive, select the language in which the
voice command system is operating, so that the
spoken commands can be identified. Selecting
the language for iDrive, refer to page84.
Symbols in the Owner's Manual
Saying commands
Activating voice command system
1.Press the button on the steering wheel. This symbol on the Control Display and
an acoustic signal indicate that the voice
command system is ready to receive spo-
ken commands.
2.Say the command.
The command appears on the Control Dis-
play.
This symbol appears on the Control Display
when you can enter additional commands.
If no further commands are possible, continue
by operating the item of equipment via iDrive.
Terminating or canceling voice
command system
Press the button on the steering wheel
or
Commands
Having the possible commands read
aloud
You can have the system read aloud the possi-
ble commands related to the selected menu
*
{...} Say the specified commands word for
word.
{{...}} Indicates responses of the voice
command system.
{Cancel}
Page 38 of 274

Opening and closing
36
Switching off an alarm
>Unlock the car with the remote control, refer
to page29.
>Insert the remote control all the way into the
ignition lock.
Indicator lamp displays
>The indicator lamp under the inside rear-
view mirror flashes continuously: the sys-
tem is armed.
>The indicator lamp flashes after locking:
doors, hood, luggage compartment lid/tail-
gate or rear window are not properly closed.
Even if you do not close the alerted area, the
system begins to monitor the remaining
areas, and the indicator lamp flashes con-
tinuously after approx. 10 seconds. The
interior motion sensor and the tilt alarm
sensor are not activated.
>The indicator lamp goes out after unlocking:
your vehicle has not been disturbed while
you were away.
>If the indicator lamp flashes after unlocking
until the remote control is inserted in the
ignition, but for no longer than approx.
5 minutes: your vehicle has been disturbed
while you were away.
Tilt alarm sensor
The tilt of the vehicle is monitored. The alarm
system reacts, e.g. to attempts to steal a wheel
or tow the vehicle.
Interior motion sensor
In order for the interior motion sensor to func-
tion properly, the windows and glass roof must
be completely closed
*.
Avoiding unintentional alarms
The tilt alarm sensor and interior motion sensor
may be switched off at the same time. This pre-
vents unintentional alarms, e.g. in the following
situations:
>In duplex garages
>During transport on car-carrying trains,
boats/ships or on a trailer
>When animals are to remain in the vehicle
Switching off tilt alarm sensor and
interior motion sensor
Press the button on the remote control
again as soon as the vehicle is locked.
The indicator lamp lights up briefly and then
flashes continuously. The tilt alarm sensor and
the interior motion sensor are switched off until
the next time the vehicle is unlocked and subse-
quently locked again.
Convenient access*
Convenient access enables you to enter your
vehicle without needing to hold the remote con-
trol in your hand. All you need to do is wear the
remote control close to your body, e.g. in your
jacket pocket. The vehicle detects the corre-
sponding remote control within the immediate
vicinity or in the passenger compartment.
Convenient access supports the following
functions:
>Unlocking/locking the vehicle
>Unlocking the luggage compartment lid/
tailgate separately
>Engine starting
>Convenient closure
Functional requirement
>The vehicle or the luggage compartment
lid/tailgate can only be locked when the
vehicle detects that the remote control cur-
rently in use is outside of the vehicle.
>The vehicle cannot be locked or unlocked
again until after approx. 2 seconds.
Page 52 of 274

Adjustments
50
Deactivating
Push the switch to the position for the passen-
ger-side mirror, arrow 2.
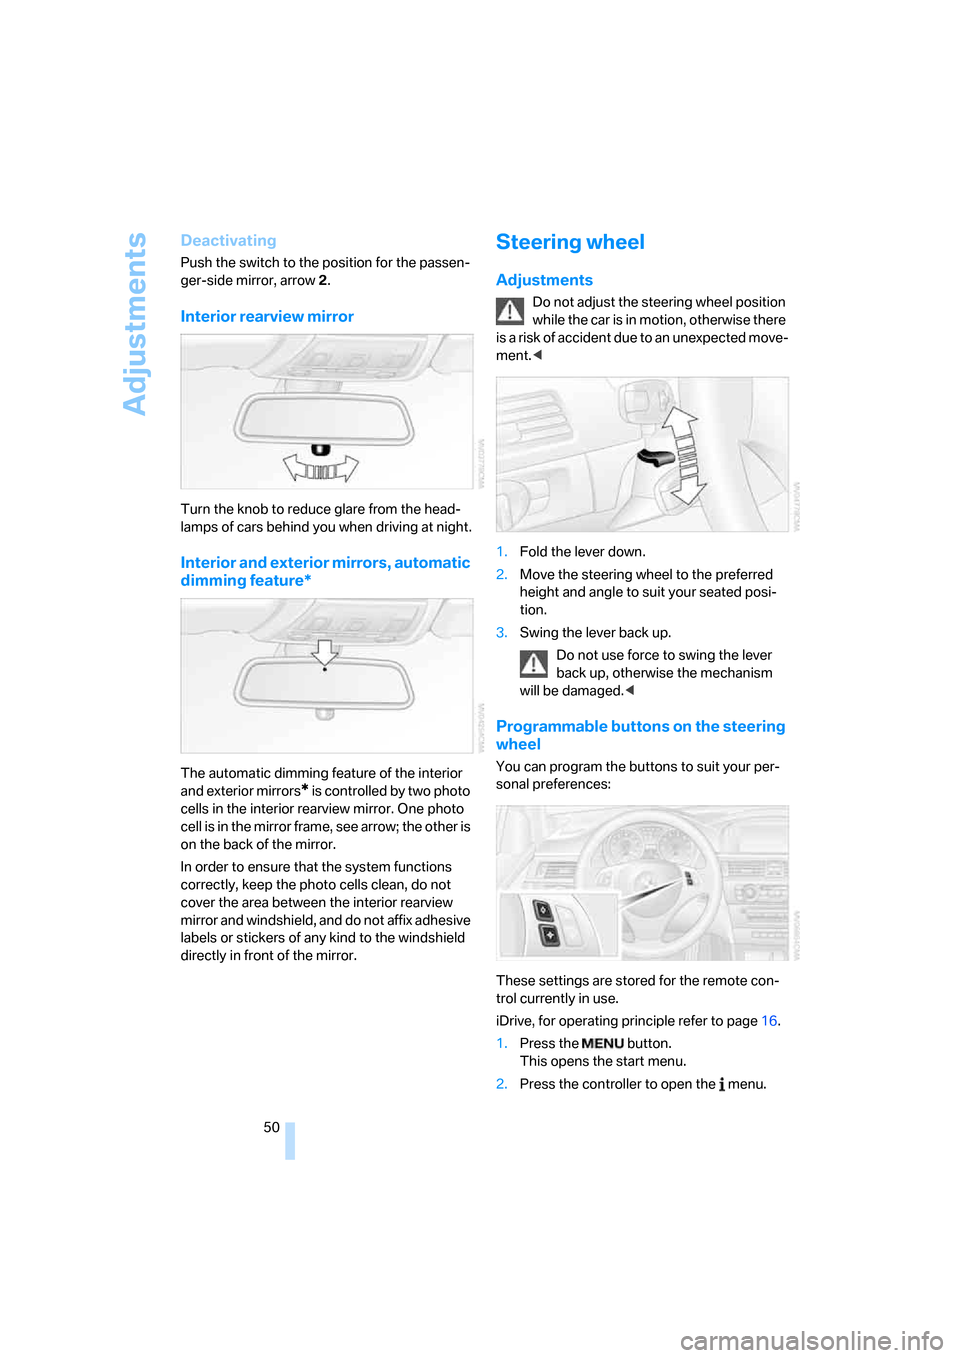
Interior rearview mirror
Turn the knob to reduce glare from the head-
lamps of cars behind you when driving at night.
Interior and exterior mirrors, automatic
dimming feature*
The automatic dimming feature of the interior
and exterior mirrors
* is controlled by two photo
cells in the interior rearview mirror. One photo
cell is in the mirror frame, see arrow; the other is
on the back of the mirror.
In order to ensure that the system functions
correctly, keep the photo cells clean, do not
cover the area between the interior rearview
mirror and windshield, and do not affix adhesive
labels or stickers of any kind to the windshield
directly in front of the mirror.
Steering wheel
Adjustments
Do not adjust the steering wheel position
while the car is in motion, otherwise there
i s a ri s k o f a c c id e n t d u e t o a n u n ex p e c t ed m o v e -
ment.<
1.Fold the lever down.
2.Move the steering wheel to the preferred
height and angle to suit your seated posi-
tion.
3.Swing the lever back up.
Do not use force to swing the lever
back up, otherwise the mechanism
will be damaged.<
Programmable buttons on the steering
wheel
You can program the buttons to suit your per-
sonal preferences:
These settings are stored for the remote con-
trol currently in use.
iDrive, for operating principle refer to page16.
1.Press the button.
This opens the start menu.
2.Press the controller to open the menu.
Page 63 of 274

Controls
61Reference
At a glance
Driving tips
Communications
Navigation
Entertainment
Mobility
Unusually rapid flashing of the indicator
lamp indicates that a turn signal indicator
has failed.<
Indicating a turn briefly
Press the lever as far as the resistance point for
as long as you wish to indicate a turn.
Triple turn signal activation
Press the lever as far as the resistance point.
The turn signals flash three times.
You can activate or deactivate this function.
iDrive, for operating principle refer to page16.
1.Open the start menu.
2.Press the controller to open the menu.
3.Select "Settings" and press the controller.
4.Select "Vehicle / Tires" and press the con-
troller.
5.If necessary, move the highlight marker to
the uppermost field. Turn the controller
until "Lighting" is selected and press the
controller.
6.Select "Triple turn signal" and press the
controller.
Triple turn signaling is activated.
The setting is stored for the remote control cur-
rently in use.
Wiper system
1Switching on wipers
2Switching off wipers or brief wipe
3Activating/deactivating intermittent wipe or
rain sensor
*
4Cleaning windshield and headlamps*
5Setting speed for intermittent wipe, or sen-
sitivity of the rain sensor
Switching on wipers
Press the lever upward, arrow 1.
The lever automatically returns to its initial posi-
tion when released.
Normal wiper speed
Press once.
The system switches to operation in the inter-
mittent mode when the vehicle is stationary.
Fast wiper speed
Press twice or press beyond the resistance
point.
The system switches to normal speed when the
vehicle is stationary.
Intermittent wipe or rain sensor*
If the car is not equipped with a rain sensor, the
intermittent-wipe time is a preset.
If the car is equipped with a rain sensor, the time
between wipes is controlled automatically and
depends on the intensity of the rainfall. The rain
sensor is mounted on the windshield, directly in
front of the interior rearview mirror.
Page 96 of 274

Technology for driving comfort and safety
94
Airbags
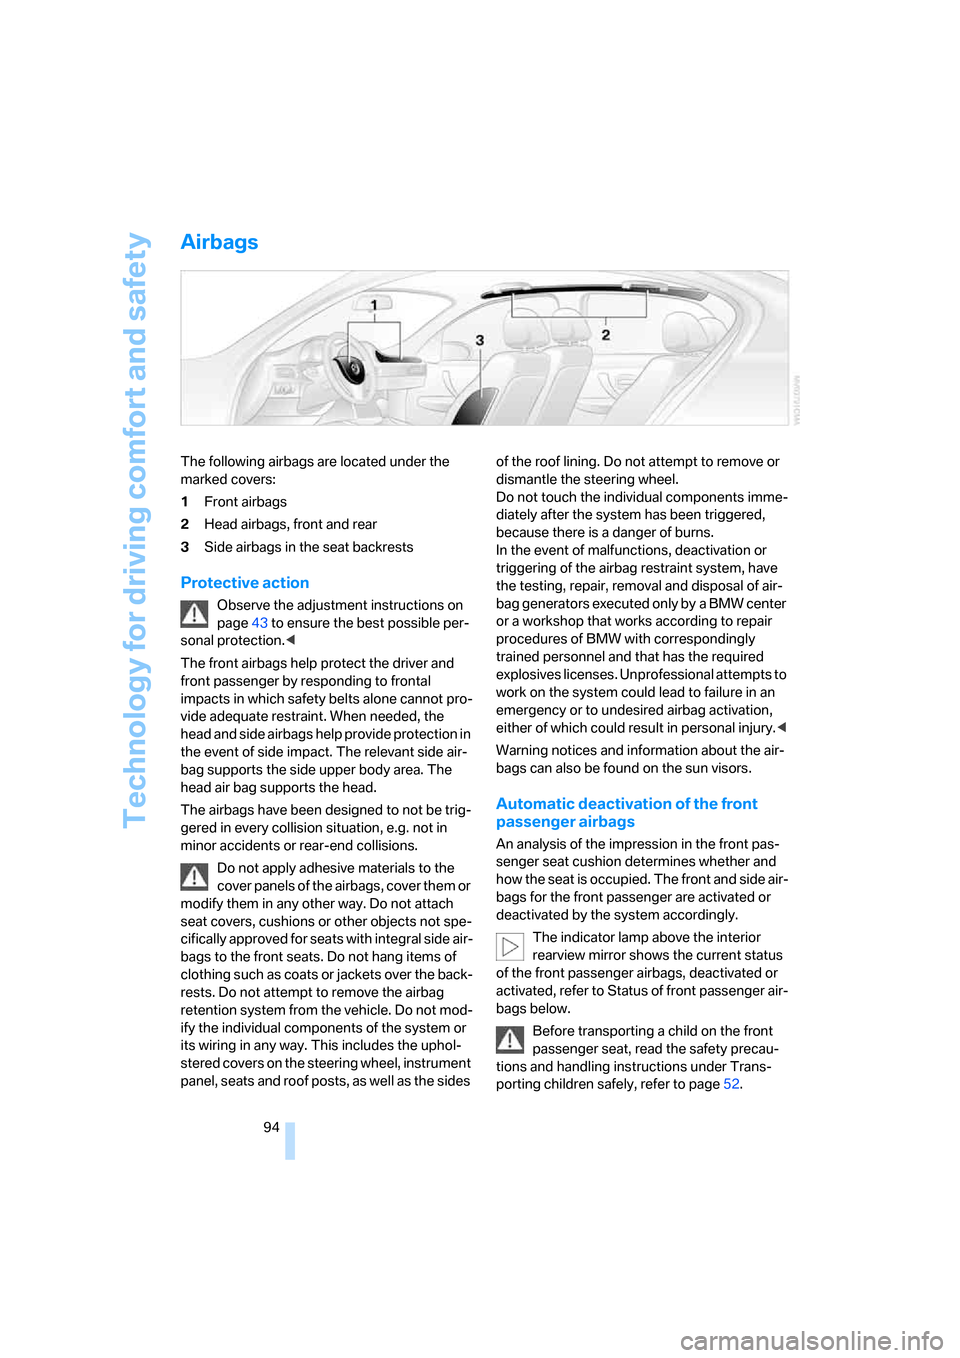
The following airbags are located under the
marked covers:
1Front airbags
2Head airbags, front and rear
3Side airbags in the seat backrests
Protective action
Observe the adjustment instructions on
page43 to ensure the best possible per-
sonal protection.<
The front airbags help protect the driver and
front passenger by responding to frontal
impacts in which safety belts alone cannot pro-
vide adequate restraint. When needed, the
head and side airbags help provide protection in
the event of side impact. The relevant side air-
bag supports the side upper body area. The
head air bag supports the head.
The airbags have been designed to not be trig-
gered in every collision situation, e.g. not in
minor accidents or rear-end collisions.
Do not apply adhesive materials to the
cover panels of the airbags, cover them or
modify them in any other way. Do not attach
seat covers, cushions or other objects not spe-
cifically approved for seats with integral side air-
bags to the front seats. Do not hang items of
clothing such as coats or jackets over the back-
rests. Do not attempt to remove the airbag
retention system from the vehicle. Do not mod-
ify the individual components of the system or
its wiring in any way. This includes the uphol-
stered covers on the steering wheel, instrument
panel, seats and roof posts, as well as the sides of the roof lining. Do not attempt to remove or
dismantle the steering wheel.
Do not touch the individual components imme-
diately after the system has been triggered,
because there is a danger of burns.
In the event of malfunctions, deactivation or
triggering of the airbag restraint system, have
the testing, repair, removal and disposal of air-
bag generators executed only by a BMW center
or a workshop that works according to repair
procedures of BMW with correspondingly
trained personnel and that has the required
explosives licenses. Unprofessional attempts to
work on the system could lead to failure in an
emergency or to undesired airbag activation,
either of which could result in personal injury.<
Warning notices and information about the air-
bags can also be found on the sun visors.
Automatic deactivation of the front
passenger airbags
An analysis of the impression in the front pas-
senger seat cushion determines whether and
how the seat is occupied. The front and side air-
bags for the front passenger are activated or
deactivated by the system accordingly.
The indicator lamp above the interior
rearview mirror shows the current status
of the front passenger airbags, deactivated or
activated, refer to Status of front passenger air-
bags below.
Before transporting a child on the front
passenger seat, read the safety precau-
tions and handling instructions under Trans-
porting children safely, refer to page52.
Page 236 of 274

Replacing components
234
Disposal
Have old batteries disposed of by your
BMW center or hand them in to a recy-
cling center. Maintain the battery in an upright
position for transport and storage. Always
secure the battery against tipping over during
transport.<
Power failure
After a temporary power loss, the functioning of
some equipment may be limited and require
reinitialization. Individual settings may likewise
have been lost and will have to be programmed:
>Time and date
These values must be updated, refer to
page79.
>Radio
In some cases, stations may have to be
stored again, refer to page162.
>Navigation system
Operability must be waited for, refer to
page128.
>Glass roof
It may happen that the roof can only be
raised. The system must be initialized.
Please contact your BMW center.
>Panorama glass roof
It may happen that the roof can only be
raised. The system must be initialized.
Please contact your BMW center.
>Seat and mirror memory
The positions must be stored again, refer to
page47.
>Inside rearview mirror with digital compass
The system must be calibrated, refer to
page108.
Fuses
Never attempt to repair a blown fuse and
do not replace a defective fuse with a sub-
stitute of another color or amperage rating, oth-
erwise this could lead to a circuit overload, ulti-
mately resulting in a fire in the vehicle.
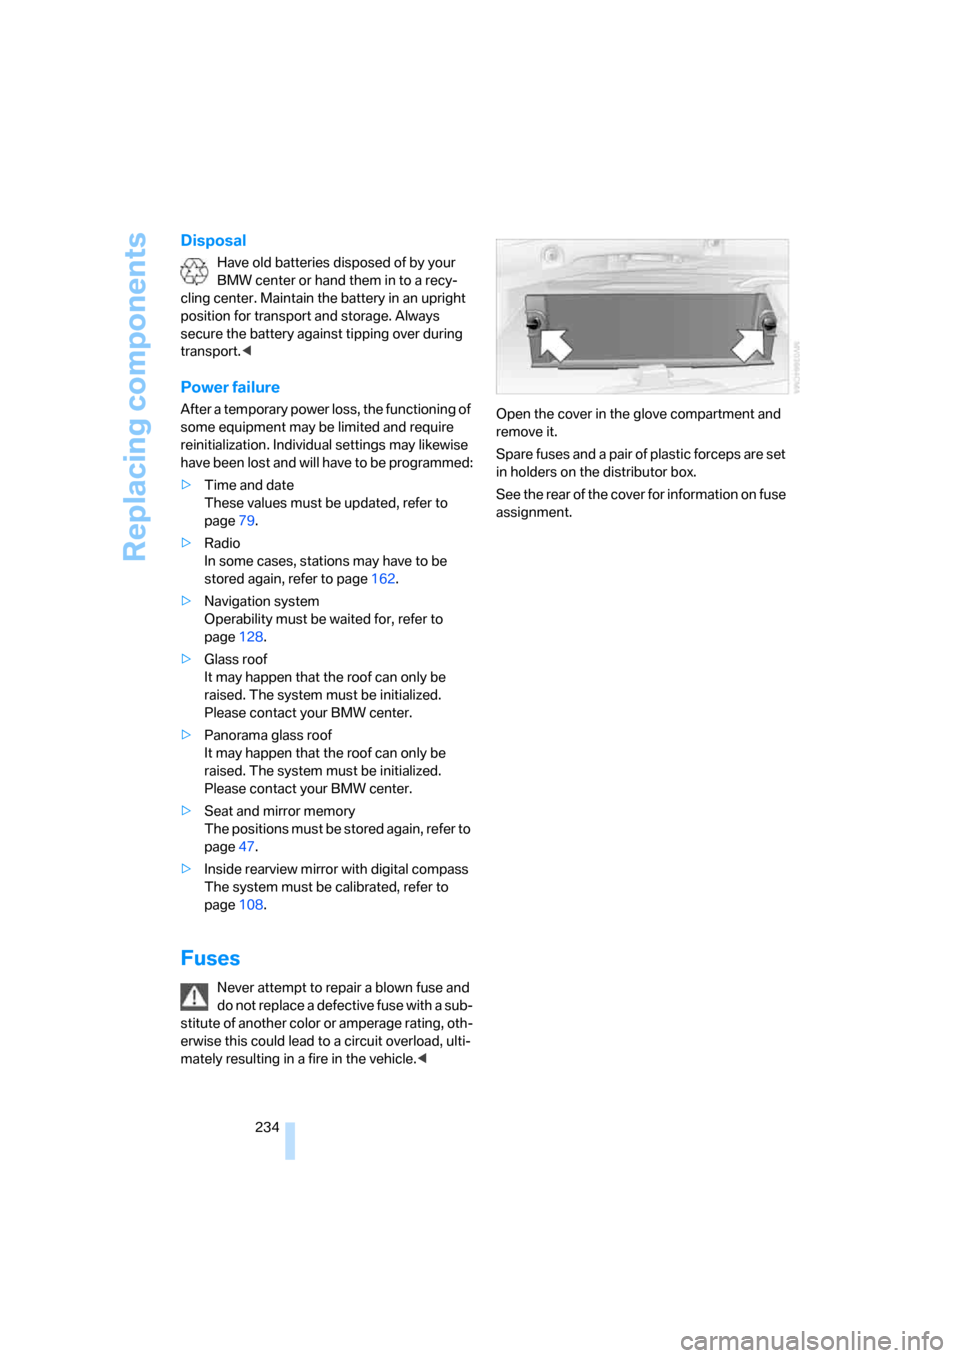
Spare fuses and a pair of plastic forceps are set
in holders on the distributor box.
See the rear of the cover for information on fuse
assignment.
Page 261 of 274

Reference 259
At a glance
Controls
Driving tips
Communications
Navigation
Entertainment
Mobility
Head restraints45
– front, removing46
– rear, removing46
– sitting safely43
Heated
– mirrors49
– rear window103
– seats47
Heating
– mirrors49
– rear window103
– residual heat103
– seats47
Heating and ventilation, refer
to Climate100
Heating while at a standstill,
refer to Using residual
heat103
Heavy loads, refer to Stowing
cargo123
Height, refer to
Dimensions243
Height adjustment
– seats44
– steering wheel50
High beams98
– headlamp flasher98
– indicator lamp13
– replacing bulbs229
High Definition Radio163
High water, refer to Driving
through water122
Highways, refer to Route
criteria141
Hill Descent Control HDC87
Hills122
Holders for cups111
Home address140
"Home address" in
navigation141
Homepage BMW4
Hood221
Hooks for shopping
bags115,116
Horn10,11
Hotel function, refer to
Locking or unlocking
separately34
Hot exhaust system121"Hour memo"80
"House number" in
destination entry133
Hydraulic brake assist, refer to
Dynamic Brake Control
DBC86
Hydroplaning121
I
IBOC, refer to High Definition
Radio163
Ice warning, refer to Outside
temperature
warning71
ID3 tag, refer to Information
about the track171
Identification marks
– Run-Flat Tires219
– tire coding217
iDrive16
– adjusting brightness84
– assistance window20
– automatic climate
control101
– changing language84
– changing units of measure
and display format76
– confirming selection or
entry19
– controls16
– displays, menus17
– menu guidance17
– operating principle16
– overview16
– selecting a menu item19
– setting the date and time79
– start menu17
– status information20
– switching menu pages19
– symbols18
iDrive operating principle16
Ignition56
– switched off56
– switched on56
Ignition key, refer to Remote
control with integrated
key28Ignition key position 1, refer to
Radio readiness56
Ignition key position 2, refer to
Ignition on56
Ignition lock56
i menu18
Imprint2
Indicator and warning
lamps13
– Tire Pressure Monitor
TPM92
Individual air distribution101
Individually programmable
buttons on steering
wheel50
Inflation pressure, refer to Tire
inflation pressure208
Inflation pressure monitoring,
refer to Tire Pressure
Monitor TPM90
Information
– on another location136
– on country136
– on current position136
– on destination location136
Information menu, refer to
i menu18
"Information on
destination"138
"Info sources"77
Initializing
– active steering93
– after power failure234
– compass, refer to
Calibrating108
– Flat Tire Monitor FTM89
– glass roof40
– panorama glass roof42
"Input map"135
Installation location
– CD changer173
– navigation DVD drive128
– telephone110
Instructions for navigation
system, refer to Voice
instructions146
Instrument cluster12
Instrument lighting99
Page 262 of 274

Everything from A - Z
260 Instrument panel, refer to
Cockpit10
Integrated key28
Integrated universal remote
control106
Interesting destination for
navigation136
"Interim time"84
Interior lamps99
– remote control30
Interior motion sensor36
Interior rearview mirror50
– automatic dimming
feature50
– compass108
Interlock, refer to Disengaging
the remote control58
Intermittent mode of the
wipers61
J
Jacking points233
Joystick, refer to iDrive16
Jumpering, refer to Jump
starting236
Jump starting236
K
Key, refer to Integrated key/
remote control28
Keyless go, refer to
Convenient access36
Keyless opening and closing,
refer to Convenient
access36
Key Memory, refer to Personal
Profile28
Kick-down59
– automatic transmission with
Steptronic59
Knock control207
L
Lamps
– automatic headlamp
control96
– parking lamps/low beams96
Lamps and bulbs, replacing
bulbs229
"Language / Units"76
"Language / Units" in
navigation129,146
"Language" on the Control
Display84
"Languages" in
navigation129,146
Lap-and-shoulder belt, refer
to Safety belts48
Lashing eyes, refer to
Securing cargo124
Last destinations, refer to
Destination list137
"Last seat pos."48
LATCH child-restraint fixing
system53
LED hand lamp110
LED Light-emitting
diodes229
Length, refer to
Dimensions243
License plate lamp, replacing
bulb233
Light-emitting diodes
LED229
Lighter111
– connecting electrical
appliances112
"Lighting"61
Lighting
– instruments99
– lamps and bulbs229
– vehicle, refer to Lamps96
Light-metal alloy wheels, care,
refer to Caring for your
vehicle brochure
Light switch96
"Limit"83
Limit, refer to Speed limit83
Load securing equipment,
refer to Securing cargo124Lock buttons, doors, refer to
Locking32
Locking
– adjusting confirmation
signal31
– from inside32
– from outside30
– without remote control, refer
to Convenient access36
Locking and unlocking doors
– confirmation signals31
– from inside32
– from outside29
Low-beam headlamps96
– automatic
96
Low beams
– replacing bulbs229
Lower back support, refer to
Lumbar support45
Luggage compartment lid33
– convenient access37
– emergency operation, refer
to Opening manually33
– emergency release34
– locking or unlocking
separately34
– opening from inside33
– opening from outside33
– opening manually33
– remote control30
Luggage rack, refer to Roof-
mounted luggage rack124
Lumbar support45
M
M+S tires, refer to Winter
tires220
Maintenance, refer to Service
Booklet
Maintenance system226
Malfunction
– automatic transmission with
Steptronic60
– luggage compartment lid/
tailgate33
– tires90
Malfunction warnings, refer to
Check Control81