2008 BMW 335XI tailgate
[x] Cancel search: tailgatePage 39 of 274
Controls
37Reference
At a glance
Driving tips
Communications
Navigation
Entertainment
Mobility
>The engine can only be started when the
vehicle detects that the remote control cur-
rently in use is inside the vehicle.
Comparison to the standard remote
control
In general, there is no difference between using
convenient access or pressing the buttons on
the remote control to carry out the functions
mentioned above. You should therefore first
familiarize yourself with the instructions on
opening and closing starting on page28.
Special features regarding the use of conve-
nient access are described below.
If you notice a brief delay while opening or
closing windows or the glass roof/pan-
orama glass roof, the system is checking
whether a remote control is inside the vehicle.
Please repeat the opening or closing proce-
dure, if necessary.<
Unlocking
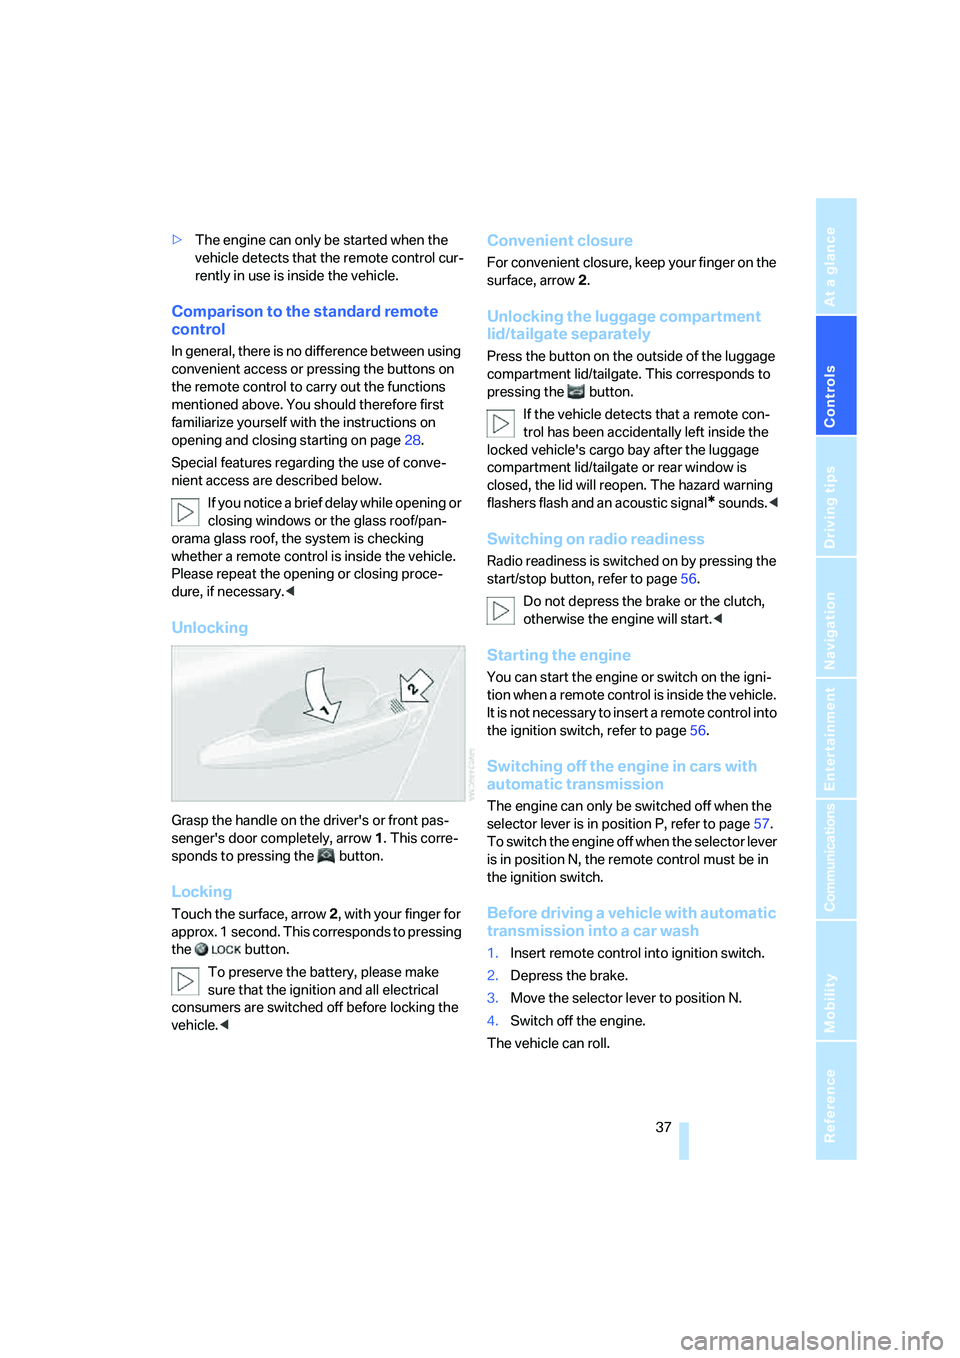
Grasp the handle on the driver's or front pas-
senger's door completely, arrow 1. This corre-
sponds to pressing the button.
Locking
Touch the surface, arrow 2, with your finger for
approx. 1 second. This corresponds to pressing
the button.
To preserve the battery, please make
sure that the ignition and all electrical
consumers are switched off before locking the
vehicle.<
Convenient closure
For convenient closure, keep your finger on the
surface, arrow 2.
Unlocking the luggage compartment
lid/tailgate separately
Press the button on the outside of the luggage
compartment lid/tailgate. This corresponds to
pressing the button.
If the vehicle detects that a remote con-
trol has been accidentally left inside the
locked vehicle's cargo bay after the luggage
compartment lid/tailgate or rear window is
closed, the lid will reopen. The hazard warning
flashers flash and an acoustic signal
* sounds.<
Switching on radio readiness
Radio readiness is switched on by pressing the
start/stop button, refer to page56.
Do not depress the brake or the clutch,
otherwise the engine will start.<
Starting the engine
You can start the engine or switch on the igni-
tion when a remote control is inside the vehicle.
It is not necessary to insert a remote control into
the ignition switch, refer to page56.
Switching off the engine in cars with
automatic transmission
The engine can only be switched off when the
selector lever is in position P, refer to page57.
T o s w i t c h t h e e n g i n e o f f w h e n t h e s e l e c t o r l e v e r
is in position N, the remote control must be in
the ignition switch.
Before driving a vehicle with automatic
transmission into a car wash
1.Insert remote control into ignition switch.
2.Depress the brake.
3.Move the selector lever to position N.
4.Switch off the engine.
The vehicle can roll.
Page 116 of 274
Practical interior accessories
114 The lashing eyes in the cargo bay provide you
with a way to attach cargo bay nets
* or draw
straps for securing suitcases and luggage, refer
to page124.
Sports Wagon:
Cargo bay
Roll-up cover
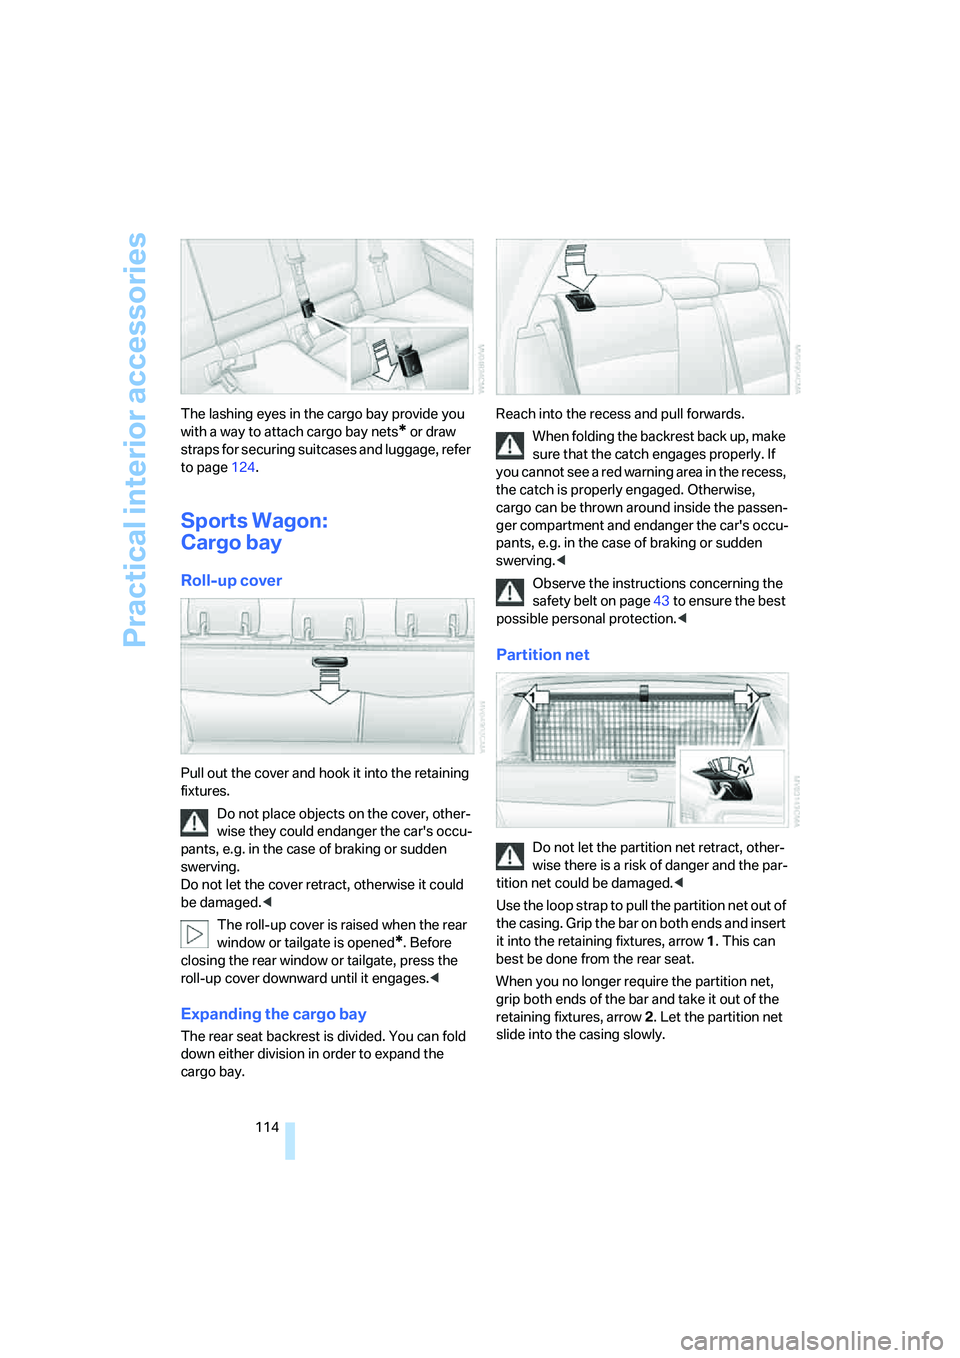
Pull out the cover and hook it into the retaining
fixtures.
Do not place objects on the cover, other-
wise they could endanger the car's occu-
pants, e.g. in the case of braking or sudden
swerving.
Do not let the cover retract, otherwise it could
be damaged.<
The roll-up cover is raised when the rear
window or tailgate is opened
*. Before
closing the rear window or tailgate, press the
roll-up cover downward until it engages.<
Expanding the cargo bay
The rear seat backrest is divided. You can fold
down either division in order to expand the
cargo bay.Reach into the recess and pull forwards.
When folding the backrest back up, make
sure that the catch engages properly. If
you cannot see a red warning area in the recess,
the catch is properly engaged. Otherwise,
cargo can be thrown around inside the passen-
ger compartment and endanger the car's occu-
pants, e.g. in the case of braking or sudden
swerving.<
Observe the instructions concerning the
safety belt on page43 to ensure the best
possible personal protection.<
Partition net
Do not let the partition net retract, other-
wise there is a risk of danger and the par-
tition net could be damaged.<
Use the loop strap to pull the partition net out of
the casing. Grip the bar on both ends and insert
it into the retaining fixtures, arrow 1. This can
best be done from the rear seat.
When you no longer require the partition net,
grip both ends of the bar and take it out of the
retaining fixtures, arrow 2. Let the partition net
slide into the casing slowly.
Page 123 of 274
Driving tips
121Reference
At a glance
Controls
Communications
Navigation
Entertainment
Mobility
Drive defensively
Avoid unnecessary acceleration and braking
maneuvers. To do so, keep an adequate dis-
tance to the forward vehicle. A defensive and
smooth driving style keeps fuel consumption
down.
Avoid high engine speeds
Only use first gear when setting off. In second
and higher gears, accelerate without hesitation
or pauses. When accelerating, shift up before
reaching high engine speeds.
When you reach the desired speed, shift into
the highest applicable gear and drive with the
engine speed as low as possible and at a con-
stant speed.
As a rule: driving at low engine speeds lowers
fuel consumption and reduces wear.
Coasting
When approaching a red light, take your foot off
the accelerator and coast to a stop in the high-
est applicable gear.
O n a d o w n h il l s lo p e , t a k e y o u r f o o t o f f t h e a c c el -
erator and coast in a suitable gear.
The fuel supply is interrupted when coasting.
Switch off the engine during lengthy
stops
Switch off the engine when stopping for lengthy
periods, e.g. at traffic lights, railroad crossings
or in traffic congestions. You achieve fuel sav-
ings even if standing time is as short as approx.
4 seconds.
Switch off functions you do not need at
the moment
Functions such as the air conditioner and the
seat or rear window heating draw large amounts
of power and consume additional fuel. Espe-
cially in city traffic and in stop and go driving
they have a considerable impact. Therefore,
switch these functions off when they are not
really needed.
Have the vehicle serviced
Have the vehicle serviced regularly to achieve
good economy and a long vehicle life. BMW
recommends having the vehicle serviced at a
BMW center. Also note the BMW service sys-
tem, refer to page226.
General driving notes
Close the luggage compartment lid/
tailgate
Operate the vehicle only when the lug-
gage compartment lid/tailgate and rear
window are closed. Otherwise, exhaust fumes
could enter the interior of the vehicle.<
If the vehicle must be driven with the luggage
compartment lid/tailgate open:
1.Close all windows and the glass roof.
2.Greatly increase the air volume of the auto-
matic climate control system, refer to
page102.
Hot exhaust system
In all vehicles, extremely high tempera-
tures are generated in the exhaust sys-
tem. Do not remove the heat shields installed
adjacent to various sections of the exhaust sys-
tem, and never apply undercoating to them.
When driving, standing at idle and while park-
ing, take care to avoid possible contact
between the hot exhaust system and any highly
flammable materials such as hay, leaves, grass,
etc. Such contact could lead to a fire, with the
risk of serious personal injuries and property
damage. Do not touch hot exhaust tail pipes.
Otherwise there is a risk of burns.<
Hydroplaning
When driving on wet or slushy roads,
reduce road speed. If you do not, a wedge
of water can form between tires and road sur-
face. This situation, known as hydroplaning,
means that the tire can completely lose contact
with the road surface, so that neither the car can
be steered nor the brake be properly applied.<
Page 127 of 274
Driving tips
125Reference
At a glance
Controls
Communications
Navigation
Entertainment
Mobility
approved gross vehicle weight or the axle loads
when loading the rack.
You can find the applicable data under Weights
on page245.
The roof load must be distributed uniformly and
should not be too large in area. Heavy items
should always be placed at the bottom. Be sure
that adequate clearance is maintained for rais-
ing the glass roof, and that objects do not
project into the opening path of the luggage
compartment lid/tailgate.
Fasten roof-mounted cargo correctly and
securely to prevent it from shifting or falling off
during the trip.
Drive smoothly. Avoid sudden acceleration and
braking maneuvers. Take corners gently.
Page 233 of 274
Mobility
231Reference
At a glance
Controls
Driving tips
Communications
Navigation
Entertainment
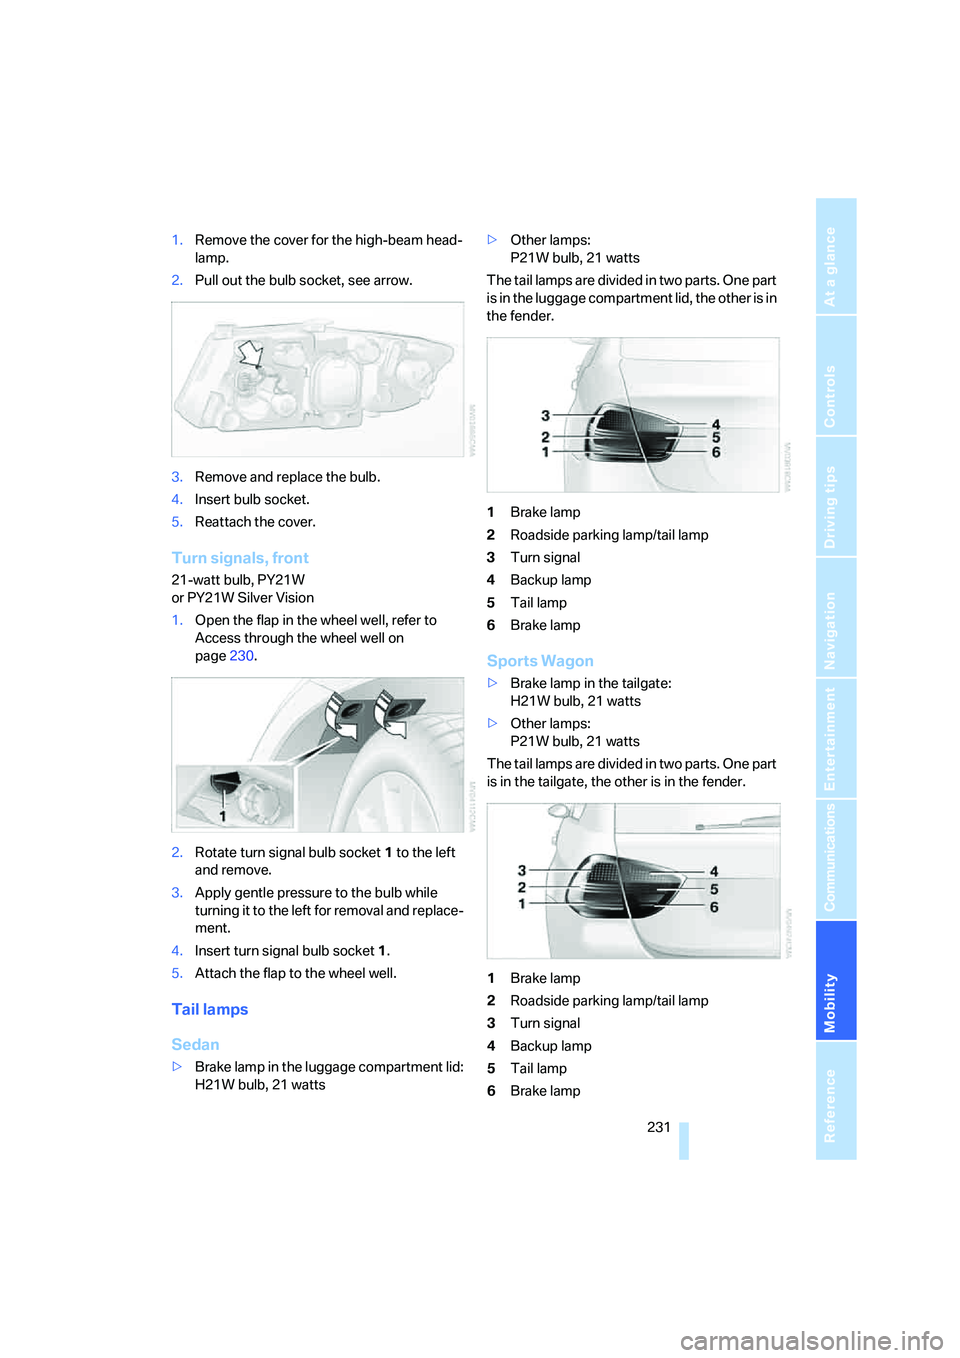
1.Remove the cover for the high-beam head-
lamp.
2.Pull out the bulb socket, see arrow.
3.Remove and replace the bulb.
4.Insert bulb socket.
5.Reattach the cover.
Turn signals, front
21-watt bulb, PY21W
or PY21W Silver Vision
1.Open the flap in the wheel well, refer to
Access through the wheel well on
page230.
2.Rotate turn signal bulb socket 1 to the left
and remove.
3.Apply gentle pressure to the bulb while
turning it to the left for removal and replace-
ment.
4.Insert turn signal bulb socket 1.
5.Attach the flap to the wheel well.
Tail lamps
Sedan
>Brake lamp in the luggage compartment lid:
H21W bulb, 21 watts>Other lamps:
P21W bulb, 21 watts
The tail lamps are divided in two parts. One part
is in the luggage compartment lid, the other is in
the fender.
1Brake lamp
2Roadside parking lamp/tail lamp
3Turn signal
4Backup lamp
5Tail lamp
6Brake lamp
Sports Wagon
>Brake lamp in the tailgate:
H21W bulb, 21 watts
>Other lamps:
P21W bulb, 21 watts
The tail lamps are divided in two parts. One part
is in the tailgate, the other is in the fender.
1Brake lamp
2Roadside parking lamp/tail lamp
3Turn signal
4Backup lamp
5Tail lamp
6Brake lamp
Page 234 of 274
Replacing components
232
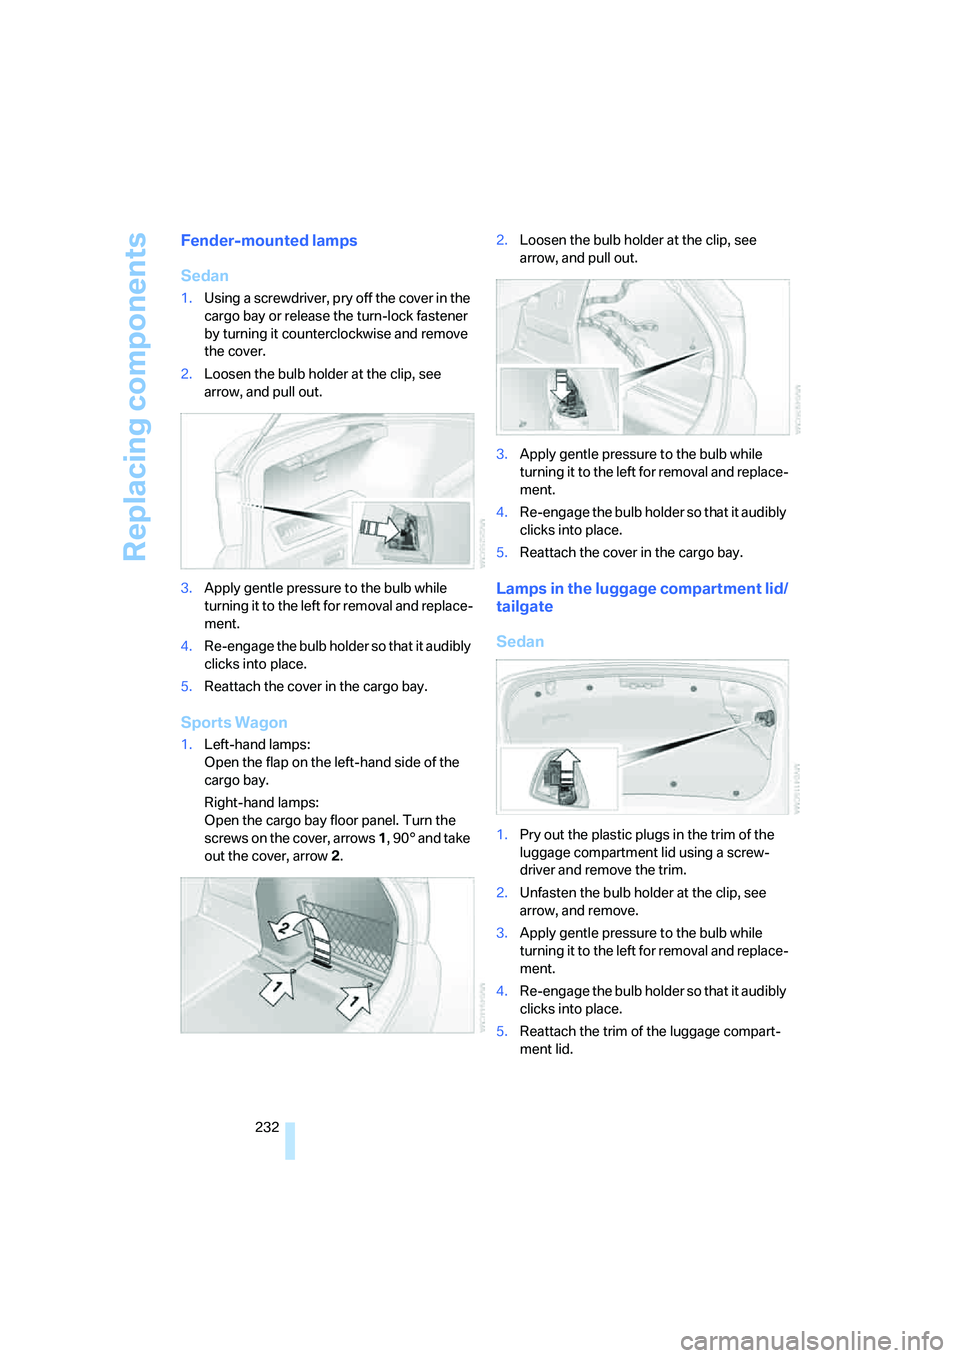
Fender-mounted lamps
Sedan
1.Using a screwdriver, pry off the cover in the
cargo bay or release the turn-lock fastener
by turning it counterclockwise and remove
the cover.
2.Loosen the bulb holder at the clip, see
arrow, and pull out.
3.Apply gentle pressure to the bulb while
turning it to the left for removal and replace-
ment.
4.Re-engage the bulb holder so that it audibly
clicks into place.
5.Reattach the cover in the cargo bay.
Sports Wagon
1.Left-hand lamps:
Open the flap on the left-hand side of the
cargo bay.
Right-hand lamps:
Open the cargo bay floor panel. Turn the
screws on the cover, arrows 1, 90° and take
out the cover, arrow 2.2.Loosen the bulb holder at the clip, see
arrow, and pull out.
3.Apply gentle pressure to the bulb while
turning it to the left for removal and replace-
ment.
4.Re-engage the bulb holder so that it audibly
clicks into place.
5.Reattach the cover in the cargo bay.
Lamps in the luggage compartment lid/
tailgate
Sedan
1.Pry out the plastic plugs in the trim of the
luggage compartment lid using a screw-
driver and remove the trim.
2.Unfasten the bulb holder at the clip, see
arrow, and remove.
3.Apply gentle pressure to the bulb while
turning it to the left for removal and replace-
ment.
4.Re-engage the bulb holder so that it audibly
clicks into place.
5.Reattach the trim of the luggage compart-
ment lid.
Page 235 of 274

Mobility
233Reference
At a glance
Controls
Driving tips
Communications
Navigation
Entertainment
Sports Wagon
1.Use a screwdriver to press out the cover at
the clips, see arrows, and fold it downward.
2.Fold away the foam insulating material.
3.Release the bulb holder at the clip, see
arrow, and remove.
4.Apply gentle pressure to the bulb while
turning it to the left for removal and replace-
ment.
5.Re-engage the bulb holder so that it audibly
clicks into place.
6.Reattach the trim of the tailgate.
License plate lamp and center brake
lamp
These lamps use LED technology for operation.
In the event of a malfunction, please contact
your BMW center or a workshop that works
according to BMW repair procedures with cor-
respondingly trained personnel.
Changing wheels
Your BMW is equipped with Run-Flat Tires as
standard. This removes the need to change a
wheel immediately in the event of a puncture.For information on continuing to drive with a
damaged tire, refer to Indication of a flat tire on
page90.
The symbol identifying Run-Flat Tires is a circle
with the letters RSC on the sidewall, refer to
Run-Flat Tires, page219.
When mounting new tires or changing over
from summer to winter tires and vice versa,
mount Run-Flat Tires for your own safety. In the
event of a flat, no spare wheel is available. Your
BMW center will be glad to advise you. Refer
also to New wheels and tires, page219.
The tools for changing wheels are avail-
able as optional accessories from your
BMW center.<
Jack mounting points
The jacking points are at the positions shown in
the illustration.
Vehicle battery
Battery care
The battery is 100 % maintenance-free, the
electrolyte will last for the life of the battery
when the vehicle is operated in a temperate cli-
mate. Your BMW center will be glad to advise in
all matters concerning the battery.
Charging the battery
Only charge the battery in the vehicle via the
terminals in the engine compartment with the
engine off. Connections, refer to Jump starting
on page236.
Page 256 of 274

Everything from A - Z
254 Brake system120
– BMW Maintenance
System226
– breaking in120
– disc brakes122
Breakdown services, refer to
Roadside Assistance235
Breaking in the clutch120
Breaking in the differential,
refer to Engine and
differential120
Break-in period120
Brightness of the Control
Display84
"Brightness" on the Control
Display84
Bulb changing, refer to Lamps
and bulbs229
Button for starting the engine,
refer to Start/stop button56
Buttons on the steering
wheel11
C
California Proposition 65
warning6
"Call"190,201
Call
– accepting188
– displaying accepted190
– ending189
– missed190
– starting189
Calling
– from phone book189
– from Top 8 list190
– redialing190
Can holders, refer to Cup
holders111
Capacities246
Capacity of the cargo bay245
Car battery, refer to Vehicle
battery233
Car care, refer to Caring for
your vehicle brochure
Car-care products, refer to
Caring for your vehicle
brochure"Car Data"73
Care, refer to Caring for your
vehicle brochure
Cargo, securing124
Cargo bay114
– capacity245
– convenient access37
– folding up the floor
panel116
– lamp, refer to Interior
lamps99
– opening from inside33
– opening from outside33
– partition net114
– roll-up cover114
Cargo bay lid, refer to
Luggage compartment lid/
tailgate33
Cargo bay net, refer to
Partition net114
Cargo loading
– securing cargo124
– stowing cargo123
– vehicle123
Caring for artificial leather,
refer to Caring for your
vehicle brochure
Caring for leather, refer to
Caring for your vehicle
brochure
Caring for plastic, refer to
Caring for your vehicle
brochure
Caring for the carpet, refer to
Caring for your vehicle
brochure
Caring for the vehicle finish,
refer to Caring for your
vehicle brochure
Car jack
– jacking points233
Car key, refer to Integrated
key/remote control28
Car phone182
– installation location, refer to
Center armrest110
– refer to Mobile phone182
– refer to separate Owner's
ManualCar radio, refer to Radio160
Car wash122
– also refer to Caring for your
vehicle brochure
– with convenient access37
Catalytic converter, refer to
Hot exhaust system121
"Categories" for satellite
radio167
CBS Condition Based
Service226
"CD"156,169
CD changer169
– compressed audio files169
– controls156
– fast forward/reverse173
– installation location173
– playing a track171
– random order172
– repeating a track172
– selecting a CD169
– selecting a track170
– switching on/off156
– tone control157
– volume157
CD player169
– compressed audio files169
– controls156
– fast forward/reverse173
– playing a track171
– random order172
– repeating a track172
– selecting a track170
– switching on/off156
– tone control157
– volume157
Center armrest110
Center brake lamp
– replacing bulb233
Center console, refer to
Around the center
console14
"Central locking"30
Central locking
– from inside32
– from outside29
Central locking system29
– convenient access36
– hotel function34