2008 BMW 335XI climate control
[x] Cancel search: climate controlPage 5 of 274

Reference
At a glance
Controls
Driving tips
Communications
Navigation
Entertainment
Mobility
Contents
The fastest way to find information on a partic-
ular topic or item is by using the index, refer to
page252.
Using this Owner's Manual
4Notes
6Reporting safety defects
At a glance
10Cockpit
16iDrive
23Voice command system
Controls
28Opening and closing
43Adjustments
52Transporting children safely
56Driving
71Everything under control
85Technology for driving comfort and
safety
96Lamps
100Climate
106Practical interior accessories
Driving tips
120Things to remember when driving
Navigation
128Starting the navigation system
130Destination entry
143Destination guidance
152What to do if …
Entertainment
156On/off and settings
160Radio
166Satellite radio
169CD player and CD changer
175AUX-In port
176USB-audio interface
Communications
182Telephoning
197BMW Assist
Mobility
206Refueling
208Wheels and tires
221Under the hood
226Maintenance
228Replacing components
235Giving and receiving assistance
Reference
242Technical data
247Short commands for the voice command
system
252Everything from A - Z
Page 17 of 274

At a glance
15Reference
Controls
Driving tips
Communications
Navigation
Entertainment
Mobility
1Microphone for voice command system*
and for telephone in hands-free mode*
2SOS: initiating an Emergency Request
call
*235
3Reading lamps99
4Glass roof/panorama glass roof
*39
5Interior lamps99
6Passenger airbag status lamp
*95
7Control Display16
8Hazard warning flashers
9DTC Dynamic Traction Control87
10Central locking system32
11Automatic climate control
12Ejecting audio CD156
13Changing
>Radio station160
>Track17014Selecting radio, CD and CD changer
15Selecting AM or FM waveband
16Ejecting navigation DVD128
18Controller16
Can be turned, pressed, or moved horizon-
tally in four directions
19Opening start menu on Control Display17
20Drive for navigation DVD128
21Programmable memory keys21
22Switching audio sources on/off and adjust-
ing volume156
23Drive for audio CD156 Air distribution to the
windshield101
Air distribution to the upper body
area101
Air distribution to the footwell101
Automatic air distribution and flow
rate102
Cooling function103
AUC Automatic recirculated-air
control102
Recirculated-air mode102
Maximum cooling102
Residual heat mode103
Air flow rate102
Defrosting windows103
Rear window defroster103
17
Heated seats*47
PDC Park Distance Control
*85
Sedan:
Roller sun blind
*109
HDC Hill Descent Control
*87
Page 19 of 274

At a glance
17Reference
Controls
Driving tips
Communications
Navigation
Entertainment
Mobility
Menu overview
Communication
>Telephone*
>BMW Assist* or TeleService*
Navigation
>Navigation system
>Onboard information, e.g. for displaying the
average fuel consumption
Entertainment
>Radio
>CD player and CD changer
*
>AUX-In port, USB-audio interface* for
external audio device
Climate
>Vent settings
>Automatic programs
>Parked car operation
menu
>Switching off Control Display
>Tone and display settings
>Settings for your vehicle, e.g. for the central
locking system
>Display of service requirements and dates
for statutory inspections
>Settings for telephone
Operating principle
As of radio readiness, the following message
appears on the Control Display:
To hide the message:
Press the controller.
The start menu is displayed.
The message is automatically hidden after
approx. 10 seconds.
Start menu
All iDrive functions can be called up via five
menu items.
Opening start menu
Press the button.
To open the start menu from the menu:
Press the button twice.
Page 20 of 274

iDrive
18
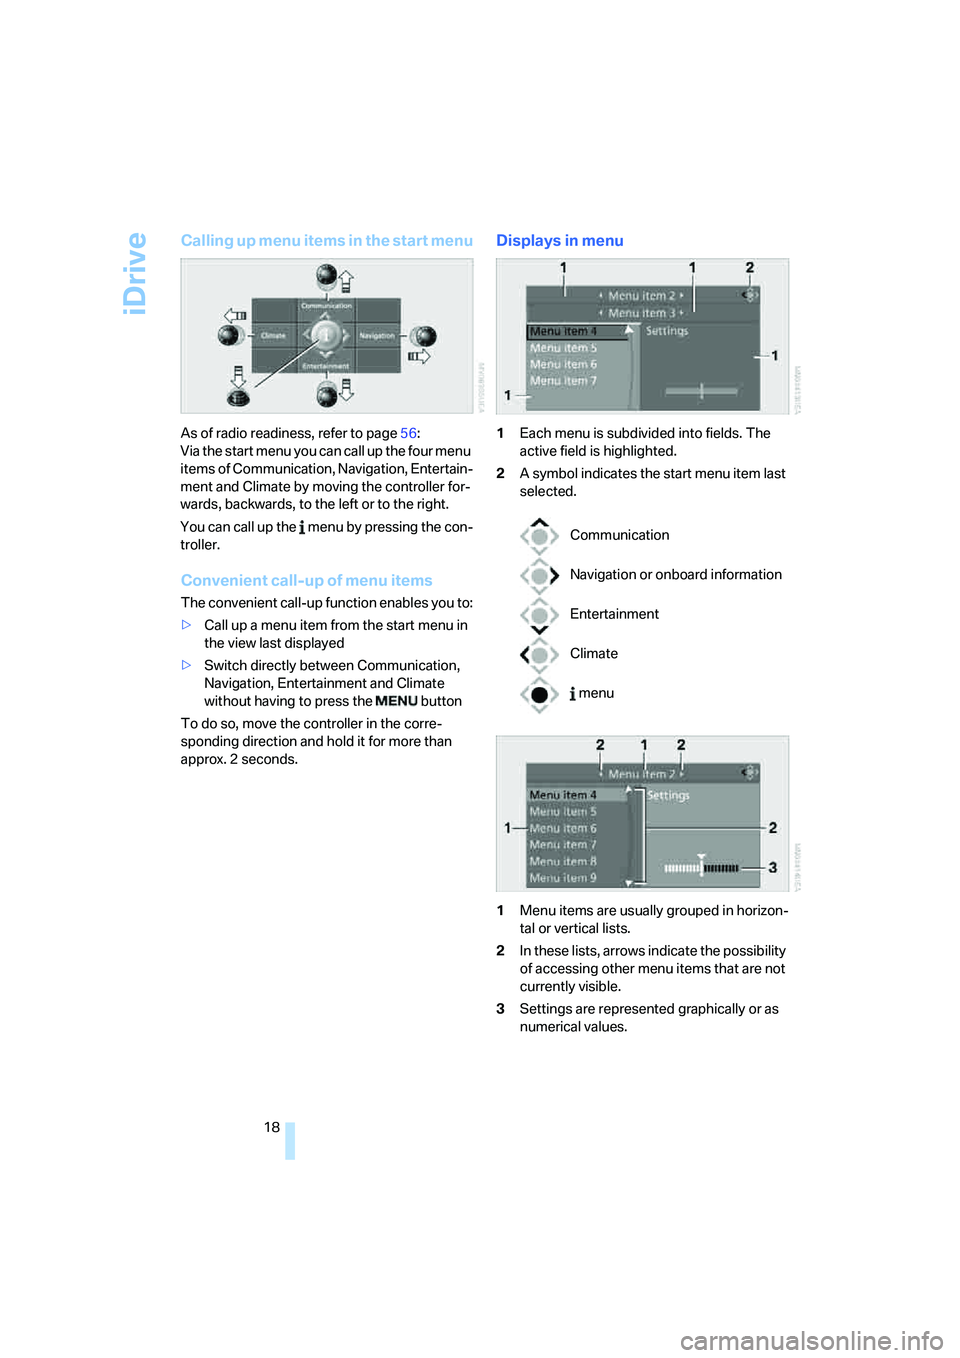
Calling up menu items in the start menu
As of radio readiness, refer to page56:
Via the start menu you can call up the four menu
items of Communication, Navigation, Entertain-
ment and Climate by moving the controller for-
wards, backwards, to the left or to the right.
You can call up the menu by pressing the con-
troller.
Convenient call-up of menu items
The convenient call-up function enables you to:
>Call up a menu item from the start menu in
the view last displayed
>Switch directly between Communication,
Navigation, Entertainment and Climate
without having to press the button
To do so, move the controller in the corre-
sponding direction and hold it for more than
approx. 2 seconds.
Displays in menu
1Each menu is subdivided into fields. The
active field is highlighted.
2A symbol indicates the start menu item last
selected.
1Menu items are usually grouped in horizon-
tal or vertical lists.
2In these lists, arrows indicate the possibility
of accessing other menu items that are not
currently visible.
3Settings are represented graphically or as
numerical values.
Communication
Navigation or onboard information
Entertainment
Climate
menu
Page 31 of 274

Controls
29Reference
At a glance
Driving tips
Communications
Navigation
Entertainment
Mobility
>Triple turn signal activation, refer to
page61
>Settings for the display on the Control Dis-
play and in the instrument cluster:
>12h/24h format of the clock, refer to
page80
>Date format, refer to page81
>Brightness of the Control Display, refer
to page84
>Language on the Control Display, refer
to page84
>Units of measure for fuel consumption,
distance covered/remaining distances,
and temperature, refer to page76
>Show visual warning for Park Distance Con-
trol PDC
*, refer to page85
>Light settings:
>Welcome lamps, refer to page96
>Pathway lighting, refer to page97
>Daytime running lamps, refer to page97
>Automatic climate control: activating/deac-
tivating AUTO program, cooling function
and automatic recirculated-air control, set-
ting temperature, air flow rate and distribu-
tion, refer to page101 ff
>Entertainment:
>Audio volume, refer to page157
>Tone control, refer to page157
>Speed-dependent volume control, refer
to page157
Central locking system
The concept
The central locking system is ready for opera-
tion whenever the driver's door is closed.
The system simultaneously engages and
releases the locks on the following:
>Doors
>Luggage compartment lid/tailgate
>Fuel filler door
Operating from outside
>Via the remote control
>Via the door lock
>In cars with convenient access
*, via the
handles on the driver's and front passen-
ger's doors
The anti-theft system is also operated at the
same time. It prevents the doors from being
unlocked using the lock buttons or door han-
dles. In addition, if the remote control is used,
the interior lamps and the door's courtesy
lamps
* are also switched on or off. The alarm
system
* is also armed or disarmed.
For further details of the alarm system,
refer to
page35.
Operating from inside
By means of the button for central locking, refer
to page32.
In the event of a sufficiently severe accident, the
central locking system unlocks automatically. In
addition, the hazard warning flashers and inte-
rior lamps come on.
Opening and closing:
Using the remote control
Persons or animals in a parked vehicle
could lock the doors from the inside. You
should therefore take the remote control with
you when you leave the vehicle so that the latter
can be opened from outside.<
Unlocking
Press the button.
The interior lamps, the courtesy lamps
* and the
welcome lamps come on.
You can set how the vehicle is to be unlocked.
The setting is stored for the remote control cur-
rently in use.
iDrive, for operating principle refer to page16.
1.Press the button.
This opens the start menu.
2.Press the controller to open the menu.
3.Select "Settings" and press the controller.
Page 102 of 274

Climate
100
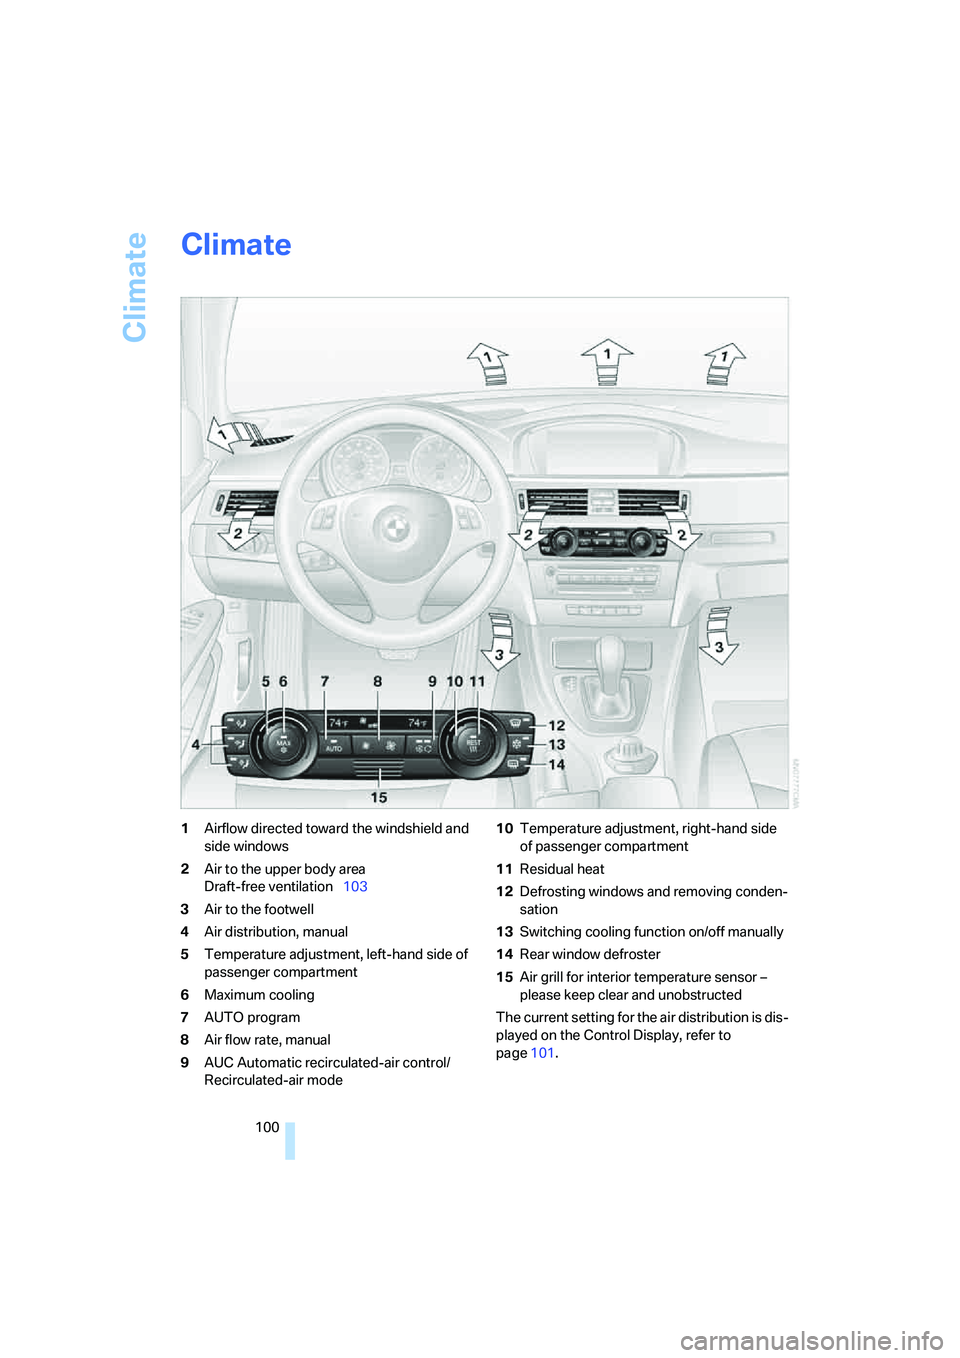
Climate
1Airflow directed toward the windshield and
side windows
2Air to the upper body area
Draft-free ventilation103
3Air to the footwell
4Air distribution, manual
5Temperature adjustment, left-hand side of
passenger compartment
6Maximum cooling
7AUTO program
8Air flow rate, manual
9AUC Automatic recirculated-air control/
Recirculated-air mode10Temperature adjustment, right-hand side
of passenger compartment
11Residual heat
12Defrosting windows and removing conden-
sation
13Switching cooling function on/off manually
14Rear window defroster
15Air grill for interior temperature sensor –
please keep clear and unobstructed
The current setting for the air distribution is dis-
played on the Control Display, refer to
page101.
Page 103 of 274

Controls
101Reference
At a glance
Driving tips
Communications
Navigation
Entertainment
Mobility
Automatic climate control
Comfortable interior climate
AUTO program7 offers the ideal air distribution
and air flow rate for almost all conditions, refer
to AUTO program below. All you need to do is
select an interior temperature which is comfort-
able for you.
The following sections inform you in detail
about how to adjust the settings.
Most settings are stored for the remote control
currently in use, refer also to Personal Profile
settings on page28.
Adjusting air distribution manually
The air distribution can be
switched on and off manually. The
air is directed to the windshield, to
the upper body area and to the
footwell. Automatic air distribution adjustment
is deactivated.
You can switch the automatic air distribution
back on by pressing the AUTO button. This
automatically switches on the cooling function
as well.
Fine adjustments to manual air
distribution
You can set the rate of incoming airflow for
manual air distribution.
iDrive, for operating principle refer to page16.
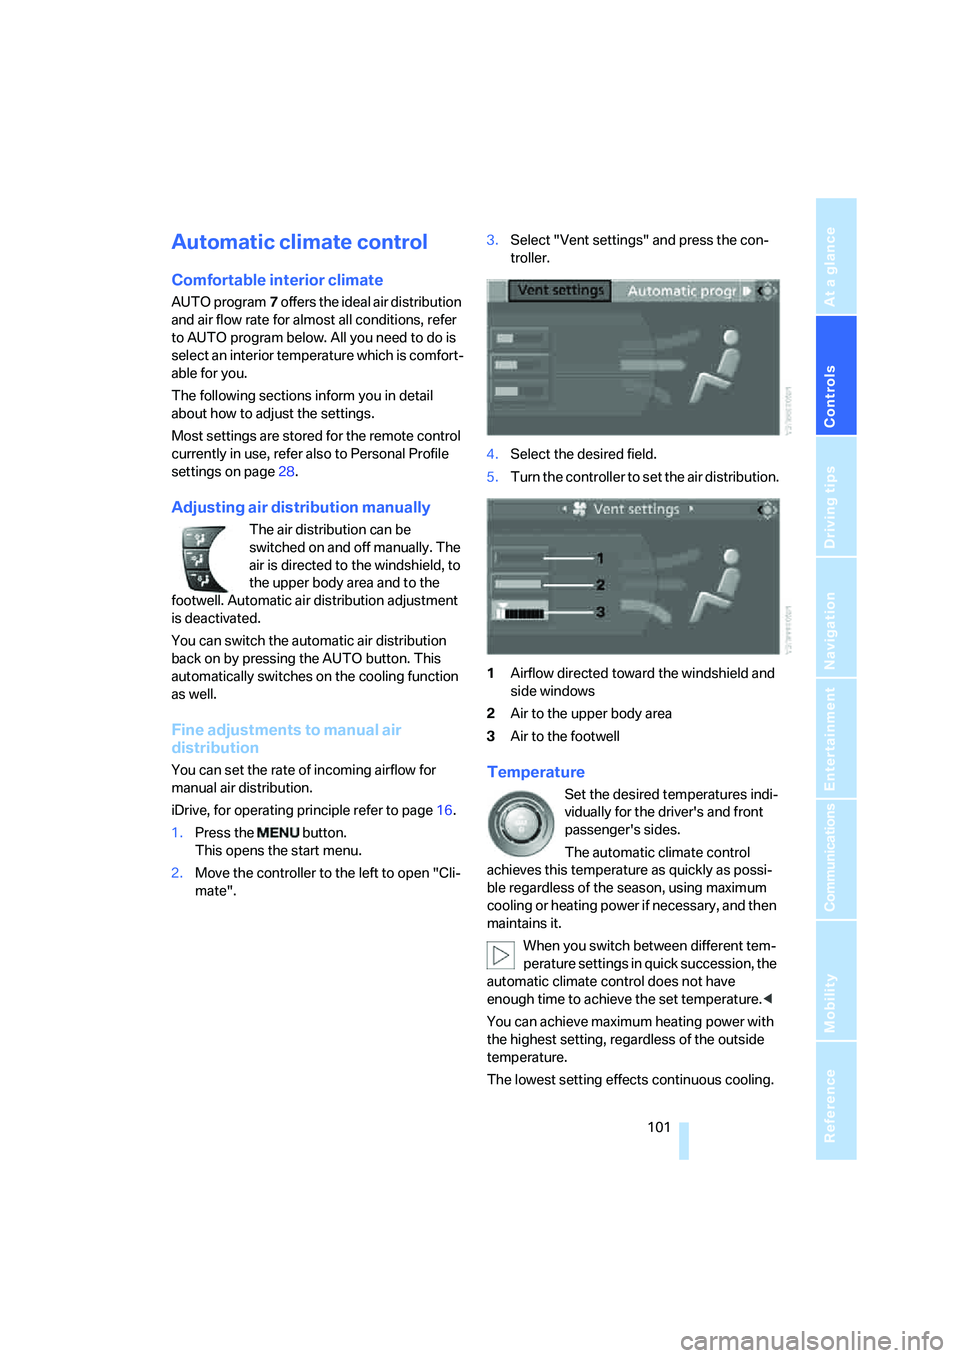
1.Press the button.
This opens the start menu.
2.Move the controller to the left to open "Cli-
mate".3.Select "Vent settings" and press the con-
troller.
4.Select the desired field.
5.Turn the controller to set the air distribution.
1Airflow directed toward the windshield and
side windows
2Air to the upper body area
3Air to the footwellTemperature
Set the desired temperatures indi-
vidually for the driver's and front
passenger's sides.
The automatic climate control
achieves this temperature as quickly as possi-
ble regardless of the season, using maximum
cooling or heating power if necessary, and then
maintains it.
When you switch between different tem-
perature settings in quick succession, the
automatic climate control does not have
enough time to achieve the set temperature.<
You can achieve maximum heating power with
the highest setting, regardless of the outside
temperature.
The lowest setting effects continuous cooling.
Page 104 of 274

Climate
102
Maximum cooling
At outside temperatures above
327/06 and when the engine is
running, you obtain a maximum
cooling effect as soon as possible.
The automatic climate control goes into recir-
culated-air mode at the lowest temperature. Air
flows at maximum rate from the vents for the
upper body area. You should therefore open
them for maximum cooling.
AUTO program
The AUTO program adjusts the air
distribution to the windshield and
side windows, towards the upper
body area and into the footwell for you. The air
flow rate and your temperature specifications
will be adapted to outside influences as a result
of seasonal changes, e.g. sunlight or window
condensation.
The cooling is switched on automatically with
the AUTO program.
Intensity of the AUTO program
Press the AUTO button repeatedly to set the
intensity of the AUTO program. The current
setting is briefly displayed on the Control Dis-
play every time the button is pressed.
You can also set the intensity of the AUTO pro-
gram via iDrive.
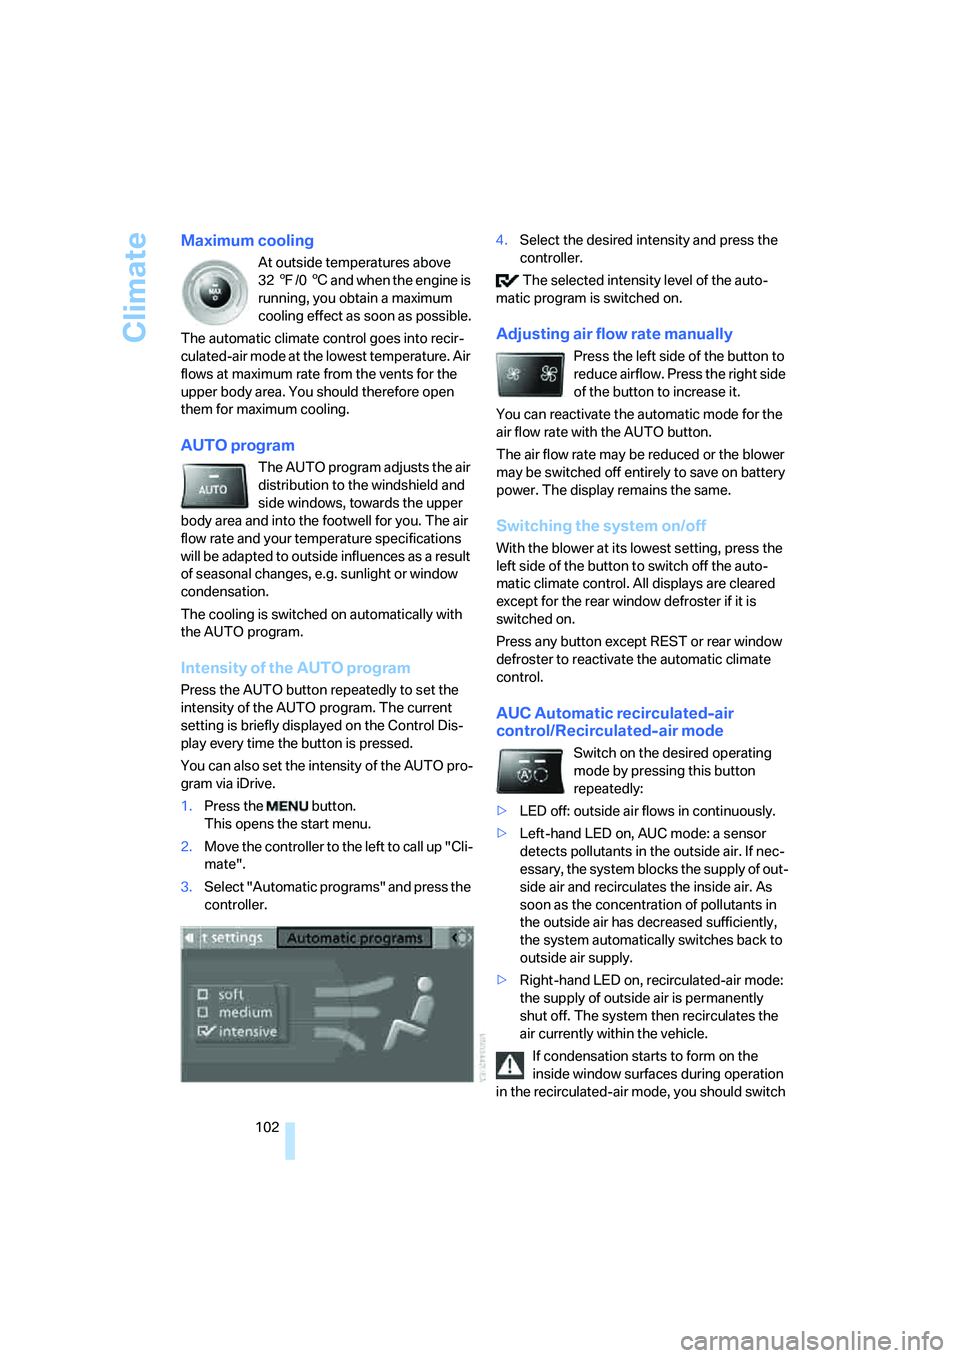
1.Press the button.
This opens the start menu.
2.Move the controller to the left to call up "Cli-
mate".
3.Select "Automatic programs" and press the
controller.4.Select the desired intensity and press the
controller.
The selected intensity level of the auto-
matic program is switched on.
Adjusting air flow rate manually
Press the left side of the button to
reduce airflow. Press the right side
of the button to increase it.
You can reactivate the automatic mode for the
air flow rate with the AUTO button.
The air flow rate may be reduced or the blower
may be switched off entirely to save on battery
power. The display remains the same.
Switching the system on/off
With the blower at its lowest setting, press the
left side of the button to switch off the auto-
matic climate control. All displays are cleared
except for the rear window defroster if it is
switched on.
Press any button except REST or rear window
defroster to reactivate the automatic climate
control.
AUC Automatic recirculated-air
control/Recirculated-air mode
Switch on the desired operating
mode by pressing this button
repeatedly:
>LED off: outside air flows in continuously.
>Left-hand LED on, AUC mode: a sensor
detects pollutants in the outside air. If nec-
essary, the system blocks the supply of out-
side air and recirculates the inside air. As
soon as the concentration of pollutants in
the outside air has decreased sufficiently,
the system automatically switches back to
outside air supply.
>Right-hand LED on, recirculated-air mode:
the supply of outside air is permanently
shut off. The system then recirculates the
air currently within the vehicle.
If condensation starts to form on the
inside window surfaces during operation
in the recirculated-air mode, you should switch