2008 BMW 335I SEDAN cooling
[x] Cancel search: coolingPage 17 of 274

At a glance
15Reference
Controls
Driving tips
Communications
Navigation
Entertainment
Mobility
1Microphone for voice command system*
and for telephone in hands-free mode*
2SOS: initiating an Emergency Request
call
*235
3Reading lamps99
4Glass roof/panorama glass roof
*39
5Interior lamps99
6Passenger airbag status lamp
*95
7Control Display16
8Hazard warning flashers
9DTC Dynamic Traction Control87
10Central locking system32
11Automatic climate control
12Ejecting audio CD156
13Changing
>Radio station160
>Track17014Selecting radio, CD and CD changer
15Selecting AM or FM waveband
16Ejecting navigation DVD128
18Controller16
Can be turned, pressed, or moved horizon-
tally in four directions
19Opening start menu on Control Display17
20Drive for navigation DVD128
21Programmable memory keys21
22Switching audio sources on/off and adjust-
ing volume156
23Drive for audio CD156 Air distribution to the
windshield101
Air distribution to the upper body
area101
Air distribution to the footwell101
Automatic air distribution and flow
rate102
Cooling function103
AUC Automatic recirculated-air
control102
Recirculated-air mode102
Maximum cooling102
Residual heat mode103
Air flow rate102
Defrosting windows103
Rear window defroster103
17
Heated seats*47
PDC Park Distance Control
*85
Sedan:
Roller sun blind
*109
HDC Hill Descent Control
*87
Page 31 of 274

Controls
29Reference
At a glance
Driving tips
Communications
Navigation
Entertainment
Mobility
>Triple turn signal activation, refer to
page61
>Settings for the display on the Control Dis-
play and in the instrument cluster:
>12h/24h format of the clock, refer to
page80
>Date format, refer to page81
>Brightness of the Control Display, refer
to page84
>Language on the Control Display, refer
to page84
>Units of measure for fuel consumption,
distance covered/remaining distances,
and temperature, refer to page76
>Show visual warning for Park Distance Con-
trol PDC
*, refer to page85
>Light settings:
>Welcome lamps, refer to page96
>Pathway lighting, refer to page97
>Daytime running lamps, refer to page97
>Automatic climate control: activating/deac-
tivating AUTO program, cooling function
and automatic recirculated-air control, set-
ting temperature, air flow rate and distribu-
tion, refer to page101 ff
>Entertainment:
>Audio volume, refer to page157
>Tone control, refer to page157
>Speed-dependent volume control, refer
to page157
Central locking system
The concept
The central locking system is ready for opera-
tion whenever the driver's door is closed.
The system simultaneously engages and
releases the locks on the following:
>Doors
>Luggage compartment lid/tailgate
>Fuel filler door
Operating from outside
>Via the remote control
>Via the door lock
>In cars with convenient access
*, via the
handles on the driver's and front passen-
ger's doors
The anti-theft system is also operated at the
same time. It prevents the doors from being
unlocked using the lock buttons or door han-
dles. In addition, if the remote control is used,
the interior lamps and the door's courtesy
lamps
* are also switched on or off. The alarm
system
* is also armed or disarmed.
For further details of the alarm system,
refer to
page35.
Operating from inside
By means of the button for central locking, refer
to page32.
In the event of a sufficiently severe accident, the
central locking system unlocks automatically. In
addition, the hazard warning flashers and inte-
rior lamps come on.
Opening and closing:
Using the remote control
Persons or animals in a parked vehicle
could lock the doors from the inside. You
should therefore take the remote control with
you when you leave the vehicle so that the latter
can be opened from outside.<
Unlocking
Press the button.
The interior lamps, the courtesy lamps
* and the
welcome lamps come on.
You can set how the vehicle is to be unlocked.
The setting is stored for the remote control cur-
rently in use.
iDrive, for operating principle refer to page16.
1.Press the button.
This opens the start menu.
2.Press the controller to open the menu.
3.Select "Settings" and press the controller.
Page 102 of 274

Climate
100
Climate
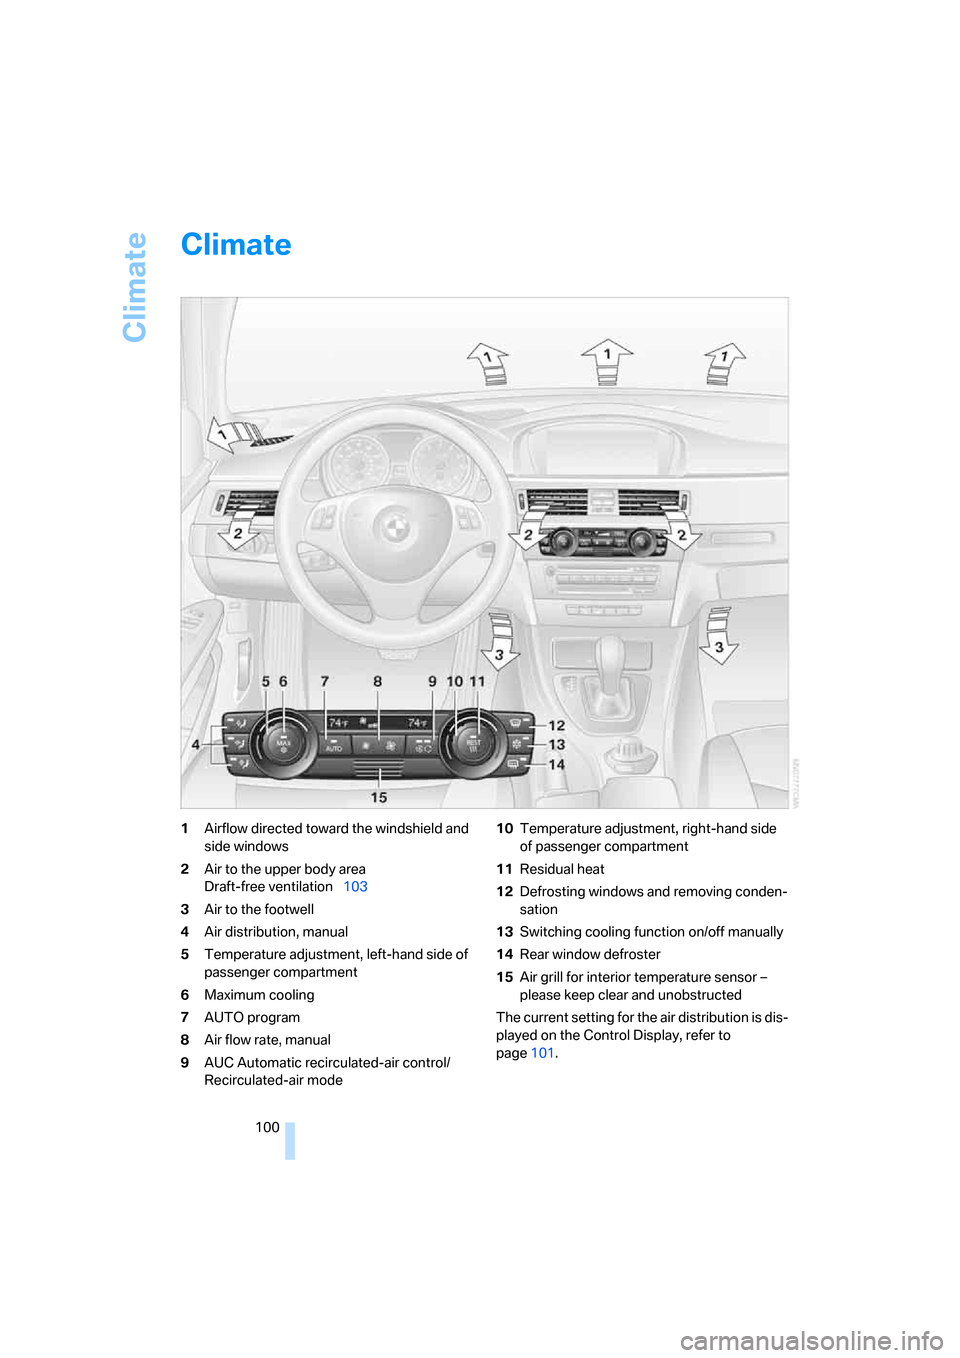
1Airflow directed toward the windshield and
side windows
2Air to the upper body area
Draft-free ventilation103
3Air to the footwell
4Air distribution, manual
5Temperature adjustment, left-hand side of
passenger compartment
6Maximum cooling
7AUTO program
8Air flow rate, manual
9AUC Automatic recirculated-air control/
Recirculated-air mode10Temperature adjustment, right-hand side
of passenger compartment
11Residual heat
12Defrosting windows and removing conden-
sation
13Switching cooling function on/off manually
14Rear window defroster
15Air grill for interior temperature sensor –
please keep clear and unobstructed
The current setting for the air distribution is dis-
played on the Control Display, refer to
page101.
Page 103 of 274

Controls
101Reference
At a glance
Driving tips
Communications
Navigation
Entertainment
Mobility
Automatic climate control
Comfortable interior climate
AUTO program7 offers the ideal air distribution
and air flow rate for almost all conditions, refer
to AUTO program below. All you need to do is
select an interior temperature which is comfort-
able for you.
The following sections inform you in detail
about how to adjust the settings.
Most settings are stored for the remote control
currently in use, refer also to Personal Profile
settings on page28.
Adjusting air distribution manually
The air distribution can be
switched on and off manually. The
air is directed to the windshield, to
the upper body area and to the
footwell. Automatic air distribution adjustment
is deactivated.
You can switch the automatic air distribution
back on by pressing the AUTO button. This
automatically switches on the cooling function
as well.
Fine adjustments to manual air
distribution
You can set the rate of incoming airflow for
manual air distribution.
iDrive, for operating principle refer to page16.
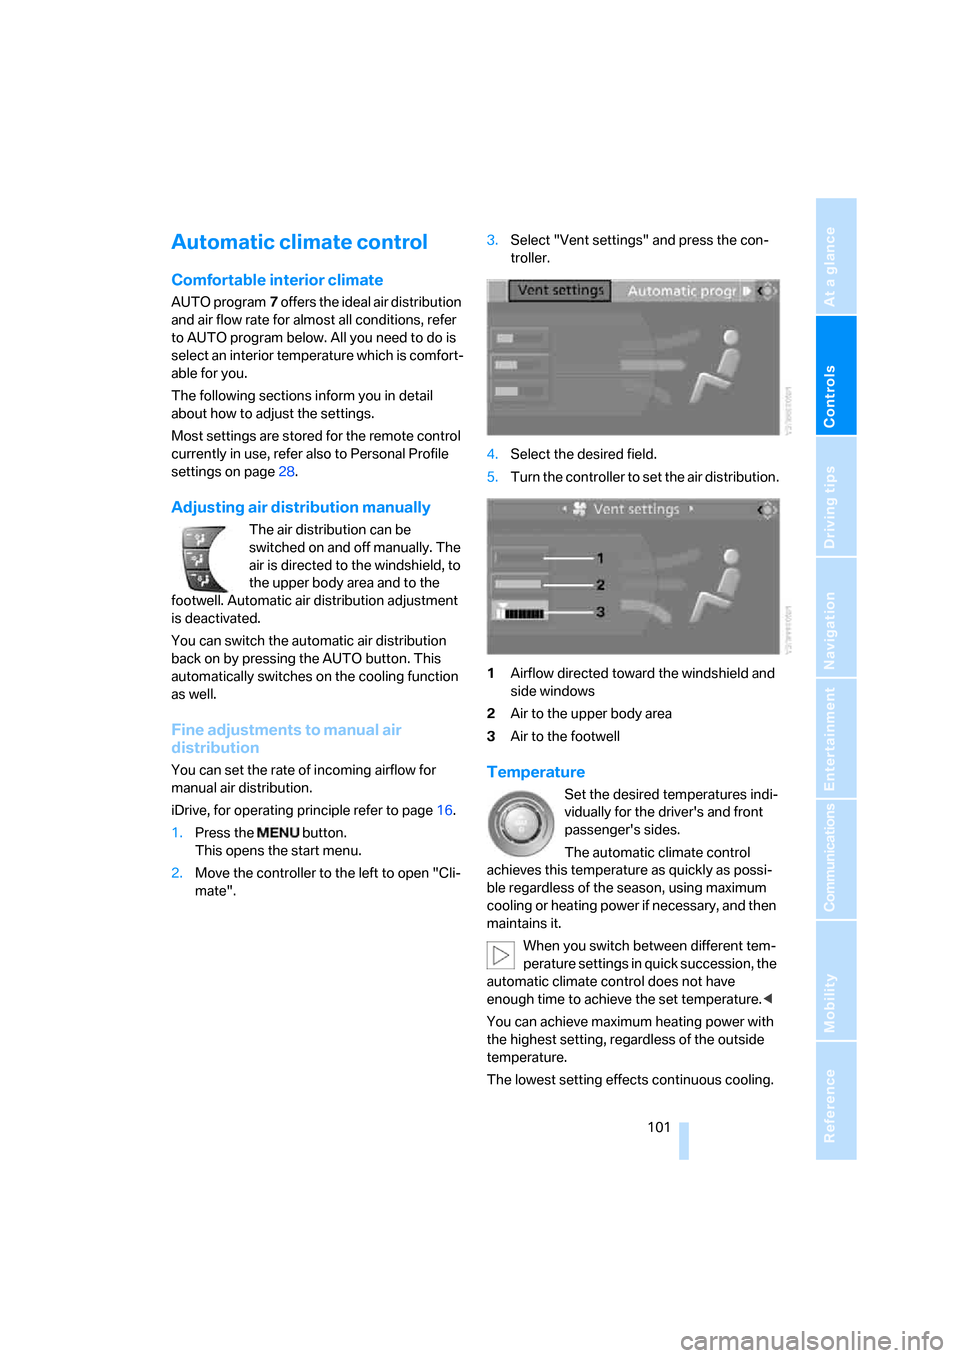
1.Press the button.
This opens the start menu.
2.Move the controller to the left to open "Cli-
mate".3.Select "Vent settings" and press the con-
troller.
4.Select the desired field.
5.Turn the controller to set the air distribution.
1Airflow directed toward the windshield and
side windows
2Air to the upper body area
3Air to the footwellTemperature
Set the desired temperatures indi-
vidually for the driver's and front
passenger's sides.
The automatic climate control
achieves this temperature as quickly as possi-
ble regardless of the season, using maximum
cooling or heating power if necessary, and then
maintains it.
When you switch between different tem-
perature settings in quick succession, the
automatic climate control does not have
enough time to achieve the set temperature.<
You can achieve maximum heating power with
the highest setting, regardless of the outside
temperature.
The lowest setting effects continuous cooling.
Page 104 of 274

Climate
102
Maximum cooling
At outside temperatures above
327/06 and when the engine is
running, you obtain a maximum
cooling effect as soon as possible.
The automatic climate control goes into recir-
culated-air mode at the lowest temperature. Air
flows at maximum rate from the vents for the
upper body area. You should therefore open
them for maximum cooling.
AUTO program
The AUTO program adjusts the air
distribution to the windshield and
side windows, towards the upper
body area and into the footwell for you. The air
flow rate and your temperature specifications
will be adapted to outside influences as a result
of seasonal changes, e.g. sunlight or window
condensation.
The cooling is switched on automatically with
the AUTO program.
Intensity of the AUTO program
Press the AUTO button repeatedly to set the
intensity of the AUTO program. The current
setting is briefly displayed on the Control Dis-
play every time the button is pressed.
You can also set the intensity of the AUTO pro-
gram via iDrive.
1.Press the button.
This opens the start menu.
2.Move the controller to the left to call up "Cli-
mate".
3.Select "Automatic programs" and press the
controller.4.Select the desired intensity and press the
controller.
The selected intensity level of the auto-
matic program is switched on.
Adjusting air flow rate manually
Press the left side of the button to
reduce airflow. Press the right side
of the button to increase it.
You can reactivate the automatic mode for the
air flow rate with the AUTO button.
The air flow rate may be reduced or the blower
may be switched off entirely to save on battery
power. The display remains the same.
Switching the system on/off
With the blower at its lowest setting, press the
left side of the button to switch off the auto-
matic climate control. All displays are cleared
except for the rear window defroster if it is
switched on.
Press any button except REST or rear window
defroster to reactivate the automatic climate
control.
AUC Automatic recirculated-air
control/Recirculated-air mode
Switch on the desired operating
mode by pressing this button
repeatedly:
>LED off: outside air flows in continuously.
>Left-hand LED on, AUC mode: a sensor
detects pollutants in the outside air. If nec-
essary, the system blocks the supply of out-
side air and recirculates the inside air. As
soon as the concentration of pollutants in
the outside air has decreased sufficiently,
the system automatically switches back to
outside air supply.
>Right-hand LED on, recirculated-air mode:
the supply of outside air is permanently
shut off. The system then recirculates the
air currently within the vehicle.
If condensation starts to form on the
inside window surfaces during operation
in the recirculated-air mode, you should switch
Page 105 of 274

Controls
103Reference
At a glance
Driving tips
Communications
Navigation
Entertainment
Mobility
it off while also increasing the air flow rate as
required.
The recirculated-air mode should not be used
over an extended period of time, otherwise the
air quality inside the car will deteriorate contin-
uously.<
Via the button* on the steering wheel
You can switch quickly between the recircu-
lated-air mode and the previous mode using an
individually programmable button
on the steer-
ing wheel, refer to page11.
Residual heat
The heat stored in the engine is
used to heat the passenger com-
partment, e.g. while stopped at a
school to pick up a child.
The function can be switched on when the fol-
lowing conditions are met:
>Up to 15 minutes after the engine has been
switched off
>While the engine is at operating tempera-
ture
>As long as battery voltage is sufficient
>At an outside temperature below 777/
256
The LED is lit when the function is on.
As of radio readiness, you can set the interior
temperature, the air flow rate and the air distri-
bution.
Defrosting windows and removing
condensation
Quickly removes ice and conden-
sation from the windshield and
front side windows.
Switch on the cooling function as well.
Switching cooling function on/off
The cooling function cools and
dehumidifies the incoming air
before reheating it as required,
according to the temperature setting. This
function is only available while the engine is
running.The cooling function helps prevent condensa-
tion on the windows or removes it quickly.
Depending on the weather, the windshield may
fog over briefly when the engine is started.
The cooling function is automatically switched
on along with the AUTO program.
Rear window defroster
The defroster is switched off auto-
matically after a certain time.
Depending on your vehicle's
equipment, the upper wires serve as an antenna
and are not part of the rear window defroster.
Ventilation
1Use the knurled wheels to smoothly open
and close the air vents
2Use the lever to change the direction of the
airflow
3Knurled wheel for more or less cool air from
the vents for the upper body area
Ventilation for cooling
Adjust the vent outlets to direct the flow of cool
air in your direction, for instance if it has become
too hot in the car.
Draft-free ventilation
Set the vent outlets so that the air flows past
you and not straight at you.
Page 226 of 274

Under the hood
224 more than 1 US quart/1 liter, refer also to
Adding engine oil below.
>"Engine oil level too high"
Too much oil will harm the engine.
Have the vehicle checked without
delay.<
>"Please observe recalculated service inter-
val for engine oil"
Do not add engine oil. You can continue
your journey. Note the newly calculated dis-
tance remaining to the next oil service, refer
to page76. Have the system checked as
soon as possible.
Adding engine oil
Do not add 1 US quart/1 liter of engine oil until a
corresponding message is shown on the Con-
trol Display.
Add oil within the next 125 miles/200 km,
otherwise the engine could be dam-
aged.<
Keep oils, greases, etc. out of the reach of
children and comply with the relevant
warnings on the containers. Otherwise, health
hazards may result.<
Oil change
Have oil changed only at your BMW center or at
a workshop that works according to BMW
repair procedures with correspondingly trained
personnel.
Specified engine oils
The quality of the engine oil selected has critical
significance for the operation and service life of
an engine. BMW continuously approves spe-cific oils after confirming their suitability for use
in its vehicles with extensive testing.
Do not use oil additives as these may
cause engine damage.<
Only use approved BMW High Performance
Synthetic Oil.
If BMW High Performance Synthetic Oil is not
available, you can add small quantities of other
synthetic oils in between oil changes. Only use
oils with the API SM specification or higher.
Your BMW center will be glad to answer
any questions regarding BMW High Per-
formance Synthetic Oil or approved synthetic
oils.<
You can also call BMW of North America at
1-800-831-1117 or visit the website
www.bmwusa.com to obtain this information.
Viscosity ratings
Viscosity is a measure of an oil's flow rating and
is categorized in SAE classes.
Selecting the appropriate SAE class depends
on the regional climatic conditions in which you
normally drive your BMW.
Approved oils belong to the 5W-40 and
5W-30 classes.<
These oils can be used for driving at all outside
temperatures.
Coolant
Do not add coolant to the cooling system
when the engine is hot. Escaping coolant
can cause burns.<
Coolant consists of half water and half additive.
Not all commercially available additives are suit-
able for your BMW. Ask your BMW center for
suitable additives.
Only use suitable additives, otherwise
engine damage may result. Because
additives are harmful to your health, it is impor-
tant to follow the instructions on the contain-
ers.<
Page 257 of 274

Reference 255
At a glance
Controls
Driving tips
Communications
Navigation
Entertainment
Mobility
Changes, technical, refer to
For your own safety5
Changing bulbs, refer to
Lamps and bulbs229
Changing the language on the
Control Display84
Changing the measurement
units on the Control
Display76
Changing wheels233
Chassis number, refer to
Engine compartment222
Check Control81
"Check Control
messages"83
Check Gas Cap206
Child-restraint fixing system
LATCH53
Child-restraint systems52
Child-safety lock55
Child seats, refer to
Transporting children
safely52
Chrome parts, care, refer to
Caring for your vehicle
brochure
Cigarette lighter, refer to
Lighter111
Cleaning, refer to Caring for
your vehicle brochure
Cleaning headlamps62
– washer fluid62
"Climate"101
Clock71
– 12h/24h mode80
– setting time79
Closing
– from inside32
– from outside29
Clothes hooks110
Cockpit10
Cold start, refer to Starting the
engine57
Combined instrument, refer to
Instrument cluster12
Comfort access, refer to
Convenient access36
Comfort area, refer to Around
the center console14"Communication"188,198,1
99,200
Compact disc, refer to
– CD changer169
– CD player169
Compartment for remote
control, refer to Ignition
lock56
Compass108
Computer73
– displays on Control
Display73
– hour signal80
Computer, refer to iDrive16
"Concert hall" for Tone
control158
"Concierge"200
Concierge service200
Condensation, refer to When
the vehicle is parked122
Condition Based Service
CBS226
Configuring settings, refer to
Personal Profile28
Confirmation signals for
locking/unlocking the
vehicle31
Connecting vacuum cleaner,
refer to Connecting
electrical appliances112
Consumption, refer to
Average consumption73
Consumption display
– average consumption73
– Energy Control72
"Continue guidance to
destination?"144
Control Center, refer to
iDrive16
Control Display
– brightness84
– changing the language84
– switching off/on21
Control Display, refer to
iDrive16
Controller, refer to iDrive16
Controls and displays10
Control unit, refer to iDrive16Convenient access36
– replacing the battery38
– what to observe before
entering a car wash37
Convenient operation
– glass roof30
– windows30
Coolant224
– checking level225
Coolant temperature72
Cooling, maximum102
Cooling fluid, refer to
Coolant224
Cooling system, refer to
Coolant224
Copyright2
Corner-illuminating lamps,
refer to Adaptive Head
Light98
Cornering lamps, refer to
Adaptive Head Light98
Correct tires219
Courtesy lamps, refer to
Interior lamps99
Cross-hairs in navigation135
Cruise control63
– active64
– malfunction64
Cruising range73
Cup holders111
Curb weight, refer to
Weights245
Current fuel consumption,
refer to Energy Control72
"Current position"151
Current position
– displaying151
– entering139
– storing139
"Customer
Relations"192,200
D
Dashboard, refer to
Cockpit10
Dashboard, refer to
Instrument cluster12