2008 BMW 328XI SEDAN window
[x] Cancel search: windowPage 77 of 274
Controls
75Reference
At a glance
Driving tips
Communications
Navigation
Entertainment
Mobility
1.Select "Set" and press the controller.
2.Select the desired menu item and press the
controller.
Display options
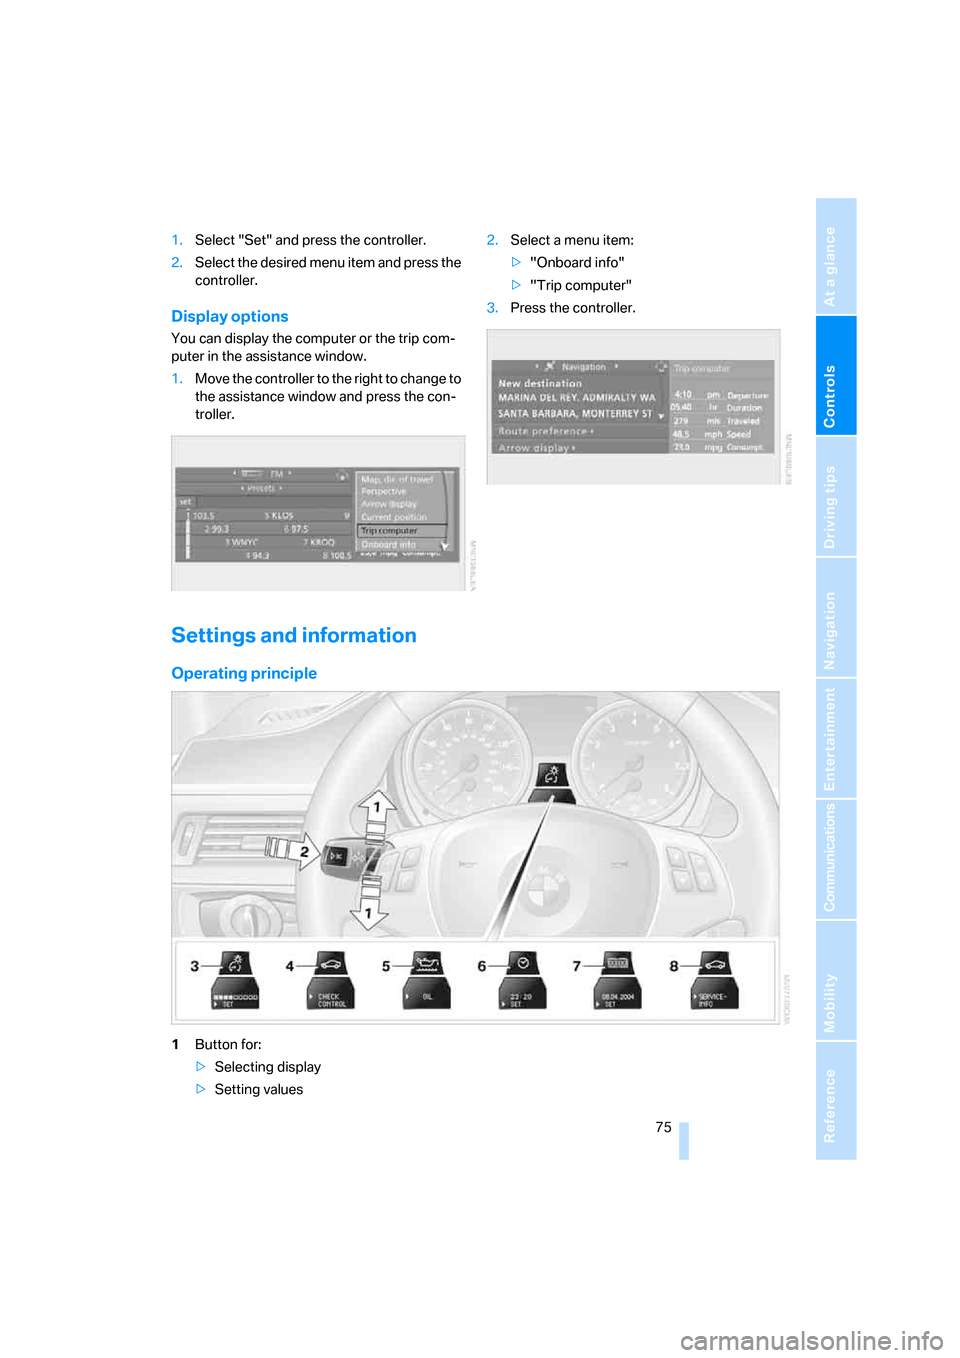
You can display the computer or the trip com-
puter in the assistance window.
1.Move the controller to the right to change to
the assistance window and press the con-
troller.2.Select a menu item:
>"Onboard info"
>"Trip computer"
3.Press the controller.
Settings and information
Operating principle
1Button for:
>Selecting display
>Setting values
Page 102 of 274
Climate
100
Climate
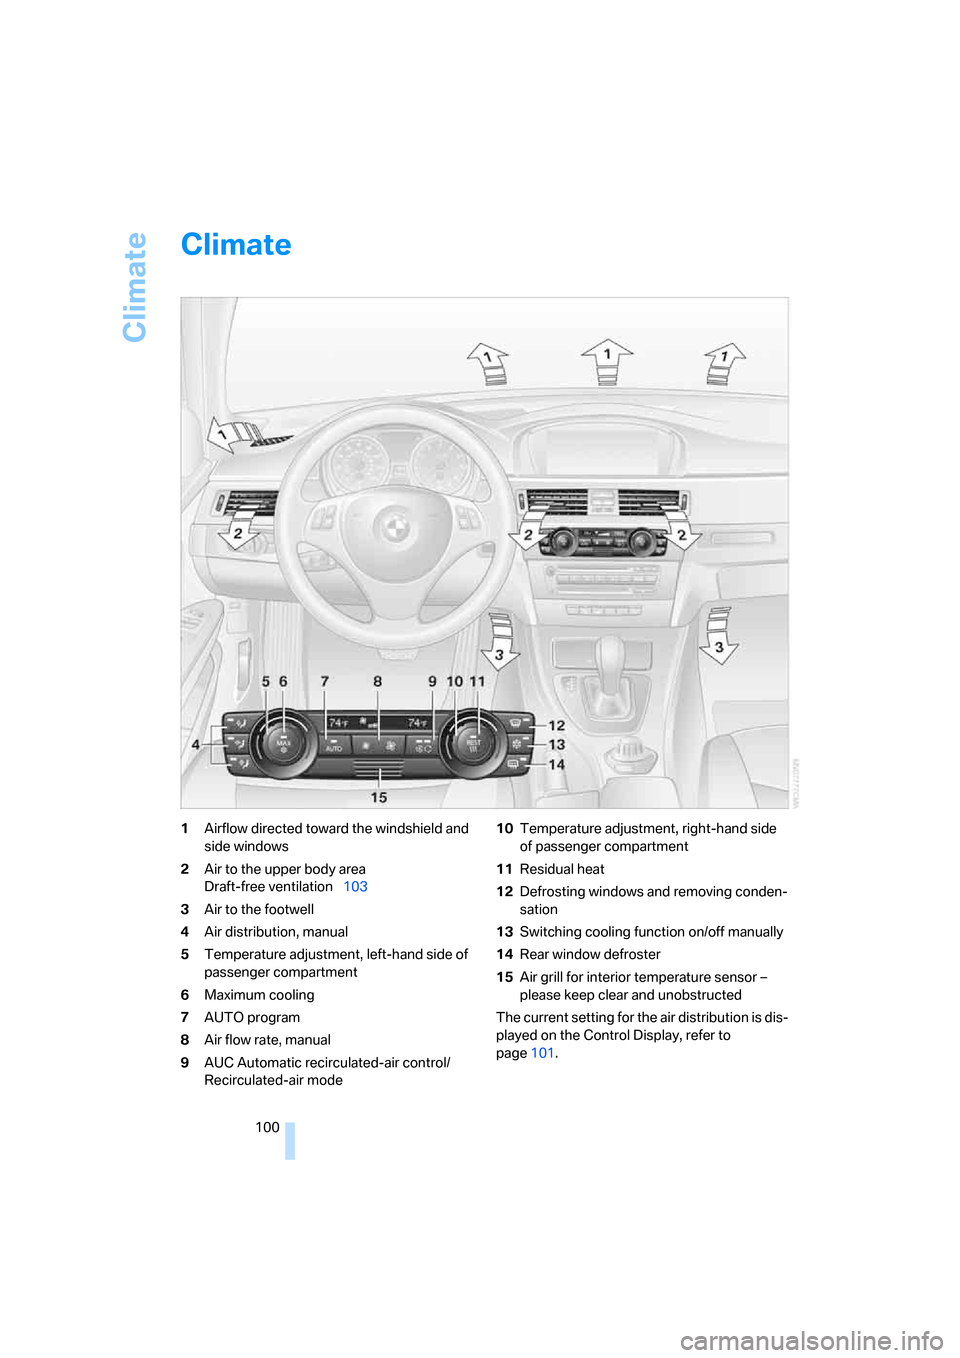
1Airflow directed toward the windshield and
side windows
2Air to the upper body area
Draft-free ventilation103
3Air to the footwell
4Air distribution, manual
5Temperature adjustment, left-hand side of
passenger compartment
6Maximum cooling
7AUTO program
8Air flow rate, manual
9AUC Automatic recirculated-air control/
Recirculated-air mode10Temperature adjustment, right-hand side
of passenger compartment
11Residual heat
12Defrosting windows and removing conden-
sation
13Switching cooling function on/off manually
14Rear window defroster
15Air grill for interior temperature sensor –
please keep clear and unobstructed
The current setting for the air distribution is dis-
played on the Control Display, refer to
page101.
Page 103 of 274
Controls
101Reference
At a glance
Driving tips
Communications
Navigation
Entertainment
Mobility
Automatic climate control
Comfortable interior climate
AUTO program7 offers the ideal air distribution
and air flow rate for almost all conditions, refer
to AUTO program below. All you need to do is
select an interior temperature which is comfort-
able for you.
The following sections inform you in detail
about how to adjust the settings.
Most settings are stored for the remote control
currently in use, refer also to Personal Profile
settings on page28.
Adjusting air distribution manually
The air distribution can be
switched on and off manually. The
air is directed to the windshield, to
the upper body area and to the
footwell. Automatic air distribution adjustment
is deactivated.
You can switch the automatic air distribution
back on by pressing the AUTO button. This
automatically switches on the cooling function
as well.
Fine adjustments to manual air
distribution
You can set the rate of incoming airflow for
manual air distribution.
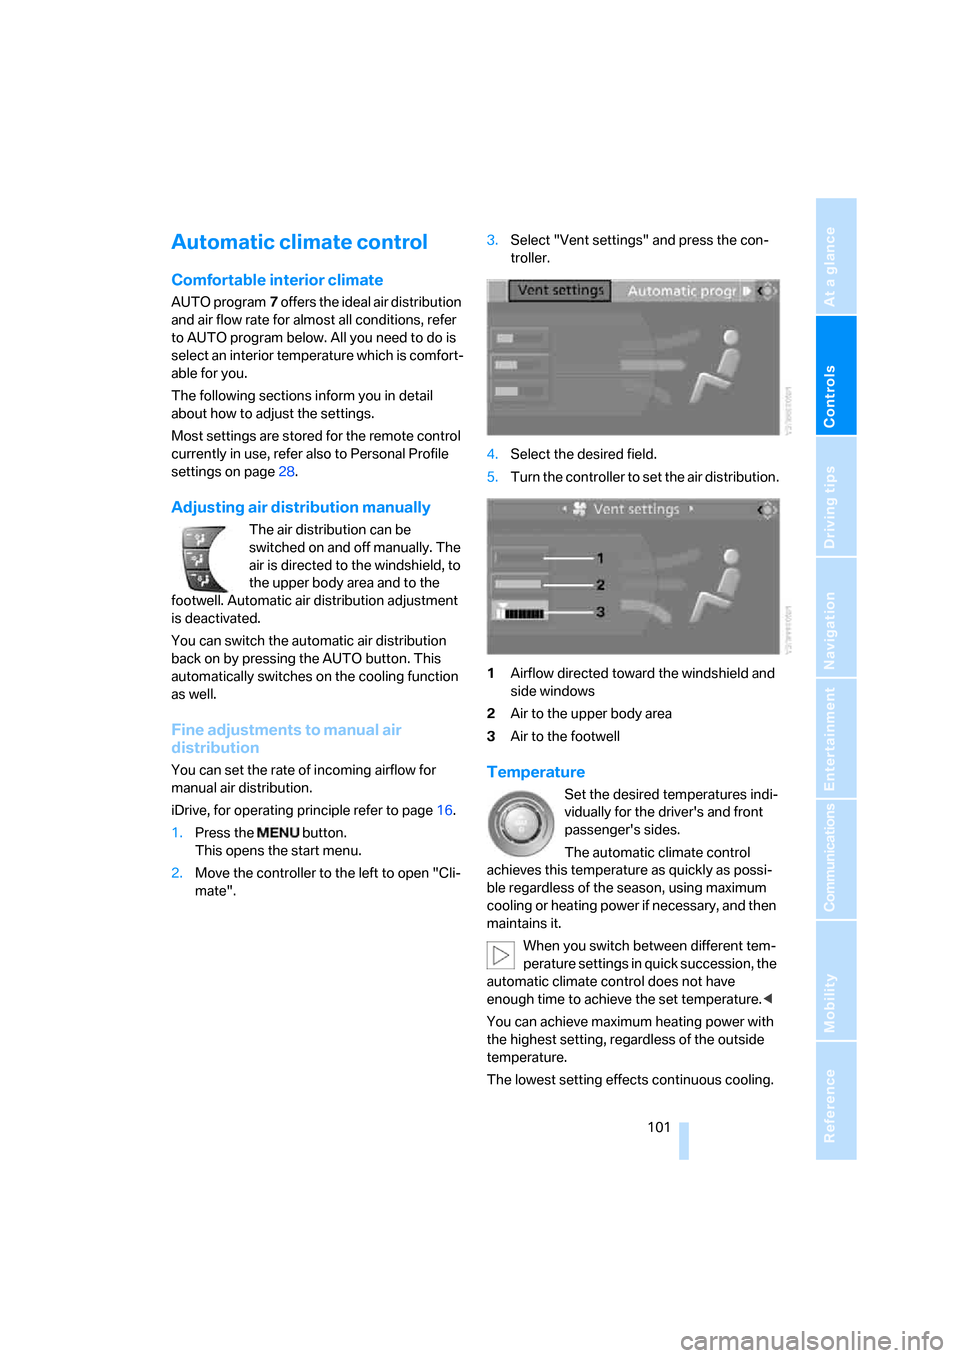
iDrive, for operating principle refer to page16.
1.Press the button.
This opens the start menu.
2.Move the controller to the left to open "Cli-
mate".3.Select "Vent settings" and press the con-
troller.
4.Select the desired field.
5.Turn the controller to set the air distribution.
1Airflow directed toward the windshield and
side windows
2Air to the upper body area
3Air to the footwellTemperature
Set the desired temperatures indi-
vidually for the driver's and front
passenger's sides.
The automatic climate control
achieves this temperature as quickly as possi-
ble regardless of the season, using maximum
cooling or heating power if necessary, and then
maintains it.
When you switch between different tem-
perature settings in quick succession, the
automatic climate control does not have
enough time to achieve the set temperature.<
You can achieve maximum heating power with
the highest setting, regardless of the outside
temperature.
The lowest setting effects continuous cooling.
Page 104 of 274

Climate
102
Maximum cooling
At outside temperatures above
327/06 and when the engine is
running, you obtain a maximum
cooling effect as soon as possible.
The automatic climate control goes into recir-
culated-air mode at the lowest temperature. Air
flows at maximum rate from the vents for the
upper body area. You should therefore open
them for maximum cooling.
AUTO program
The AUTO program adjusts the air
distribution to the windshield and
side windows, towards the upper
body area and into the footwell for you. The air
flow rate and your temperature specifications
will be adapted to outside influences as a result
of seasonal changes, e.g. sunlight or window
condensation.
The cooling is switched on automatically with
the AUTO program.
Intensity of the AUTO program
Press the AUTO button repeatedly to set the
intensity of the AUTO program. The current
setting is briefly displayed on the Control Dis-
play every time the button is pressed.
You can also set the intensity of the AUTO pro-
gram via iDrive.
1.Press the button.
This opens the start menu.
2.Move the controller to the left to call up "Cli-
mate".
3.Select "Automatic programs" and press the
controller.4.Select the desired intensity and press the
controller.
The selected intensity level of the auto-
matic program is switched on.
Adjusting air flow rate manually
Press the left side of the button to
reduce airflow. Press the right side
of the button to increase it.
You can reactivate the automatic mode for the
air flow rate with the AUTO button.
The air flow rate may be reduced or the blower
may be switched off entirely to save on battery
power. The display remains the same.
Switching the system on/off
With the blower at its lowest setting, press the
left side of the button to switch off the auto-
matic climate control. All displays are cleared
except for the rear window defroster if it is
switched on.
Press any button except REST or rear window
defroster to reactivate the automatic climate
control.
AUC Automatic recirculated-air
control/Recirculated-air mode
Switch on the desired operating
mode by pressing this button
repeatedly:
>LED off: outside air flows in continuously.
>Left-hand LED on, AUC mode: a sensor
detects pollutants in the outside air. If nec-
essary, the system blocks the supply of out-
side air and recirculates the inside air. As
soon as the concentration of pollutants in
the outside air has decreased sufficiently,
the system automatically switches back to
outside air supply.
>Right-hand LED on, recirculated-air mode:
the supply of outside air is permanently
shut off. The system then recirculates the
air currently within the vehicle.
If condensation starts to form on the
inside window surfaces during operation
in the recirculated-air mode, you should switch
Page 105 of 274

Controls
103Reference
At a glance
Driving tips
Communications
Navigation
Entertainment
Mobility
it off while also increasing the air flow rate as
required.
The recirculated-air mode should not be used
over an extended period of time, otherwise the
air quality inside the car will deteriorate contin-
uously.<
Via the button* on the steering wheel
You can switch quickly between the recircu-
lated-air mode and the previous mode using an
individually programmable button
on the steer-
ing wheel, refer to page11.
Residual heat
The heat stored in the engine is
used to heat the passenger com-
partment, e.g. while stopped at a
school to pick up a child.
The function can be switched on when the fol-
lowing conditions are met:
>Up to 15 minutes after the engine has been
switched off
>While the engine is at operating tempera-
ture
>As long as battery voltage is sufficient
>At an outside temperature below 777/
256
The LED is lit when the function is on.
As of radio readiness, you can set the interior
temperature, the air flow rate and the air distri-
bution.
Defrosting windows and removing
condensation
Quickly removes ice and conden-
sation from the windshield and
front side windows.
Switch on the cooling function as well.
Switching cooling function on/off
The cooling function cools and
dehumidifies the incoming air
before reheating it as required,
according to the temperature setting. This
function is only available while the engine is
running.The cooling function helps prevent condensa-
tion on the windows or removes it quickly.
Depending on the weather, the windshield may
fog over briefly when the engine is started.
The cooling function is automatically switched
on along with the AUTO program.
Rear window defroster
The defroster is switched off auto-
matically after a certain time.
Depending on your vehicle's
equipment, the upper wires serve as an antenna
and are not part of the rear window defroster.
Ventilation
1Use the knurled wheels to smoothly open
and close the air vents
2Use the lever to change the direction of the
airflow
3Knurled wheel for more or less cool air from
the vents for the upper body area
Ventilation for cooling
Adjust the vent outlets to direct the flow of cool
air in your direction, for instance if it has become
too hot in the car.
Draft-free ventilation
Set the vent outlets so that the air flows past
you and not straight at you.
Page 111 of 274
Controls
109Reference
At a glance
Driving tips
Communications
Navigation
Entertainment
Mobility
>The compass direction shown does not
change although the direction of travel
does.
>Not all compass directions are shown.
Procedure
1.Make sure that no large metal objects or
overhead power lines are in the vicinity of
your vehicle and that you have enough
space to drive in a circle.
2.Set the currently valid compass zone.
3.Press the adjustment button for approx.
6-7 seconds to call up C. Then drive in at
least one full circle at a speed of no more
than 4 mph or 7 km/h.
If calibration is successful, the display
changes from C to a compass direction.
Setting right-hand/left-hand steering
Your digital compass is factory-set to right-
hand or left-hand steering, in accordance with
your vehicle.
Setting the language
You can set the language of the display:
Press the adjustment button for approx.
12-13 seconds. Briefly press the adjustment
button again to switch between English, "E",
and German, "O".
The setting is automatically saved after approx.
10 seconds.
Roller sun blinds*
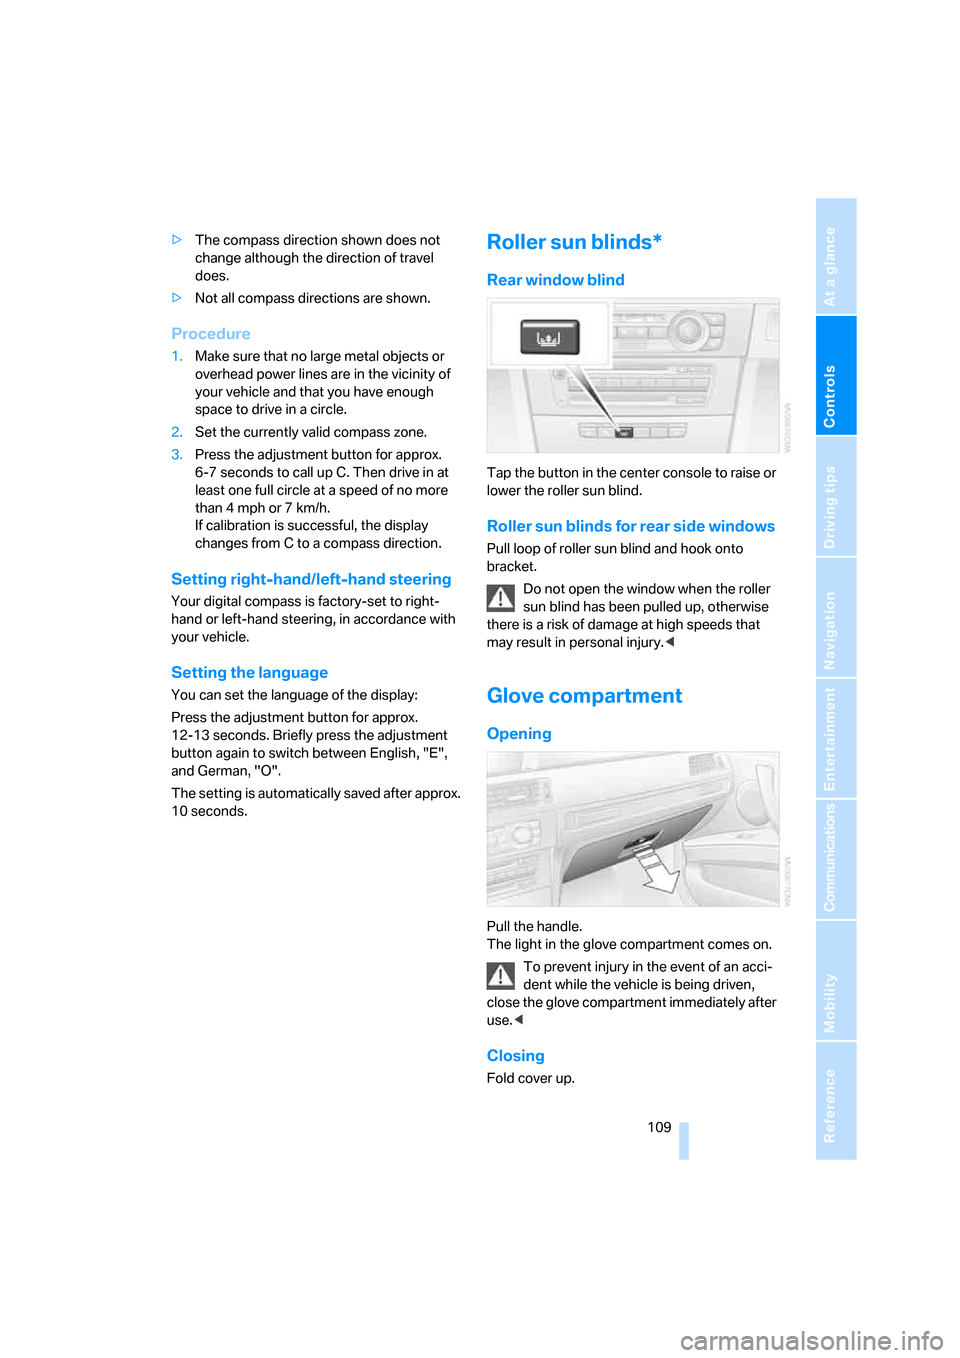
Rear window blind
Tap the button in the center console to raise or
lower the roller sun blind.
Roller sun blinds for rear side windows
Pull loop of roller sun blind and hook onto
bracket.
Do not open the window when the roller
sun blind has been pulled up, otherwise
there is a risk of damage at high speeds that
may result in personal injury.<
Glove compartment
Opening
Pull the handle.
The light in the glove compartment comes on.
To prevent injury in the event of an acci-
dent while the vehicle is being driven,
close the glove compartment immediately after
use.<
Closing
Fold cover up.
Page 115 of 274
Controls
113Reference
At a glance
Driving tips
Communications
Navigation
Entertainment
Mobility
Sedan:
Through-loading system*
Opening
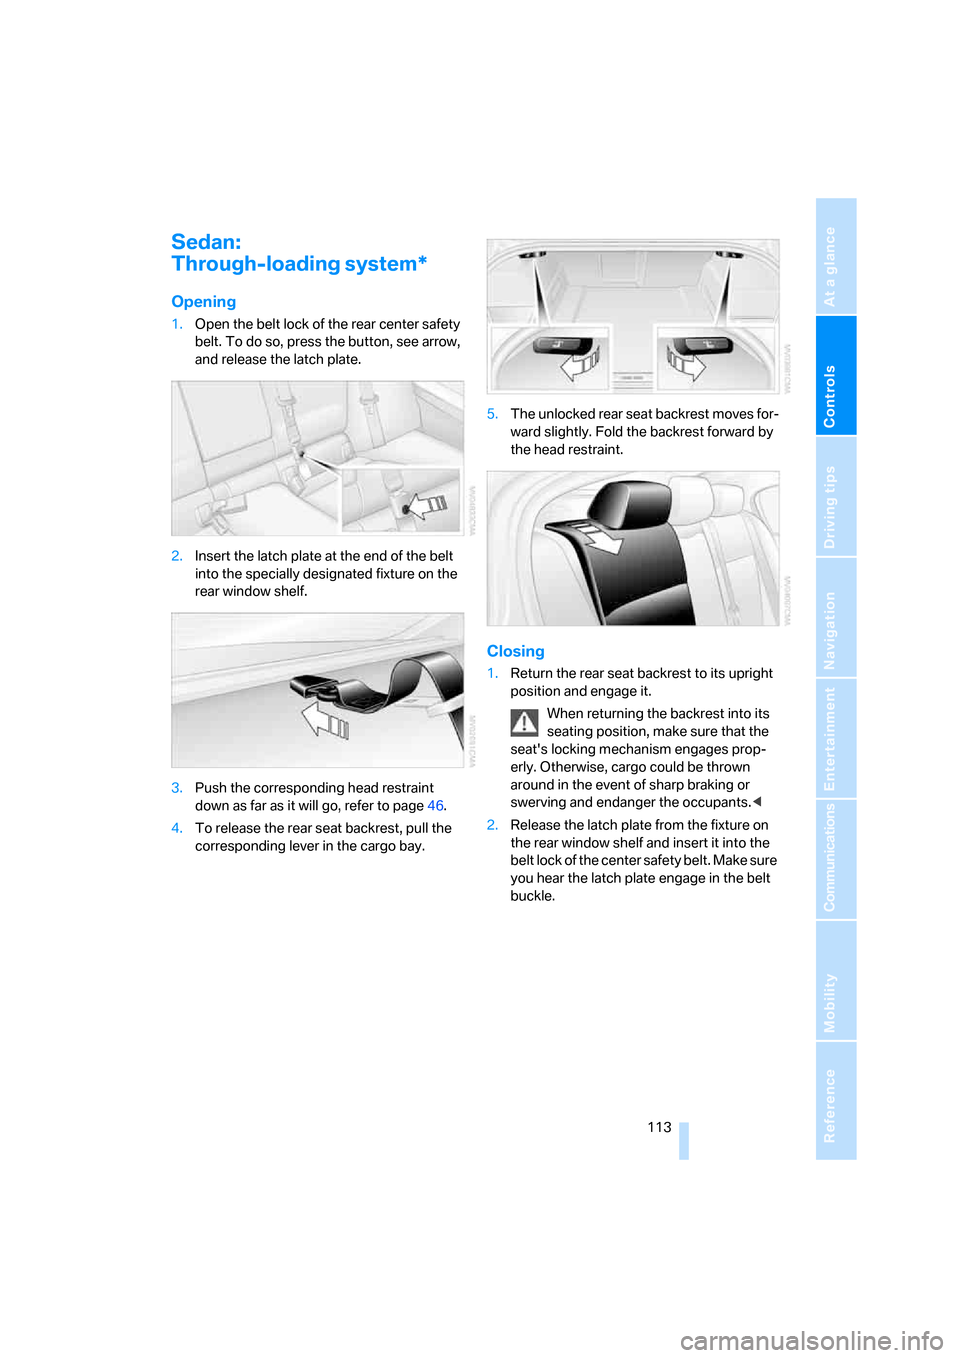
1.Open the belt lock of the rear center safety
belt. To do so, press the button, see arrow,
and release the latch plate.
2.Insert the latch plate at the end of the belt
into the specially designated fixture on the
rear window shelf.
3.Push the corresponding head restraint
down as far as it will go, refer to page46.
4.To release the rear seat backrest, pull the
corresponding lever in the cargo bay.5.The unlocked rear seat backrest moves for-
ward slightly. Fold the backrest forward by
the head restraint.
Closing
1.Return the rear seat backrest to its upright
position and engage it.
When returning the backrest into its
seating position, make sure that the
seat's locking mechanism engages prop-
erly. Otherwise, cargo could be thrown
around in the event of sharp braking or
swerving and endanger the occupants.<
2.Release the latch plate from the fixture on
the rear window shelf and insert it into the
belt lock of the center safety belt. Make sure
you hear the latch plate engage in the belt
buckle.
Page 116 of 274
Practical interior accessories
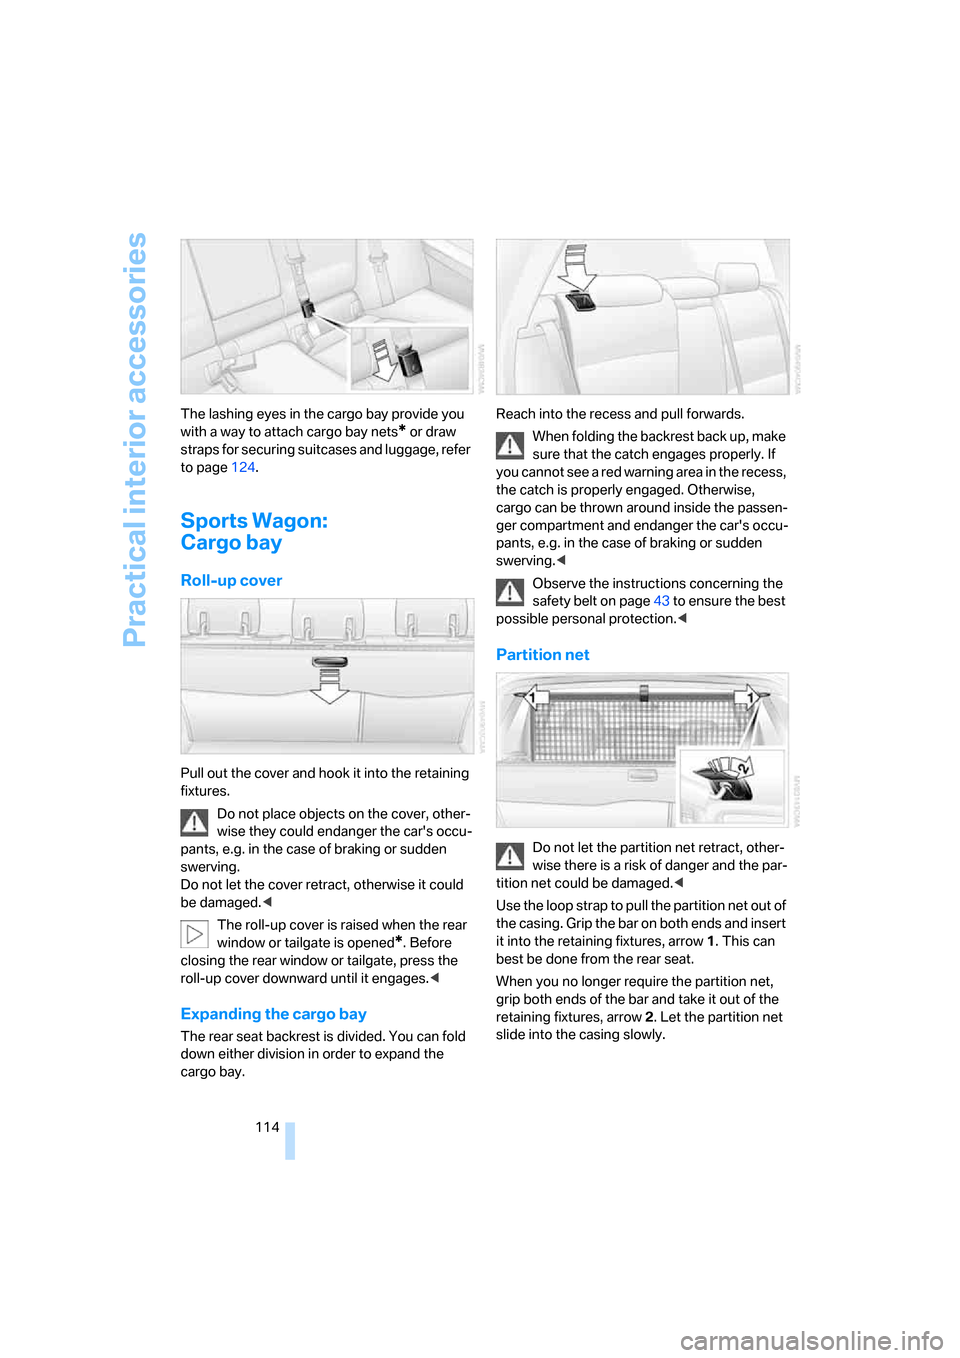
114 The lashing eyes in the cargo bay provide you
with a way to attach cargo bay nets
* or draw
straps for securing suitcases and luggage, refer
to page124.
Sports Wagon:
Cargo bay
Roll-up cover
Pull out the cover and hook it into the retaining
fixtures.
Do not place objects on the cover, other-
wise they could endanger the car's occu-
pants, e.g. in the case of braking or sudden
swerving.
Do not let the cover retract, otherwise it could
be damaged.<
The roll-up cover is raised when the rear
window or tailgate is opened
*. Before
closing the rear window or tailgate, press the
roll-up cover downward until it engages.<
Expanding the cargo bay
The rear seat backrest is divided. You can fold
down either division in order to expand the
cargo bay.Reach into the recess and pull forwards.
When folding the backrest back up, make
sure that the catch engages properly. If
you cannot see a red warning area in the recess,
the catch is properly engaged. Otherwise,
cargo can be thrown around inside the passen-
ger compartment and endanger the car's occu-
pants, e.g. in the case of braking or sudden
swerving.<
Observe the instructions concerning the
safety belt on page43 to ensure the best
possible personal protection.<
Partition net
Do not let the partition net retract, other-
wise there is a risk of danger and the par-
tition net could be damaged.<
Use the loop strap to pull the partition net out of
the casing. Grip the bar on both ends and insert
it into the retaining fixtures, arrow 1. This can
best be done from the rear seat.
When you no longer require the partition net,
grip both ends of the bar and take it out of the
retaining fixtures, arrow 2. Let the partition net
slide into the casing slowly.