2008 BMW 328I SEDAN Cargo
[x] Cancel search: CargoPage 32 of 274
Opening and closing
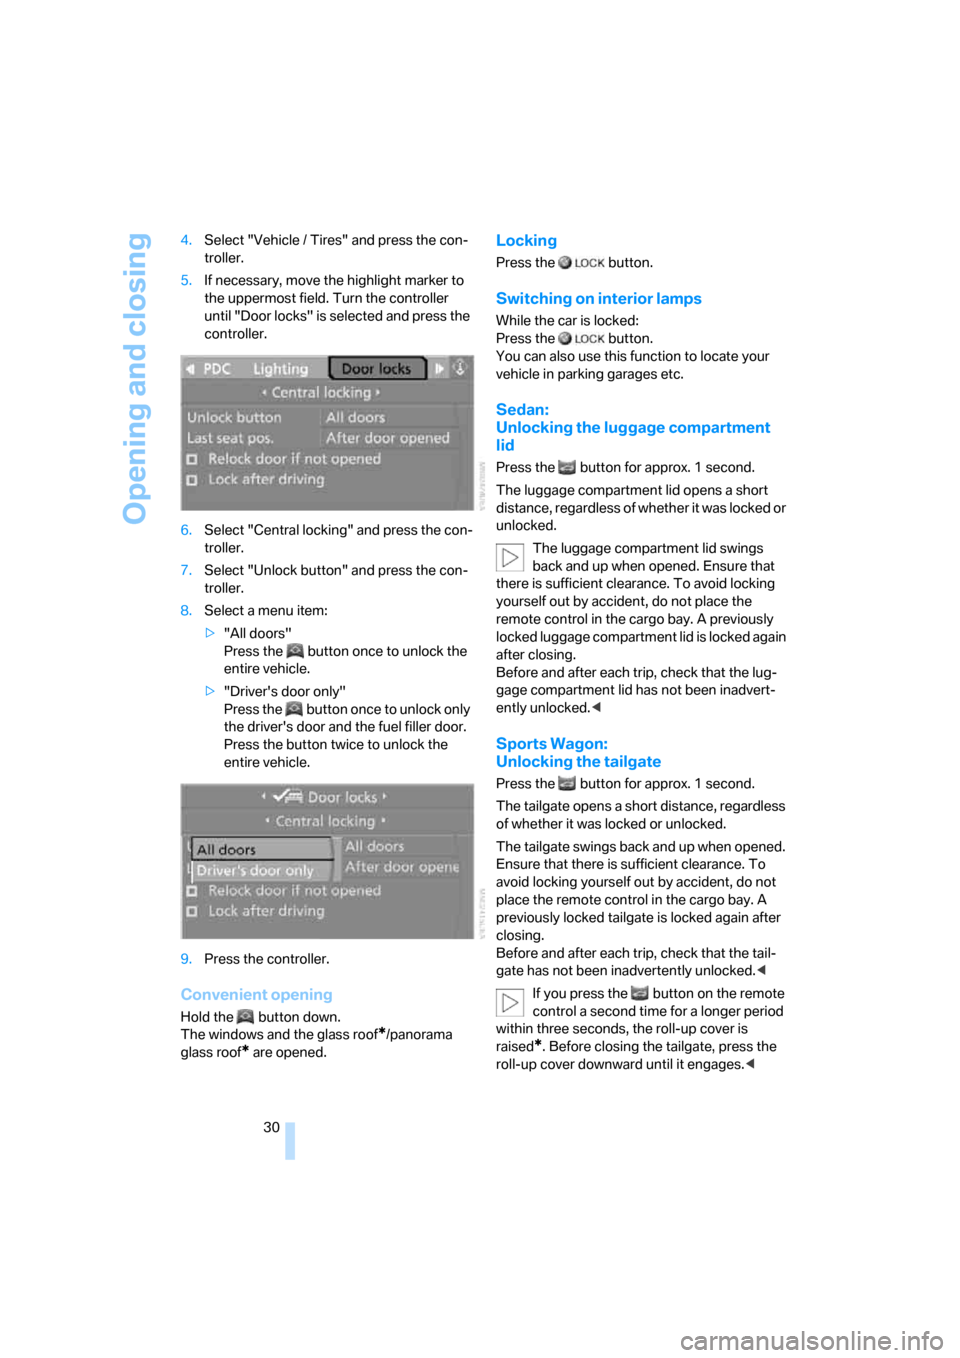
30 4.Select "Vehicle / Tires" and press the con-
troller.
5.If necessary, move the highlight marker to
the uppermost field. Turn the controller
until "Door locks" is selected and press the
controller.
6.Select "Central locking" and press the con-
troller.
7.Select "Unlock button" and press the con-
troller.
8.Select a menu item:
>"All doors"
Press the button once to unlock the
entire vehicle.
>"Driver's door only"
Press the button once to unlock only
the driver's door and the fuel filler door.
Press the button twice to unlock the
entire vehicle.
9.Press the controller.
Convenient opening
Hold the button down.
The windows
and the glass roof*/panorama
glass roof
* are opened.
Locking
Press the button.
Switching on interior lamps
While the car is locked:
Press the button.
You can also use this function to locate your
vehicle in parking garages etc.
Sedan:
Unlocking the luggage compartment
lid
Press the button for approx. 1 second.
The luggage compartment lid opens a short
distance, regardless of whether it was locked or
unlocked.
The luggage compartment lid swings
back and up when opened. Ensure that
there is sufficient clearance. To avoid locking
yourself out by accident, do not place the
remote control in the cargo bay. A previously
locked luggage compartment lid is locked again
after closing.
Before and after each trip, check that the lug-
gage compartment lid has not been inadvert-
ently unlocked.<
Sports Wagon:
Unlocking the tailgate
Press the button for approx. 1 second.
The tailgate opens a short distance, regardless
of whether it was locked or unlocked.
The tailgate swings back and up when opened.
Ensure that there is sufficient clearance. To
avoid locking yourself out by accident, do not
place the remote control in the cargo bay. A
previously locked tailgate is locked again after
closing.
Before and after each trip, check that the tail-
gate has not been inadvertently unlocked.<
If you press the button on the remote
control a second time for a longer period
within three seconds, the roll-up cover is
raised
*. Before closing the tailgate, press the
roll-up cover downward until it engages.<
Page 36 of 274
Opening and closing
34 Turn the key all the way to the left: the luggage
compartment lid opens.
If you open the luggage compartment lid
using the key while the alarm system is
armed, the alarm will be triggered. Switching off
an alarm, refer to page36.<
Sports Wagon
In the event of an electrical malfunction:
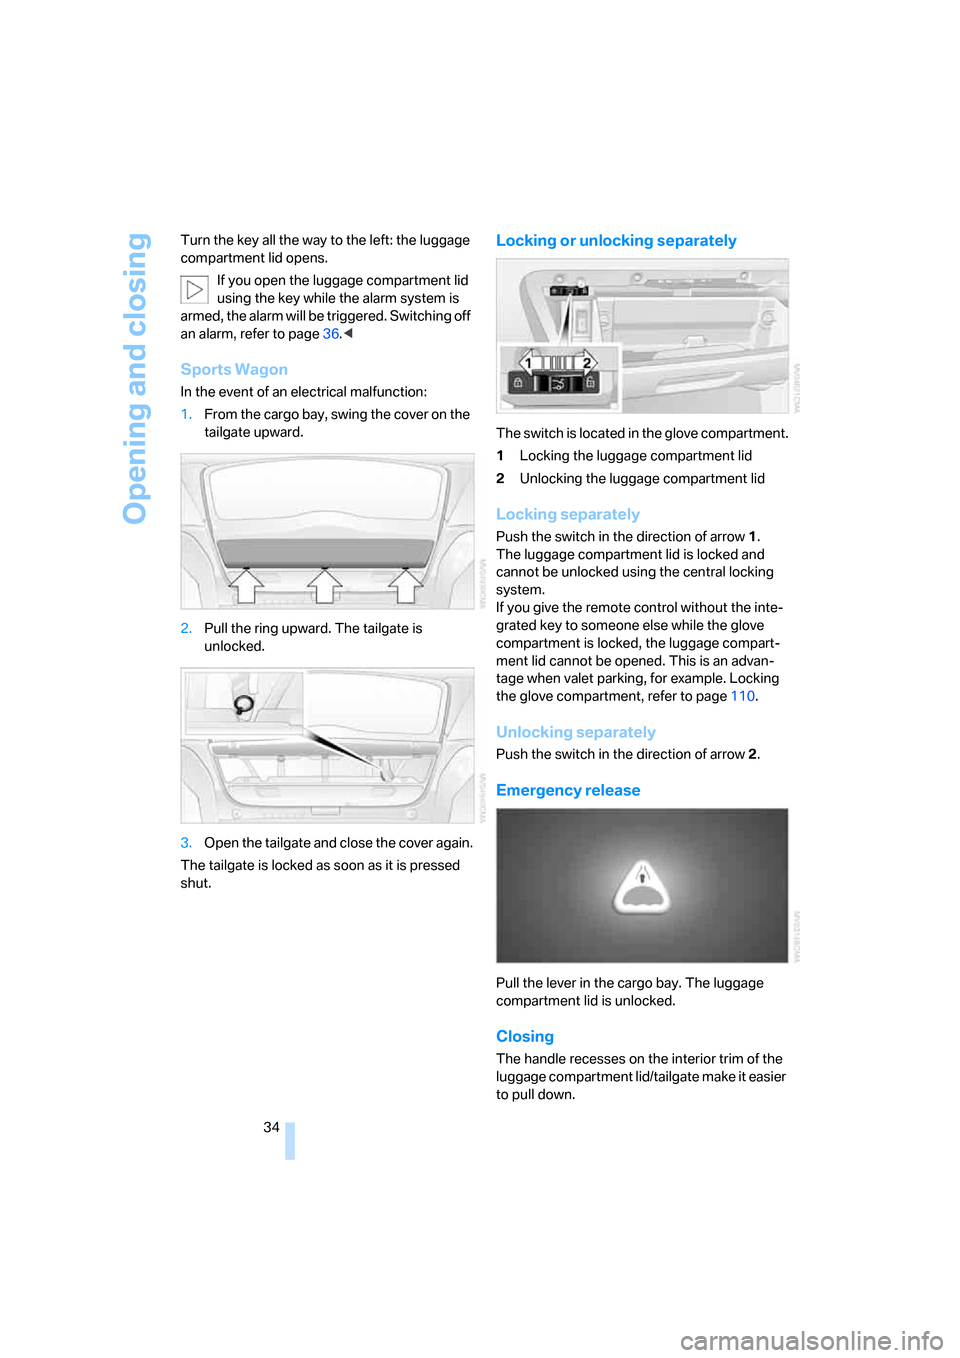
1.From the cargo bay, swing the cover on the
tailgate upward.
2.Pull the ring upward. The tailgate is
unlocked.
3.Open the tailgate and close the cover again.
The tailgate is locked as soon as it is pressed
shut.
Locking or unlocking separately
The switch is located in the glove compartment.
1Locking the luggage compartment lid
2Unlocking the luggage compartment lid
Locking separately
Push the switch in the direction of arrow 1.
The luggage compartment lid is locked and
cannot be unlocked using the central locking
system.
If you give the remote control without the inte-
grated key to someone else while the glove
compartment is locked, the luggage compart-
ment lid cannot be opened. This is an advan-
tage when valet parking, for example. Locking
the glove compartment, refer to page110.
Unlocking separately
Push the switch in the direction of arrow 2.
Emergency release
Pull the lever in the cargo bay. The luggage
compartment lid is unlocked.
Closing
The handle recesses on the interior trim of the
luggage compartment lid/tailgate make it easier
to pull down.
Page 37 of 274

Controls
35Reference
At a glance
Driving tips
Communications
Navigation
Entertainment
Mobility
Make sure that the closing path of the
luggage compartment lid/tailgate is clear,
otherwise injuries may result.<
Sedan
Sports Wagon
Sports Wagon: opening and closing the
rear window
Small items can be loaded and unloaded
quickly when the rear window is opened sepa-
rately.
The roll-up cover is raised when the rear
window is opened. Before closing the rear
window, press the roll-up cover downward until
it engages.<
Press the button: the rear window opens
slightly. It can now be swung upwards.Press the window shut to close it.
Make sure that the corners of any pointed
or sharp-edged cargo are padded if they
could bump against the rear window while the
vehicle is in motion, otherwise the heating ele-
ments of the rear window could be damaged.<
Alarm system*
The concept
The vehicle alarm system responds:
>When a door, the hood or the luggage com-
partment lid/tailgate is opened
>To movements inside the vehicle: Interior
motion sensor, refer to page36
>When the car's inclination changes, for
instance if an attempt is made to jack it up
and steal the wheels or to raise it prior to
towing away
>When there is an interruption in the power
supply from the battery
The alarm system signals unauthorized entry
attempts for a short time by means of:
>An acoustic alarm
>Switching on the hazard warning flashers
>Flashing the high beams
Arming and disarming
When you lock or unlock the vehicle, either with
the remote control or at the door lock, the alarm
system is armed or disarmed at the same time.
You can open the luggage compartment lid/tail-
gate even when the alarm system is armed, by
pressing the button on the remote control,
refer to page30. The lid is locked and moni-
tored again as soon as you close it.
Panic mode*
You can trigger the alarm system if you find
yourself in a dangerous situation:
Press the button for at least three seconds.
To switch off the alarm: press any button.
Page 39 of 274

Controls
37Reference
At a glance
Driving tips
Communications
Navigation
Entertainment
Mobility
>The engine can only be started when the
vehicle detects that the remote control cur-
rently in use is inside the vehicle.
Comparison to the standard remote
control
In general, there is no difference between using
convenient access or pressing the buttons on
the remote control to carry out the functions
mentioned above. You should therefore first
familiarize yourself with the instructions on
opening and closing starting on page28.
Special features regarding the use of conve-
nient access are described below.
If you notice a brief delay while opening or
closing windows or the glass roof/pan-
orama glass roof, the system is checking
whether a remote control is inside the vehicle.
Please repeat the opening or closing proce-
dure, if necessary.<
Unlocking
Grasp the handle on the driver's or front pas-
senger's door completely, arrow 1. This corre-
sponds to pressing the button.
Locking
Touch the surface, arrow 2, with your finger for
approx. 1 second. This corresponds to pressing
the button.
To preserve the battery, please make
sure that the ignition and all electrical
consumers are switched off before locking the
vehicle.<
Convenient closure
For convenient closure, keep your finger on the
surface, arrow 2.
Unlocking the luggage compartment
lid/tailgate separately
Press the button on the outside of the luggage
compartment lid/tailgate. This corresponds to
pressing the button.
If the vehicle detects that a remote con-
trol has been accidentally left inside the
locked vehicle's cargo bay after the luggage
compartment lid/tailgate or rear window is
closed, the lid will reopen. The hazard warning
flashers flash and an acoustic signal
* sounds.<
Switching on radio readiness
Radio readiness is switched on by pressing the
start/stop button, refer to page56.
Do not depress the brake or the clutch,
otherwise the engine will start.<
Starting the engine
You can start the engine or switch on the igni-
tion when a remote control is inside the vehicle.
It is not necessary to insert a remote control into
the ignition switch, refer to page56.
Switching off the engine in cars with
automatic transmission
The engine can only be switched off when the
selector lever is in position P, refer to page57.
T o s w i t c h t h e e n g i n e o f f w h e n t h e s e l e c t o r l e v e r
is in position N, the remote control must be in
the ignition switch.
Before driving a vehicle with automatic
transmission into a car wash
1.Insert remote control into ignition switch.
2.Depress the brake.
3.Move the selector lever to position N.
4.Switch off the engine.
The vehicle can roll.
Page 56 of 274
Transporting children safely
54
Sedan
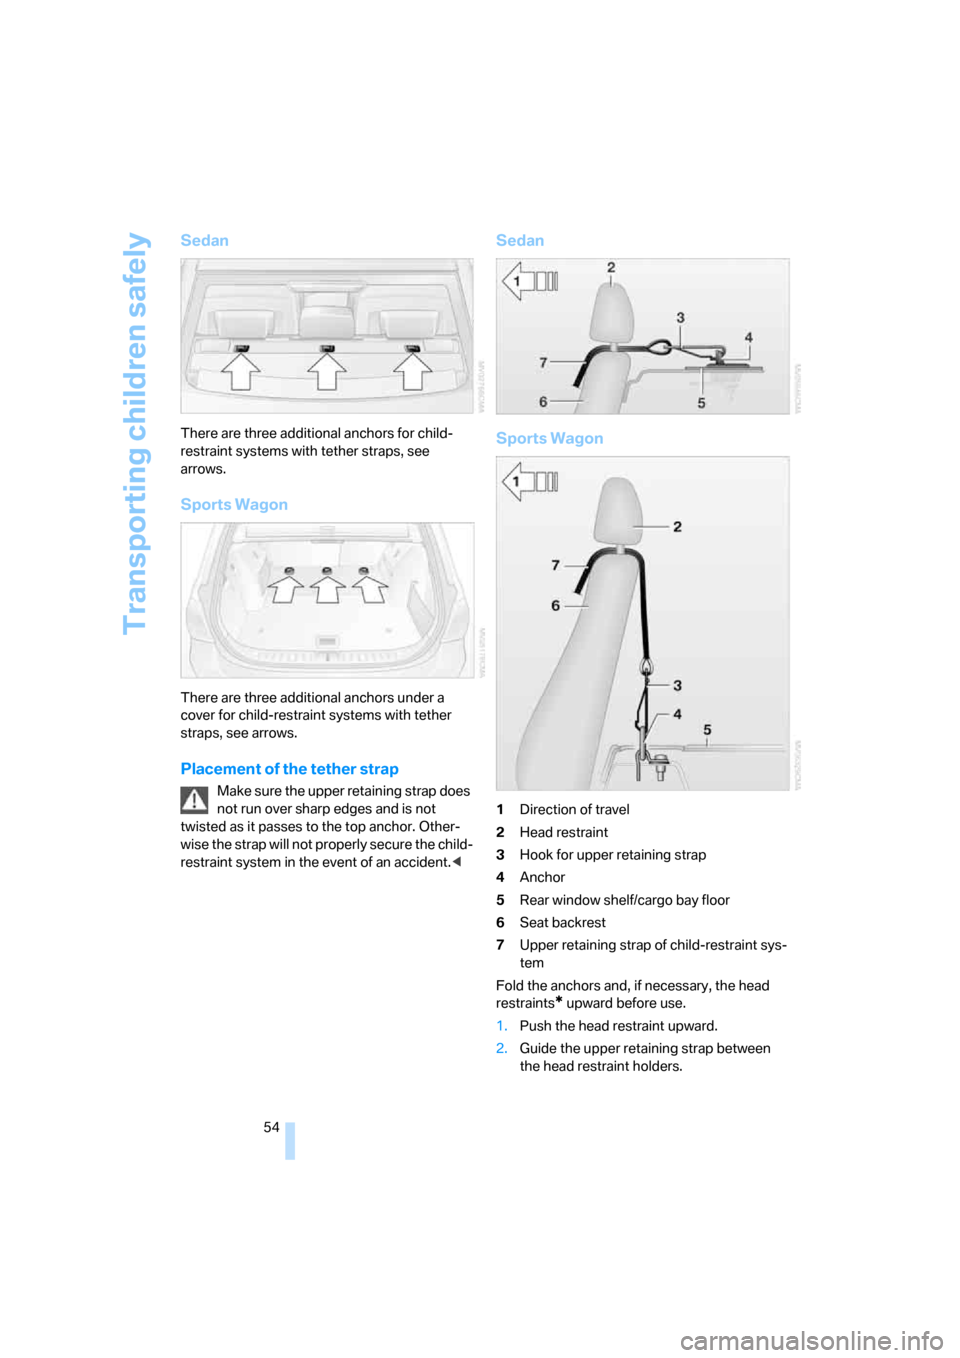
There are three additional anchors for child-
restraint systems with tether straps, see
arrows.
Sports Wagon
There are three additional anchors under a
cover for child-restraint systems with tether
straps, see arrows.
Placement of the tether strap
Make sure the upper retaining strap does
not run over sharp edges and is not
twisted as it passes to the top anchor. Other-
wise the strap will not properly secure the child-
restraint system in the event of an accident.<
Sedan
Sports Wagon
1Direction of travel
2Head restraint
3Hook for upper retaining strap
4Anchor
5Rear window shelf/cargo bay floor
6Seat backrest
7Upper retaining strap of child-restraint sys-
tem
Fold the anchors and, if necessary, the head
restraints
* upward before use.
1.Push the head restraint upward.
2.Guide the upper retaining strap between
the head restraint holders.
Page 92 of 274
Technology for driving comfort and safety
90
Indication of a flat tire
The warning lamps come on in yellow
and red. A message appears on the
Control Display. In addition, an
acoustic signal sounds. There is a flat
tire or substantial loss of tire pressure.
1.Cautiously reduce speed to below 50 mph
or 80 km/h. Avoid sudden braking and
steering maneuvers. Do not exceed a speed
of 50 mph or 80 km/h.
If the car is not equipped with Run-
Flat Tires, refer to page219, the stan-
dard equipment by design, do not continue
driving. Otherwise a severe accident could
result if you continue driving.<
2.At the next opportunity, check the air pres-
sure in all four tires.
If all four tires are inflated to the cor-
rect pressures, the Flat Tire Monitor
might not have been initialized. The system
must then be initialized.<
3.In the event of complete tire pressure loss,
0 psi/0 kPa, you can estimate the possible
distance for continued driving on the basis
of the following guidelines:
>With a light load:
1 to 2 persons without luggage:
approx. 155 miles/250 km
>With a medium load:
2 persons, cargo bay full, or 4 persons
without luggage:
approx. 90 miles/150 km
>With a full load or when towing a trailer:
4 or more persons, cargo bay full:
approx. 30 miles/50 km
Drive cautiously and do not exceed a
speed of 50 mph or 80 km/h, otherwise
there is a risk of an accident. In the event of
pressure loss, vehicle handling changes. This
includes reduced tracking stability in braking,
extended braking distance and altered natural
steering characteristics.
If unusual vibration or loud noises occur during
the journey, this may be an indication that the
damaged tire has finally failed. Reduce your
speed and pull over as soon as possible at a suitable location. Otherwise parts of the tire
could come loose, resulting in an accident. Do
not continue driving. Instead, contact your
BMW center.<
Malfunction
The warning lamps come on in yel-
low. A message appears on the Con-
trol Display. The Flat Tire Monitor has
a malfunction or has failed. Have the
system checked as soon as possible.
Tire Pressure Monitor TPM*
The concept
TPM checks the inflation pressures of the four
mounted tires. The system notifies you if there
is a significant loss of pressure in one or more
tires.
Functional requirement
In order to assure the reliable reporting of a flat
tire, the system must be reset while all tire infla-
tion pressures are correct.
Always use wheels with TPM electronics. Oth-
erwise, the system may malfunction.
Each time a tire inflation pressure has
been corrected or a wheel or tire has been
changed, reset the system.<
System limitations
TPM cannot warn you in advance of sud-
den severe tire damage caused by out-
side influences.<
The system does not work correctly if it has not
been reset; for example, a flat tire may be indi-
cated even though the tire inflation pressures
are correct.
The system is inactive and cannot indicate a flat
tire if a wheel without TPM electronics, such as
a compact spare wheel, has been mounted, or if
TPM is temporarily malfunctioning due to other
systems or devices using the same radio fre-
quency.
Page 94 of 274
Technology for driving comfort and safety
92 rupted at any time. When driving resumes, the
reset is continued automatically. On the Control
Display, the tires are shown in green and "Sta-
tus: TPM active" is displayed again.
If a flat tire is detected while the system is
resetting and determining the inflation
pressures, all tires on the Control Display are
displayed in yellow. The message "Tire low!" is
shown.<
Message for low tire inflation pressure
The warning lamps come on in yellow
and red. A message appears on the
Control Display. In addition, a signal
sounds. There is a flat tire or substan-
tial loss of tire pressure.
1.Cautiously reduce speed to below 50 mph/
80 km/h. Avoid sudden braking and steer-
ing maneuvers. Do not exceed a speed of
50 mph/80 km/h.
If the car is not equipped with Run-
Flat Tires, refer to page219, the stan-
dard equipment by design, do not continue
driving. Otherwise a severe accident could
result after a tire puncture if you continue
driving.<
2.In the event of complete pressure loss,
0 psi/0 kPa, you can estimate the possible
distance for continued driving on the basis
of the following guidelines:
>With a light load:
1 to 2 persons without luggage:
approx. 155 miles/250 km
>With a medium load:
2 persons, cargo bay full, or 4 persons
without luggage:
approx. 95 miles/150 km
>With a full load:
4 or more persons, cargo bay full:
approx. 30 miles/50 km
Drive cautiously and do not exceed a
speed of 50 mph/80 km/h. In the event of
pressure loss, vehicle handling changes. This
includes reduced tracking stability in braking,
extended braking distance and altered natural
steering characteristics.If unusual vibration or loud noises occur during
the journey, this may be an indication that the
damaged tire has finally failed. Reduce your
speed and pull over as soon as possible at a
suitable location. Otherwise parts of the tire
could come loose, resulting in an accident. Do
not continue driving. Instead, contact your
BMW center.<
Malfunction
The small warning lamp flashes in
yellow and then lights up continu-
ously; the larger warning lamp comes
on in yellow. On the Control Display,
the tires are shown in gray and a message
appears. No punctures can be detected.
his type of message is shown in the following
situations:
>If there is a malfunction
Have the system checked.
>If a wheel without TPM electronics has
been mounted
>If TPM is temporarily malfunctioning due to
other systems or devices using the same
radio frequency.
Message for unsuccessful system
reset
The warning lamp lights up yellow. A
message will appear on the Control
Display. The system is not reset after
a tire has been changed, for example.
Check the tire inflation pressure and reset the
system, refer to page91.
Declaration according to NHTSA/
FMVSS 138
Tire Pressure Monitoring Systems
Each tire should be checked monthly when cold
and inflated to the inflation pressure recom-
mended by the vehicle manufacturer on the
vehicle placard or tire inflation pressure label. If
your vehicle has tires of a different size than the
size indicated on the vehicle placard or tire infla-
tion pressure label, you should determine the
proper tire inflation pressure for those tires. As
an added safety feature, your vehicle has been
Page 101 of 274
Controls
99Reference
At a glance
Driving tips
Communications
Navigation
Entertainment
Mobility
Instrument lighting
You can adjust the brightness of the instrument
lighting only when the parking lamps or the low
beams are switched on.
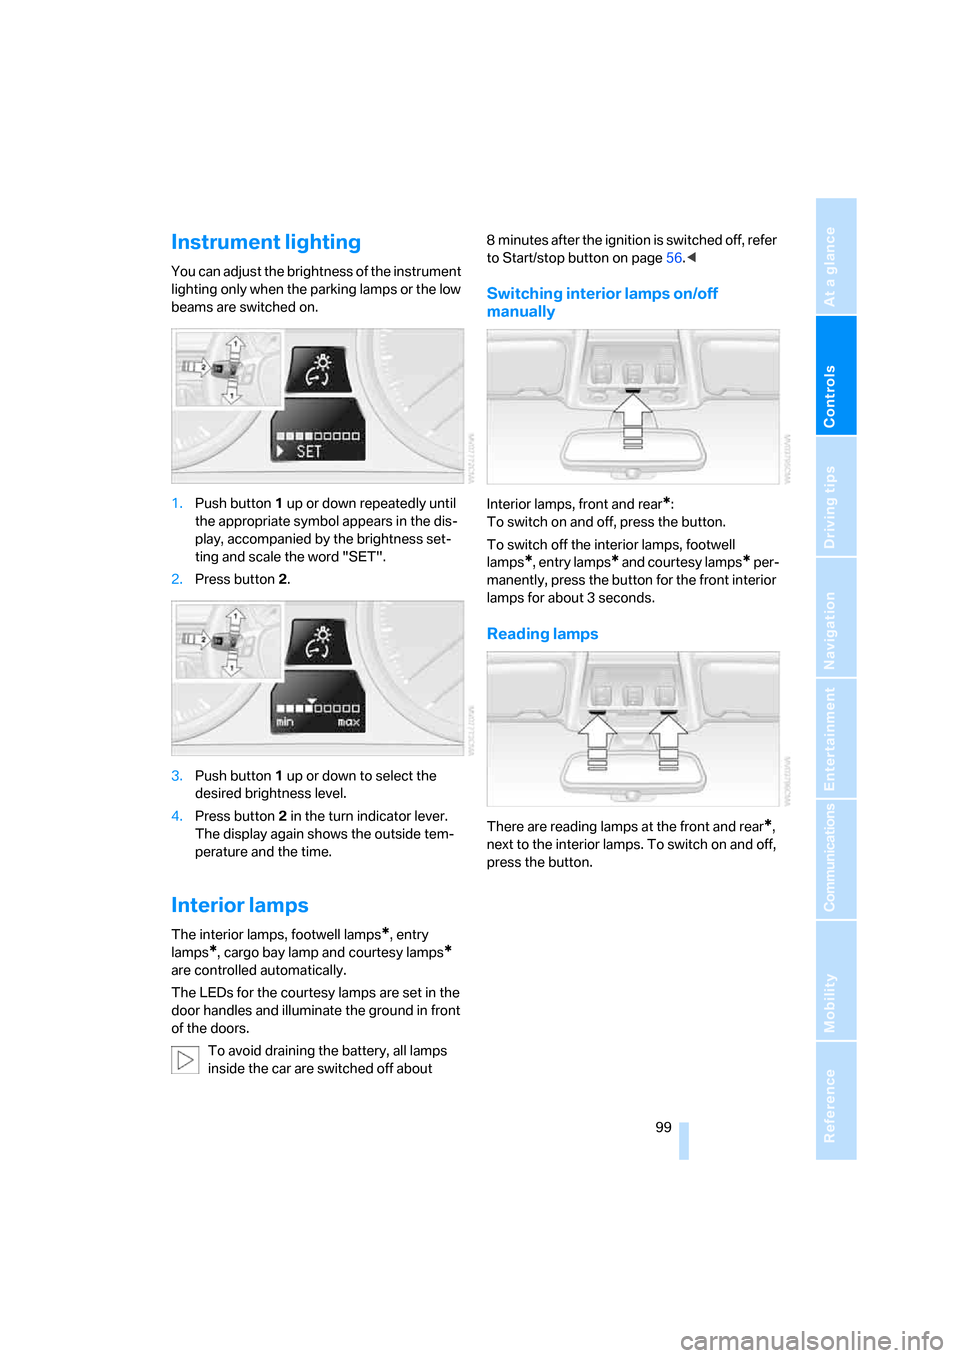
1.Push button 1 up or down repeatedly until
the appropriate symbol appears in the dis-
play, accompanied by the brightness set-
ting and scale the word "SET".
2.Press button 2.
3.Push button 1 up or down to select the
desired brightness level.
4.Press button 2 in the turn indicator lever.
The display again shows the outside tem-
perature and the time.
Interior lamps
The interior lamps, footwell lamps*, entry
lamps
*, cargo bay lamp and courtesy lamps*
are controlled automatically.
The LEDs for the courtesy lamps
are set in the
door handles and illuminate the ground in front
of the doors.
To avoid draining the battery, all lamps
inside the car are switched off about 8 minutes after the ignition is switched off, refer
to Start/stop button on page56.<
Switching interior lamps on/off
manually
Interior lamps, front and rear*:
To switch on and off, press the button.
To switch off the interior lamps, footwell
lamps
*, entry lamps* and courtesy lamps* per-
manently, press the button for the front interior
lamps for about 3 seconds.
Reading lamps
There are reading lamps at the front and rear*,
next to the interior lamps. To switch on and off,
press the button.