2008 AUDI TT ROADSTER flat tire
[x] Cancel search: flat tirePage 266 of 316
1111...__W_ h_ a _ t_d_ o_ l _d _o_ n_ o_ vv_ ? ______________________________________________ _
& WARNING (continued)
-if you have been driving with very low tire pressures or tires
with no air
• Seek professional assistance if it is not possible to repair the
tire with the tire sealant.
& WARNING
The tire sealant must not come into contact with skin, eyes or
clothing.
• If you get any tire sealant
in your eyes or come into contact
with it, rinse the affected area thoroughly with clean water. Find a physician immediately!
• Change any clothing contaminated with tire sealant immedi
ately.
• Do not inhale the vapor!
• If you have swallowed tire sealant, rinse your mouth thor
oughly right away and drink plenty of water .
- Do not induce vomiting! Find a physician immediately!
• If you have allergic reactions, find a physician immediately .
• Keep the tire sealant away from children .
0 Note
Do not use commercially available tire sealants. The electrical
components of the tire pressure monitoring system will no longer
work properly.
'i> For the sake of the environment
Used sealant bottles can be dropped off at a recycling facility.
[ i] Tips
• If sealant has run out, allow it to dry. Then you can peel it off.
• Have the tire sealant replaced every 4 years at a dealership. •
Applies to vehic les: with T ire Mob ility System
Preliminary steps
Some preliminary steps are necessary for tire repair .
Fig. 168 Tire Mobility
System under luggage
compartment floor
- If you have a flat tire, park the vehicle as far as possible
from moving traffic.
- Apply the
parking brake firmly.
- On vehicles with manual transmission, engage
1st gear,
or move the selector lever to the P position on vehicles
w ith automatic transmission.
- Check whether a repair using the Tire Mobility System is
possible~
page 263, "General and safety pointers".
Have all passengers
leave the vehicle and stay away from
the danger zone~&.
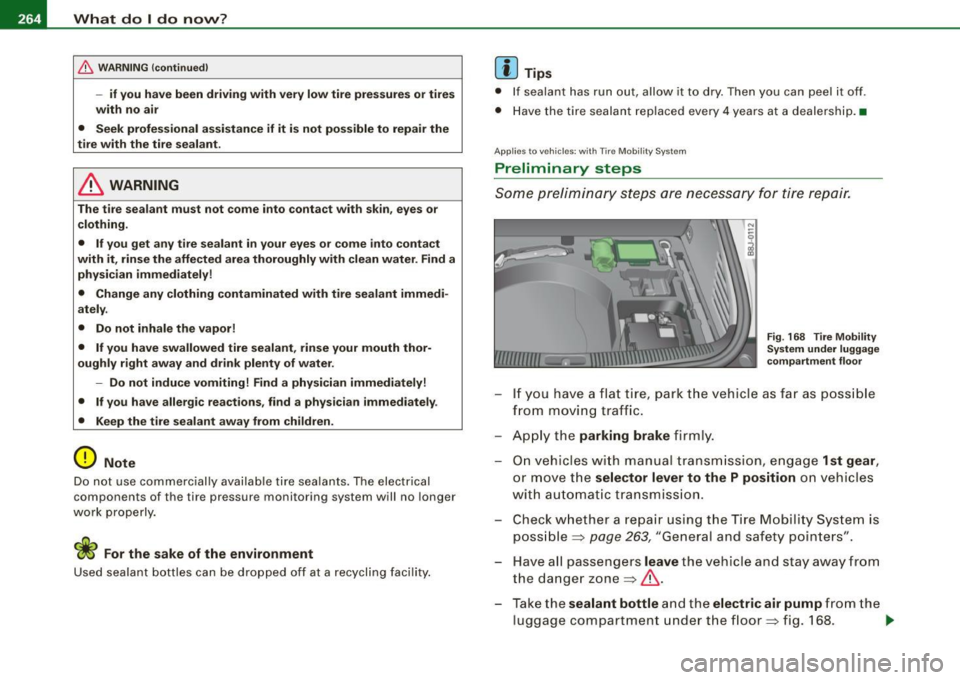
- Take the
sealant bottle and the electric air pump from the
luggage compartment under the floor ~ fig. 168. .,_
Page 267 of 316
_______________________________________________ W_ h_ a _ t_d_ o_ l _d _o_ n_ o_ w_ ? _ __.1111
- Remove the "max. 50 mph" (80 km/h) sticker from the
sealant bottle and affix it to the instrument cluster in the
driver's view.
& WARNING
• Turn the hazard flashers on and set up the warning triangle if
you have a flat tire in moving traffic . In this way you protect your
self and other road users.
• Make sure that all passengers are in a safe place, out of the
danger zone (for example, behind a guard rail).
0 Note
Particular care is necessary if you are making a tire repair on a steep
incline.
[ i] Tips
Obey all laws. •
Applies to vehicles: with T ire Mobil ity System
Making a tire repair
Tire repair consists of the following sections.
Fig. 169 Parts of the
Tire Mobility System Fig
. 170 Connector for
the Tire Mobility System
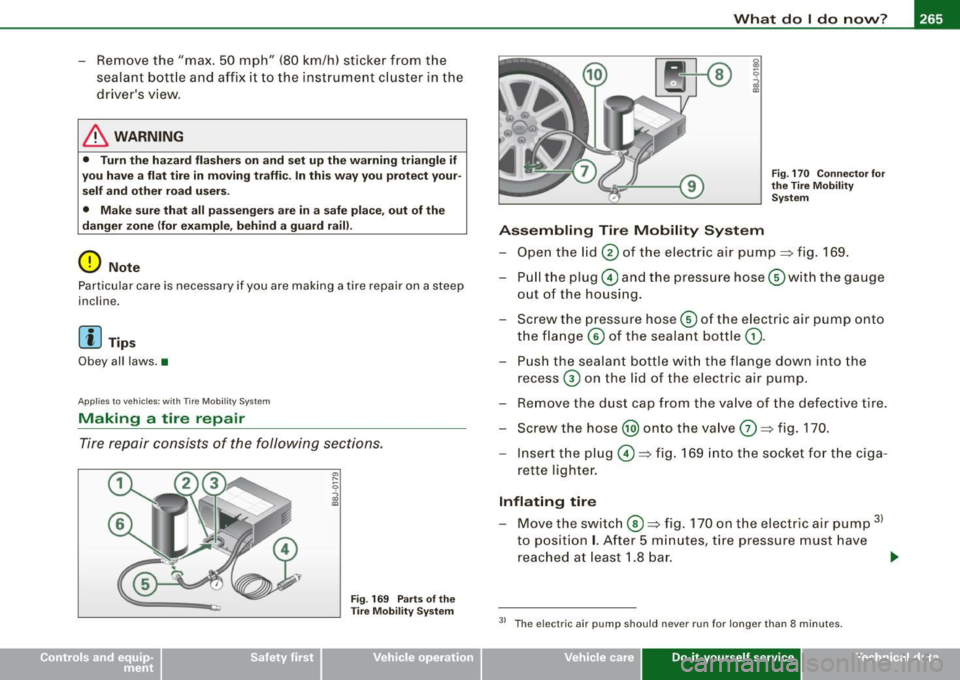
Assembling Tire Mobility System
- Open the lid 0 of the electric air pump~ fig. 169.
- Pull the plug© and the pressure hose G)with the gauge
out of the housing.
- Screw the pressure hose© of the electric air pump onto
the flange © of the sealant bottle
G).
- Push the sealant bottle with the flange down into the
recess
G) on the lid of the electric air pump.
- Remove the dust cap from the valve of the defective tire.
- Screw the hose @) onto the valve
G) ~ fig. 170.
- Insert the plug©~ fig. 169 into the socket for the ciga-
rette lighter.
Inflating tire
- Move the switch®~ fig. 170 on the electric air pump 31
to position I. After 5 minutes, tire pressure must have
reached at least 1.8 bar.
~
3> The e lectric air pump should never run for longer than 8 minutes.
Vehicle care Do-it-yourself service irechnical data
Page 268 of 316
11111.___W_ h_ a _ t_d_ o_ l _d _o_ n_ o_ w_ ? ______________________________________________ _
- Switch the electric air pump off - switch in position
0. If
the required tire pressure of at least 1.8 bar has not been
reached, follow the instructions in the section Re
inflating tire.
Re-inflating tire
-Remove the hose from the valve and pull the plug out of
the socket.
- Drive the vehicle slowly 10 meters backward or forward.
This helps to distribute the sealant better.
- Remove the empty inflation bottle and screw the hose
G)
=> page 265, fig. 169 from the electric pump directly onto
the valve.
- Insert the plug ©=>
page 265, fig. 169 into the socket for
the cigarette lighter.
- Move the switch
@ => page 265, fig. 170 on the electric
air pump
31 to position I. After 5 minutes, tire pressure
must have reached at least
1 .8 bar.
- Switch the electric air pump off - switch in position
0. If
the required tire pressure of at least 1.8 bar has not been reached, it is not possible to make a repair with the tire
sealant. Seek professional assistance.
Disassembling Tire Mobility System
- Remove the hose from the valve and pull the plug out of
the socket.
- Screw the dust cap onto the valve.
- Place the empty sealant bottle back in the original pack-
aging and cl ip it in place under the floor so that no tire
sealant can run out into t he vehicle. -
Place the electric air pump in the luggage compartment
for the time being.
- Start driving right away so that the sealant is distributed
in the tire.
& WARNING
• Follow the manufacturer's safety instructions on the decal for
the air pump and the sealant bottle.
• If a tire pressure of 1.8 bar cannot be achieved after pumping
for 5 minutes, the tire is too severely damaged. Do not continue to
drive.
• Seek professional assistance if it is not possible to repair the
tire with the tire sealant.
[ i] Tips
• Do not operate the electric air pump for more than 8 minutes
without stopping, otherwise it can overheat. When the air pump has
cooled down, you can continue to use it.
• If sealant has escaped, allow it to dry, then you can peel it off. •
Applies to vehic les : with Tire Mobil ity Sys tem
Final check
After driving for a short distance , tire pressure
must be checked
- After driving for about 10 minutes, stop and check the
tire pressure .
- If tir e pressure is still at least 1.3 bar, inflate the tire to
specified pressure (see driveas side B -pillarl, drive to the
next repair shop and have the tire and the sealant bottle
replaced.
~
Page 271 of 316
_______________________________________________ W_ h_ a _ t_d_ o_ l _d _o_ n_ o_ w_ ? _ __.ffllll
& WARNING
• Using force without control to speed the wheel change up can
cause the vehicle to slip off the jack and cause serious personal
injuries.
• Do not loosen the wheel bolts more than one turn before you
raise the vehicle with the jack . - Risk of injury!
[ i] Tips
• Never try and use the hexagonal socket in the handle of the
screwdriver to loosen or tighten the wheel bolts.
• If a wheel bolt sits very tight, you may find it easier to loosen by
carefully pushing down on the end of the wheel bolt wrench with
one foot only . As you do, hold on to the car to keep yourself stable
and take care not to slip. •
Rais ing the vehicle
The vehicle must be lifted with the jack first before the
wheel can be removed.
-
Fig. 174 Wheel
change: mounting
points for the lifting
jack Fig
. 175 Close-up:
proper positioning of
lifting jack
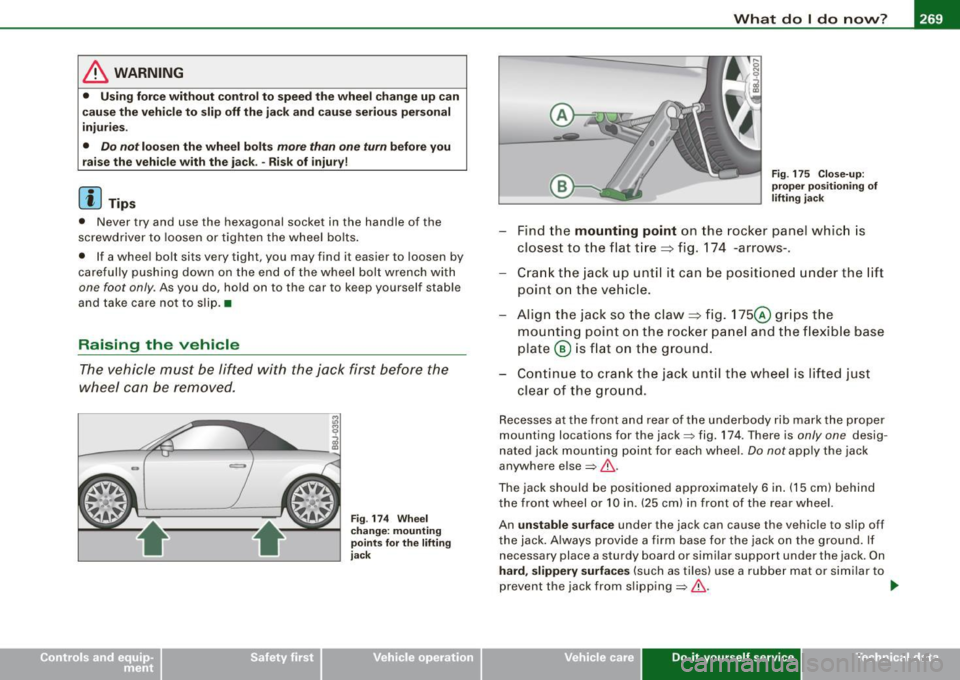
-Find the mounting point on the rocker panel which is
closest to the flat tire ~ fig. 174 -arrows-.
- Crank the jack up until it can be positioned under the lift
point on the vehicle.
- Align the jack so the claw~ fig. 175@ grips the
mounting point on the rocker panel and the flexible base
plate @ is flat on the ground.
- Continue to crank the jack until the wheel is lifted just
clear of the ground.
Recesses at the front and rear of the underbody rib mark the proper
mounting locations for the jack=> fig. 174 . There is
only one desig
nated jack mounting point for each wheel.
Do not apply the jack
anywhere else=>&.
The jack should be positioned approximately 6 in. (15 cm) behind
the front wheel or 10 in. (25 cm) in front of the rear wheel.
An
unstable surface under the jack can cause the vehicle to slip off
the jack. Always provide a firm base for the jack on the ground. If
necessary place a sturdy board or similar support under the jack. On
hard, slippery surfaces (such as tiles) use a rubber mat or similar to
prevent the jack from slipping=> &. .,
Vehicle care Do-it-yourself service irechnical data
Page 273 of 316

What do I do now? -
----------------
•
-Screw the threaded end of the alignment pin from the
tool kit hand-tight into the now vacant bolt hole
=:> page 270, fig. 177.
- Then completely unscrew the other wheel bolts as
described above.
- Take off the wheel leaving the alignment pin in the bolt
hole.
Putting on the wheel
- Lift the spare wheel and carefully slide it over the align
ment pin to guide it in place.
- Use the hexagonal socket in the screwdriver handle to
screw in and tighten all wheel bolts slightly.
- Unscrew the alignment pin and insert and tighten the
remaining wheel bolt slightly like the rest.
- Turn the jack handle counter -clockwise to lower the
vehicle until the jack is fully released.
- Use the wheel bolt wrench to tighten all wheel bolts
firmly =:> page 268. Tighten them crosswise, from one
bolt to the (approximately) opposite one, to keep the
wheel centered.
[ i J Tips
Never use the hexagonal socket in the handle of the screwdriver to
loosen or tighten the wheel bolts.
• Pull the reversible blade from the screwdriver before you use the
hexagonal socket in the handle to turn the wheel bolts.
• When mounting tires with
unidirectional tread design make sure
the tread pattern is pointed the right way~
page 272.
• The wheel bolts should be clean and easy to turn. Check for dirt
and corrosion on the mating surfaces of both the wheel and the
hub . Remove all dirt from these surfaces before remounting the
wheel. •
Notes on wheel change
Please read the information~ page 249, "New tires and replacing
tires and wheels", if you are going to use a spare tire which is
different from the tires on your vehicle.
After you change a tire:
• Check the tire pressure on the spare immediately after
mounting.
• Have the wheel bolt tightening torque checked with a torque
wrench as soon as possible by your authorized Audi dealer or a qualified service station .
• With steel and alloy wheel rims, the wheel bolts are correctly
tightened at a torque of 90 ft lb (120 Nml.
• If you notice while changing a tire that the wheel bolts are
corroded and difficult to turn, then they should be replaced before
you check the tightening torque.
• Replace the flat tire with a new one and have it installed on your
vehicle as soon as possible. Remount the wheel cover.
Until then, drive with extra care and at reduced speeds.
& WARNING
• If you are going to equip your vehicle with tires or rims which
differ from those which were factory installed, then be sure to read
the information
~ page 249, "New tires and replacing tires and
wheels".
• Always store the tools securely in luggage compartment.
Otherwise, in an accident or sudden maneuver they could fly
forward, causing injury to passengers in the vehicle.
Do-it-yourself service
Page 303 of 316

______________________________________________ A_ l.:.. p _h_ a_ b_e _t_ic _ a _ l _in _ d_e _ x __ _
Automatic folding top
closing .. .... .... ....... ..... ... . 62
opening ... ... ... .... .... ... .... .. 62
Automatic headlight control .. ......... 70
Automatic transmission .. .... .... .... 113
Driving Notes ......... .... .. ..... 114
Emergency program .... ...... .... 119
Emergency release . . . . . . . . . . . . . . . 120
Ignition key safety lock . ...... ..... 106
Kick -down .. ... .. .... .... ...... .. 117
Launch Control Program ........... 117
Selector lever lock ........ .... .... 116
Selector lever positions .... ..... .. 115
Tiptronic ... .. .... .... ... .... .... 118
Tiptronic controls on the steering wheel
119
Average speed ... ... ..... ... .... .... . 39
Avoid damaging the vehicle ..... .... . 194
B
Battery .. ... .... .... .... ..... .. 231, 234
Battery location inside the engine
compartment . ...... .... .... 221, 222
Charging ........................ 235
Checking battery acid level .. .. 234, 235
Connecting ...................... 231
Disconnecting .... .... .... ...... . 231
Important warnings when working on the
battery ........................ 232
Replacing the battery .. .......... . 231
Winter operation ................. 231
Working on the battery ... .... .... . 232
Battery voltage . .... .... .... ... .... .. 35
Controls and equip
ment Safety first
Before
driving . .... . .. ... ... ........ 128
Bi -Xenon headlights .................. 75
Blended gasoline . ... .... .... .... .... 214
Body cavity sealing ...... ...... ... .. . 207
Booster seats .. ...... .... .... .... ... 175
How do I properly install a booster seat in
my vehicle? . .......... .... ... .. 175
Safety instructions . .... .... ... .... 175
Brake fluid Changing the brake fluid .. ........ 230
Checking the brake fluid level ...... 230
What is the correct brake fluid level? 230
What should I do if the brake fluid warning
light comes on? ... .. .... .... .... 230
Brake fluid reservoir . ...... ...... .... 230
Brake light defective ........ .... .... .. 36
Brake system ... ... .. .... ........ 32, 230
Anti-lock brake system .. ....... .... 20
Brake Assistant ........ ... .. .... . 189
Brake fluid ................... .... 230
Brake f luid specifications for refill and
replacement .... ...... ...... .... 230
Brake pads ... ... .... .... .... .... 193
General information .............. 188
How does the moisture or road sa lt affect
the brakes? ..... ...... ...... .... 188
Warning/indicator lights .. ...... .... 20
Break -in period ...... ...... ... .. .... 192
Brake pads ...................... 193
Tires .. .... .... ... .... .... .... ... 192
Bulbs .... ... .... .. . .. .............. 277
C
California Proposition 65 Warning . .... 221
Battery specific .... ... .... .... .... 234
Capacities ... .... ........ ... .... .... 291
Car care ... .... ... .. .... .... .... .... 200
Interior ..... .... .. .... ........... 208
Plastic and vinyl .................. 204
Weatherstrips ..... .... ...... ..... 206
Care of exterior .. .... ....... ........ 200
Cargo area
See Luggage compartment . ... .... . 135
Catalytic converter ...... .... .... .... 193
CD changer ..... .... .... .... .... ..... 96
Certification ...... ... .... ...... ...... 45
Changing a flat tire ... .... .... ....... 267
Changing engine oil ............. .... 226
Chassis Undercoating .... ..... ... .... .... 207
See also Audi magnetic ride .... .... 112
Check ing
Battery acid level ......... ... . 234, 235
Engine coolant level .............. 228
Checking tire pressure . ... .... .... ... 244
Child restraint
Danger of using child restraints in the front seat .... ... .... .... .... ... 147
Child restraints Where can I get additional information
about chi ld restraints? ... ........ 180
Child safety ...... .... ... .... ... 168, 173
Booster seats .... .... .... .... ... . 175
Convertible child safety seats ... ... 174
Vehicle operation Vehicle care Do-it-yourself service Technical data
Page 304 of 316
___ A_l.:,. p _h_ a_ b_e _t _i c_ a_l _i n_ d_e _x ____________________________________________ _
Convertible locking retractor . . . . . . . 177
Important safety instructions for using child safety seats .. ..... .. .. .... 171
Important things to know when driving with chi ldren . .... .... ... .... ... 168
Infant seats .. ........ ....... .... 173
Older children and safety belts ..... 177
Safety belts and older children . . . . . 177
Which restraint system should my older child wear? .. .... .... ... ... .... 177
Child safety seat .... .... ... .. ...... . 173
Convertible locking retractor . . . . . . . 177
Installing ..... ............ ...... 177
Ch ild safety seats
How do I properly install a chi ld safety
seat in my vehicle? .. ... .... . .. .. 171
Safety instructions . . . . . . . . . . . . . . . 171
Cigarette lighter ... ..... ... ....... ... 95
Cleaning Alcantara (synthetic suede) . . . . . . . . 211
E ngine compartment ... .. .... .... 212
Fabrics and fabric coverings . ...... 208
Instrument panel ... .. .... ... .... 209
Interior ...... .... .... .... .... ... 208
Leather . . . . . . . . . . . . . . . . . . . . . . . . . 210
P lastic and viny l .. .... ....... .... 204
Plastic parts ..................... 209
Safety belts . . . . . . . . . . . . . . . . . . . . . 212
Trim strips .................. 204, 205
Cleaning and protection ... .. .... .... 200
Climate control A/C operation . . . . . . . . . . . . . . . . . . . . 102
Air distribution . . . . . . . . . . . . . . . . . . 101
Air ven ts . . . . . . . . . . . . . . . . . . . . . . . . 1 02 Automatic mode .
. . . . . . . . . . . . . . . . 101
Defrost . . . . . . . . . . . . . . . . . . . . . . . . . 101
Economical use .................. 103
Fan ... .... ....... .... .... .... .. 100
Heated seats . . . . . . . . . . . . . . . . . . . . 104
Rear window defogger . . . . . . . . . . . . 103
Switching on and off ..... ... .. ... 100
Climate controls ... .. .... ..... .. ... .. 98
Air recirculation mode .. .... ...... 102
Controls ......................... 98
Dust filter ..... ............... .... 98
Heating ........ ... .... .... .... ... 98
Pollen fi lter .. ...... .... .... .... ... 98
Venti lation .... .... .... .... .... ... 98
Clock ... ... .. .... ..... .. ... ... .... .. 13
Co ld tire inflation pressure . ...... .... 242
Coming -home -function ............... 73
Compass mirror ..... .... ... ... .. .... 85
Consumer In formation .... .... ... 136, 293
Contacting NHTSA . . . . . . . . . . . . . . . . . . 136
Con trols and displays . . . . . . . . . . . . . . . . 11
Conve nience close/open feature
P o wer top . . . . . . . . . . . . . . . . . . . . . . . . 63
Windows ... .. .... .... .... .... ... 58
Convertible chi ld seats
How do I proper ly install a convertib le
chi ld seat in my vehic le? ... .... .. 174
Safety instructions ............... 174
Convertible locking retractor Activating ... .. ..... .. .... .... ... 1 79
Deactivati ng . . . . . . . . . . . . . . . . . . . . . 180
Using to secure a chi ld safety seat . . 177,
179 Coolant System
Expansion tank 228
Coolant system ...... .... .... .... ... 227
Cornering light .... ....... ....... .... 72
Cruise contro l ...................... 110
Changing speed ................. 111
Presetting your speed ............. 111
Switching off . .... ..... ... .... ... 111
Switching on .. .... .... ..... .. ... 110
Warning/indicator l ights ........... . 19
Cruising range ..... ... .... .... ...... . 39
Cup holder . ...... .... .... ... .... .... 94
D
Damp ing
See Audi magnet ic ride ..... .... ... 112
Data .......... ... ....... .... ...... 291
Data recorder . ........ ... .. .... .... 184
Date display .. .... .... ............... 13
Daytime running lights ......... ...... 71
Daytime running lights (Canada) ...... . 71
Declaration of conformity ............. 45
def What does this mean when it appears in the trip odometer disp lay? .. ...... 14
Defrosting the windows ............. . 101
De termining correct load li mit ... .. ... 247
Digital clock . .... .... ..... .. ..... .... 13
Setting the time ................... 13
Digital compass ... ....... .... ...... . 85
Digital speedometer ...... .... .... .... 2 4
Page 305 of 316
______________________________________________ A_ l_,_ p _h_ a_ b_e _t_i c_ a _ l _in _ d_e _ x __ lllll
Dimensions ... .. ...... . .... .. .. .... 290 Electronic differential lock (EDU
Dipstick Reading the dipstick properly
Direct Shift Gearbox 224
Emergency release . . . . . . . . . . . . . . . 120
Distance ........ .... ....... ...... ... 40
Driver information system . .... .... ... . 22
Digital speedometer ... .. .... ...... 24
Fuel filler cap ...... ..... .... .... .. 24
Menu button ..................... 28
Menu display ..................... 27
Open door or rear lid warning . ......
24
Outside temperature display .. .... .. 23
Parking brake warning ............. 30
red symbols .. ............. ....... 31
Setting ...... .... ... .... ..... .. .. 28
Sound system disp lay ............ .. 23
Text messages . .... .... .... .... ... 30
Driver seat See Seating position . ............. 130
Driving Run -flat tires . .... .... ....... .... . 258
Dr iving messages ... ..... .. ... .... ... 30
Driving safely . . . . . . . . . . . . . . . . . . . . . . . 128
Driving time ... .... ... ..... .... .... .. 39
Duplicate key .... .... ...... ....... ... 47
Dust filter . ....... .... .... ........ ... 99
E
Electro -mechanical power assist ... 21, 190 How the system works
............ 186
Warning/indicator lights ............ 20
Electronic immobilizer ...... ... .. .. 14, 49
Electronic power cont ro l
EPC warning/indicator light ..... .... 17
Electronic Stability Program .......... 184
Electronic stabilization program (ESP! Warning/indicator lights ........ .... 18
Emergency flasher Warning/ind icator lights .. .... ...... 19
Emergency flashers .................. 75
Emergency locking . ... .... .... ... .. .. 54
Emergency operation Folding top ....................... 64
Rear lid .. .... ....... .... .... .... . 56
Emergency release for selector lever ... 120
Emergency starting ........ ... .... ... 278
Emergency towing .. ............. .. . 281
Engine Cecking and filling locations ... ... . 222
Checking and filling locations ...... 221
Coolant ... .. .... .... ..... .. ... .. 227
Hood . ..... .. ... ... .. .... ..... .. 219
Starting ..................... 106, 107
Starting with jumper cables ........ 278
Stopping .... .... ...... ...... ... . 107
Engine compartment .... ...... ...... 221
Safety instructions ................ 220
Working in the engine compartment 220
Engine coolant sys tem ..... .... ...... 227
Adding coolant .... .... ..... ... ... 228
Checking the engine coolant leve l .. . 228 Radiator fan
... .. .. .. .... .... .... 229
Temperature gauge ................ 13
Engine cooling system Malfunction ... .. .... .... .... ..... 32
Engine data .. ............... .... ... 291
Engine hood Closing .. ... ........ .... ... ..... 220
How to release the hood ... ... ... .. 219
Engine oil . ...... .... .... ... .... .... 222
Adding .... ....... .... ... .... .... 225
Additives .. .... .... ... .... .... ... 225
Changing . .... .... .... ..... ..... . 226
Checking the engine oi l leve l ... .... 224
Indications and conditions requiring extra checking .... .... .... .... .... ... 224
Oil consumption . ...... ..... .. .... 224
Oil grades . ....... .... .... ....... 222
Pressure malfunction .............. 33
Recommended oil check intervals ... 224
Specification and viscosity ......... 222
Engine oi l leve l .. .... .... ... .... .... . 35
Engine oil sensor defective .... ...... .. 35
Environment Break-in period ..... .. ... .... .... . 192
Catalytic converter .......... ... .. . 193
Disposing of your vehic le battery .. . 231
Driving at high speeds . ...... .... . 194
Dr iving to minim ize pollution and noise .
194
Fuel .. .... .... .... ... .... .... ... 216
Fuel economy ......... ........ ... 194
Leakage from your vehicle . .... .... 220
Letting the vehicle stand and warm up ..
195
Controls and equip ment Safety first Vehicle operation
Vehicle care Do-it-yourself service Technical data