2008 AUDI TT ROADSTER fold seats
[x] Cancel search: fold seatsPage 4 of 316

Table of contents
Table of contents
Vehicle literature ........ .
About this Owner's Manual .............. ...... . .
Controls and
equipment .. .. ... . .. ... ... . .
Cockpi t ... .......... ...... ..... .
Genera l ill ustration ............. .
Instruments and
warning/indica tor lig hts ....... .
Instruments .............. ..... .
Warning/indicator lights ........ .
Driver informa tion system ..... .
Introduction ............... .... .
On-Board Diagnostic system (080)
Menu display ...... ............ .
Au to-Check Control ... ... .... .. .
Speed warn ing system . ... ..... .
Trip computer ................. .
T ire pressure monitoring system ..
Opening and closing .......... .
Keys .......................... .
Powe r lock ing system ..... ..... .
Rear lid /tr unk lid .............. . . 5 Ant
i-theft a larm system ........ .
Power w indows ... ... .... .... .
Folding top ................ ... .
Folding top ... .. ..... ...... ... .
6 W ind Deflector ........... ... .. .
E merge ncy Ope rat ion of the Fold ing
Top ........... ............ .. . .
Clear vision . ... ............ ... .
56 Cruise control . . . . . . . . . . . . . . . . . . 11 O
57 Audi magnetic ride . . . . . . . . . . . . . 112
60
Transm1ss1on . . . . . . . . . . . . . . . . . . . 113
60 Manua l transmiss ion . . . . . . . . . . . . 1 13
64 S tron ic tra nsmission . . . . . . . . . . . 1 13
64
69
Home link® . ...... .. ... ... ... .. .
Universa l remote control ....... .
121
121
Lights . . . . . . . . . . . . . . . . . . . . . . . . . 69
In ter io r lights ....... ..... ... .. .
V is ion ..................... ... .
W iper and washer system ...... .
Mirrors ..... ............... ... .
Digital compass ............... .
9 Seats and storage ......... ... .
11
1 1
1 2
12
1 6
22
22
26
27
29
37
39
41
47
47
50 55 Genera
l recommendat ions ..... .
Ad justing front seats manua lly ..
Powe r seats ..... ....... .... .. .
Lumbar support .. ............. .
Head restraints ............•...
Luggage compartment ........ .
Cup holder ... ...... ... ..... .. .
As htray ................... ... .
Cigarette lighter /socket ..... ... .
Storage ............ ....... ... .
Warm and cold ............... .
Climate controls ....... ... .• .. .
Rear window defogger
Qlil ..••.••
Heated sea ts .. ..... ..... ..... .
On the road . ... .. .......... ... .
Steering ...................... .
Ign it ion lock an d ignition sw itch .
Starting and stopping the engine
Park ing brake ................. .
Acoustic pa rking system .... ... .
77
77
78
82
85
87
87
88
89
91
92
93
94
94
95
95
98
98
103
104
105
105
106
107
108
109
Safety first ............... . .
Driving Safely . ...... ... ...... . .
General notes .. .... ....... ... . .
Prope r occupan t seating pos it ions
D river and passenger side footwe ll
Peda l a rea .. .. .... .... ... ..... .
Stow ing luggage .............. .
Report ing s afety defects ...... . .
Safety belts ................... .
General notes ................. .
Why safe ty be lts? .............. .
Safety belts ................... .
Safety belt tensioners .......... .
Airbag system ... ... ...... .... . .
Important things to know ...... .
F . b ron t air ags ........ ....... .. .
Monito ring the Advanced Airbag
System ....................... . 127
128
128
130
13
4
13 4
135
136
137
137
138
141
14 4
146
146
150
157
Page 95 of 316
Luggage compartment
Applies to vehicles: with pass-through and removable ski bag
Pass-through with Ski Bag
Using the pass-through and the removable ski bag, you
can transport long objects (e.g. skis) neatly and without
damaging the interior.
Loading
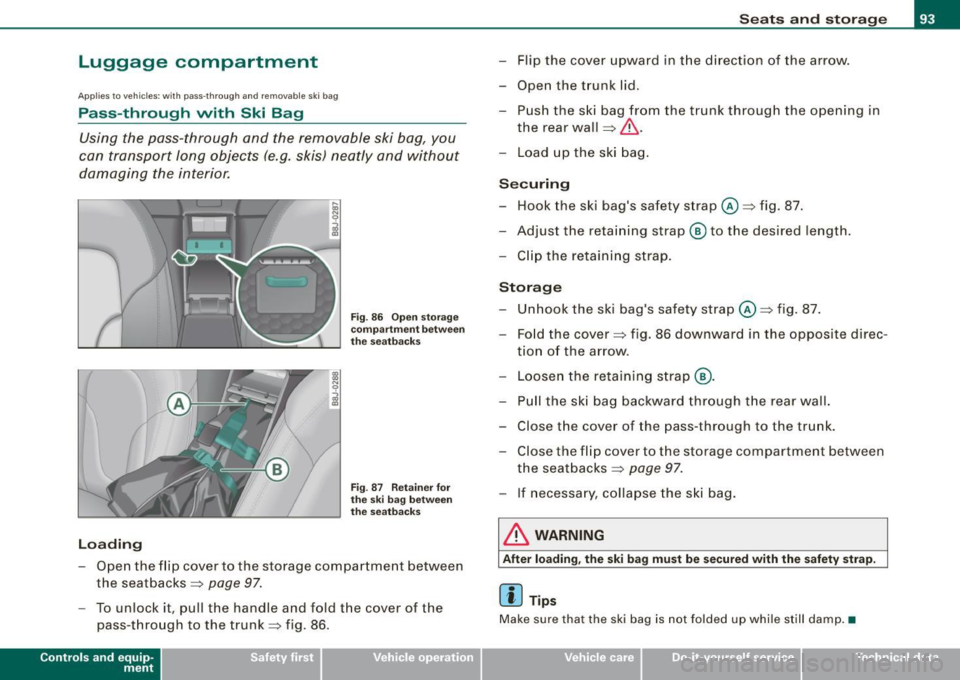
Fig . 86 Open storage
compartment between
the seatbacks
Fig . 87 Retainer for
the ski bag between
the seatbacks
-Open the flip cover to the storage compartment between
the seatbacks => page
97.
-To unlock it, pull the handle and fold the cover of the
pass -through to the trunk=> fig. 86.
Contro ls and eq uip
ment
Seats and storage
- Flip the cover upward in the direction of the arrow.
- Open the trunk lid.
- Push the ski bag from the trunk through the opening in
the rear wall
=> &, .
- Load up the ski bag.
Securing
Hook the ski bag's safety strap @=>fig. 87.
Adjust the retaining strap® to the desired length.
- Clip the retaining strap.
Storage
- Unhook the ski bag's safety strap@=> fig. 87.
- Fold the cover => fig. 86 downward in the opposite direc-
tion of the arrow .
- Loosen the retaining strap @.
Pull the ski bag backward through the rear wall.
- Close the cover of the pass-through to the trunk.
- Close the flip cover to the storage compartment between
the seatbacks => page
97.
- If necessary , collapse the ski bag.
& WARNING
After loading, the ski bag must be secured w ith the safety strap.
[ i] Tips
Mak e sure that the ski bag is not folded up while still damp. •
Vehicle care
I I irechnical data
Page 98 of 316
Seats and storage
& WARNING (continued)
when accelerating or when applying the brakes or when driving
around a corner.
• When you are driving make sure that anything you may have
placed in the center console or other storage locations cannot fall
out into the footwells . In case of sudden braking you would not be
able to brake, depress the clutch or accelerate. •
Glove compartment
The glove compartment is illuminated and can be locked .
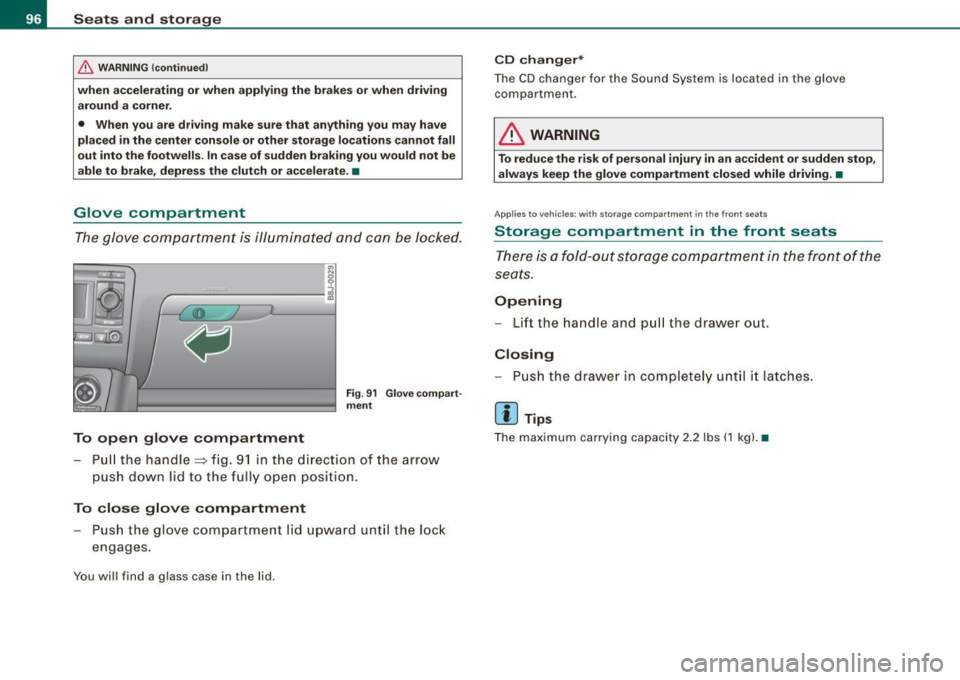
To open glove compartment
Fig. 91 Glove compart
ment
- Pull the handle=> fig. 91 in the direct ion of the arrow
push down lid to the fully open position.
To close glove compartment
Push the glove compartment lid upward until the lock
engages.
You will find a glass case in the lid .
CD changer*
The CD changer for the Sound System is located in the glove
compartmen t.
LJ}. WARNING
To reduce the risk of personal injury in an accident or sudden stop,
always keep the glove compartment closed while driving. •
App lies to veh icle s: w ith sto ra ge co mpart ment in the front seats
Storage compartment in the front seats
There is a fold-out storage compartment in the front of the
seats.
Opening
- Lift the handle and pull the drawer ou t.
Closing
- Push the drawer in completely until it latches.
[ i ] Tips
The maximum carrying capacity 2.2 lbs (1 kg). •
Page 133 of 316

Driving Safely -
----------------
& WARNING (continued)
• Always adjust the driver's seat and the steering wheel so that
there are at least 4 inches (10 cm) between the knees and the
lower part of the instrument panel.
• Always hold the steering wheel on the outside of the steering
wheel rim with your hands at the 9 o'clock and 3 o'clock positions
to help reduce the risk of personal injury if the driver's airbag inflates .
• Never hold the steering wheel at the 12 o'clock position or with
your hands at other positions inside the steering wheel rim or on
the steering wheel hub. Holding the steering wheel the wrong way
can cause serious injuries to the hands, arms and head if the
driver's airbag inflates
• Pointing the steering wheel toward your face decreases the
ability of the supplemental driver's airbag to protect you in a colli
sion .
• Always sit in an upright position and never lean against or
place any part of your body too close to the area where the airbags
are located.
• Before driving, always adjust the front seats and head
restraints properly and make sure that all passengers are properly
restrained .
• Never adjust the seats while the vehicle is moving. Your seat
may move unexpectedly and you could lose control of the vehicle.
• Never drive with the backrest reclined or tilted far back! The
farther the backrests are tilted back, the greater the risk of injury due to incorrect positioning of the safety belt and improper
seating position.
• Children must always ride in child seats=>
page 168. Special
precautions apply when installing a child seat on the front
passenger seat=>
page 146. •
Controls and equip
ment Safety first Vehicle operation
Proper seating position for the front
passenger
The proper front passenger seating position is important
for safe, relaxed driving.
For your own safety and to reduce the ris k of injury in the
event of an accident, we recommend that you adjust the
seat for the front passenger to the following pos ition:
- Move the front passenger seat back as far as possible.
There must be a minimum of 10 inches (25 cm) between
the breastbone and the instrument panel =>
&.
- Adjust the angle of the seatback so that it is in an upright
position and your back comes in full contact with it
whenever the vehicle is moving.
- Adjust the head restraint so that the upper edge is as
even with the top of your head as possible but not lower
than eye level and so that it is as close to the back of your
head as possible =>
page 132.
-Keep both feet flat on the floor in front of the front
passenger seat.
- Fasten and wear safety belts correctly=>
page 141.
For detailed information on how to adjust the front passenger's
seat, see => page 87.
& WARNING
Front seat passengers who are unbelted, out of position or too
close to the airbag can be seriously injured or killed by the airbag
as it unfolds. To help reduce the risk of serious personal injury : .,
Vehicle care Do-it-yourself service Technical data
Page 134 of 316

-Driving
Safely ------=-------=----------------
& WARNING
(continued)
• Passengers must always sit in an upright position and never
lean against or place any part of their body too close to the area
where the airbags are located.
• Passengers who are unbelted, out of position or too close to the
airbag can be seriously injured by an airbag as it unfolds with
great force in the blink of an eye .
• Always make sure that there are at least 10 inches (25 cm)
between the front passenger's breastbone and the instrument
panel.
• Always make sure that there are at least 4 inches (10 cm)
between the front passenger's knees and the lower part of the
instrument panel .
• Each passenger must always sit on a seat of their own and
properly fasten and wear the safety belt belonging to that seat .
• Before driving, always adjust the front passenger seat and
head restraint properly.
• Always keep your feet on the floor in front of the seat. Never
rest them on the seat, instrument panel, out of the window, etc .
The airbag system and safety belt will not be able to protect you properly and can even increase the risk of injury in a crash .
• Never drive with the backrest reclined or tilted far back! The
farther the backrests are tilted back, the greater the risk of injury
due to incorrect positioning of the safety belt and improper
seating position.
• Children must always ride in child seats:::::,
page 168. Special
precautions apply when installing a child seat on the front
passenger seat=:>
page 146. •
Proper adjustment of head restraints
Correctly adjusted head restraints are an important part
of your vehicle's occupant restraint system and can help
to reduce the risk of injuries in accident situations.
Fig. 120 Correctly
adjusted head restraint
viewed from the side
The head restraints must be correctly adjusted to achieve
the best protection.
-Adjust the head restraint so that the upper edge of the
restraint is level with the top of your head, but no lower
than eye level and so it is as close to the back of your
head as possible~ fig. 120.
Adjusting head restraints=:> page 92.
& WARNING
Driving without head restraints or with improperly adjusted head
restraints increases the risk of serious injuries in a collision. To
help reduce the risk of injury :
• Always drive with the head restraints in place and properly
adjusted .
• Every person in the vehicle must have a properly adjusted head
restraint. .,_
Page 157 of 316
& WARNING
To reduce the risk of injury when an airbag inflates, always wear
safety belts properly.
• If you are unrestrained , leaning forward , sitting sideways or out
of position in any way, your risk of injury is much higher.
• You will also receive serious injuries and could even be killed if
you are up against the airbag or too close to it when it inflates ·
even with an Advanced Airbag~
page 146. •
More important things to know about front
airbags
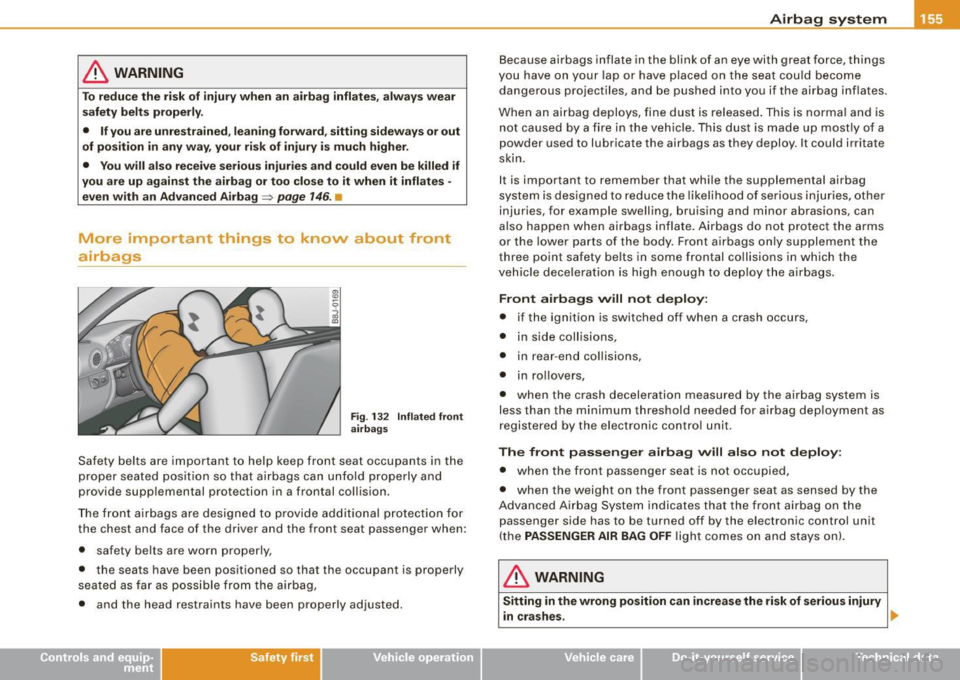
Fig . 132 Inflate d front
airbags
Safety belts are important to help keep front seat occupants in the
proper seated posit ion so that airbags can unfold properly and
provide supp lemental protection in a frontal collision.
The front airbags are designed to provide additional protection for
the chest and face of the driver and the front seat passenger when :
• safety belts are worn properly,
• the seats have been positioned so that the occupant is properly
seated as far as possible from the air bag,
• and the head restraints have been properly adjusted .
Safety first
Airbag system
Because airbags inflate in the blink of an eye with great force, things
you have on your lap or have placed on the seat could become
dangerous projectiles, and be pushed into you if the airbag inflates .
When an airbag deploys, fine dust is released . This is norma l and is
not caused by a fire in the vehicle. This dust is made up mostly of a
powder used to lubricate the airbags as they deploy. It could irritate
skin.
It is important to remember that while the supplemental airbag
system is designed to reduce the likel ihood of serious injuries, other
injuries, for example swelling, bruising and minor abrasions , can
also happen when airbags inflate. Airbags do not protect the arms
or the lower parts of the body. Front airbags only supplement the
three point safety be lts in some frontal collisions in which the
vehic le deceleration is high enough to dep loy the a irbags.
Front airbags will not deploy:
• if the ignition is switched off when a crash occurs,
• in side collisions,
• in rear -end collisions,
• in rollovers,
• when the crash deceleration measured by the airbag system is
less than the minimum threshold needed for airbag deployment as
registered by the electronic control unit.
The front passenger airbag will also not deploy:
• when the front passenger seat is not occupied,
• when the weight on the front passenger seat as sensed by the
Advanced Airbag System indicates that the front airbag on the
passenger side has to be turned off by the electronic control unit
(the
PASSENGER AIR BAG OFF light comes on and stays onl.
& WARNING
Sitting in the wrong position can increase the risk of serious injury
in cras hes. .,,_
Vehicle care
I I irechnical data
Page 210 of 316
., __ C_ le_ a _ n_i_n ~g _ a_ n_ d __ p_r _o _t _e _c_ t_ i_o _n ___________________________________________ _
& WARN ING (c o ntinu ed )
• Do not apply additional und ercoating or ru stpr oofing on or
near the e xhaust man ifold , ex h aust p ipe s, ca talyt ic con verte r or
heat sh ields . W hile driving , the sub stan ce used for underco atin g
c ould overh eat and cause a fire .
• Alw ays read and heed all WARNINGS and oth er inform ation
~ p ag e200 .•
Care of interior
Aluminum trim
Use on ly neutral -pH products to remove spots and deposits from
a luminum surfaces. Chrome care products and alka line cleaners
wi ll attack aluminum surfaces and can damage them over t ime.
& WARNING
Alway s read and heed all WARNIN GS and the inform ation
~ page 200 . •
Fabrics and fabric coverings
Fabrics and fabric coverings (e .g. seats, door trim pane ls, etc.)
should be cleaned at regu lar intervals with a vacuum cleaner. This
removes surface dirt particles which could become embedded in
the fabric through use . Steam c leaners should not be used, because
the steam tends to push the dirt deeper into the fabric and lock it
there .
Norm al c leanin g
Generally, we recommend using a so ft sponge or a l int -free
microfiber cloth to the clean fabric. Brushes should only be used for carpets and floor mats, since other fabric surfaces could be harmed
b
y brushes .
Normal surface stains can be cleaned using a commercially avail
able foam cleaner . Spread the foam on the surface of the fabric with
a soft sponge and work it in gently. Do not saturate the fabric. Then
pat the foam dry using absorbent, dry cloths (e.g. microfiber c loth)
and vacuum it af ter it has dried complete ly .
C leaning st ains
Stains caused by beverages (e.g . coffee, fruit juice, etc.) can be
treated with a mild detergent solution. Apply the detergent so lution
with a sponge . In the case of stubborn stains, a de tergent paste can
be applied directly to the stain and worked into the fabric. After
wa rds, use copious amounts of clean wa ter to remove the
remaining detergent . App ly the water with a damp cloth or sponge
and pat the fabric dry w ith an absorbent, dry c lo th.
Stains from choco late or makeup shou ld have detergent paste (e .g.
ox -gall soap) rubbed into them . Afterwards, remove the soap with
water (damp sponge).
Alcoho l can be used to treat stains from grease, oi l, lipstick or a ba ll
point pen . Melted grease or dye must be patted off using absorbe nt
material. It may be necessary to retreat the areas with detergent
p aste and wa ter.
I n the case of general soiling of the upholstery and cover material,
we recommend hiring a specialist that has the equipment to clean
the seat covers and other fabr ic surfaces by shampooing and spray
extraction.
& WARNING
Alway s read and heed all WARNINGS and the information
~ page 200 .
Page 212 of 316
___ C_ le_ a _ n_i_n ~g _ a_ n_ d __ p_r _o _t _e _c_ t_ i_o _n ___________________________________________ _
clothing materials can discolor leather seats (especially if such
clothing is damp and was not dyed correctly). Dust and dirt particles
in pores, folds, and seams can have an abrasive effect and can
damage the leather surface as well as weaken seams.
The leather should be cleaned regularly as needed. After having
been used for a relatively long time, your leather seats will acquire
a rich aged finish. This is a characteristic of natural leather and a
sign of true quality.
In order to maintain the value of this natural product over the life of
your vehicle, you should follow the recommendations below:
0 Note
• To keep your leather from bleaching out, do not allow it to be
exposed to bright sunlight for long periods of time. If you have to
leave the vehicle parked outside for long periods, cover the leather
to protect it from direct exposure to sunlight.
• Sharp objects on clothing, such as zippers, rivets or sharp pieces
on belts can leave permanent scratches or scrape marks on the
surface of the leather.
[ i J Tips
• After each time you clean the leather and at regular intervals, use
a leather preservative creme that contains UV -blockers and that
works into the leather. This creme will nourish and moisturize the leather, helping it to breathe and stay supple. It also helps to build
up a protective coating on the surface.
• Clean the leather every 2 -3 months, and clean any areas that get
soiled.
• Remove fresh marks made by ballpoint pens, ink, lipstick, shoe
polish, etc. as soon as possible.
• Preserve the color of the leather as needed by using a special
colored leather care creme to touch up areas of uneven color. •
Applies to vehicles: w ith natu ral leather
Cleaning and caring for leather upholstery
and trim
Natural leather requires special care and attention.
Normal cleaning
-Clean soiled areas with a slightly moistened cotton or
woolen cloth.
More stubborn dirt
- More stubborn dirt can be removed using a cloth satu
rated with a mild soap solution (2 tablespoons mild
liquid soap).
- Never allow the soap solution to saturate the leather, and
make certain that no water soaks into the seams.
Wipe off the soap solution with a soft, dry cloth.
Cleaning spots
-Remove fresh water-based spots (such as coffee, tea,
juices, blood) with an absorbent cloth or paper towel.
- Remove fresh
grease or oil-based spots (such as butter,
mayonnaise, chocolate) with an absorbent cloth or paper
towel, or use the cleaner from the leather care kit if the
spot has not yet penetrated into the surface of the
leather.
- Use an oil/grease dissolving spray, if
oil/grease spots
have dried on.
- Remove specific kinds of spots (ballpoint pen, felt
marker, fingernail polish, water-based paint, shoe polish,
etc.) with a spot remover specifically formulated for leather. ..,_