Page 270 of 294
Downloaded from www.Manualslib.com manuals search engine Fuses and bulbs 268
Installing
– Perform all of the above steps in reverse sequence.The headlight must be inserted in two guides (on the underside of
the headlight). This is the only way to ensure that the headlight is
installed in the correct position. To determine whether the headlight
is correctly installed, check that it is aligned flush with adjacent
body parts (such as the wing panel).
Do not interchange the securing screws.
Caution
Please take particular care not to damage or scratch the adjacent
parts of the body when removing or installing the headlights.Applies to vehicles: with xenon headlight bulbsChanging bulb for turn signalsThe bulb is secured in the bulb carrier with a bayonet
fastener.
– Remove the headlight ⇒page 267.
– Take off the rubber cap (small cover) and remove the bulb
carrier.
– Lightly press the defective bulb into the bulb carrier, then
turn it anti-clockwise and remove it.
– Do not touch the glass part of the new bulb with your
bare hands, use a cloth or paper towel instead.
– Fit the new bulb, pressing it into the bulb carrier, and turn
it clockwise as far as it will go.
– If necessary, use a cloth to remove any fingerprints from
the glass part of the bulb.– Insert the bulb carrier into the headlight.
Note
Ensure that the rubber cap is seated correctly so that no water can
enter the unit.Changing bulb for front fog lightsPreparations
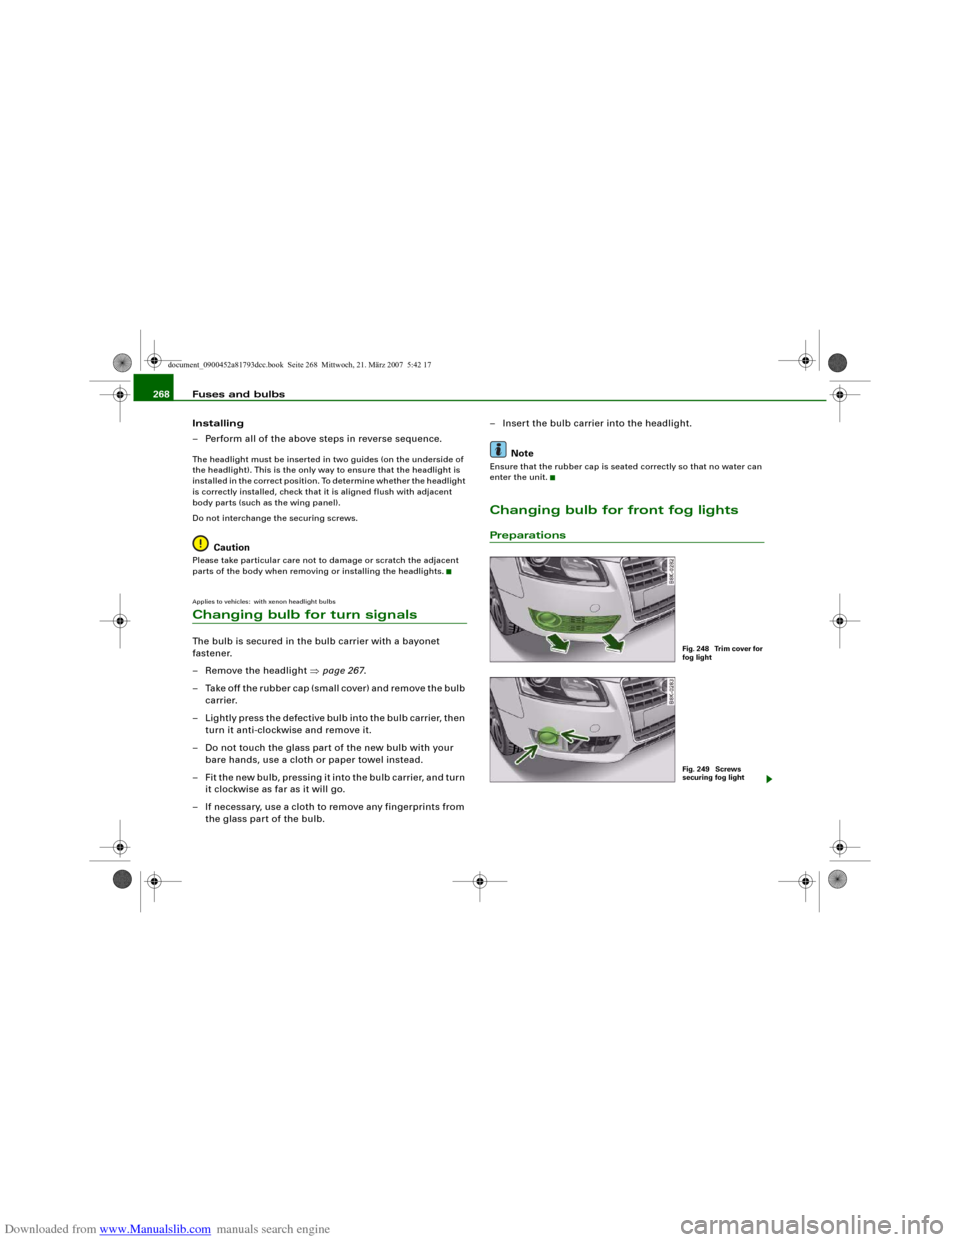
Fig. 248 Trim cover for
fog lightFig. 249 Screws
securing fog light
document_0900452a81793dcc.book Seite 268 Mittwoch, 21. März 2007 5:42 17
Page 271 of 294
Downloaded from www.Manualslib.com manuals search engine Fuses and bulbs269
Controls
Safety
Driving tips
General maintenance
Self-help
Technical data
The description for changing the bulb refers to the left fog
light; in principle the same procedure applies to the right
fog light.
– Switch off the ignition and the lights.
– Detach the trim cover ⇒page 268, fig. 248 (pull it care-
fully in the direction of the arrow).
– Remove the two securing screws ⇒page 268, fig. 249
and pull the fog light unit out of the bumper.
– Unplug the electrical connector.
CautionThe trim cover is secured to the bumper by several retaining hooks.
Do not use force when removing the trim cover to avoid damaging
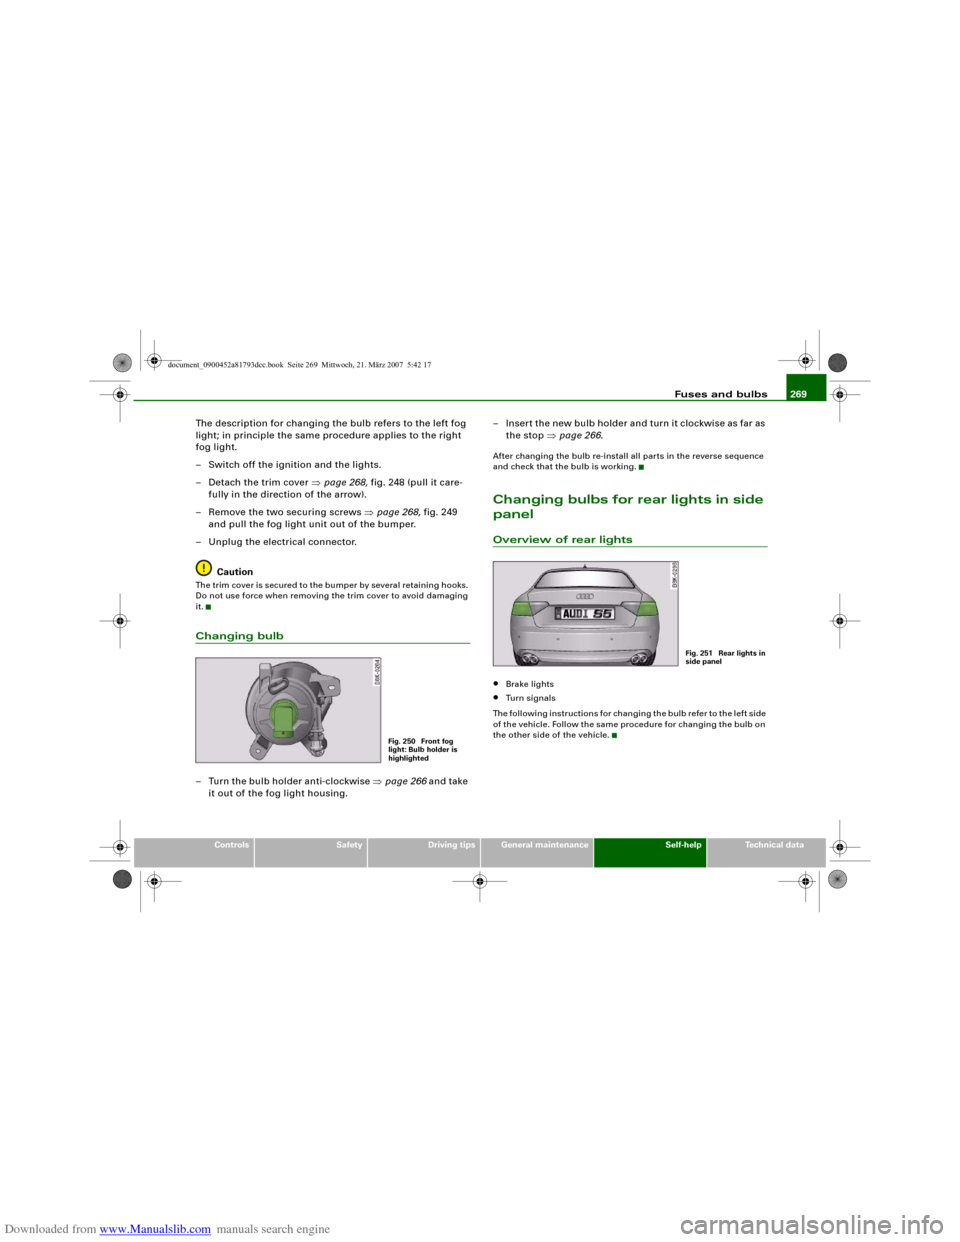
it.Changing bulb– Turn the bulb holder anti-clockwise ⇒page 266 and take
it out of the fog light housing.– Insert the new bulb holder and turn it clockwise as far as
the stop ⇒page 266.
After changing the bulb re-install all parts in the reverse sequence
and check that the bulb is working.Changing bulbs for rear lights in side
panelOverview of rear lights•
Brake lights
•
Turn signals
The following instructions for changing the bulb refer to the left side
of the vehicle. Follow the same procedure for changing the bulb on
the other side of the vehicle.
Fig. 250 Front fog
light: Bulb holder is
highlighted
Fig. 251 Rear lights in
side panel
document_0900452a81793dcc.book Seite 269 Mittwoch, 21. März 2007 5:42 17
Page 272 of 294
Downloaded from www.Manualslib.com manuals search engine Fuses and bulbs 270Removing rear light
To change the bulbs, you must remove the rear light.
Removing the light requires a certain degree of practical
skill.– Check which of the bulbs is defective.
–Open the boot lid.
– Remove the side trim.
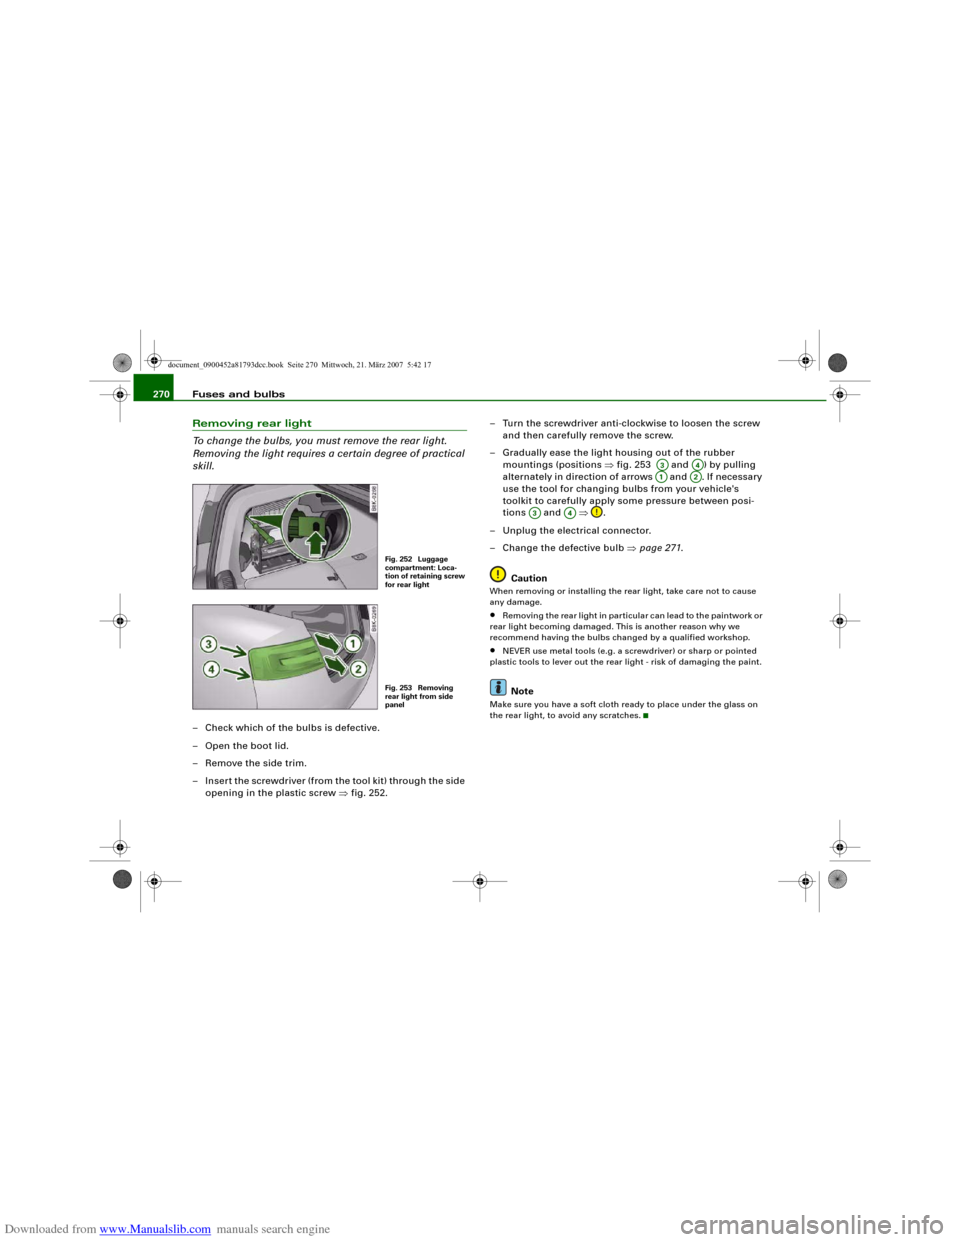
– Insert the screwdriver (from the tool kit) through the side
opening in the plastic screw ⇒fig. 252.– Turn the screwdriver anti-clockwise to loosen the screw
and then carefully remove the screw.
– Gradually ease the light housing out of the rubber
mountings (positions ⇒fig. 253 and ) by pulling
alternately in direction of arrows and . If necessary
use the tool for changing bulbs from your vehicle's
toolkit to carefully apply some pressure between posi-
tions and ⇒.
– Unplug the electrical connector.
– Change the defective bulb ⇒page 271.
Caution
When removing or installing the rear light, take care not to cause
any damage.•
Removing the rear light in particular can lead to the paintwork or
rear light becoming damaged. This is another reason why we
recommend having the bulbs changed by a qualified workshop.
•
NEVER use metal tools (e.g. a screwdriver) or sharp or pointed
plastic tools to lever out the rear light - risk of damaging the paint.Note
Make sure you have a soft cloth ready to place under the glass on
the rear light, to avoid any scratches.
Fig. 252 Luggage
compartment: Loca-
tion of retaining screw
for rear lightFig. 253 Removing
rear light from side
panel
A3
A4
A1
A2
A3
A4
document_0900452a81793dcc.book Seite 270 Mittwoch, 21. März 2007 5:42 17
Page 273 of 294
Downloaded from www.Manualslib.com manuals search engine Fuses and bulbs271
Controls
Safety
Driving tips
General maintenance
Self-help
Technical data
Changing bulbs
All bulbs can be changed easily after removing the rear
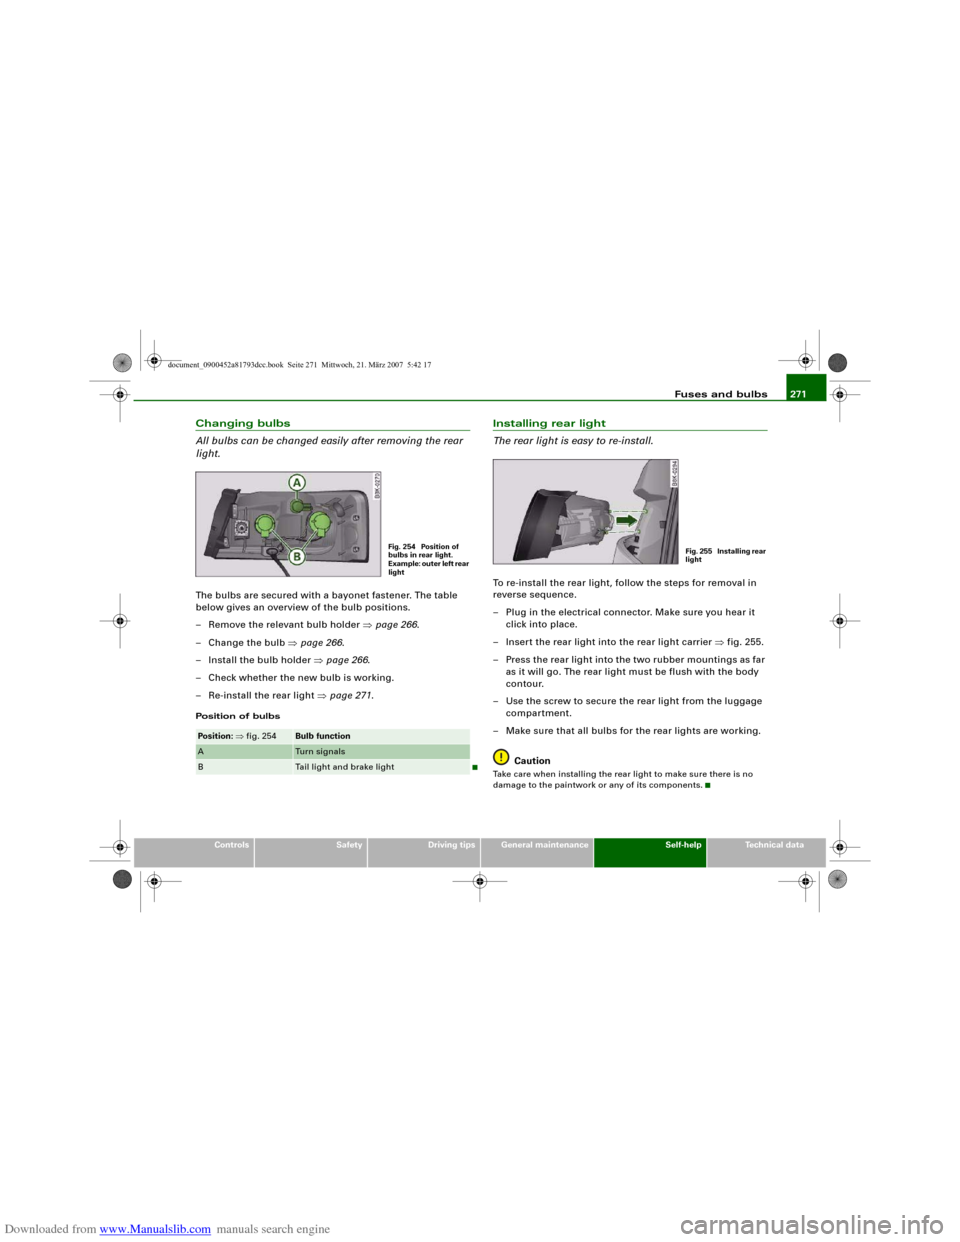
light.The bulbs are secured with a bayonet fastener. The table
below gives an overview of the bulb positions.
– Remove the relevant bulb holder ⇒page 266.
– Change the bulb ⇒page 266.
– Install the bulb holder ⇒page 266.
– Check whether the new bulb is working.
– Re-install the rear light ⇒page 271.Position of bulbs
Installing rear light
The rear light is easy to re-install.To re-install the rear light, follow the steps for removal in
reverse sequence.
– Plug in the electrical connector. Make sure you hear it
click into place.
– Insert the rear light into the rear light carrier ⇒fig. 255.
– Press the rear light into the two rubber mountings as far
as it will go. The rear light must be flush with the body
contour.
– Use the screw to secure the rear light from the luggage
compartment.
– Make sure that all bulbs for the rear lights are working.
CautionTake care when installing the rear light to make sure there is no
damage to the paintwork or any of its components.
Pos iti on: ⇒fig. 254
Bulb function
A
Tu r n s i g n a l s
B
Tail light and brake light
Fig. 254 Position of
bulbs in rear light.
Example: outer left rear
light
Fig. 255 Installing rear
light
document_0900452a81793dcc.book Seite 271 Mittwoch, 21. März 2007 5:42 17
Page 274 of 294
Downloaded from www.Manualslib.com manuals search engine Fuses and bulbs 272Changing bulbs in boot lidRear lights in boot lid•
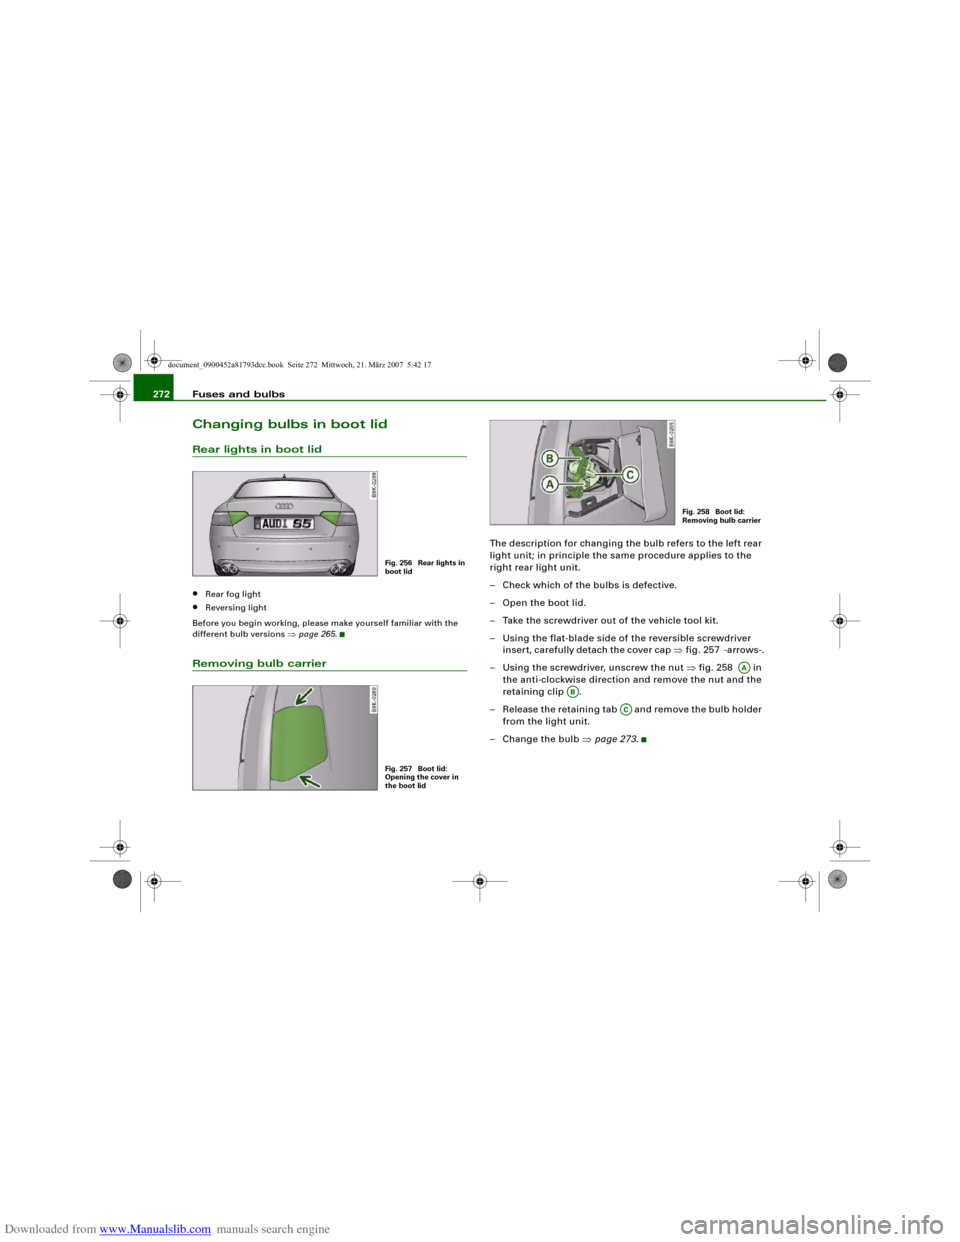
Rear fog light
•
Reversing light
Before you begin working, please make yourself familiar with the
different bulb versions ⇒page 265.
Removing bulb carrier
The description for changing the bulb refers to the left rear
light unit; in principle the same procedure applies to the
right rear light unit.
– Check which of the bulbs is defective.
– Open the boot lid.
– Take the screwdriver out of the vehicle tool kit.
– Using the flat-blade side of the reversible screwdriver
insert, carefully detach the cover cap ⇒fig. 257 -arrows-.
– Using the screwdriver, unscrew the nut ⇒fig. 258 in
the anti-clockwise direction and remove the nut and the
retaining clip .
– Release the retaining tab and remove the bulb holder
from the light unit.
– Change the bulb ⇒page 273.
Fig. 256 Rear lights in
boot lidFig. 257 Boot lid:
Opening the cover in
the boot lid
Fig. 258 Boot lid:
Removing bulb carrier
AA
AB
AC
document_0900452a81793dcc.book Seite 272 Mittwoch, 21. März 2007 5:42 17
Page 275 of 294
Downloaded from www.Manualslib.com manuals search engine Fuses and bulbs273
Controls
Safety
Driving tips
General maintenance
Self-help
Technical data
Changing bulbs
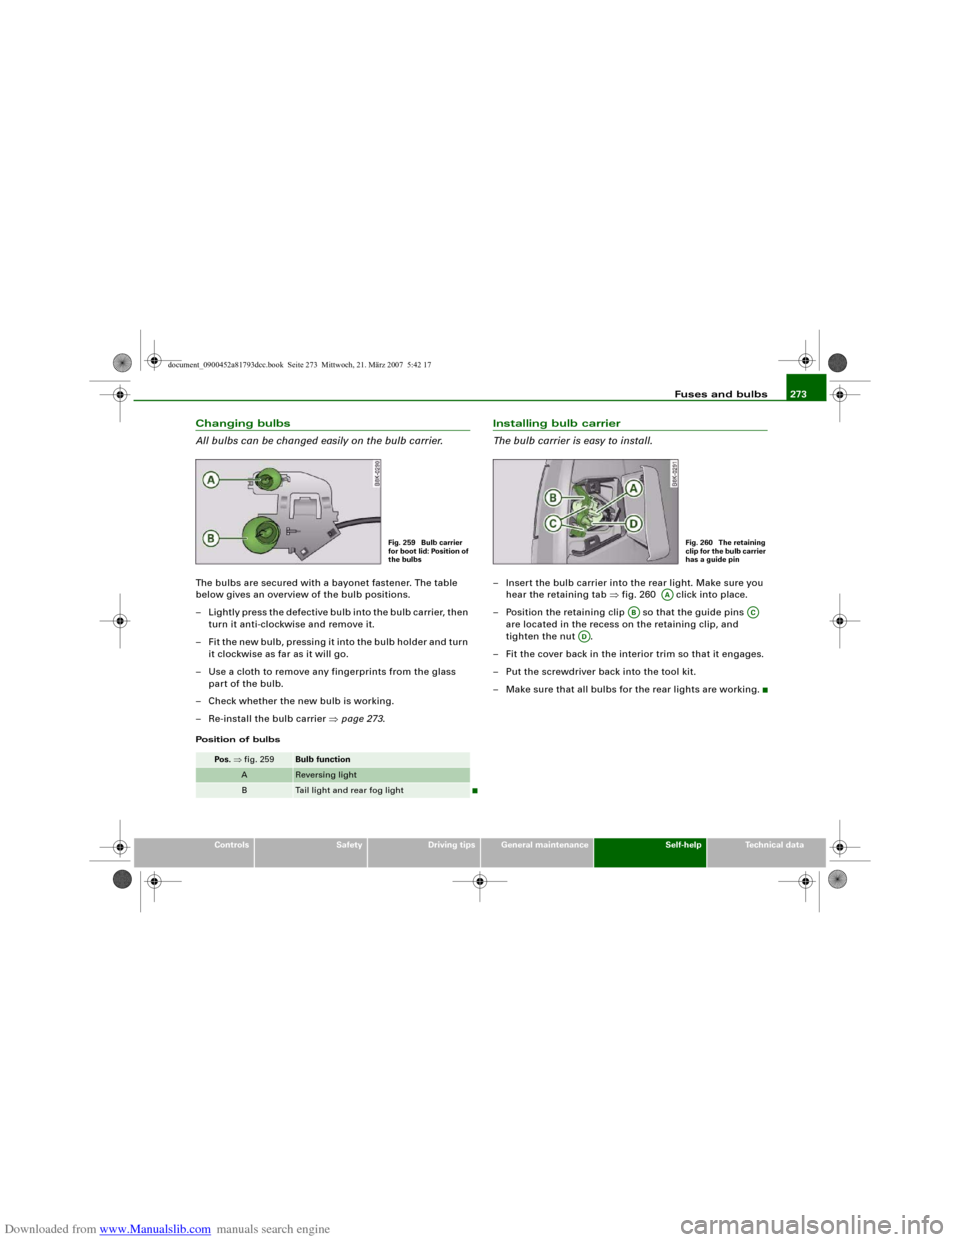
All bulbs can be changed easily on the bulb carrier.The bulbs are secured with a bayonet fastener. The table
below gives an overview of the bulb positions.
– Lightly press the defective bulb into the bulb carrier, then
turn it anti-clockwise and remove it.
– Fit the new bulb, pressing it into the bulb holder and turn
it clockwise as far as it will go.
– Use a cloth to remove any fingerprints from the glass
part of the bulb.
– Check whether the new bulb is working.
– Re-install the bulb carrier ⇒page 273.Position of bulbs
Installing bulb carrier
The bulb carrier is easy to install.– Insert the bulb carrier into the rear light. Make sure you
hear the retaining tab ⇒fig. 260 click into place.
– Position the retaining clip so that the guide pins
are located in the recess on the retaining clip, and
tighten the nut .
– Fit the cover back in the interior trim so that it engages.
– Put the screwdriver back into the tool kit.
– Make sure that all bulbs for the rear lights are working.
Pos. ⇒fig. 259
Bulb function
A
Reversing light
B
Tail light and rear fog light
Fig. 259 Bulb carrier
for boot lid: Position of
the bulbs
Fig. 260 The retaining
clip for the bulb carrier
has a guide pin
AA
AB
AC
AD
document_0900452a81793dcc.book Seite 273 Mittwoch, 21. März 2007 5:42 17
Page 276 of 294
Downloaded from www.Manualslib.com manuals search engine Fuses and bulbs 274Number plate lightRemoving number plate light
– Take the screwdriver out of the vehicle tool kit
⇒page 245.
– Insert the flat-blade side of the reversible screwdriver
insert into the slot on the number plate light ⇒fig. 261.
– Using the screwdriver, start by pressing the number
plate light to the right -arrow 1- and then pull the number
plate light downwards from this position -arrow 2- and
out of the opening.
– Detach the number plate light.Changing bulb
– Press the defective bulb out of the bulb holder and fit the
new bulb.
Installing number plate light
– First insert the side with the retaining element ⇒fig. 262
and then carefully press the number plate light into the
opening.
– Check whether the new bulb is working.
Fig. 261 Boot lid:
Removing number
plate lightFig. 262 Number plate
light: Retaining
element
document_0900452a81793dcc.book Seite 274 Mittwoch, 21. März 2007 5:42 17
Page 277 of 294
Downloaded from www.Manualslib.com manuals search engine Fuses and bulbs275
Controls
Safety
Driving tips
General maintenance
Self-help
Technical data
document_0900452a81793dcc.book Seite 275 Mittwoch, 21. März 2007 5:42 17