2008 AUDI A5 ESP
[x] Cancel search: ESPPage 233 of 313
Checking and topping up fluids231
Controls
Safety
Driving tips
General maintenance
Self-help
Technical data
Working on components in the engine compartment
Extra caution is necessary when working on components
in the engine compartment.Always be aware of the danger of injury and scalding as well as the
risk of accident or fire when working in the engine compartment
(e.g. when checking and refilling fluids). Always observe the warn-
ings listed below and follow all normal safety precautions. The
engine compartment of any motor vehicle is a potentially
hazardous area. ⇒.
WARNING
•
Switch off the engine.
•
Remove the ignition key.
•
Apply the parking brake.
•
Put the gear lever in neutral or selector in P.
•
Wait for the engine to cool down.
•
Keep children away from engine compartment.
•
Never spill fluids on hot engine components. These fluids can
cause a fire (e.g. radiator anti-freeze).
•
Take care not to cause short circuits in the electrical system,
especially when working on the battery.
•
Do not touch the radiator fan when the engine is hot. The fan
may start running suddenly.
•
Do not unscrew the cap on the expansion tank when the engine
is hot. The cooling system is under pressure.
•
Protect face, hands and arms by covering the cap with a large,
thick rag to protect against escaping coolant and steam.
•
If any tests have to be performed with the engine running,
there is an extra safety risk from the rotating parts, such as the
drive belts, alternator and radiator fan, etc., and from the high-
voltage ignition system.
•
Vehicles with automatic gearbox: Never open the throttle inad-
vertently (for instance by hand from the engine compartment) if a
gear is engaged while the vehicle is stationary with the engine
running. The vehicle could otherwise start moving immediately
and possibly cause an accident.
•
Observe the following additional warnings if work on the fuel
system or the electrical system is necessary:
−Always disconnect the battery.
−Do not smoke.
−Never work near naked flames.
−Always keep an approved fire extinguisher immediately
available.Caution
When topping up fluids make sure the correct fluid is put into the
correct filler opening. This can otherwise cause serious malfunc-
tions or engine damage.
For the sake of the environment
Inspect the ground underneath your vehicle regularly so that any
leaks are detected at an early stage. If you find oil spots or other
fluids, have your vehicle inspected by a qualified workshop.
Note
On right-hand drive vehicles* some of the containers/ reservoirs
mentioned below are located on the other side of the engine
compartment.
WARNING (continued)
document_0900452a8179700c.book Seite 231 Donnerstag, 22. März 2007 10:19 10
Page 245 of 313
Wheels and tyres243
Controls
Safety
Driving tips
General maintenance
Self-help
Technical data
Wheels and tyresWheelsGeneral notes–When driving with new tyres, be especially careful during
the first 500 km.
– If you have to drive over a kerb or similar obstacle, drive
very slowly and as near as possible at a right angle to the
kerb.
– Inspect the tyres regularly for damage (cuts, cracks or
blisters, etc.). Remove any foreign bodies embedded in
the treads.
– Damaged wheels and tyres must be replaced immedi-
ately.
– Keep grease, oil and fuel off the tyres.
– Replace any missing valve caps as soon as possible.
– Mark the wheels before taking them off so that they
rotate in the same direction when put back.
– When removed, the wheels or tyres should be stored in a
cool, dry and preferably dark place.New tyres
New tyres do not give maximum grip straight away and should
therefore be “run in” by driving carefully and at moderate speeds for
about the first 500 km. This will also help to make the tyres last
longer.
The tread depth of new tyres may vary, according to the type and
make of tyre and the tread pattern.Concealed damage
Damage to tyres and rims is often not readily visible. If you notice
unusual vibration or the car pulling to one side, this may indicate
that one of the tyres is damaged. Reduce speed immediately if there
is any reason to suspect that damage may have occurred. Inspect
the tyres for damage. If no external damage is visible, drive slowly
and carefully to the nearest qualified workshop and have the car
inspected.
Tyres with directional tread pattern
An arrow on the tyre sidewall indicates the direction of rotation on
tyres with directional tread. Always note the direction of rotation
indicated when mounting the wheel. This guarantees optimum grip
and helps to avoid aquaplaning, excessive noise and wear.
Tyre service life
Correct inflation pressures and sensible driving habits
will increase the service life of your tyres.– Check the tyre pressures at least once a month.
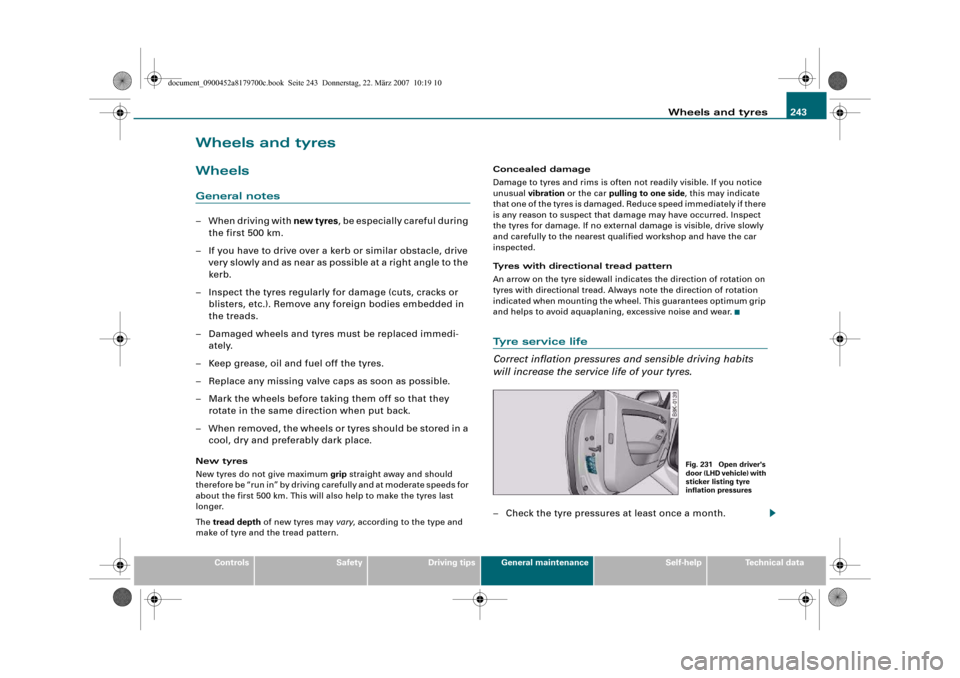
Fig. 231 Open driver's
door (LHD vehicle) with
sticker listing tyre
inflation pressures
document_0900452a8179700c.book Seite 243 Donnerstag, 22. März 2007 10:19 10
Page 246 of 313
Wheels and tyres 244
– The tyre pressures should only be checked when the
tyres are cold. The slightly raised pressures of warm tyres
must not be reduced.
– The pressures must be altered to suit major changes in
the load being carried.
– Avoid fast cornering and hard acceleration.
– Inspect the tyres for irregular wear from time to time.Tyre pressure and vehicle loading
The tyre pressure must be adjusted according to the load the vehicle
is carrying. We recommend adhering to the tyre pressure specifica-
tions for a maximum load. The tyre inflation pressures are listed on
a sticker on the end face of the driver's door ⇒page 243, fig. 231.
However, if you prefer an extra-smooth ride and the vehicle is not
fully loaded, you can select the tyre pressure for a normal load (no
more than three people travelling in the vehicle). However, should
you wish to drive with a full load you must increase the tyre pressure
to the specified maximum.
Under-inflation or over-inflation will reduce the life of the tyres
considerably and also impair the car's handling. Correct inflation
pressures are very important, especially at high speeds. The pres-
sures should therefore be checked at least once a month and before
starting a journey.
Do not forget the spare wheel* when checking the tyre pressures.
Keep the spare tyre inflated to the highest pressure required for the
road wheels.
Driving habits
Fast cornering, heavy acceleration and hard braking (squealing
tyres) all increase tyre wear.Wheel balancing
The wheels on new vehicles are balanced. However, various factors
encountered in normal driving can cause them to become unbal-
anced, which results in steering vibration.
Unbalanced wheels should be rebalanced, as they otherwise cause
excessive wear on steering, suspension and tyres. A wheel must
also be rebalanced when a new tyre is fitted or if a tyre is repaired.
Incorrect wheel alignment
Incorrect wheel alignment causes excessive tyre wear, impairing the
safety of the vehicle. If you notice excessive tyre wear, contact your
Audi dealer.
WARNING
•
Always adapt the tyre pressure accordingly when the vehicle
load changes.
•
Under-inflated tyres flex more and can overheat at continuous
high speeds. This can cause tread separation and tyre blow-out,
which could result in an accident.For the sake of the environment
Under-inflated tyres will increase the fuel consumption.
document_0900452a8179700c.book Seite 244 Donnerstag, 22. März 2007 10:19 10
Page 247 of 313
Wheels and tyres245
Controls
Safety
Driving tips
General maintenance
Self-help
Technical data
Tread wear indicators
The tread wear indicators show the condition of the tyre
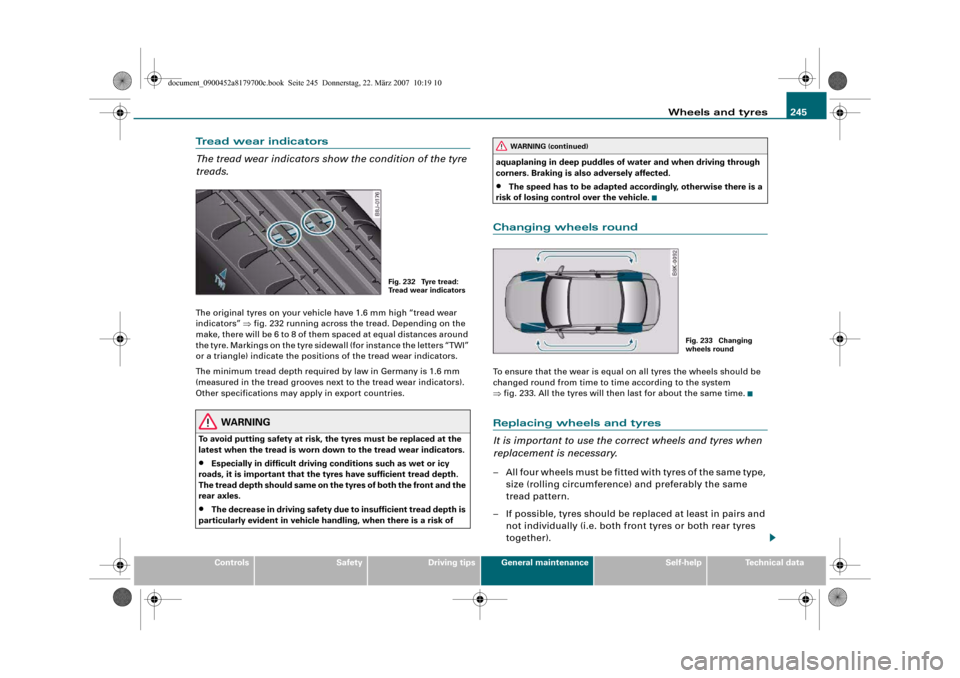
treads.The original tyres on your vehicle have 1.6 mm high “tread wear
indicators” ⇒fig. 232 running across the tread. Depending on the
make, there will be 6 to 8 of them spaced at equal distances around
the tyre. Markings on the tyre sidewall (for instance the letters “TWI”
or a triangle) indicate the positions of the tread wear indicators.
The minimum tread depth required by law in Germany is 1.6 mm
(measured in the tread grooves next to the tread wear indicators).
Other specifications may apply in export countries.
WARNING
To avoid putting safety at risk, the tyres must be replaced at the
latest when the tread is worn down to the tread wear indicators.•
Especially in difficult driving conditions such as wet or icy
roads, it is important that the tyres have sufficient tread depth.
The tread depth should same on the tyres of both the front and the
rear axles.
•
The decrease in driving safety due to insufficient tread depth is
particularly evident in vehicle handling, when there is a risk of aquaplaning in deep puddles of water and when driving through
corners. Braking is also adversely affected.
•
The speed has to be adapted accordingly, otherwise there is a
risk of losing control over the vehicle.
Changing wheels roundTo ensure that the wear is equal on all tyres the wheels should be
changed round from time to time according to the system
⇒fig. 233. All the tyres will then last for about the same time.Replacing wheels and tyres
It is important to use the correct wheels and tyres when
replacement is necessary.– All four wheels must be fitted with tyres of the same type,
size (rolling circumference) and preferably the same
tread pattern.
– If possible, tyres should be replaced at least in pairs and
not individually (i.e. both front tyres or both rear tyres
together).
Fig. 232 Tyre tread:
Tr e a d w e a r i n d i c a t o r s
WARNING (continued)
Fig. 233 Changing
wheels round
document_0900452a8179700c.book Seite 245 Donnerstag, 22. März 2007 10:19 10
Page 252 of 313
Accessories and modifications to the vehicle 250Accessories and modifications to the vehicleAccessories and replacement partsAlways ask your dealer or specialist retailer for advice
before purchasing accessories and replacement parts.Your car is designed to offer a high standard of active and passive
safety. For this reason, we recommend that you ask an Audi dealer
for advice before fitting accessories or replacement parts. Audi
dealers have the latest information from the manufacturer and can
recommend accessories and replacement parts which are suitable
for your requirements. They can also answer any questions you
might have regarding official regulations.
We recommend you to use only Audi accessories and Audi Genuine
parts
®. Audi has tested these parts and accessories for suitability,
reliability and safety. Audi dealers have the necessary experience
and facilities to ensure that the parts are installed properly.
Although the market is constantly scrutinised, Audi cannot judge or
assume responsibility for the reliability, safety and suitability of
non-genuine products - even though in some instances, these parts
may have been approved by an officially recognised technical
testing authority or accompanied by an official approval certificate.
Any retro-fitted equipment which has a direct effect on the vehicle
and/or the way it is driven (e.g. cruise control system or electroni-
cally-controlled suspension) must be approved for use in your
vehicle and bear the e mark (the European Union's approval
symbol).
If any additional electrical components are fitted which do not serve
to control the vehicle itself (for instance a refrigerator box, laptop or
ventilator fan, etc.), these must bear the CE mark (manufacturer
conformity declaration in the European Union).
WARNING
Never attach accessories (such as cup holders or telephone
brackets) to the surfaces covering the airbag units or the areas
around the airbags: this could cause injury if the airbag is
triggered.ModificationsModifications must always be carried out according to
our specifications.Unauthorised modifications to the electronic components or soft-
ware in the vehicle may cause malfunctioning. Due to the way the
electronic components are linked together in networks, other
systems may be affected by the faults. This can seriously impair
safety, lead to excessive wear of components, and also invalidate
the type approval for your vehicle.
You will appreciate that your Audi dealer cannot be held liable for
any damage caused by modifications and/or work performed incor-
rectly.
We recommend that all work should be performed by an Audi work-
shop using Audi Genuine parts
®.
WARNING
Incorrectly performed modifications or other work on your vehicle
can lead to malfunctions and cause accidents.
document_0900452a8179700c.book Seite 250 Donnerstag, 22. März 2007 10:19 10
Page 268 of 313
Self-help 266Starting the engine
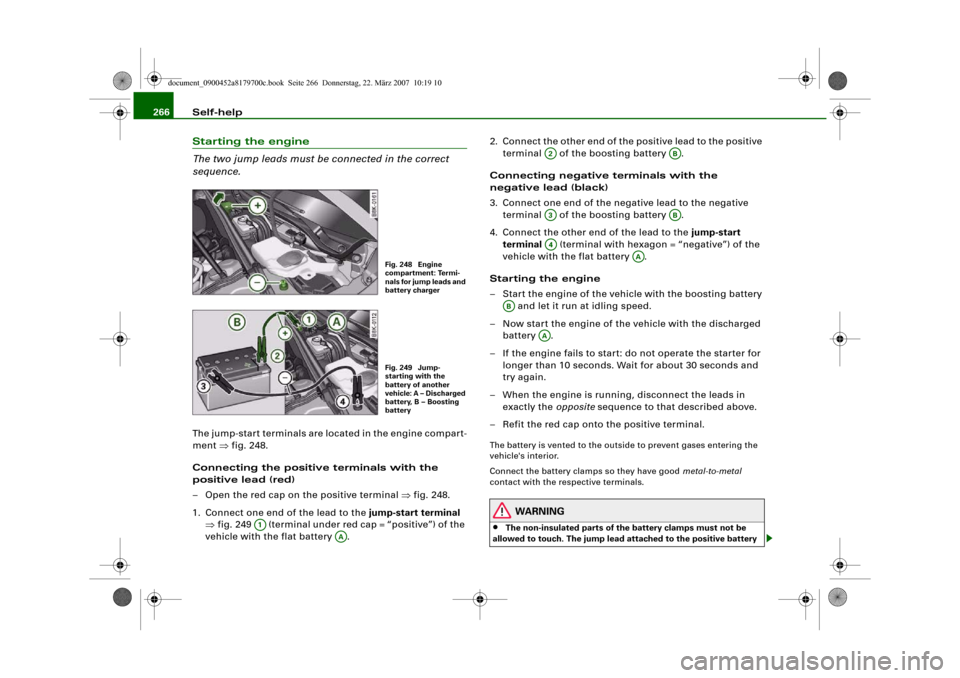
The two jump leads must be connected in the correct
sequence.The jump-start terminals are located in the engine compart-
ment ⇒fig. 248.
Connecting the positive terminals with the
positive lead (red)
– Open the red cap on the positive terminal ⇒fig. 248.
1. Connect one end of the lead to the jump-start terminal
⇒fig. 249 (terminal under red cap = “positive”) of the
vehicle with the flat battery .2. Connect the other end of the positive lead to the positive
terminal of the boosting battery .
Connecting negative terminals with the
negative lead (black)
3. Connect one end of the negative lead to the negative
terminal of the boosting battery .
4. Connect the other end of the lead to the jump-start
terminal (terminal with hexagon = “negative”) of the
vehicle with the flat battery .
Starting the engine
– Start the engine of the vehicle with the boosting battery
and let it run at idling speed.
– Now start the engine of the vehicle with the discharged
battery .
– If the engine fails to start: do not operate the starter for
longer than 10 seconds. Wait for about 30 seconds and
try again.
– When the engine is running, disconnect the leads in
exactly the opposite sequence to that described above.
– Refit the red cap onto the positive terminal.
The battery is vented to the outside to prevent gases entering the
vehicle's interior.
Connect the battery clamps so they have good metal-to-metal
contact with the respective terminals.
WARNING
•
The non-insulated parts of the battery clamps must not be
allowed to touch. The jump lead attached to the positive battery
Fig. 248 Engine
compartment: Termi-
nals for jump leads and
battery chargerFig. 249 Jump-
starting with the
battery of another
vehicle: A – Discharged
battery, B – Boosting
battery
A1
AA
A2
AB
A3
AB
A4
AA
AB
AA
document_0900452a8179700c.book Seite 266 Donnerstag, 22. März 2007 10:19 10
Page 269 of 313
Self-help267
Controls
Safety
Driving tips
General maintenance
Self-help
Technical data terminal must not touch metal parts of the vehicle: this can cause
short circuiting.
•
Do not bend over the batteries – risk of acid burns.
•
The screw plugs on the battery cells must be screwed in firmly.
•
Keep sparks, flame and lighted cigarettes away from batteries:
the gases given off can cause an explosion.
•
If jump-starting another vehicle, position the jump leads in
such a way that they cannot come into contact with any moving
parts in the engine compartment of the other vehicle.Caution
Please note that the above method of connecting the leads is meant
for jump-starting your vehicle. If jump-starting another vehicle, you
should not connect the negative lead (–) to the negative terminal of
the discharged battery, but directly to the engine block or a solid
metal part bolted to the engine block. If the battery of the other
vehicle does not have a gas vent, there is a risk that a mixture of
oxygen and hydrogen gas can accumulate and cause an
explosion.Tow-starting and towing awayGeneral notes
Points to observe when tow-starting or towing awayIf you use a towrope:
Notes for the driver of the towing vehicle
– The towrope must be taut before driving off.– Engage the clutch very gently when starting to move; on
vehicles with automatic gearbox press the accelerator
slowly.
Notes for the driver of the towed vehicle
– The ignition should be switched on so that the turn
signals, horn, windscreen wipers and washers can be
used. Please ensure that the steering wheel is unlocked
when you switch on the ignition, and that it moves freely.
–Put gear lever in neutral (manual gearbox) or move
selector lever to position N (automatic gearbox).
– The brake servo and power steering only work when the
engine is running. Considerably more effort is required
on the brake pedal and steering wheel when the engine
is switched off.
– Ensure that the towrope remains taut at all times when
towing.
Towrope or towbar
It is easier and safer to tow a vehicle with a towbar. You should only
use a towrope if you do not have a towbar.
A towrope should be slightly elastic to reduce the loading on both
vehicles. It is advisable to use a towrope made of synthetic fibre or
similar material.
Attach the tow-rope or tow-bar only to the towing anchorages
intended for this purpose ⇒page 268 or ⇒page 269.
Driving technique
Towing requires some experience – especially when using a
towrope. Both drivers should be familiar with the technique required
for towing. Inexperienced drivers should not attempt to tow-start or
tow away another vehicle.
WARNING (continued)
document_0900452a8179700c.book Seite 267 Donnerstag, 22. März 2007 10:19 10
Page 276 of 313
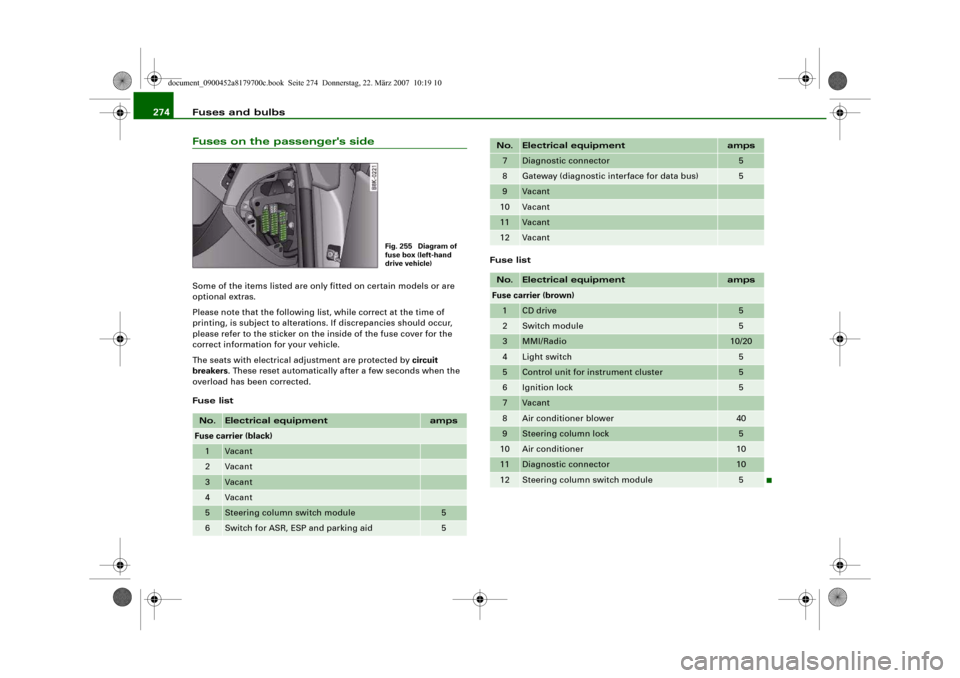
Fuses and bulbs 274Fuses on the passenger's sideSome of the items listed are only fitted on certain models or are
optional extras.
Please note that the following list, while correct at the time of
printing, is subject to alterations. If discrepancies should occur,
please refer to the sticker on the inside of the fuse cover for the
correct information for your vehicle.
The seats with electrical adjustment are protected by circuit
breakers. These reset automatically after a few seconds when the
overload has been corrected.
Fuse listFuse listNo.
Electrical equipment
amps
Fuse carrier (black)1
Vacant
2
Vacant
3
Vacant
4
Vacant
5
Steering column switch module
5
6
Switch for ASR, ESP and parking aid
5
Fig. 255 Diagram of
fuse box (left-hand
drive vehicle)
7
Diagnostic connector
5
8
Gateway (diagnostic interface for data bus)
5
9
Vacant
10
Vacant
11
Vacant
12
Vacant
No.
Electrical equipment
amps
Fuse carrier (brown)1
CD drive
5
2
Switch module
5
3
MMI/Radio
10/20
4
Light switch
5
5
Control unit for instrument cluster
5
6
Ignition lock
5
7
Vacant
8
Air conditioner blower
40
9
Steering column lock
5
10
Air conditioner
10
11
Diagnostic connector
10
12
Steering column switch module
5
No.
Electrical equipment
amps
document_0900452a8179700c.book Seite 274 Donnerstag, 22. März 2007 10:19 10