2008 AUDI A5 seats
[x] Cancel search: seatsPage 191 of 313
Child safety189
Controls
Safety
Driving tips
General maintenance
Self-help
Technical data
Fitting child safety seatsGeneral information
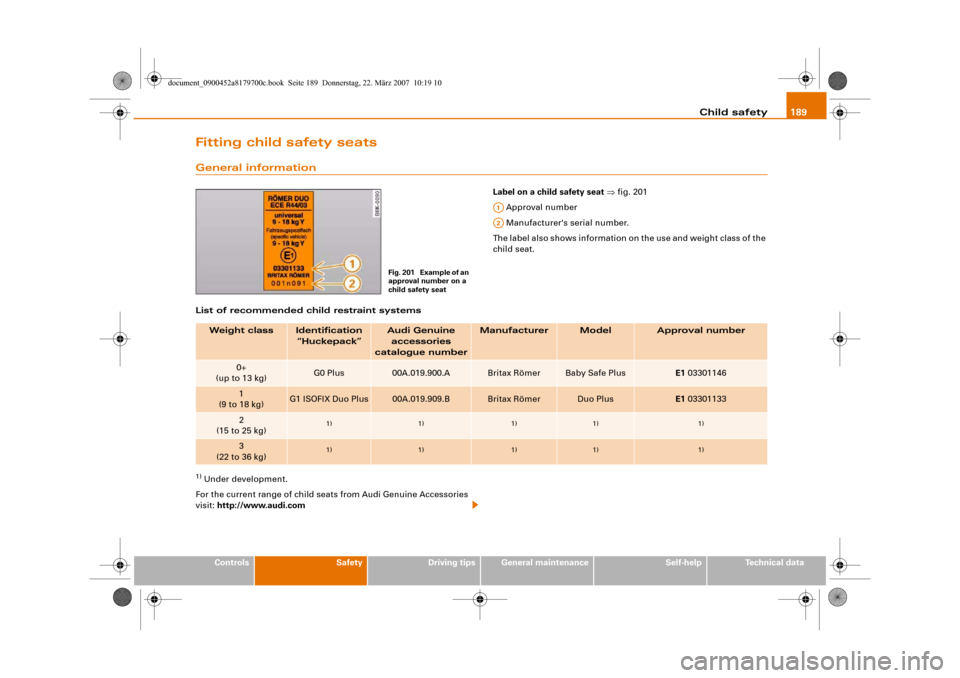
Label on a child safety seat ⇒fig. 201
Approval number
Manufacturer's serial number.
The label also shows information on the use and weight class of the
child seat.
List of recommended child restraint systems
1) Under development.
For the current range of child seats from Audi Genuine Accessories
visit: http://www.audi.com
Fig. 201 Example of an
approval number on a
child safety seat
A1A2
Weight class
Identification
“Huckepack”
Audi Genuine
accessories
catalogue number
Manufacturer
Model
Approval number
0+
(up to 13 kg)
G0 Plus
00A.019.900.A
Britax Römer
Baby Safe Plus
E1 03301146
1
(9 to 18 kg)
G1 ISOFIX Duo Plus
00A.019.909.B
Britax Römer
Duo Plus
E1 03301133
2
(15 to 25 kg)
1)
1)
1)
1)
1)
3
(22 to 36 kg)
1)
1)
1)
1)
1)
document_0900452a8179700c.book Seite 189 Donnerstag, 22. März 2007 10:19 10
Page 193 of 313
Child safety191
Controls
Safety
Driving tips
General maintenance
Self-help
Technical data
Possible alternatives for securing a child safety seat
A child safety seat can be secured on the rear seats and
on the front passenger's seat.The following alternatives are available for safely securing a child
safety seat on the rear seats and on the front passenger's seat.•
Child safety seats of the categories 0 to 3 can be secured with the
standard three-point seat belts.
•
Child safety seats of the categories 0, 0+ and 1 with the “ISOFIX”
system can be secured without seat belts using the “ISOFIX”
retainers* ⇒page 191.
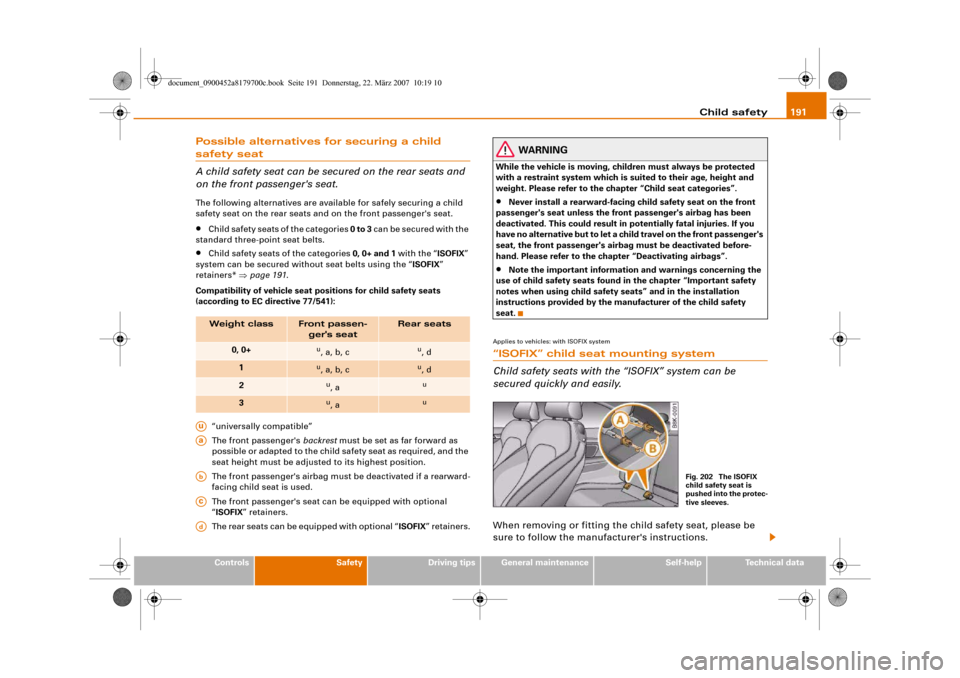
Compatibility of vehicle seat positions for child safety seats
(according to EC directive 77/541):
“universally compatible”
The front passenger's backrest must be set as far forward as
possible or adapted to the child safety seat as required, and the
seat height must be adjusted to its highest position.
The front passenger's airbag must be deactivated if a rearward-
facing child seat is used.
The front passenger's seat can be equipped with optional
“ISOFIX” retainers.
The rear seats can be equipped with optional “ISOFIX” retainers.
WARNING
While the vehicle is moving, children must always be protected
with a restraint system which is suited to their age, height and
weight. Please refer to the chapter “Child seat categories”.•
Never install a rearward-facing child safety seat on the front
passenger's seat unless the front passenger's airbag has been
deactivated. This could result in potentially fatal injuries. If you
have no alternative but to let a child travel on the front passenger's
seat, the front passenger's airbag must be deactivated before-
hand. Please refer to the chapter “Deactivating airbags”.
•
Note the important information and warnings concerning the
use of child safety seats found in the chapter “Important safety
notes when using child safety seats” and in the installation
instructions provided by the manufacturer of the child safety
seat.
Applies to vehicles: with ISOFIX system“ISOFIX” child seat mounting system
Child safety seats with the “ISOFIX” system can be
secured quickly and easily.When removing or fitting the child safety seat, please be
sure to follow the manufacturer's instructions.
Weight class
Front passen-
ger's seat
Rear seats
0, 0+
u, a, b, c
u, d
1
u, a, b, c
u, d
2
u, a
u
3
u, a
u
AuAaAbAcAd
Fig. 202 The ISOFIX
child safety seat is
pushed into the protec-
tive sleeves.
document_0900452a8179700c.book Seite 191 Donnerstag, 22. März 2007 10:19 10
Page 194 of 313
Child safety 192
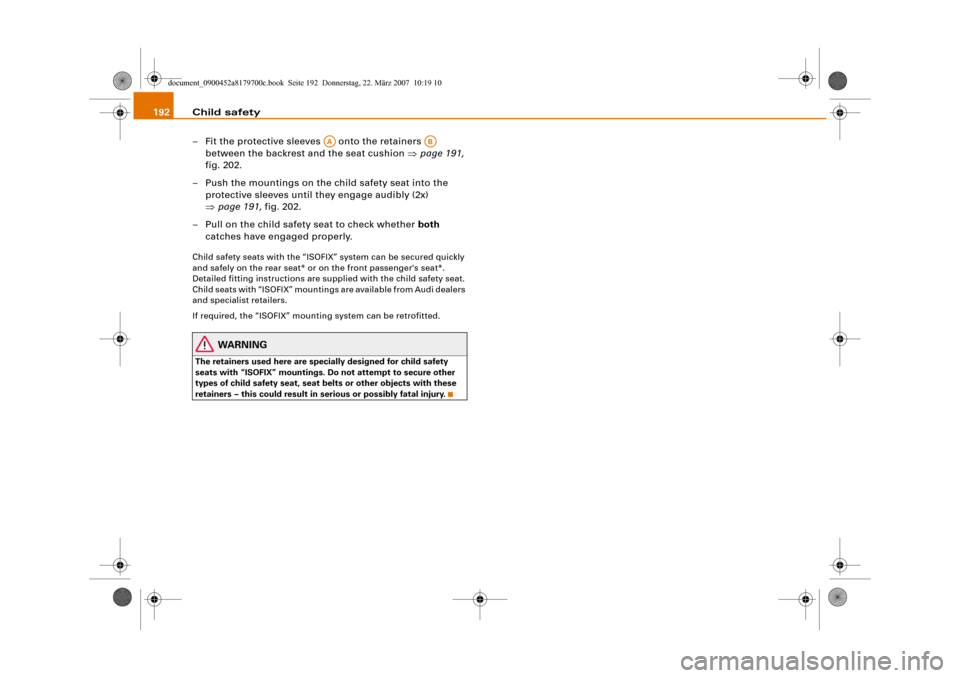
– Fit the protective sleeves onto the retainers
between the backrest and the seat cushion ⇒page 191,
fig. 202.
– Push the mountings on the child safety seat into the
protective sleeves until they engage audibly (2x)
⇒page 191, fig. 202.
– Pull on the child safety seat to check whether both
catches have engaged properly.Child safety seats with the “ISOFIX” system can be secured quickly
and safely on the rear seat* or on the front passenger's seat*.
Detailed fitting instructions are supplied with the child safety seat.
Child seats with “ISOFIX” mountings are available from Audi dealers
and specialist retailers.
If required, the “ISOFIX” mounting system can be retrofitted.
WARNING
The retainers used here are specially designed for child safety
seats with “ISOFIX” mountings. Do not attempt to secure other
types of child safety seat, seat belts or other objects with these
retainers – this could result in serious or possibly fatal injury.
AA
AB
document_0900452a8179700c.book Seite 192 Donnerstag, 22. März 2007 10:19 10
Page 225 of 313
Care of vehicle and cleaning223
Controls
Safety
Driving tips
General maintenance
Self-help
Technical data After washing, the wheels should only be cleaned with an "acid-
free" cleaning agent for alloy wheels. This is available from Audi
dealers and specialist retailers. Never leave the cleaning agent on
the rims for any longer than specified in the instructions before
rinsing it off. If the wheel cleaner fluid contains acid it can attack the
surfaces of the wheel bolts.
Car polish or other abrasive agents should not be used. If the
protective paint coating is damaged by stone chips etc., the
damaged area should be touched up immediately.
WARNING
Please note when cleaning the wheels that water, ice and road salt
can impair the effectiveness of the brakes – this can cause an
accident.Care of interiorMMI display screen and control consoleThe MMI display screen can be cleaned with a soft cloth and a
special “LCD cleaner” (available from retailers of electrical goods).
Moisten the cloth with a small amount of the cleaning fluid.
Clean the MMI control console with a fine brush first to prevent any
dirt from getting in between the control buttons and the housing.
We then recommend wiping the MMI control console using a cloth
moistened with washing-up liquid and water.
Caution
To avoid scratching the screen, do not wipe the MMI display with a
dry cloth.•
To avoid any possibility of damage, do not let any liquid get
inside the control console.
Plastic parts and leatherettePlastic parts and leatherette can be cleaned with a damp cloth. If
this is not sufficient, plastic parts and leatherette should only be
treated with a special solvent-free plastic cleaner.Textile covers and trim partsTextile covers and trim parts (e.g. seats, door trim) should be
cleaned regularly with a vacuum cleaner. This will remove surface
dirt which could otherwise be rubbed into the textile material
during use. Do not use steam cleaners, as the steam could carry the
dirt deeper into the textile material.
Normal cleaning
We recommend that you use a soft sponge or lint-free, micro-fibre
cloth for normal cleaning. Only use brushes on floor coverings and
mats, as other textile surfaces could become damaged.
In the case of normal surface dirt you can use a foam cleaner. Use a
sponge to spread the foam on the textile surface and to work it into
the material lightly. However, make sure that the textile material
does not become soaking wet. Then dab off the foam with a dry and
absorbent cloth (e.g. a micro-fibre cloth) and vacuum off any
residue once the surface is completely dry.
Removal of stains
To treat stains caused by spilled drinks (coffee, fruit juice or similar)
make up a solution with a mild detergent for sensitive fabrics and
apply it with a sponge. If the stains are difficult to remove, a
washing paste can be applied directly onto the stain and worked
into the fabric. The surface will then have to be wiped with clear
water to remove any residue left by the paste. To do so, use a damp
cloth or sponge and then dab the stain with an absorbent cloth.
Treat chocolate or make-up stains with a washing paste and then
rinse off with water (using a damp sponge).
document_0900452a8179700c.book Seite 223 Donnerstag, 22. März 2007 10:19 10
Page 226 of 313
Care of vehicle and cleaning 224A spirit-based cleaner can be used to remove grease, oil, lipstick or
ball point pen. Then dab the dissolved grease or colour particles off
with an absorbent cloth or similar. You may also have to treat the
stain once more using washing paste and water.
If the covers or textile trim panels are badly soiled we recommend
that you have them cleaned by a professional cleaning company.
Note
Please make sure you close any velcro fasteners on your clothing, as
these could otherwise damage the upholstery.Applies to vehicles: with leather upholsteryNatural leather
Audi does everything possible to preserve the special
qualities of leather as a natural product.General notes
We have a wide selection of leathers. The main type used is nappa
in various forms, that is leather with a smooth surface in a selection
of colours.
The amount of dye used determines the appearance and properties
of leather. If the leather is left in a more natural state, it retains its
typical natural appearance and is pleasant and comfortable for the
seat occupants. Fine veins, healed scars, insect bites, wrinkles and
a subtle variation in shading remain visible; these are the character-
istic features of genuine natural leather.
Natural napped leather does not have a protective surface coating
of dye. It is therefore somewhat more prone to damage. You should
bear this in mind if children or pets often travel in the car, or if there
are other factors that could lead to damage.
Types of leather with a coloured surface coating are likely to be
more resistant to damage. This has a great advantage for day-to-day use. However, this means that the typical natural characteristics of
the surface are less apparent, though this does not affect quality.
Cleaning and care
Because of the natural properties of the specially selected hides
employed, the finished leather has a certain sensitivity to grease
and dirt, etc. so a degree of care is required in everyday use and
when looking after the leather. Dark clothing (especially if damp or
incorrectly dyed) may stain leather upholstery. Dust and grit in the
pores and seams can have an abrasive effect and damage the
surface of the leather. Therefore leather should be cleaned at
regular intervals, depending on the actual amount of use. When
they have been in use for a certain time, your car seats will acquire
a typical and distinctive patina. This is characteristic for real leather
upholstery, and is a sign of genuine quality.
To maintain the value of natural leather you should note the
following points:
Caution
•
Avoid exposing leather to direct sunlight for long periods, other-
wise it may tend to lose some of its colour. If the car is left for a
prolonged period in the bright sun, it is best to cover the leather.
•
Sharp-edged objects on clothing, such as belts, zip fasteners,
rivets or similar, can also leave permanent scratches and rough
marks on the surface of the leather.Note
•
Use a suitable impregnating cream with ultra-violet protection at
regular intervals and after cleaning. This cream will nourish and
moisturise the leather, keep it supple and able to breathe. In addi-
tion, it will also help to protect the surface of the leather.
•
Clean the leather every 2 to 3 months and remove fresh dirt as
necessary.
document_0900452a8179700c.book Seite 224 Donnerstag, 22. März 2007 10:19 10
Page 275 of 313
Fuses and bulbs273
Controls
Safety
Driving tips
General maintenance
Self-help
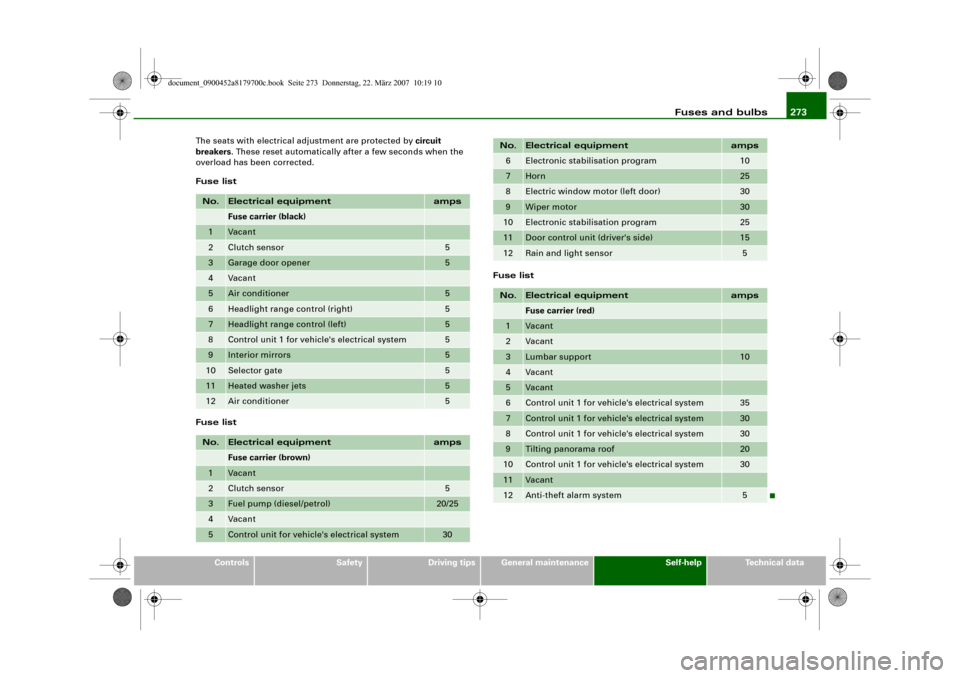
Technical data The seats with electrical adjustment are protected by circuit
breakers. These reset automatically after a few seconds when the
overload has been corrected.
Fuse list
Fuse listFuse list
No.
Electrical equipment
amps
Fuse carrier (black)
1
Vacant
2
Clutch sensor
5
3
Garage door opener
5
4
Vacant
5
Air conditioner
5
6
Headlight range control (right)
5
7
Headlight range control (left)
5
8
Control unit 1 for vehicle's electrical system
5
9
Interior mirrors
5
10
Selector gate
5
11
Heated washer jets
5
12
Air conditioner
5
No.
Electrical equipment
amps
Fuse carrier (brown)
1
Vacant
2
Clutch sensor
5
3
Fuel pump (diesel/petrol)
20/25
4
Vacant
5
Control unit for vehicle's electrical system
30
6
Electronic stabilisation program
10
7
Horn
25
8
Electric window motor (left door)
30
9
Wiper motor
30
10
Electronic stabilisation program
25
11
Door control unit (driver's side)
15
12
Rain and light sensor
5
No.
Electrical equipment
amps
Fuse carrier (red)
1
Vacant
2
Vacant
3
Lumbar support
10
4
Vacant
5
Vacant
6
Control unit 1 for vehicle's electrical system
35
7
Control unit 1 for vehicle's electrical system
30
8
Control unit 1 for vehicle's electrical system
30
9
Tilting panorama roof
20
10
Control unit 1 for vehicle's electrical system
30
11
Vacant
12
Anti-theft alarm system
5
No.
Electrical equipment
amps
document_0900452a8179700c.book Seite 273 Donnerstag, 22. März 2007 10:19 10
Page 276 of 313
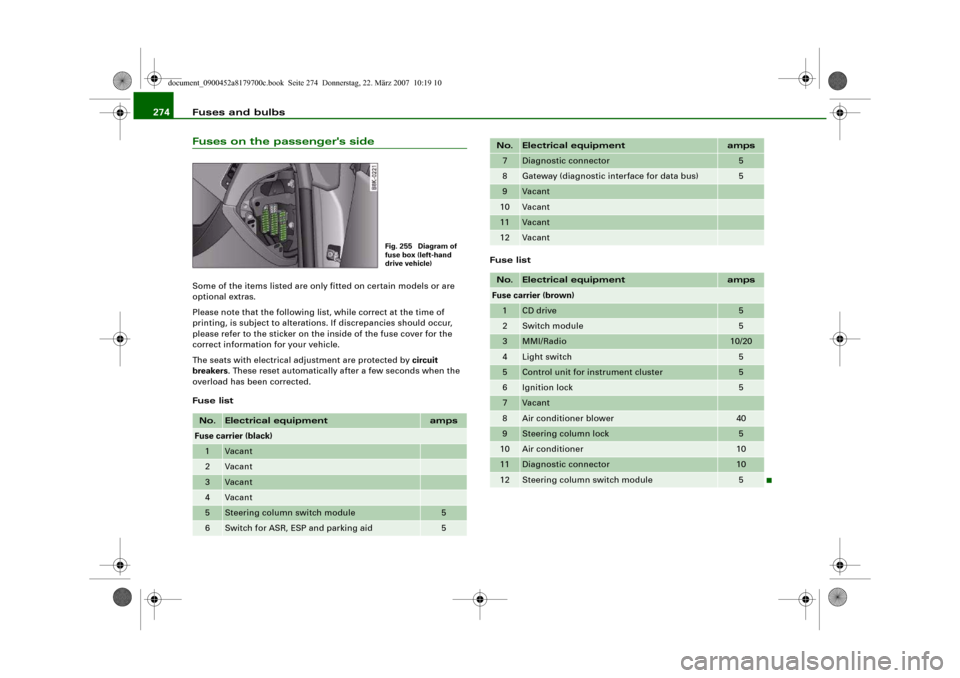
Fuses and bulbs 274Fuses on the passenger's sideSome of the items listed are only fitted on certain models or are
optional extras.
Please note that the following list, while correct at the time of
printing, is subject to alterations. If discrepancies should occur,
please refer to the sticker on the inside of the fuse cover for the
correct information for your vehicle.
The seats with electrical adjustment are protected by circuit
breakers. These reset automatically after a few seconds when the
overload has been corrected.
Fuse listFuse listNo.
Electrical equipment
amps
Fuse carrier (black)1
Vacant
2
Vacant
3
Vacant
4
Vacant
5
Steering column switch module
5
6
Switch for ASR, ESP and parking aid
5
Fig. 255 Diagram of
fuse box (left-hand
drive vehicle)
7
Diagnostic connector
5
8
Gateway (diagnostic interface for data bus)
5
9
Vacant
10
Vacant
11
Vacant
12
Vacant
No.
Electrical equipment
amps
Fuse carrier (brown)1
CD drive
5
2
Switch module
5
3
MMI/Radio
10/20
4
Light switch
5
5
Control unit for instrument cluster
5
6
Ignition lock
5
7
Vacant
8
Air conditioner blower
40
9
Steering column lock
5
10
Air conditioner
10
11
Diagnostic connector
10
12
Steering column switch module
5
No.
Electrical equipment
amps
document_0900452a8179700c.book Seite 274 Donnerstag, 22. März 2007 10:19 10
Page 308 of 313
Index 306FFastening rings . . . . . . . . . . . . . . . . . . 78, 169
Filling the tank . . . . . . . . . . . . . . . . . . . . . 228
Releasing the tank flap manually . . . 229
Fire extinguisher . . . . . . . . . . . . . . . . . . . . 255
First-aid kit . . . . . . . . . . . . . . . . . . . . . . . . 254
Floor mats . . . . . . . . . . . . . . . . . . . . . 167, 168
Fog lights . . . . . . . . . . . . . . . . . . . . . . . . . . . 55
Foreign countries
SeeDriving abroad . . . . . . . . . . . . . . . 205
Four-wheel drive . . . . . . . . . . . . . . . . . . . . 201
Front passenger
SeeSitting position . . . . . . . . . . . . . . . 165
Fuel
Biodiesel . . . . . . . . . . . . . . . . . . . . . . . 227
Capacity . . . . . . . . . . . . . . . . . . . . . . . . 293
Consumption . . . . . . . . . . . . . . . . . . . . 293
Current fuel consumption . . . . . . . . . . 25
Diesel . . . . . . . . . . . . . . . . . . . . . . . . . . 227
Ethanol . . . . . . . . . . . . . . . . . . . . . . . . . 227
Fuel gauge . . . . . . . . . . . . . . . . . . . . . . . 19
Fuel level low . . . . . . . . . . . . . . . . . . . . . 36
Petrol . . . . . . . . . . . . . . . . . . . . . . . . . . 227
Saving fuel . . . . . . . . . . . . . . . . . . . . . . 206
Fuel consumption . . . . . . . . . . . . . . . . . . . 293
Fuel gauge . . . . . . . . . . . . . . . . . . . . . . . . . . 19
Fuel range . . . . . . . . . . . . . . . . . . . . . . . . . . 25
Fuel tank flap . . . . . . . . . . . . . . . . . . . . . . 228
Fuse, changing . . . . . . . . . . . . . . . . . . . . . 272
GGarage door opener . . . . . . . . . . . . . . . . . 154
Gear-change indicator . . . . . . . . . . . . . . . . 21
Generator
SeeAlternator . . . . . . . . . . . . . . . . . . . . 31
Glove box . . . . . . . . . . . . . . . . . . . . . . . . . . . 91
Glow plug system
Indicator lamp . . . . . . . . . . . . . . . . . . . . 16HHandbrake
SeeElectro-mechanical parking brake . . .
121
Hazard warning lights . . . . . . . . . . . . . . . . 58
Indicator lamp . . . . . . . . . . . . . . . . . . . . 17
Head restraints
Front seats . . . . . . . . . . . . . . . . . . . . . . . 76
Rear seats . . . . . . . . . . . . . . . . . . . . . . . 76
Headlight flasher . . . . . . . . . . . . . . . . . . . . 59
Headlight range control . . . . . . . . . . . . . . . 56
Malfunction . . . . . . . . . . . . . . . . . . . . . . 37
Headlights . . . . . . . . . . . . . . . . . . . . . . . . . . 54
adaptive light . . . . . . . . . . . . . . . . . . . . . 58
Changing dip settings . . . . . . . . . . . . 205
Headlight range control . . . . . . . . . . . . 56
Washer system . . . . . . . . . . . . . . . . . . . 64
Heated
Exterior mirrors . . . . . . . . . . . . . . . . . . . 67
Front seats (deluxe automatic air
conditioner) . . . . . . . . . . . . . . . . . . . . 115
Rear seats . . . . . . . . . . . . . . . . . . . . . . 115Rear window . . . . . . . . . . . . . . . . . 98, 107
Washer jets . . . . . . . . . . . . . . . . . . . . . . 62
Heated rear window . . . . . . . . . . . . . . 98, 107
Heating
Deluxe automatic air conditioner . . . . 93
Deluxe automatic air conditioner plus . . .
101
HomeLink . . . . . . . . . . . . . . . . . . . . . . . . . . 154
Horn . . . . . . . . . . . . . . . . . . . . . . . . . . . . . . . . 9
IIgnition key
Emergency release . . . . . . . . . . . . . . . . 41
Safety interlock . . . . . . . . . . . . . . . . . . 116
Ignition lock . . . . . . . . . . . . . . . . . . . . . . . . 116
Malfunction . . . . . . . . . . . . . . . . . . . 34, 37
Immobiliser . . . . . . . . . . . . . . . . . . . . . . 14, 39
Indicator lamps . . . . . . . . . . . . . . . . . . . . . . 15
Cruise control system . . . . . . . . . . . . . . 17
Glow plug system . . . . . . . . . . . . . . . . . 16
Main beam headlights . . . . . . . . . . . . . 17
Overview . . . . . . . . . . . . . . . . . . . . . . . . . 15
Trailer turn signals . . . . . . . . . . . . . . . . 17
Turn signals . . . . . . . . . . . . . . . . . . . . . . 17
Inflation pressures (tyres) . . . . . . . . . . . . 243
Inspection intervals . . . . . . . . . . . . . . . . . . 23
Instrument cluster . . . . . . . . . . . . . . . . . . . 11
Instrument lighting . . . . . . . . . . . . . . . . . . . 57
Interior lights
Dimming . . . . . . . . . . . . . . . . . . . . . . . . . 60
Front . . . . . . . . . . . . . . . . . . . . . . . . . . . . 60
Rear . . . . . . . . . . . . . . . . . . . . . . . . . . . . . 60
document_0900452a8179700c.book Seite 306 Donnerstag, 22. März 2007 10:19 10