2008 AUDI A5 seats
[x] Cancel search: seatsPage 4 of 313
Contents 2ContentsNotes on this Owner's
Manual
. . . . . . . . . . . . . . . . . . . . . .
Controls
. . . . . . . . . . . . . . . . . . . . .
Controls and displays
. . . . . . . . . .
Overview . . . . . . . . . . . . . . . . . . . . . .
Instruments and
warning/indicator lamps
. . . . . . .
Instruments . . . . . . . . . . . . . . . . . . . .
Warning and indicator lamps . . . . .
Driver information system
. . . . . .
Introduction . . . . . . . . . . . . . . . . . . . .
On-board computer . . . . . . . . . . . . .
Speed warning function . . . . . . . . .
Auto-check control . . . . . . . . . . . . . .
Doors and windows
. . . . . . . . . . . .
Remote control keys . . . . . . . . . . . .
Central locking system . . . . . . . . . .
Boot lid . . . . . . . . . . . . . . . . . . . . . . . .
Electric windows . . . . . . . . . . . . . . .
Tilting panorama roof . . . . . . . . . . .
Lights and vision
. . . . . . . . . . . . . . .
Lights . . . . . . . . . . . . . . . . . . . . . . . . .
Interior lights . . . . . . . . . . . . . . . . . . .
Clear vision . . . . . . . . . . . . . . . . . . . .
Windscreen wipers . . . . . . . . . . . . . .Rear-view mirrors . . . . . . . . . . . . . .
Digital compass . . . . . . . . . . . . . . . .
Seats and storage
. . . . . . . . . . . . .
Manual adjustment of front seats
Easy-entry function . . . . . . . . . . . . .
Electric adjustment of front seats
Easy-entry function . . . . . . . . . . . . .
Seat memory . . . . . . . . . . . . . . . . . .
Head restraints . . . . . . . . . . . . . . . .
Front armrest . . . . . . . . . . . . . . . . . .
Luggage compartment . . . . . . . . .
Roof carrier . . . . . . . . . . . . . . . . . . . .
Cup holders . . . . . . . . . . . . . . . . . . .
Ashtrays . . . . . . . . . . . . . . . . . . . . . .
Cigarette lighter and electrical
sockets . . . . . . . . . . . . . . . . . . . . . . .
On-board 230 Volt Euro socket . . .
Storage compartments . . . . . . . . .
Heating and cooling
. . . . . . . . . . .
Deluxe automatic air conditioner .
Deluxe automatic air conditioner -
basic settings . . . . . . . . . . . . . . . . . .
Deluxe automatic air conditioner
plus . . . . . . . . . . . . . . . . . . . . . . . . . .
Deluxe automatic air conditioner
plus - basic settings . . . . . . . . . . . .
Auxiliary heating and auxiliary
ventilation . . . . . . . . . . . . . . . . . . . . .
Seat heating . . . . . . . . . . . . . . . . . . .
Driving
. . . . . . . . . . . . . . . . . . . . . . . . .
Steering . . . . . . . . . . . . . . . . . . . . . . .
Ignition lock . . . . . . . . . . . . . . . . . . .
Starting and stopping the engine
with the advanced key . . . . . . . . . .
Electro-mechanical parking brake
Cruise control system . . . . . . . . . .
Automatic gearbox
. . . . . . . . . . . . .
multitronic® . . . . . . . . . . . . . . . . . . .
Audi parking system
. . . . . . . . . . .
Parking aid systems . . . . . . . . . . . .
parking system . . . . . . . . . . . . . . . . .
parking system plus . . . . . . . . . . . .
parking system advanced . . . . . . .
Towing bracket . . . . . . . . . . . . . . . . .
Settings . . . . . . . . . . . . . . . . . . . . . . .
Special parking situations . . . . . . .
Safety notes . . . . . . . . . . . . . . . . . . .
HomeLink
. . . . . . . . . . . . . . . . . . . . . .
Universal transmitter . . . . . . . . . . . .
Safety
. . . . . . . . . . . . . . . . . . . . . . .
Safe driving
. . . . . . . . . . . . . . . . . . . .
General notes . . . . . . . . . . . . . . . . . .
Correct sitting positions . . . . . . . . .
Pedal area . . . . . . . . . . . . . . . . . . . . .
Stowing luggage safely . . . . . . . . .
Seat belts
. . . . . . . . . . . . . . . . . . . . . .
Why is it so important to use seat
belts? . . . . . . . . . . . . . . . . . . . . . . . . .
Forces acting in a collision . . . . . .
How to wear seat belts properly .
Belt tensioners . . . . . . . . . . . . . . . . . 5
7
9
9
11
11
15
20
20
25
28
29
39
39
42
48
50
52
54
54
60
61
6265
68
70
70
71
72
73
74
76
77
77
84
85
86
87
89
91
93
93
100
101
109
111
115
116
116
116
118
121
125130
130
137
137
137
138
140
147
148
150
152
154
154
161
162
162
164
167
168
170
170
171
173
175
document_0900452a8179700c.book Seite 2 Donnerstag, 22. März 2007 10:19 10
Page 5 of 313
Contents3
Controls
Safety
Driving tips
General maintenance
Self-help
Technical data Airbag system
. . . . . . . . . . . . . . . . .
Description of airbag system . . . .
Front airbags . . . . . . . . . . . . . . . . . .
Side airbags . . . . . . . . . . . . . . . . . . .
Head-protection airbags
(sideguard) . . . . . . . . . . . . . . . . . . . .
Deactivating the front passenger's
airbag via the key-operated switch
Child safety
. . . . . . . . . . . . . . . . . . . .
Points to remember if children are
travelling in the car . . . . . . . . . . . . .
Child safety seats . . . . . . . . . . . . . .
Fitting child safety seats . . . . . . . .
Driving tips
. . . . . . . . . . . . . . . .
Intelligent technology
. . . . . . . . . .
Electronic stabilisation program
(ESP) . . . . . . . . . . . . . . . . . . . . . . . . . .
Brakes . . . . . . . . . . . . . . . . . . . . . . . .
Power steering (servotronic) . . . . .
Four-wheel drive (quattro®) . . . . . .
Power management . . . . . . . . . . . .
Your vehicle and the
environment
. . . . . . . . . . . . . . . . . . .
Running in . . . . . . . . . . . . . . . . . . . .
Emission control systems . . . . . . .
Driving abroad . . . . . . . . . . . . . . . . .
How to improve economy and
minimise pollution . . . . . . . . . . . . .
Environmental compatibility . . . . .
Towing a trailer
. . . . . . . . . . . . . . . .
Driving the vehicle with a trailer or
caravan . . . . . . . . . . . . . . . . . . . . . . .
Removable towing bracket . . . . . .
General maintenance
. .
Care of vehicle and cleaning
. . .
General notes . . . . . . . . . . . . . . . . . .
Care of exterior . . . . . . . . . . . . . . . . .
Care of interior . . . . . . . . . . . . . . . . .
Fuel and filling the tank
. . . . . . . .
Petrol . . . . . . . . . . . . . . . . . . . . . . . . .
Diesel . . . . . . . . . . . . . . . . . . . . . . . . .
Filling the tank . . . . . . . . . . . . . . . . .
Checking and topping up fluidsBonnet . . . . . . . . . . . . . . . . . . . . . . . .
Engine compartment layout . . . . .
Engine oil . . . . . . . . . . . . . . . . . . . . . .
Cooling system . . . . . . . . . . . . . . . . .
Brake fluid . . . . . . . . . . . . . . . . . . . . .
Battery . . . . . . . . . . . . . . . . . . . . . . . .
Windscreen washer . . . . . . . . . . . . . Wheels and tyres
. . . . . . . . . . . . . . .
Wheels . . . . . . . . . . . . . . . . . . . . . . . .
Accessories and modifications
to the vehicle
. . . . . . . . . . . . . . . . . . .
Accessories and replacement
parts . . . . . . . . . . . . . . . . . . . . . . . . . .
Modifications . . . . . . . . . . . . . . . . . .
Radio transmitters and business
equipment . . . . . . . . . . . . . . . . . . . . .
Self-help
. . . . . . . . . . . . . . . . . . . . .
Self-help
. . . . . . . . . . . . . . . . . . . . . . . .
Warning triangle . . . . . . . . . . . . . . . .
First-aid kit . . . . . . . . . . . . . . . . . . . . .
Fire extinguisher . . . . . . . . . . . . . . . .
To o l s a n d T y r e M o b i l i t y S y s t e m . . .
Compact temporary spare wheel*
Tyre repairs . . . . . . . . . . . . . . . . . . . .
Changing a wheel . . . . . . . . . . . . . .
Jump-starting . . . . . . . . . . . . . . . . . .
Tow-starting and towing away . . .
Fuses and bulbs
. . . . . . . . . . . . . . . .
Fuses . . . . . . . . . . . . . . . . . . . . . . . . . .
Bulbs . . . . . . . . . . . . . . . . . . . . . . . . . .
Changing bulbs for headlights . . .
Changing bulb for turn signals . . .
Changing bulb for side lights . . . . .
Changing bulb for front fog lights
Changing bulbs for rear lights in
side panel . . . . . . . . . . . . . . . . . . . . . .
Changing bulbs in boot lid . . . . . . .
Number plate light . . . . . . . . . . . . . . 176
176
178
180
181
183
185
185
186
189
195
196
196
199
201
201
202
205
205
205
205
206
207208
208
211
219
220
220
220
223
227
227
227
228
230
230
232
233
235
238
239
242
243
243250
250
250
251
253
254
254
254
255
255
256
257
260
265
267
272
272
276
278
282
282
283
284
286
288
document_0900452a8179700c.book Seite 3 Donnerstag, 22. März 2007 10:19 10
Page 59 of 313
Lights and vision57
Controls
Safety
Driving tips
General maintenance
Self-help
Technical data
– Turn the thumbwheel
⇒page 56, fig. 53 to the appro-
priate setting.
Adjustment settings
The settings correspond roughly to the following load conditions:
Two front occupants, luggage compartment empty
All seats occupied, luggage compartment empty
All seats occupied, luggage compartment loaded
Driver only, luggage compartment loaded
Caution
Always adjust the headlights to avoid dazzling oncoming traffic.
Make sure you lower the headlights when the vehicle is carrying a
heavy load.Instrument lighting
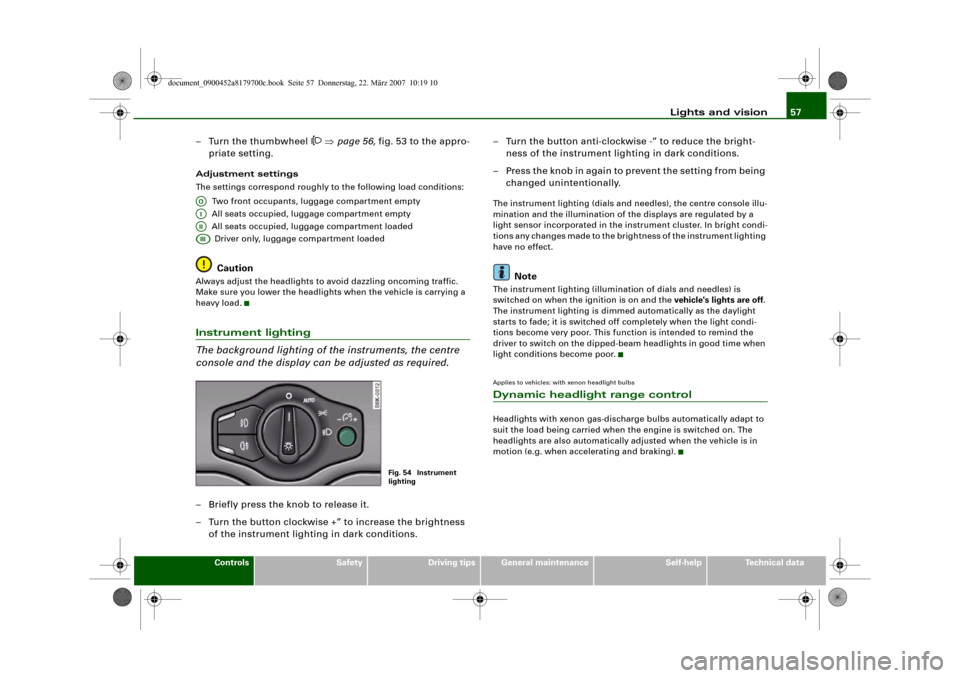
The background lighting of the instruments, the centre
console and the display can be adjusted as required.– Briefly press the knob to release it.
– Turn the button clockwise +” to increase the brightness
of the instrument lighting in dark conditions.– Turn the button anti-clockwise -” to reduce the bright-
ness of the instrument lighting in dark conditions.
– Press the knob in again to prevent the setting from being
changed unintentionally.
The instrument lighting (dials and needles), the centre console illu-
mination and the illumination of the displays are regulated by a
light sensor incorporated in the instrument cluster. In bright condi-
tions any changes made to the brightness of the instrument lighting
have no effect.
Note
The instrument lighting (illumination of dials and needles) is
switched on when the ignition is on and the vehicle's lights are off.
The instrument lighting is dimmed automatically as the daylight
starts to fade; it is switched off completely when the light condi-
tions become very poor. This function is intended to remind the
driver to switch on the dipped-beam headlights in good time when
light conditions become poor.Applies to vehicles: with xenon headlight bulbsDynamic headlight range controlHeadlights with xenon gas-discharge bulbs automatically adapt to
suit the load being carried when the engine is switched on. The
headlights are also automatically adjusted when the vehicle is in
motion (e.g. when accelerating and braking).
AOAIAIIAIII
Fig. 54 Instrument
lighting
document_0900452a8179700c.book Seite 57 Donnerstag, 22. März 2007 10:19 10
Page 72 of 313
Seats and storage 70Seats and storageManual adjustment of front seatsApplies to vehicles: with manual seat adjustmentSeat adjuster controls
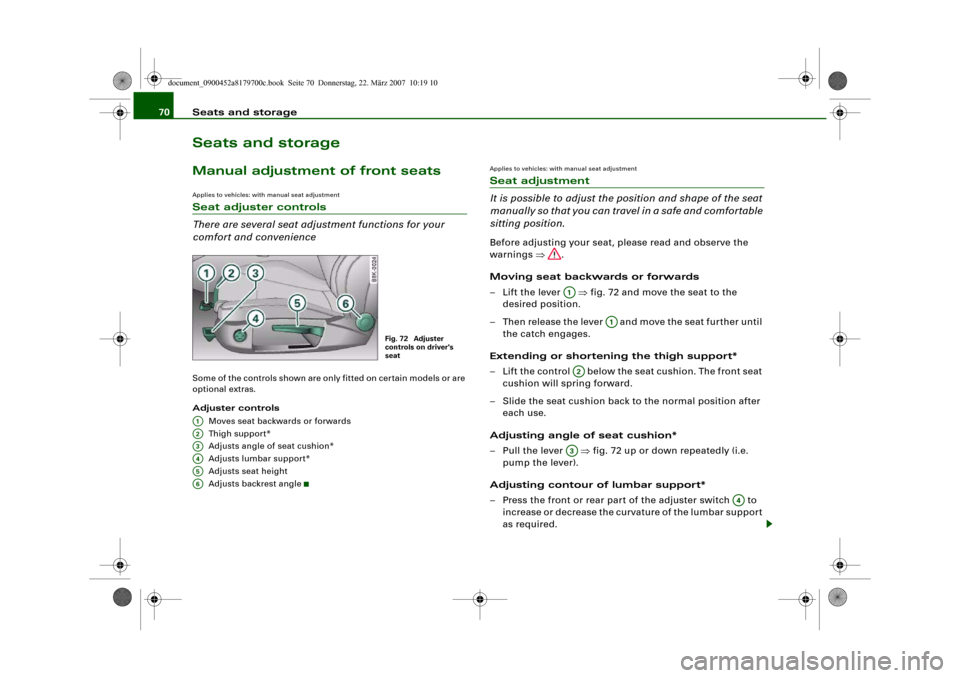
There are several seat adjustment functions for your
comfort and convenienceSome of the controls shown are only fitted on certain models or are
optional extras.
Adjuster controls
Moves seat backwards or forwards
Thigh suppor t*
Adjusts angle of seat cushion*
Adjusts lumbar support*
Adjusts seat height
Adjusts backrest angle
Applies to vehicles: with manual seat adjustmentSeat adjustment
It is possible to adjust the position and shape of the seat
manually so that you can travel in a safe and comfortable
sitting position.Before adjusting your seat, please read and observe the
warnings ⇒.
Moving seat backwards or forwards
– Lift the lever ⇒fig. 72 and move the seat to the
desired position.
– Then release the lever and move the seat further until
the catch engages.
Extending or shortening the thigh support*
– Lift the control below the seat cushion. The front seat
cushion will spring forward.
– Slide the seat cushion back to the normal position after
each use.
Adjusting angle of seat cushion*
– Pull the lever ⇒fig. 72 up or down repeatedly (i.e.
pump the lever).
Adjusting contour of lumbar support*
– Press the front or rear part of the adjuster switch to
increase or decrease the curvature of the lumbar support
as required.
Fig. 72 Adjuster
controls on driver's
seat
A1A2A3A4A5A6
A1
A1
A2A3
A4
document_0900452a8179700c.book Seite 70 Donnerstag, 22. März 2007 10:19 10
Page 73 of 313
Seats and storage71
Controls
Safety
Driving tips
General maintenance
Self-help
Technical data
Adjusting height of lumbar support*
– Press the top or bottom part of the adjuster switch to
move the lumbar support upwards or downwards as
required.
Raising or lowering the seat
– Pull the lever ⇒page 70, fig. 72 up or down repeat-
edly (i.e. pump the lever).
Adjusting backrest angle
– Lean forwards to take your weight off the backrest.
– Turn the adjuster wheel ⇒page 70, fig. 72 to set the
angle of the backrest as required.
WARNING
•
Never adjust the driver's seat when the vehicle is moving - this
could lead to an accident.
•
Be careful when adjusting the seat height. Careless or uncon-
trolled use of the seat adjustment can cause injuries.
•
Do not drive with the backrests of the front seats reclined too
far as otherwise the seat belt and airbag could fail to restrain the
wearer properly in an accident, possibly leading to injury.
Applies to vehicles: with manual seat adjustmentEasy-entry functionThe easy-entry function gives improved access to the rear
seats.Folding down backrest and moving front seats
forwards
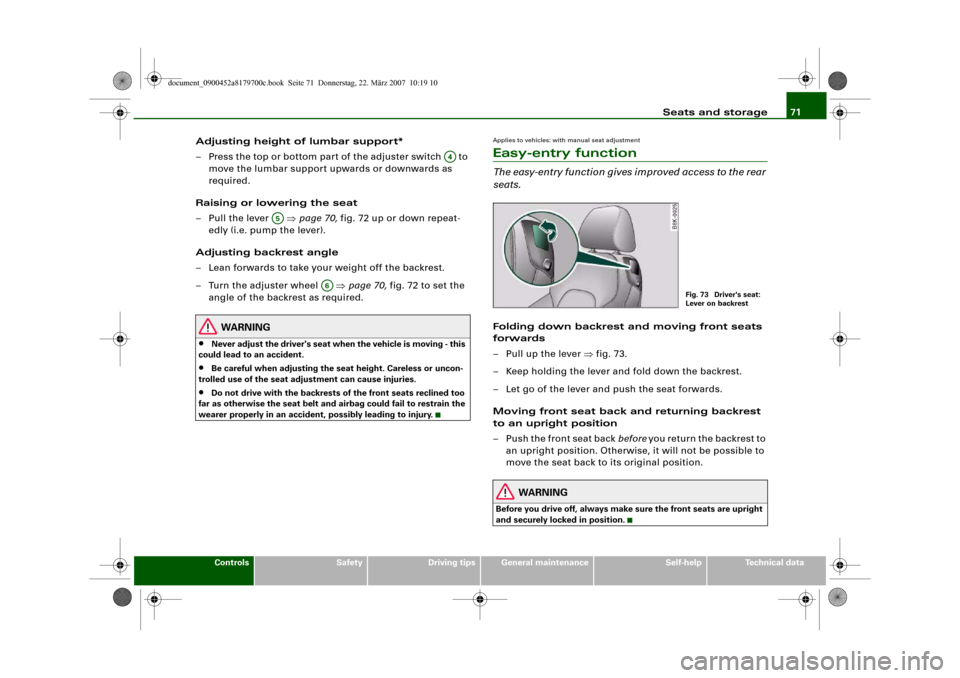
– Pull up the lever ⇒fig. 73.
– Keep holding the lever and fold down the backrest.
– Let go of the lever and push the seat forwards.
Moving front seat back and returning backrest
to an upright position
– Push the front seat back before you return the backrest to
an upright position. Otherwise, it will not be possible to
move the seat back to its original position.
WARNING
Before you drive off, always make sure the front seats are upright
and securely locked in position.
A4
A5
A6
Fig. 73 Driver's seat:
Lever on backrest
document_0900452a8179700c.book Seite 71 Donnerstag, 22. März 2007 10:19 10
Page 74 of 313
Seats and storage 72Electric adjustment of front seatsApplies to vehicles: with electric seat adjustmentSeat adjuster controls
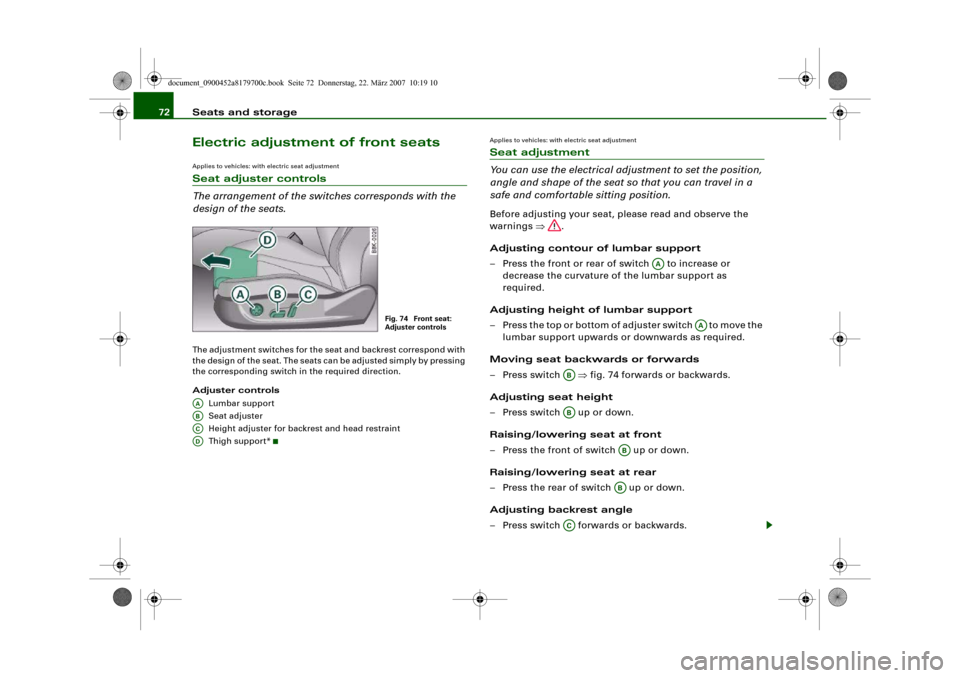
The arrangement of the switches corresponds with the
design of the seats.The adjustment switches for the seat and backrest correspond with
the design of the seat. The seats can be adjusted simply by pressing
the corresponding switch in the required direction.
Adjuster controls
Lumbar support
Seat adjuster
Height adjuster for backrest and head restraint
Thigh suppor t*
Applies to vehicles: with electric seat adjustmentSeat adjustment
You can use the electrical adjustment to set the position,
angle and shape of the seat so that you can travel in a
safe and comfortable sitting position.Before adjusting your seat, please read and observe the
warnings ⇒.
Adjusting contour of lumbar support
– Press the front or rear of switch to increase or
decrease the curvature of the lumbar support as
required.
Adjusting height of lumbar support
– Press the top or bottom of adjuster switch to move the
lumbar support upwards or downwards as required.
Moving seat backwards or forwards
– Press switch ⇒fig. 74 forwards or backwards.
Adjusting seat height
– Press switch up or down.
Raising/lowering seat at front
– Press the front of switch up or down.
Raising/lowering seat at rear
– Press the rear of switch up or down.
Adjusting backrest angle
– Press switch forwards or backwards.
Fig. 74 Front seat:
Adjuster controls
AAABACAD
AA
AA
ABAB
ABAB
AC
document_0900452a8179700c.book Seite 72 Donnerstag, 22. März 2007 10:19 10
Page 75 of 313
Seats and storage73
Controls
Safety
Driving tips
General maintenance
Self-help
Technical data
Adjusting head restraint height
– Press switch up or down.
Extending or shortening the thigh support*
– Lift the control below the seat cushion. The front seat
cushion will spring forward.
– Slide the seat cushion back to the desired position.
WARNING
•
Never adjust the driver's seat when the vehicle is moving - this
could lead to an accident.
•
The electrical seat adjustment also works when the ignition is
off and when the key is not in the ignition. To avoid accidental inju-
ries, never leave children unattended in the vehicle.
•
Be careful when adjusting the seat height. Careless or uncon-
trolled use of the height adjustment can cause injuries.
•
Do not drive with the backrests of the front seats reclined too
far as otherwise the seat belt and airbag could fail to restrain the
wearer properly in an accident, possibly leading to injury.
Applies to vehicles: with electric seat adjustmentEasy-entry functionThe easy-entry function gives improved access to the rear
seats.Tipping the front backrests forward
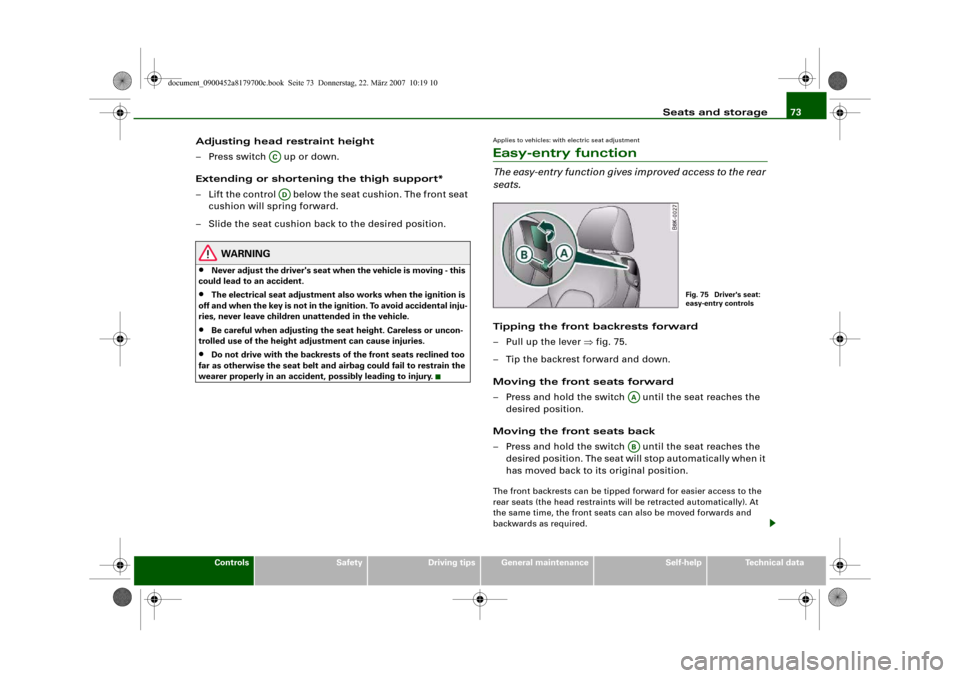
– Pull up the lever ⇒fig. 75.
– Tip the backrest forward and down.
Moving the front seats forward
– Press and hold the switch until the seat reaches the
desired position.
Moving the front seats back
– Press and hold the switch until the seat reaches the
desired position. The seat will stop automatically when it
has moved back to its original position.The front backrests can be tipped forward for easier access to the
rear seats (the head restraints will be retracted automatically). At
the same time, the front seats can also be moved forwards and
backwards as required.
ACAD
Fig. 75 Driver's seat:
easy-entry controls
AAAB
document_0900452a8179700c.book Seite 73 Donnerstag, 22. März 2007 10:19 10
Page 76 of 313
Seats and storage 74When the front seats are moved forward, their original positions are
stored in a memory. The seats then stop automatically in this posi-
tion when they are moved back. If you want to move one of the seats
back further, release the switch and press it again.
The head restraints on the front seats retract automatically
(depending on the seat height setting) when the backrests are
tipped forward, and move back to their original positions when the
backrests are returned to the upright position.
Note
The easy-entry switches on the relevant seat are out of action when
the driver's or passenger's doors are closed.Seat memoryApplies to vehicles: with seat memoryMemory for driver's seat
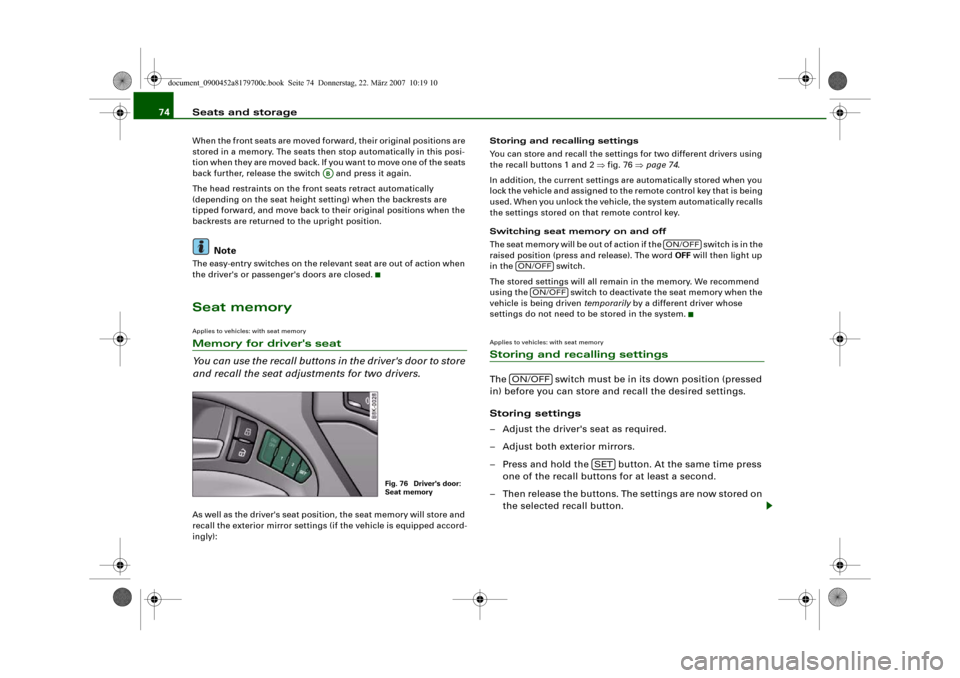
You can use the recall buttons in the driver's door to store
and recall the seat adjustments for two drivers.As well as the driver's seat position, the seat memory will store and
recall the exterior mirror settings (if the vehicle is equipped accord-
ingly):Storing and recalling settings
You can store and recall the settings for two different drivers using
the recall buttons 1 and 2 ⇒fig. 76 ⇒page 74.
In addition, the current settings are automatically stored when you
lock the vehicle and assigned to the remote control key that is being
used. When you unlock the vehicle, the system automatically recalls
the settings stored on that remote control key.
Switching seat memory on and off
Th e s e a t m e m o r y w i l l b e o u t o f a c t i o n i f t h e s w i t c h i s i n t h e
raised position (press and release). The word OFF will then light up
in the switch.
The stored settings will all remain in the memory. We recommend
using the switch to deactivate the seat memory when the
vehicle is being driven temporarily by a different driver whose
settings do not need to be stored in the system.
Applies to vehicles: with seat memoryStoring and recalling settingsThe switch must be in its down position (pressed
in) before you can store and recall the desired settings.
Storing settings
– Adjust the driver's seat as required.
– Adjust both exterior mirrors.
– Press and hold the button. At the same time press
one of the recall buttons for at least a second.
– Then release the buttons. The settings are now stored on
the selected recall button.
AB
Fig. 76 Driver's door:
Seat memory
ON/OFF
ON/OFF
ON/OFF
ON/OFF
SET
document_0900452a8179700c.book Seite 74 Donnerstag, 22. März 2007 10:19 10