2008 AUDI A5 brake fluid
[x] Cancel search: brake fluidPage 223 of 313
Care of vehicle and cleaning221
Controls
Safety
Driving tips
General maintenance
Self-help
Technical data
WARNING
•
Do not wash the vehicle with the ignition switched on – risk of
accident.
•
Do not clean the underside of the car or inside the wheel arches
without protecting your hands and arms. You may cut yourself on
sharp metal parts.
•
Take care when washing the car during the winter: moisture
and ice on the brakes may affect braking efficiency – this could
cause an accident.Caution
•
Do not wash the vehicle in direct sunlight – otherwise the paint
can be damaged.
•
Do not use insect sponges, or abrasive household sponges, etc.
– they can damage the surfaces.
•
The headlights should only be washed with water – do not wipe
them with a dry cloth or sponge. It is best to use soapy water.
•
Never wash tyres with a jet that sprays the water out in a direct
stream. This could damage the tyres – even if the spray is kept at a
distance and only used for a very short time.For the sake of the environment
The car should only be washed in special wash bays. This prevents
oily water from getting into the public drains. In some districts,
washing vehicles anywhere else may be prohibited.Waxing and polishingWaxing
Waxing protects the paintwork. It is time to apply a good coat of wax
when water no longer forms droplets and rolls off the clean paint-
work.Even if a wax solution is used regularly in the car wash, it is advis-
able to protect the paint with a coat of wax at least twice a year.
In the summer, you will find it is much easier to remove dead insects
(which accumulate on the bumper and the front of the bonnet) if the
car has been waxed recently.
Polishing
Polishing is only necessary if the paint has lost its shine, and the
gloss cannot be brought back by putting on wax.
The car must be waxed after polishing if the polish used does not
contain wax compounds to seal the paint.
Caution
Matt painted and plastic parts must not be treated with wax or
polish.Ornamental trim and mouldingsThe metal brightwork on the body is made of aluminium rather than
chrome (for environmental reasons).
Dirt or marks on the trim mouldings should be removed with an
acid-free cleaning agent (do not use a chrome cleaner). Body polish
is also unsuitable for use on trim mouldings. The intensive cleaning
fluids often used before the car goes into a car wash may contain
alkaline substances, which can cause dull or milky patches when
they dry out.
Audi dealers carry stocks of cleaning products which have been
tested for use on your vehicle and are not harmful to the
environment.
document_0900452a8179700c.book Seite 221 Donnerstag, 22. März 2007 10:19 10
Page 225 of 313
Care of vehicle and cleaning223
Controls
Safety
Driving tips
General maintenance
Self-help
Technical data After washing, the wheels should only be cleaned with an "acid-
free" cleaning agent for alloy wheels. This is available from Audi
dealers and specialist retailers. Never leave the cleaning agent on
the rims for any longer than specified in the instructions before
rinsing it off. If the wheel cleaner fluid contains acid it can attack the
surfaces of the wheel bolts.
Car polish or other abrasive agents should not be used. If the
protective paint coating is damaged by stone chips etc., the
damaged area should be touched up immediately.
WARNING
Please note when cleaning the wheels that water, ice and road salt
can impair the effectiveness of the brakes – this can cause an
accident.Care of interiorMMI display screen and control consoleThe MMI display screen can be cleaned with a soft cloth and a
special “LCD cleaner” (available from retailers of electrical goods).
Moisten the cloth with a small amount of the cleaning fluid.
Clean the MMI control console with a fine brush first to prevent any
dirt from getting in between the control buttons and the housing.
We then recommend wiping the MMI control console using a cloth
moistened with washing-up liquid and water.
Caution
To avoid scratching the screen, do not wipe the MMI display with a
dry cloth.•
To avoid any possibility of damage, do not let any liquid get
inside the control console.
Plastic parts and leatherettePlastic parts and leatherette can be cleaned with a damp cloth. If
this is not sufficient, plastic parts and leatherette should only be
treated with a special solvent-free plastic cleaner.Textile covers and trim partsTextile covers and trim parts (e.g. seats, door trim) should be
cleaned regularly with a vacuum cleaner. This will remove surface
dirt which could otherwise be rubbed into the textile material
during use. Do not use steam cleaners, as the steam could carry the
dirt deeper into the textile material.
Normal cleaning
We recommend that you use a soft sponge or lint-free, micro-fibre
cloth for normal cleaning. Only use brushes on floor coverings and
mats, as other textile surfaces could become damaged.
In the case of normal surface dirt you can use a foam cleaner. Use a
sponge to spread the foam on the textile surface and to work it into
the material lightly. However, make sure that the textile material
does not become soaking wet. Then dab off the foam with a dry and
absorbent cloth (e.g. a micro-fibre cloth) and vacuum off any
residue once the surface is completely dry.
Removal of stains
To treat stains caused by spilled drinks (coffee, fruit juice or similar)
make up a solution with a mild detergent for sensitive fabrics and
apply it with a sponge. If the stains are difficult to remove, a
washing paste can be applied directly onto the stain and worked
into the fabric. The surface will then have to be wiped with clear
water to remove any residue left by the paste. To do so, use a damp
cloth or sponge and then dab the stain with an absorbent cloth.
Treat chocolate or make-up stains with a washing paste and then
rinse off with water (using a damp sponge).
document_0900452a8179700c.book Seite 223 Donnerstag, 22. März 2007 10:19 10
Page 233 of 313
Checking and topping up fluids231
Controls
Safety
Driving tips
General maintenance
Self-help
Technical data
Working on components in the engine compartment
Extra caution is necessary when working on components
in the engine compartment.Always be aware of the danger of injury and scalding as well as the
risk of accident or fire when working in the engine compartment
(e.g. when checking and refilling fluids). Always observe the warn-
ings listed below and follow all normal safety precautions. The
engine compartment of any motor vehicle is a potentially
hazardous area. ⇒.
WARNING
•
Switch off the engine.
•
Remove the ignition key.
•
Apply the parking brake.
•
Put the gear lever in neutral or selector in P.
•
Wait for the engine to cool down.
•
Keep children away from engine compartment.
•
Never spill fluids on hot engine components. These fluids can
cause a fire (e.g. radiator anti-freeze).
•
Take care not to cause short circuits in the electrical system,
especially when working on the battery.
•
Do not touch the radiator fan when the engine is hot. The fan
may start running suddenly.
•
Do not unscrew the cap on the expansion tank when the engine
is hot. The cooling system is under pressure.
•
Protect face, hands and arms by covering the cap with a large,
thick rag to protect against escaping coolant and steam.
•
If any tests have to be performed with the engine running,
there is an extra safety risk from the rotating parts, such as the
drive belts, alternator and radiator fan, etc., and from the high-
voltage ignition system.
•
Vehicles with automatic gearbox: Never open the throttle inad-
vertently (for instance by hand from the engine compartment) if a
gear is engaged while the vehicle is stationary with the engine
running. The vehicle could otherwise start moving immediately
and possibly cause an accident.
•
Observe the following additional warnings if work on the fuel
system or the electrical system is necessary:
−Always disconnect the battery.
−Do not smoke.
−Never work near naked flames.
−Always keep an approved fire extinguisher immediately
available.Caution
When topping up fluids make sure the correct fluid is put into the
correct filler opening. This can otherwise cause serious malfunc-
tions or engine damage.
For the sake of the environment
Inspect the ground underneath your vehicle regularly so that any
leaks are detected at an early stage. If you find oil spots or other
fluids, have your vehicle inspected by a qualified workshop.
Note
On right-hand drive vehicles* some of the containers/ reservoirs
mentioned below are located on the other side of the engine
compartment.
WARNING (continued)
document_0900452a8179700c.book Seite 231 Donnerstag, 22. März 2007 10:19 10
Page 234 of 313

Checking and topping up fluids 232Closing the bonnet– To close the bonnet, pull it down to overcome the spring
pressure.
– Then let it drop into the catches; do not press down ⇒.
WARNING
•
For safety reasons the bonnet must always be completely
closed when the vehicle is moving. After closing it always check
that it is properly secured. The bonnet must be flush with the adja-
cent body panels.
•
Should you notice that the bonnet is not safely secured when
the vehicle is moving, stop the vehicle immediately and close the
bonnet properly, otherwise it could cause an accident.
Engine compartment layoutEngine compartment layout
Main components for checking and refillingFig. 223 Typical locations of fluid containers, engine oil dipstick and engine oil
filler cap
Jump-start terminal (+) under a cover . . . . . . . . . . . . .
Brake fluid reservoir (
) . . . . . . . . . . . . . . . . . . . . . . . .
Engine oil filler cap (
) . . . . . . . . . . . . . . . . . . . . . . . .
Engine oil dipstick (orange) . . . . . . . . . . . . . . . . . . . . . .
Radiator expansion tank () . . . . . . . . . . . . . . . . . . . . .
Windscreen washer container (
) . . . . . . . . . . . . . . . .
Jump-start terminal (-) with hexagon head . . . . . . . . .
Hydraulic fluid reservoir for power steering . . . . . . . .
A1
241, 266
A2
238
A3
234
A4
234
A5
236
A6
242
A7
241, 266
A8
201
document_0900452a8179700c.book Seite 232 Donnerstag, 22. März 2007 10:19 10
Page 240 of 313
Checking and topping up fluids 238Brake fluidChecking brake fluid level
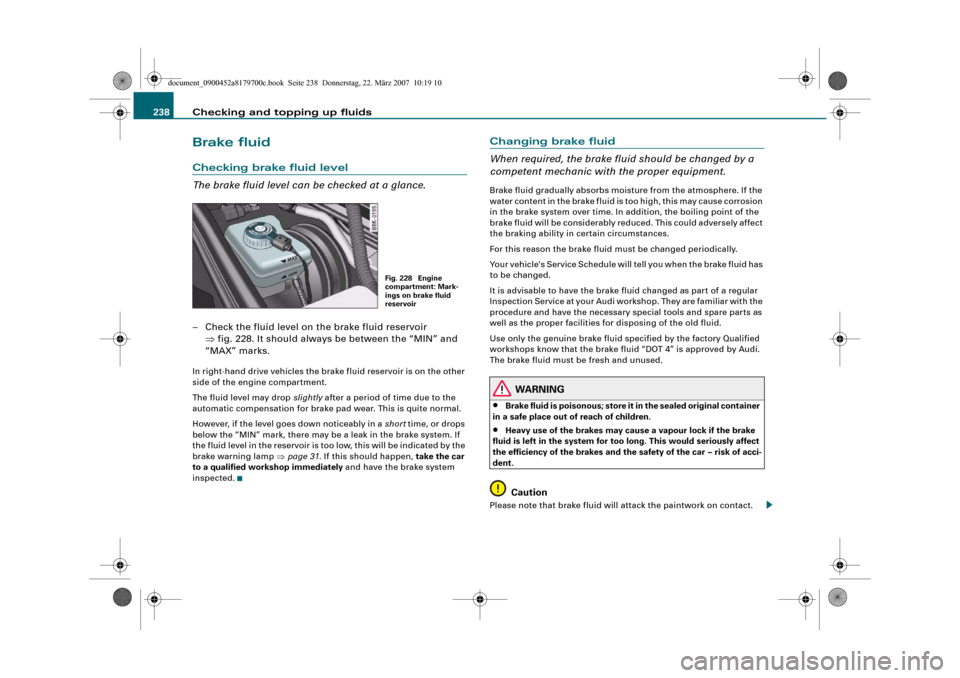
The brake fluid level can be checked at a glance.– Check the fluid level on the brake fluid reservoir
⇒fig. 228. It should always be between the “MIN” and
“MAX” marks.In right-hand drive vehicles the brake fluid reservoir is on the other
side of the engine compartment.
The fluid level may drop slightly after a period of time due to the
automatic compensation for brake pad wear. This is quite normal.
However, if the level goes down noticeably in a short time, or drops
below the “MIN” mark, there may be a leak in the brake system. If
the fluid level in the reservoir is too low, this will be indicated by the
brake warning lamp ⇒page 31. If this should happen, take the car
to a qualified workshop immediately and have the brake system
inspected.
Changing brake fluid
When required, the brake fluid should be changed by a
competent mechanic with the proper equipment.Brake fluid gradually absorbs moisture from the atmosphere. If the
water content in the brake fluid is too high, this may cause corrosion
in the brake system over time. In addition, the boiling point of the
brake fluid will be considerably reduced. This could adversely affect
the braking ability in certain circumstances.
For this reason the brake fluid must be changed periodically.
Your vehicle's Service Schedule will tell you when the brake fluid has
to be changed.
It is advisable to have the brake fluid changed as part of a regular
Inspection Service at your Audi workshop. They are familiar with the
procedure and have the necessary special tools and spare parts as
well as the proper facilities for disposing of the old fluid.
Use only the genuine brake fluid specified by the factory Qualified
workshops know that the brake fluid “DOT 4” is approved by Audi.
The brake fluid must be fresh and unused.
WARNING
•
Brake fluid is poisonous; store it in the sealed original container
in a safe place out of reach of children.
•
Heavy use of the brakes may cause a vapour lock if the brake
fluid is left in the system for too long. This would seriously affect
the efficiency of the brakes and the safety of the car – risk of acci-
dent.Caution
Please note that brake fluid will attack the paintwork on contact.
Fig. 228 Engine
compartment: Mark-
ings on brake fluid
reservoir
document_0900452a8179700c.book Seite 238 Donnerstag, 22. März 2007 10:19 10
Page 241 of 313
Checking and topping up fluids239
Controls
Safety
Driving tips
General maintenance
Self-help
Technical data
For the sake of the environment
If the fluid has to be drained out of the brake system, use an appro-
priate container to catch the used brake fluid and dispose of it in the
proper manner.BatteryGeneral notes
All work on batteries requires specialist knowledge.The battery is virtually maintenance-free. It is checked as part of the
Inspection Service.
We recommend that you replace a battery once it is older than 5
years.
When an airbag is triggered, the battery will, under certain circum-
stances, be disconnected from the on-board power supply for
safety reasons ⇒ in “General notes on airbag system” on
page 176.
Disconnecting the battery
If the battery is disconnected, some of the vehicle's functions will
become inoperative (e.g. electric windows). These functions will
require resetting after the battery is reconnected. For this reason,
the battery should only be disconnected from the vehicle's electrical
system when absolutely necessary.
If the vehicle is not used for long periods
If you do not drive your vehicle for a period of several days or weeks,
the power management will gradually shut off the on-board
systems one by one, or reduce the amount of current they are using.
This limits the amount of power consumed and helps to ensure reli-
able starting even after a long period ⇒page 202.Please note that certain convenience features, such as the Audi
advanced key*, the remote control key or the electrical seat adjust-
ment may not be available when you unlock the vehicle. These func-
tions will be restored when you switch on the ignition and start the
engine.
Winter conditions
At low temperatures the battery has to work very hard. It also
provides only a fraction of the starting power it has at normal
temperatures.
For this reason, we recommend having the battery checked and
charged if necessary before the start of winter ⇒page 241.
WARNING
•
All work on batteries requires specialist knowledge. For queries
regarding the vehicle battery please contact an Audi dealership or
other qualified workshop (risk of chemical burns / risk of explo-
sion).
•
The battery must not be opened. Do not attempt to make any
changes to the electrolyte level of the battery. Otherwise, there is
a risk that a mixture of oxygen and hydrogen gas can accumulate
and cause an explosion.Note
If the vehicle is to be left standing for a period of several weeks at
extremely low temperatures, the battery should be removed from
the vehicle. This ensures that it cannot “freeze up” and be
damaged.
document_0900452a8179700c.book Seite 239 Donnerstag, 22. März 2007 10:19 10
Page 305 of 313
Index303
Controls
Safety
Driving tips
General maintenance
Self-help
Technical data Bicycle rack
Trailer . . . . . . . . . . . . . . . . . . . . . . . . . . 211
Biodiesel . . . . . . . . . . . . . . . . . . . . . . . . . . . 227
Bioethanol fuel . . . . . . . . . . . . . . . . . . . . . 227
Blower
Deluxe automatic air conditioner . . . . 96
Deluxe automatic air conditioner plus . .
105
Bonnet
Closing . . . . . . . . . . . . . . . . . . . . . . . . . 232
Opening . . . . . . . . . . . . . . . . . . . . . . . . 230
Releasing . . . . . . . . . . . . . . . . . . . . . . . 230
Boot
SeeLoading luggage compartment . 168
SeeLuggage compartment . . . . . . . . . 77
Boot lid
Central locking system . . . . . . . . . . . . . 48
Manual release . . . . . . . . . . . . . . . . . . . . 49
Brake system
Brake assist system . . . . . . . . . . . . . . . 197
Brake fluid . . . . . . . . . . . . . . . . . . . . . . 238
Brake light defective . . . . . . . . . . . . . . . 36
Brake pads worn . . . . . . . . . . . . . . . . . . 36
Brake servo . . . . . . . . . . . . . . . . . . . . . . 199
Electro-mechanical parking brake . . . 121
General notes . . . . . . . . . . . . . . . . . . . . 199
Malfunction . . . . . . . . . . . . . . . . . . . . . . 31
Warning lamp . . . . . . . . . . . . . . . . . . . . 19
Bulb holder
Bayonet fastener . . . . . . . . . . . . . . . . . 278
Bulb monitor . . . . . . . . . . . . . . . . . . . . . . . . 36Bulbs
Bayonet fastener . . . . . . . . . . . . . . . . . 277
Changing (general notes) . . . . . . . . . . 276
Bulbs, changing . . . . . . . . . . . . . . . . . . . . . 276
Brake lights . . . . . . . . . . . . . . . . . . . . . . 284
Bulb holder with bayonet fastener . 277,
278
Dipped headlights . . . . . . . . . . . . . . . . 280
Front fog lights . . . . . . . . . . . . . . . . . . 283
Main beam headlights . . . . . . . . . . . . 279
Number plate light . . . . . . . . . . . . . . . 288
Rear fog light . . . . . . . . . . . . . . . . . . . . 286
Rear lights . . . . . . . . . . . . . . . . . . . . . . 284
Reversing light . . . . . . . . . . . . . . . . . . . 286
Turn signals (rear) . . . . . . . . . . . . . . . . 284
Business equipment . . . . . . . . . . . . . . . . . 251
CCapacities . . . . . . . . . . . . . . . . . . . . . . . . . . 293
Car keys . . . . . . . . . . . . . . . . . . . . . . . . . . . . 39
Care of vehicle . . . . . . . . . . . . . . . . . . . . . . 220
Catalytic converter . . . . . . . . . . . . . . . . . . 205
Central locking system . . . . . . . . . . . . . . . . 42
Boot lid . . . . . . . . . . . . . . . . . . . . . . . . . . 48
Deadlock mechanism . . . . . . . . . . . . . . 46
Fuel tank flap . . . . . . . . . . . . . . . . . . . . 228
Locking . . . . . . . . . . . . . . . . . . . . . . . . . . 46
Locking and unlocking the vehicle from
inside . . . . . . . . . . . . . . . . . . . . . . . . . . 47
Manual locking . . . . . . . . . . . . . . . . . . . . 48
Opening and closing windows . . . . . . . 50
Switches on driver's door . . . . . . . . . . . 47
Unlocking . . . . . . . . . . . . . . . . . . . . . . . . 46Cetane number . . . . . . . . . . . . . . . . . . . . . 227
Changing a wheel . . . . . . . . . . . . . . . . . . . 260
Changing bulbs
SeeBulbs . . . . . . . . . . . . . . . . . . . . . . . . 276
Chassis number . . . . . . . . . . . . . . . . . . . . . 293
Child safety . . . . . . . . . . . . . . . . . . . . . . . . 185
Child safety seat . . . . . . . . . . . . . . . . . . . . 186
Child seat categories . . . . . . . . . . . . . . 186
Fitting . . . . . . . . . . . . . . . . . . . . . . . . . . 189
ISOFIX system . . . . . . . . . . . . . . . . . . . . 191
On front passenger's seat . . . . . . . . . . 186
Safety notes . . . . . . . . . . . . . . . . . . . . . 185
Cigarette lighter . . . . . . . . . . . . . . . . . . . . . . 87
Cleaning . . . . . . . . . . . . . . . . . . . . . . . . . . . 220
Cleaning Alcantara . . . . . . . . . . . . . . . . . . 226
Cleaning seat covers
Alcantara . . . . . . . . . . . . . . . . . . . . . . . . 226
Natural leather . . . . . . . . . . . . . . . . . . . 225
Textile covers . . . . . . . . . . . . . . . . . . . . 223
Cleaning textile covers and trim parts . . 223
Clock, setting . . . . . . . . . . . . . . . . . . . . . . . . 13
Closing
Bonnet . . . . . . . . . . . . . . . . . . . . . . . . . . 232
Coat hooks . . . . . . . . . . . . . . . . . . . . . . . . . . 92
Colour code . . . . . . . . . . . . . . . . . . . . . . . . 293
Compact temporary spare wheel
SeeSpare wheel . . . . . . . . . . . . . . . . . . 256
Compartment for (sun)glasses . . . . . . . . . 91
Compass in mirror . . . . . . . . . . . . . . . . . . . . 68
Controls and displays
Overview . . . . . . . . . . . . . . . . . . . . . . . . . . 9
Convenience close function . . . . . . . . . . . . 50
document_0900452a8179700c.book Seite 303 Donnerstag, 22. März 2007 10:19 10
Page 312 of 313
Index 310Sunroof (tilting panorama roof)
Convenience open/close function . . . . 50
Supplementary heater
Deluxe automatic air conditioner . . . 101
Deluxe automatic air conditioner plus . . .
110
Switches on driver's door
Central locking system . . . . . . . . . . . . . 47
Switching off the engine . . . . . . . . . 118, 120
Symbols . . . . . . . . . . . . . . . . . . . . . . . . . . . . 15TTailgate
SeeBoot lid . . . . . . . . . . . . . . . . . . . . . . 48
Tank capacity . . . . . . . . . . . . . . . . . . . . . . 293
Technical data . . . . . . . . . . . . . . . . . . . . . 292
Text messages . . . . . . . . . . . . . . . . . . . . . . 30
Tools . . . . . . . . . . . . . . . . . . . . . . . . . . . . . 255
Total journey memory . . . . . . . . . . . . . . . . 26
Tow-away protection . . . . . . . . . . . . . . . . . 47
Towing
Automatic braking . . . . . . . . . . . . . . . 209
Trailer stabilisation . . . . . . . . . . . . . . . 209
Towing away . . . . . . . . . . . . . . . . . . . . . . . 267
Towing bracket
Parking system . . . . . . . . . . . . . . . . . . 147
Towing bracket, removable . . . . . . . . . . . 211
Towing bracket, retrofitting . . . . . . . . . . 216
Towline anchorage
Front . . . . . . . . . . . . . . . . . . . . . . . . . . . 268
Rear . . . . . . . . . . . . . . . . . . . . . . . . . . . 269
Tow-starting . . . . . . . . . . . . . . . . . . . . . . . 269Traction control system
How the system works . . . . . . . . . . . . 198
Trailer . . . . . . . . . . . . . . . . . . . . . . . . . . . . . 208
Accessories . . . . . . . . . . . . . . . . . . . . . 211
Notes on towing . . . . . . . . . . . . . . . . . 210
Points to check before towing . . . . . . 208
Technical requirements . . . . . . . . . . . 208
Trailer stabilisation . . . . . . . . . . . . . . . . . . 209
Trailer turn signals
Indicator lamp . . . . . . . . . . . . . . . . . . . . 17
Trailer weights
SeePerformance, weights and
dimensions . . . . . . . . . . . . . . . . . . . . 295
Transport bag
SeeLoad-through hatch . . . . . . . . . . . . 83
Tread depth . . . . . . . . . . . . . . . . . . . . . . . . 245
Trip recorder . . . . . . . . . . . . . . . . . . . . . . . . 14
Trips, checklist . . . . . . . . . . . . . . . . . . . . . 162
Turn signals . . . . . . . . . . . . . . . . . . . . . . . . . 59
Indicator lamp . . . . . . . . . . . . . . . . . . . . 17
Type plate . . . . . . . . . . . . . . . . . . . . . . . . . 293
Tyre Mobility System . . . . . . . . . . . . . . . . 257
Tyre pressure . . . . . . . . . . . . . . . . . . . . . . 243
Tyre repair kit . . . . . . . . . . . . . . . . . . . . . . 255
Tyre Mobility System . . . . . . . . . . . . . 257
Tyres
Inflation pressures . . . . . . . . . . . . . . . 243
Tread wear indicators . . . . . . . . . . . . . 245
Tyre service life . . . . . . . . . . . . . . . . . . 243
UUniversal transmitter . . . . . . . . . . . . . . . . 154Unleaded fuel . . . . . . . . . . . . . . . . . . . . . . 227
Unlocking . . . . . . . . . . . . . . . . . . . . . . . . . . . 44
Central locking system . . . . . . . . . . . . . 46
VVehicle data sticker . . . . . . . . . . . . . . . . . . 293
Vehicle identification data . . . . . . . . . . . . 293
Vehicle identification number . . . . . . . . . 293
Ventilation
Deluxe automatic air conditioner . . . . 93
Deluxe automatic air conditioner plus . . .
101
Ventilation slots . . . . . . . . . . . . . . . . . . . . 168WWarning lamps . . . . . . . . . . . . . . . . . . . . . . 15
Airbag system . . . . . . . . . . . . . . . . . . . . 16
Anti-lock brake system . . . . . . . . . . . . . 18
Brake system . . . . . . . . . . . . . . . . . . . . . 19
Electro-mechanical parking brake . 18, 19
Electronic stabilisation program . . . . . 16
Emission control system . . . . . . . . . . . 17
Engine management . . . . . . . . . . . . . . . 15
Seat belt . . . . . . . . . . . . . . . . . . . . . . . . . 17
Warning triangle . . . . . . . . . . . . . . . . . . . . 254
Washer fluid level low . . . . . . . . . . . . . . . . 36
Washing the vehicle
By hand . . . . . . . . . . . . . . . . . . . . . . . . . 220
Car wash . . . . . . . . . . . . . . . . . . . . . . . . 220
With high-pressure cleaner . . . . . . . . 220
Waxing . . . . . . . . . . . . . . . . . . . . . . . . . . . . 221
document_0900452a8179700c.book Seite 310 Donnerstag, 22. März 2007 10:19 10