2008 AUDI A5 warning
[x] Cancel search: warningPage 215 of 313
Towing a trailer213
Controls
Safety
Driving tips
General maintenance
Self-help
Technical data
– Also check the shaft section of the ball joint and its asso-
ciated mechanical parts to make sure they are clean and
undamaged.Continued ⇒page 213, “Fitting the ball joint (step 2)”.
WARNING
It is important to keep the mounting fixture clean. Otherwise the
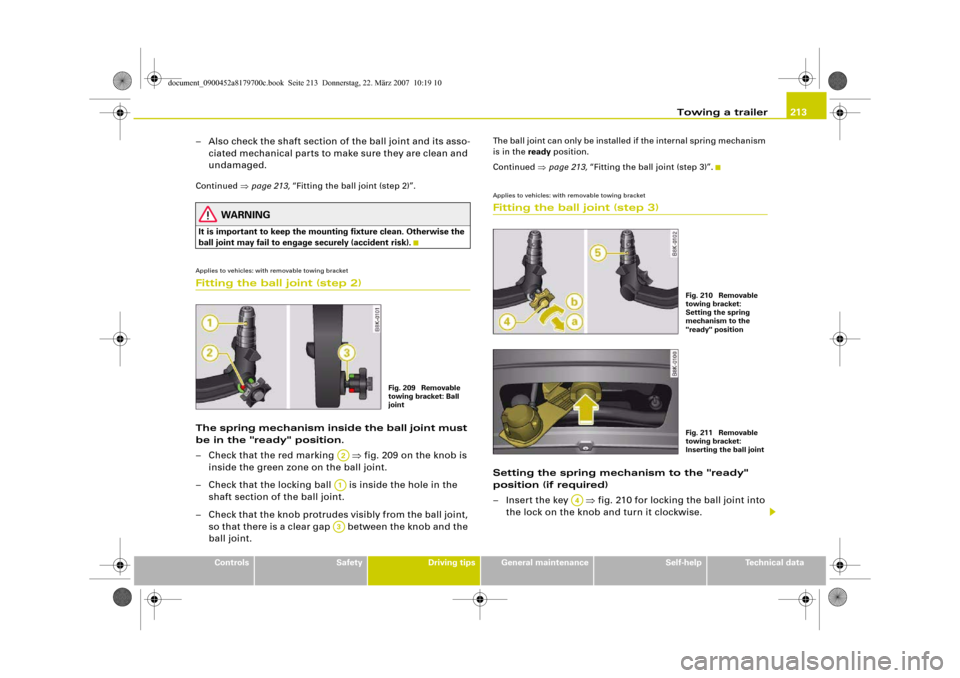
ball joint may fail to engage securely (accident risk).Applies to vehicles: with removable towing bracketFitting the ball joint (step 2)The spring mechanism inside the ball joint must
be in the "ready" position.
– Check that the red marking ⇒fig. 209 on the knob is
inside the green zone on the ball joint.
– Check that the locking ball is inside the hole in the
shaft section of the ball joint.
– Check that the knob protrudes visibly from the ball joint,
so that there is a clear gap between the knob and the
ball joint.
The ball joint can only be installed if the internal spring mechanism
is in the ready position.
Continued ⇒page 213, “Fitting the ball joint (step 3)”.Applies to vehicles: with removable towing bracketFitting the ball joint (step 3)Setting the spring mechanism to the "ready"
position (if required)
– Insert the key ⇒fig. 210 for locking the ball joint into
the lock on the knob and turn it clockwise.
Fig. 209 Removable
towing bracket: Ball
joint
A2A1A3
Fig. 210 Removable
towing bracket:
Setting the spring
mechanism to the
"ready" positionFig. 211 Removable
towing bracket:
Inserting the ball joint
A4
document_0900452a8179700c.book Seite 213 Donnerstag, 22. März 2007 10:19 10
Page 216 of 313
Towing a trailer 214
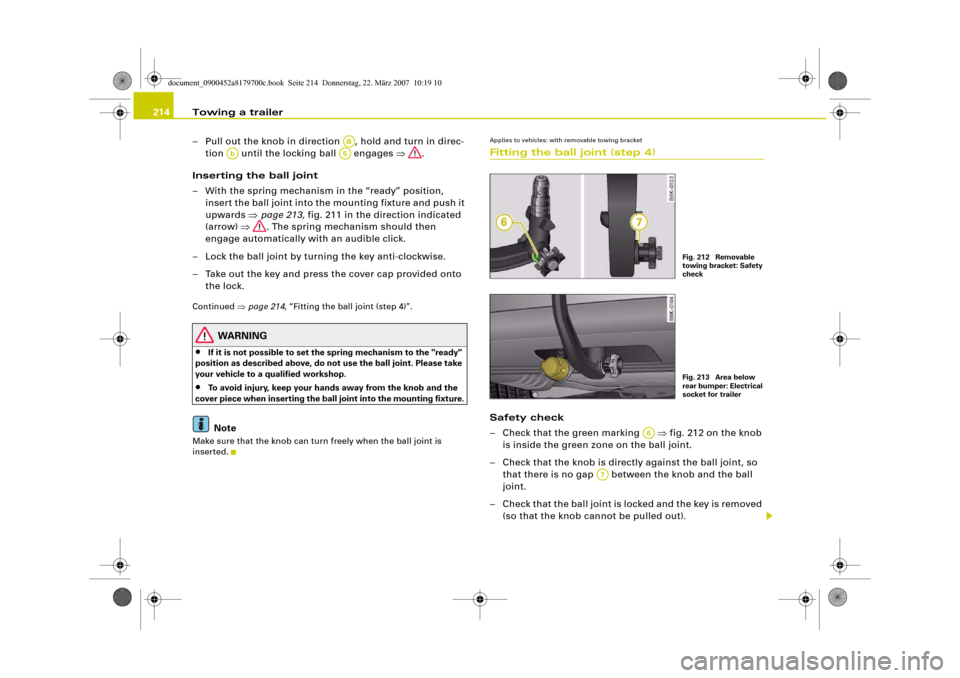
– Pull out the knob in direction , hold and turn in direc-
tion until the locking ball engages ⇒.
Inserting the ball joint
– With the spring mechanism in the “ready” position,
insert the ball joint into the mounting fixture and push it
upwards ⇒page 213, fig. 211 in the direction indicated
(arrow) ⇒. The spring mechanism should then
engage automatically with an audible click.
– Lock the ball joint by turning the key anti-clockwise.
– Take out the key and press the cover cap provided onto
the lock.Continued ⇒page 214, “Fitting the ball joint (step 4)”.
WARNING
•
If it is not possible to set the spring mechanism to the "ready"
position as described above, do not use the ball joint. Please take
your vehicle to a qualified workshop.
•
To avoid injury, keep your hands away from the knob and the
cover piece when inserting the ball joint into the mounting fixture.Note
Make sure that the knob can turn freely when the ball joint is
inserted.
Applies to vehicles: with removable towing bracketFitting the ball joint (step 4)Safety check
– Check that the green marking ⇒fig. 212 on the knob
is inside the green zone on the ball joint.
– Check that the knob is directly against the ball joint, so
that there is no gap between the knob and the ball
joint.
– Check that the ball joint is locked and the key is removed
(so that the knob cannot be pulled out).
Aa
Ab
A5
Fig. 212 Removable
towing bracket: Safety
checkFig. 213 Area below
rear bumper: Electrical
socket for trailer
A6
A7
document_0900452a8179700c.book Seite 214 Donnerstag, 22. März 2007 10:19 10
Page 217 of 313
Towing a trailer215
Controls
Safety
Driving tips
General maintenance
Self-help
Technical data
– Check that the ball joint fits tightly in the mounting
fixture (try moving it about to check).
Electrical socket for trailer
– The cable of the towing bracket can be connected to the
socket ⇒page 214, fig. 213.If the safety check is not satisfactory, the ball joint must be fitted
again properly.
WARNING
To avoid accidents, the ball joint must meet all the safety require-
ments listed in the safety check. The towing bracket must not be
used if any one of these requirements is not met. If this is the case,
you should contact a qualified workshop.Applies to vehicles: with removable towing bracketRemoving the ball joint
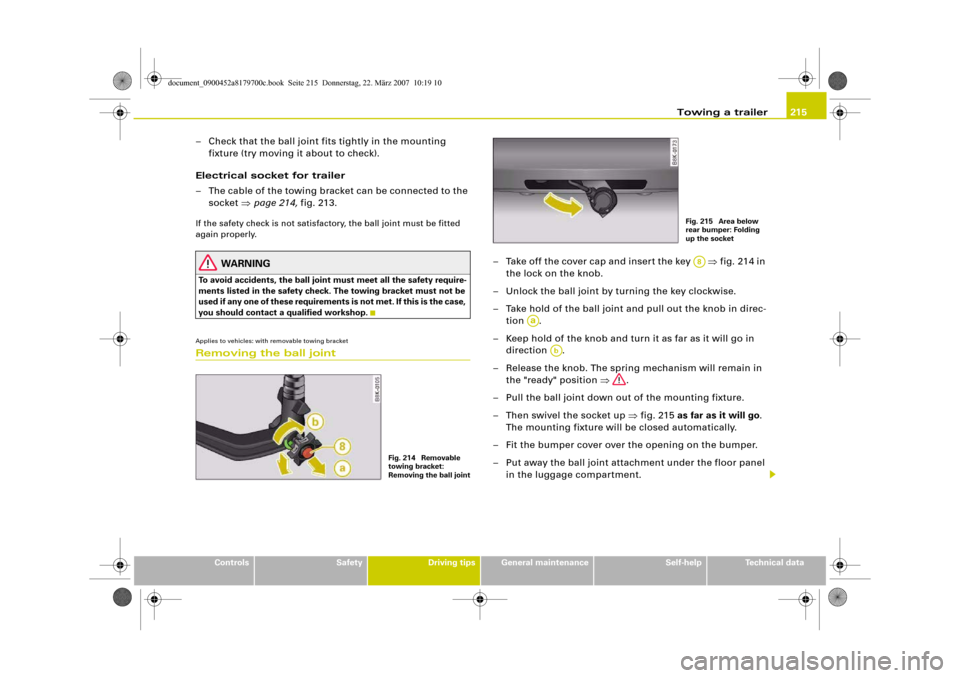
– Take off the cover cap and insert the key ⇒fig. 214 in
the lock on the knob.
– Unlock the ball joint by turning the key clockwise.
– Take hold of the ball joint and pull out the knob in direc-
tion .
– Keep hold of the knob and turn it as far as it will go in
direction .
– Release the knob. The spring mechanism will remain in
the "ready" position ⇒.
– Pull the ball joint down out of the mounting fixture.
– Then swivel the socket up ⇒fig. 215 as far as it will go.
The mounting fixture will be closed automatically.
– Fit the bumper cover over the opening on the bumper.
– Put away the ball joint attachment under the floor panel
in the luggage compartment.
Fig. 214 Removable
towing bracket:
Removing the ball joint
Fig. 215 Area below
rear bumper: Folding
up the socketA8
Aa
Ab
document_0900452a8179700c.book Seite 215 Donnerstag, 22. März 2007 10:19 10
Page 218 of 313
Towing a trailer 216
WARNING
M a k e su re t h a t t he so ck e t u ni t has closed off the mounting fixture
of the towing bracket properly. Otherwise the ball joint may fail to
engage securely if dirt accumulates in the mounting fixture.Towing bracket (retrofitting)
If required, the vehicle can be retrofitted with a towing
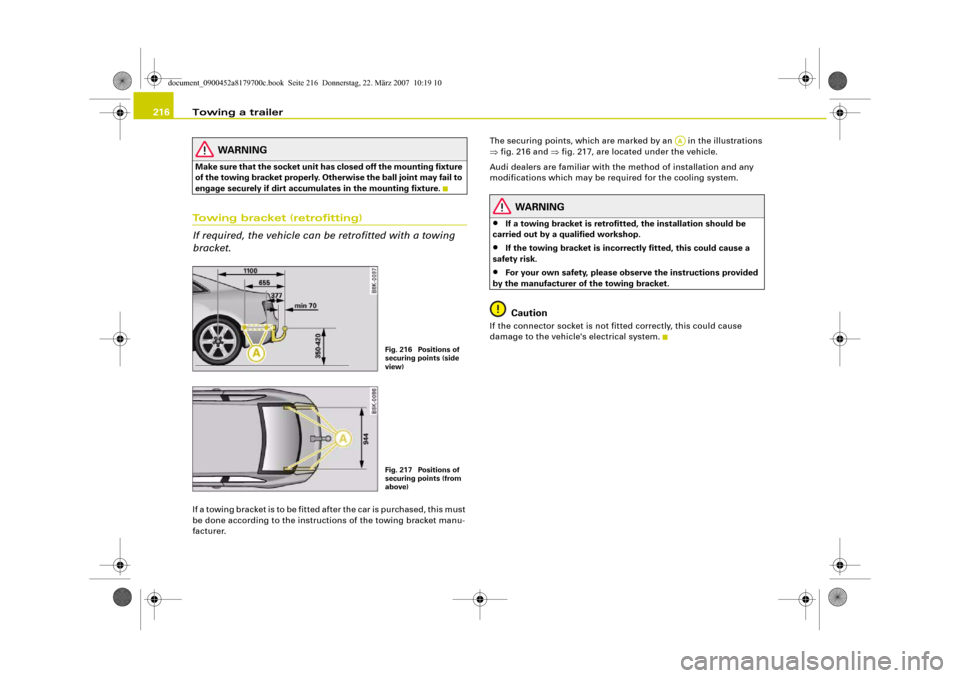
bracket.If a towing bracket is to be fitted after the car is purchased, this must
be done according to the instructions of the towing bracket manu-
facturer.The securing points, which are marked by an in the illustrations
⇒fig. 216 and ⇒fig. 217, are located under the vehicle.
Audi dealers are familiar with the method of installation and any
modifications which may be required for the cooling system.
WARNING
•
If a towing bracket is retrofitted, the installation should be
carried out by a qualified workshop.
•
If the towing bracket is incorrectly fitted, this could cause a
safety risk.
•
For your own safety, please observe the instructions provided
by the manufacturer of the towing bracket.Caution
If the connector socket is not fitted correctly, this could cause
damage to the vehicle's electrical system.
Fig. 216 Positions of
securing points (side
view)Fig. 217 Positions of
securing points (from
above)
AA
document_0900452a8179700c.book Seite 216 Donnerstag, 22. März 2007 10:19 10
Page 222 of 313
Care of vehicle and cleaning 220Care of vehicle and cleaningGeneral notesRegular care helps to maintain the value of the vehicle.Regular and careful care helps to maintain the value of the vehicle.
This may also be one of the requirements for upholding any
warranty claims in the event of corrosion or paint defects.
Audi dealers and specialist retailers carry stocks of suitable car care
products. Please follow the instructions for use on the packaging.
WARNING
•
Cleaning products and other materials used for car care can
damage health if misused.
•
Car care materials can contain toxic substances and must
always be kept in a safe place out of reach of children.For the sake of the environment
•
When purchasing car care products, try to select ones which are
not harmful to the environment.
•
Surplus cleaning materials should not be disposed of together
with ordinary household waste.
Care of exteriorWa s hi ng t he ve hi c l eThe longer substances like insects, bird droppings, resinous tree
sap, road dirt, industrial deposits, tar, soot or road salt and other
aggressive materials remain on the vehicle, the more damage they do to the paintwork. High temperatures (for instance in strong
sunlight) further intensify the corrosive effect.
After the period when salt is put on the roads it is important to have
the underside of the vehicle washed thoroughly.
Automatic car washes
Before going through a car wash, be sure to take the usual precau-
tions such as closing the windows and sunroof. If the vehicle has
special accessories such as spoilers or a roof carrier or two-way
radio aerial, etc., it is advisable to consult the car wash operator.
It is best to use a car wash without revolving bristles if possible.
Washing your car with a high-pressure cleaner
When cleaning the vehicle with a high-pressure cleaner, always
follow the operating instructions for the equipment. This applies
particularly to the operating pressure and the spraying distance. Do
not hold the spray nozzle too close to soft materials, such as rubber
hoses or seals.
Do not use a nozzle that sprays the water out in a direct stream or
one that has a rotating jet for forcing off dirt.
Washing the car by hand
When washing the car by hand, use plenty of water to soften the dirt
first, and rinse off as well as possible.
Then clean the vehicle with a soft sponge, glove or brush, using only
slight pressure. You should start on the roof and work down. Special
car shampoo should only be used for very persistent dirt.
Rinse the sponge or glove thoroughly and often.
Wheels, sills and similar should be cleaned last. Use a second
sponge for this.
document_0900452a8179700c.book Seite 220 Donnerstag, 22. März 2007 10:19 10
Page 223 of 313
Care of vehicle and cleaning221
Controls
Safety
Driving tips
General maintenance
Self-help
Technical data
WARNING
•
Do not wash the vehicle with the ignition switched on – risk of
accident.
•
Do not clean the underside of the car or inside the wheel arches
without protecting your hands and arms. You may cut yourself on
sharp metal parts.
•
Take care when washing the car during the winter: moisture
and ice on the brakes may affect braking efficiency – this could
cause an accident.Caution
•
Do not wash the vehicle in direct sunlight – otherwise the paint
can be damaged.
•
Do not use insect sponges, or abrasive household sponges, etc.
– they can damage the surfaces.
•
The headlights should only be washed with water – do not wipe
them with a dry cloth or sponge. It is best to use soapy water.
•
Never wash tyres with a jet that sprays the water out in a direct
stream. This could damage the tyres – even if the spray is kept at a
distance and only used for a very short time.For the sake of the environment
The car should only be washed in special wash bays. This prevents
oily water from getting into the public drains. In some districts,
washing vehicles anywhere else may be prohibited.Waxing and polishingWaxing
Waxing protects the paintwork. It is time to apply a good coat of wax
when water no longer forms droplets and rolls off the clean paint-
work.Even if a wax solution is used regularly in the car wash, it is advis-
able to protect the paint with a coat of wax at least twice a year.
In the summer, you will find it is much easier to remove dead insects
(which accumulate on the bumper and the front of the bonnet) if the
car has been waxed recently.
Polishing
Polishing is only necessary if the paint has lost its shine, and the
gloss cannot be brought back by putting on wax.
The car must be waxed after polishing if the polish used does not
contain wax compounds to seal the paint.
Caution
Matt painted and plastic parts must not be treated with wax or
polish.Ornamental trim and mouldingsThe metal brightwork on the body is made of aluminium rather than
chrome (for environmental reasons).
Dirt or marks on the trim mouldings should be removed with an
acid-free cleaning agent (do not use a chrome cleaner). Body polish
is also unsuitable for use on trim mouldings. The intensive cleaning
fluids often used before the car goes into a car wash may contain
alkaline substances, which can cause dull or milky patches when
they dry out.
Audi dealers carry stocks of cleaning products which have been
tested for use on your vehicle and are not harmful to the
environment.
document_0900452a8179700c.book Seite 221 Donnerstag, 22. März 2007 10:19 10
Page 224 of 313
Care of vehicle and cleaning 222Plastic partsPlastic parts will come clean with regular washing. If this is not suffi-
cient, plastic parts should only be treated with a special solvent-free
plastic cleaning agent. Do not use paint cleaners, polishes or wax on
plastic parts.Paint damageMinor damage to the paint, such as scratches or stone chips, should
be touched up without delay before the metal starts to corrode. Suit-
able touch-up brushes or sprays for your car can be obtained from
an Audi dealer.
The number of the original paint finish on the vehicle is given on the
data sticker ⇒page 293.
If corrosion is already visible it must be thoroughly removed by a
qualified workshop.Windows
Clear vision is an essential safety factor.The windscreen must not be cleaned with insect remover or wax,
otherwise the windscreen wipers will not function properly
(juddering).
Traces of rubber, oil, grease or silicone can be removed with a
window cleaning solution or a silicone remover. Wax residue can
only be removed with a special cleaner. Your Audi dealer will be able
to provide you with more detailed information.
The windows should also be cleaned on the inside at regular inter-
vals.
Use a separate cloth or chamois to dry the windows. Cloths used for
waxing and polishing contain residues that will cause smears on the
glass.
WARNING
Do not use water-repellent coatings on the windscreen. In bad visi-
bility conditions such as light rain, low sun or when driving at
night these coatings can cause increased dazzle, which is a
serious safety hazard. Such coatings can also cause the wiper
blades to judder.
Caution
•
Remove snow and ice from windows and mirrors with a plastic
scraper only. To avoid scratches caused by dirt on the glass, the
scraper should only be pushed in one direction and not moved to
and fro.
•
The heating element for the rear window is located on the inner
side of the window. To avoid damaging the heating element, do not
put stickers on the inner side of the window.
•
Never use warm or hot water to remove snow and ice from
windows and mirrors. This could cause the glass to crack!
Rubber seals (weatherstrips)The weatherstrips will remain pliable and last longer if they are
occasionally treated with a suitable care product (for example sili-
cone spray). This will also prevent premature ageing and leaks. The
doors will be easier to open as well. If they are kept pliable, the door
seals will be less likely to freeze up in the winter.WheelsThe wheels require regular attention to preserve their appearance.
It is important to remove road salt and brake dust by washing the
wheels at regular intervals, otherwise the finish will be impaired.
document_0900452a8179700c.book Seite 222 Donnerstag, 22. März 2007 10:19 10
Page 225 of 313
Care of vehicle and cleaning223
Controls
Safety
Driving tips
General maintenance
Self-help
Technical data After washing, the wheels should only be cleaned with an "acid-
free" cleaning agent for alloy wheels. This is available from Audi
dealers and specialist retailers. Never leave the cleaning agent on
the rims for any longer than specified in the instructions before
rinsing it off. If the wheel cleaner fluid contains acid it can attack the
surfaces of the wheel bolts.
Car polish or other abrasive agents should not be used. If the
protective paint coating is damaged by stone chips etc., the
damaged area should be touched up immediately.
WARNING
Please note when cleaning the wheels that water, ice and road salt
can impair the effectiveness of the brakes – this can cause an
accident.Care of interiorMMI display screen and control consoleThe MMI display screen can be cleaned with a soft cloth and a
special “LCD cleaner” (available from retailers of electrical goods).
Moisten the cloth with a small amount of the cleaning fluid.
Clean the MMI control console with a fine brush first to prevent any
dirt from getting in between the control buttons and the housing.
We then recommend wiping the MMI control console using a cloth
moistened with washing-up liquid and water.
Caution
To avoid scratching the screen, do not wipe the MMI display with a
dry cloth.•
To avoid any possibility of damage, do not let any liquid get
inside the control console.
Plastic parts and leatherettePlastic parts and leatherette can be cleaned with a damp cloth. If
this is not sufficient, plastic parts and leatherette should only be
treated with a special solvent-free plastic cleaner.Textile covers and trim partsTextile covers and trim parts (e.g. seats, door trim) should be
cleaned regularly with a vacuum cleaner. This will remove surface
dirt which could otherwise be rubbed into the textile material
during use. Do not use steam cleaners, as the steam could carry the
dirt deeper into the textile material.
Normal cleaning
We recommend that you use a soft sponge or lint-free, micro-fibre
cloth for normal cleaning. Only use brushes on floor coverings and
mats, as other textile surfaces could become damaged.
In the case of normal surface dirt you can use a foam cleaner. Use a
sponge to spread the foam on the textile surface and to work it into
the material lightly. However, make sure that the textile material
does not become soaking wet. Then dab off the foam with a dry and
absorbent cloth (e.g. a micro-fibre cloth) and vacuum off any
residue once the surface is completely dry.
Removal of stains
To treat stains caused by spilled drinks (coffee, fruit juice or similar)
make up a solution with a mild detergent for sensitive fabrics and
apply it with a sponge. If the stains are difficult to remove, a
washing paste can be applied directly onto the stain and worked
into the fabric. The surface will then have to be wiped with clear
water to remove any residue left by the paste. To do so, use a damp
cloth or sponge and then dab the stain with an absorbent cloth.
Treat chocolate or make-up stains with a washing paste and then
rinse off with water (using a damp sponge).
document_0900452a8179700c.book Seite 223 Donnerstag, 22. März 2007 10:19 10