2008 AUDI A4 Glow plug
[x] Cancel search: Glow plugPage 18 of 342
Instruments and warning/indicator lamps 16Additional warning and indicator lamps are displayed on vehicles
equipped with the adaptive cruise control* ⇒page 134.
Note
A number of functions are monitored by the auto-check control
⇒page 21. If a malfunction should occur, this will be shown by the
display in the instrument cluster either with a red symbol (priority 1
– serious malfunction) or a yellow symbol (priority 2 – other
malfunction or item requiring attention).Applies to vehicles: with Audi drive selectDynamic steering
If the warning lamp
lights up when you switch on the ignition and
goes out when the engine has started, the dynamic steering is acti-
vated.
If the warning lamp stays on after the engine has started, this
indicates a malfunction in the system. You can continue driving
carefully at reduced speed to the next qualified workshop, however
the steering may feel heavier and its response may be more sensi-
tive than usual. In addition, it is possible that the steering wheel will
be off centre when driving in a straight line.
WARNING
Have the system malfunction in the dynamic steering repaired by
a qualified workshop as soon as possible – risk of accident.
Note
•
If the warning lamp
flashes, this indicates that the dynamic
steering is being initialised. The message “Dynamic steering: Initial-
ising” ⇒page 36 will appear in the driver information system
display.
•
The stabilisation functions of the dynamic steering ⇒page 222
are not available in the event of a system malfunction.
Applies to vehicles: with petrol engineEngine management
This warning lamp monitors the engine management
system on petrol engines.The
warning lamp (Electronic Power Control) lights up when the
ignition is switched on to show that the lamp is working properly.Note
If the warning lamp lights up while the vehicle is moving, this indi-
cates a fault in the engine management system. The engine should
be serviced by a qualified workshop without delay.Applies to vehicles: with diesel engineGlow plug system
The indicator lamp lights up to show that the glow plugs
are preheating.Your vehicle is equipped with an automatic glow plug system.
The indicator lamp
lights up while the glow plugs are preheating.
If the engine fails to start immediately, the glow plugs have not
finished preheating. In this case, keep the clutch pedal depressed
(or keep your foot on the brake if your vehicle has an automatic
gearbox) until the engine starts.
Anti-lock brake system (ABS)
⇒page 19
Electro-mechanical parking
brake/Audi hold assist*
⇒page 20
Fault in brake system
⇒page 20
document_0900452a81b1b9de.book Seite 16 Donnerstag, 26. Juli 2007 9:16 09
Page 19 of 342
Instruments and warning/indicator lamps17
Controls
Safety
Driving tips
General maintenance
Self-help
Technical data
Note
•
If the glow plug indicator lamp should start flashing while the
vehicle is moving, this indicates a fault in the engine management
system. The engine should be serviced without delay.
•
If the indicator lamp fails to light up when the ignition is
switched on, this can mean that the glow plug system is defective.
The engine should be serviced.
Electronic stabilisation program (ESP)
This warning lamp monitors the electronic stabilisation
program.The warning lamp
has the following functions:
•
It flashes when the ESP or traction control system (ASR) inter-
venes while the vehicle is in motion.
•
The warning lamp will light up continuously if the ESP or the
traction control system (ASR) has been switched off using the ESP
OFF button ⇒page 222.
•
It lights up when the ignition is switched on and should go out
again after about 2 seconds. This signals that the lamp is working
properly.
•
It will light up continuously if there is a malfunction in the ESP.
•
It will also come on if a fault should occur in the ABS because the
ESP operates in conjunction with the ABS.
If the battery has been disconnected, if the battery voltage is very
low, or if the engine has been started from an outside power source,
the ESP system will perform an initialisation of the various on-board
sensors while you drive the first few metres. The warning lamp will
light up during this period. It will go out when the initialisation has
been completed.
If the warning lamp lights up and stays on after the engine is
started, this may mean that the control system has temporarily
switched off the ESP. In this case the ESP can be reactivated by switching the ignition off and then on again. If the warning lamp
goes out, this means the system is fully functional.
For further information on the ESP ⇒page 222.
Airbag system
This warning lamp monitors the airbag and seat belt
tensioner system.The warning lamp
should light up for a few seconds when the
ignition is switched on.
If the warning lamp does not go out, or if it lights up, flashes or
flickers when the vehicle is moving, this indicates a malfunction in
the system. This is also the case if the warning lamp does not light
up when the ignition is switched on.
WARNING
If a malfunction should occur, have the system checked immedi-
ately by a qualified workshop. If this is neglected, there is a risk
that the airbag system and/or belt tensioners may not be acti-
vated in an accident.Tyre pressure monitoring
The tyre pressure should be corrected as soon as possible
if it is too low.If the
symbol flashes for about a minute and then remains lit after
you switch on the ignition, there is a fault in the system. Please
contact the nearest qualified workshop as soon as possible.
For more detailed information on the tyre pressure monitoring
system, please refer to ⇒page 39.
document_0900452a81b1b9de.book Seite 17 Donnerstag, 26. Juli 2007 9:16 09
Page 89 of 342
Seats and storage87
Controls
Safety
Driving tips
General maintenance
Self-help
Technical data
Cigarette lighter and electrical
socketsCigarette lighterUsing cigarette lighter
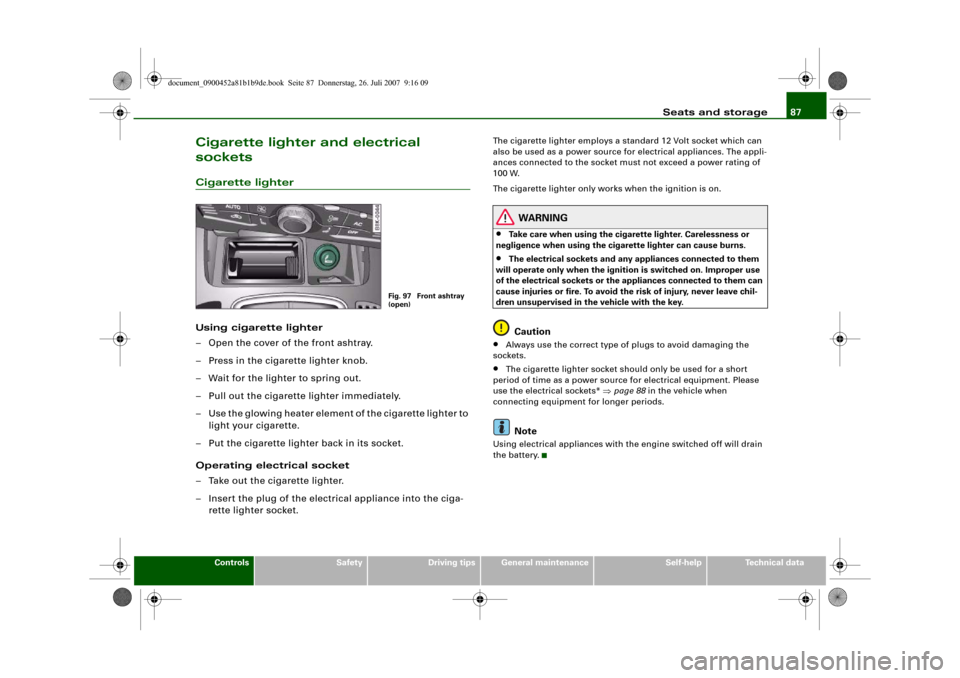
– Open the cover of the front ashtray.
– Press in the cigarette lighter knob.
– Wait for the lighter to spring out.
– Pull out the cigarette lighter immediately.
– Use the glowing heater element of the cigarette lighter to
light your cigarette.
– Put the cigarette lighter back in its socket.
Operating electrical socket
– Take out the cigarette lighter.
– Insert the plug of the electrical appliance into the ciga-
rette lighter socket.
The cigarette lighter employs a standard 12 Volt socket which can
also be used as a power source for electrical appliances. The appli-
ances connected to the socket must not exceed a power rating of
100 W.
The cigarette lighter only works when the ignition is on.
WARNING
•
Take care when using the cigarette lighter. Carelessness or
negligence when using the cigarette lighter can cause burns.
•
The electrical sockets and any appliances connected to them
will operate only when the ignition is switched on. Improper use
of the electrical sockets or the appliances connected to them can
cause injuries or fire. To avoid the risk of injury, never leave chil-
dren unsupervised in the vehicle with the key.Caution
•
Always use the correct type of plugs to avoid damaging the
sockets.
•
The cigarette lighter socket should only be used for a short
period of time as a power source for electrical equipment. Please
use the electrical sockets* ⇒page 88 in the vehicle when
connecting equipment for longer periods.Note
Using electrical appliances with the engine switched off will drain
the battery.
Fig. 97 Front ashtray
(open)
document_0900452a81b1b9de.book Seite 87 Donnerstag, 26. Juli 2007 9:16 09
Page 118 of 342
Driving 116DrivingSteeringApplies to vehicles: with manually adjustable steering columnAdjusting the steering wheel position
The height and reach of the steering wheel can be
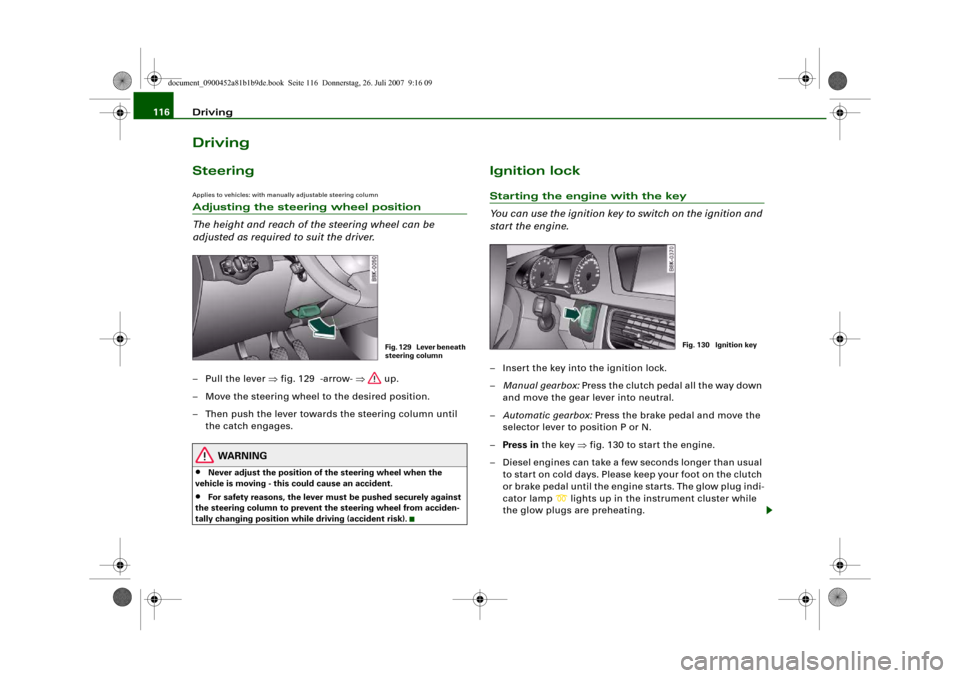
adjusted as required to suit the driver.– Pull the lever ⇒fig. 129 -arrow- ⇒ up.
– Move the steering wheel to the desired position.
– Then push the lever towards the steering column until
the catch engages.
WARNING
•
Never adjust the position of the steering wheel when the
vehicle is moving - this could cause an accident.
•
For safety reasons, the lever must be pushed securely against
the steering column to prevent the steering wheel from acciden-
tally changing position while driving (accident risk).
Ignition lockStarting the engine with the key
You can use the ignition key to switch on the ignition and
start the engine.– Insert the key into the ignition lock.
–Manual gearbox: Press the clutch pedal all the way down
and move the gear lever into neutral.
–Automatic gearbox: Press the brake pedal and move the
selector lever to position P or N.
–Press in the key ⇒fig. 130 to start the engine.
– Diesel engines can take a few seconds longer than usual
to star t on cold days. Please keep your foot on the clutch
or brake pedal until the engine starts. The glow plug indi-
cator lamp
lights up in the instrument cluster while
the glow plugs are preheating.
Fig. 129 Lever beneath
steering column
Fig. 130 Ignition key
document_0900452a81b1b9de.book Seite 116 Donnerstag, 26. Juli 2007 9:16 09
Page 121 of 342
Driving119
Controls
Safety
Driving tips
General maintenance
Self-help
Technical data
–Automatic gearbox: Press the brake pedal and move the
selector lever to position P or N ⇒.
–Press the Start/Stop button ⇒page 118, fig. 131 to start
the engine.
– Diesel engines can take a few seconds longer than usual
to star t on cold days. Please keep your foot on the clutch
or brake pedal until the engine starts. The glow plug indi-
cator lamp
lights up in the instrument cluster while
the glow plugs are preheating.
If you press the Start/Stop button without pressing the clutch or
brake pedal, the ignition will be switched on (and will be switched
off if you press the button again). Diesel engines are preheated
when the ignition is switched on.
If the engine fails to start straight-away, switch off the starter after
about 10 seconds and try again after about half a minute.
When starting from cold the engine may be a little noisy for the first
few seconds until oil pressure has built up in the hydraulic tappets.
This is quite normal and no cause for concern.
Driver message in the instrument cluster display
No key identified
This message appears when you press the Start/Stop button if there
is no remote control key inside the vehicle or if the system cannot
detect or identify the key. This can happen, for example, if the radio
signal from the key is obstructed by a metal briefcase or similar.
Electronic equipment, such as mobile phones, can also interfere
with the radio signal from the key.
Press brake pedal to start engine
This message appears on automatic vehicles if you press the
Start/Stop button to start the engine without first pressing the
brake pedal. The engine will only start if you press the brake pedal.Press clutch pedal to start engine
This message appears on manual vehicles if you press the
Start/Stop button to start the engine without first pressing the
clutch pedal. The engine will only star t if you press the clutch pedal.
Engage N or P to start engine
This message will appear if you try to start the engine when the
selector lever of the automatic gearbox is not in P or N. The engine
can only be started if the selector lever is in one of these positions.
Key not in vehicle
This message will appear together with the symbol
if the remote
control key is removed from the vehicle while the engine is running.
This is to remind you not to continue driving without the key (for
example if you change drivers).
If the remote control key is not in the vehicle you will not be able to
switch on the ignition or restart the engine after it has been
switched off. Without the key, you will also not be able to lock the
vehicle from the outside.
Shift to P, otherwise vehicle can roll away. Doors do not lock if lever
is not in P. or Please move selector lever to position P. Vehicle
cannot be locked.
For safety reasons, this message will appear and a warning buzzer
will sound if the selector lever of the automatic gearbox is not in
position P when you switch off the ignition with the Start/Stop
button. Put the selector lever in position P; otherwise the vehicle
can roll away. If the lever is not in position P you will not be able to
lock the vehicle using the exterior locking switch on the door handle
or the remote control key.
Advanced key defective! Use ignition lock
This message appears if the vehicle has to be started with the igni-
tion key instead of the Start/Stop button.
document_0900452a81b1b9de.book Seite 119 Donnerstag, 26. Juli 2007 9:16 09
Page 336 of 342
Index 334
Operation . . . . . . . . . . . . . . . . . . . . . . . 121
Parking . . . . . . . . . . . . . . . . . . . . . . . . . 122
Releasing and applying . . . . . . . . . . . 121
Warning lamp . . . . . . . . . . . . . . . . . 19, 20
Electronic differential lock
How the system works . . . . . . . . . . . . 222
Warning lamp . . . . . . . . . . . . . . . . . . . . 19
Electronic immobiliser . . . . . . . . . . . . . 14, 43
Electronic stabilisation program
How the system works . . . . . . . . . . . . 222
Warning lamp . . . . . . . . . . . . . . . . . . . . 17
Emergency braking function . . . . . . . . . . 123
Emergency key . . . . . . . . . . . . . . . . . . . . . . 45
Emergency release
Ignition key . . . . . . . . . . . . . . . . . . . . . . 46
Emission control systems
Catalytic converter . . . . . . . . . . . . . . . 229
Diesel particulate filter . . . . . . . . . . . . 229
Emissions . . . . . . . . . . . . . . . . . . . . . . . . . 321
Engine compartment
Safety notes . . . . . . . . . . . . . . . . . . . . . 255
Engine compartment layout . . . . . . . . . . 256
Engine data
SeePerformance, weights and
dimensions . . . . . . . . . . . . . . . . . . . . 323
Engine hood
SeeBonnet . . . . . . . . . . . . . . . . . . . . . . 254
Engine management
(EPC) warning lamp . . . . . . . . . . . . . . . 16
Engine oil . . . . . . . . . . . . . . . . . . . . . . 34, 257
Checking oil level . . . . . . . . . . . . 258, 259
Consumption . . . . . . . . . . . . . . . . 258, 259
LongLife Service . . . . . . . . . . . . . . . . . 257Topping up . . . . . . . . . . . . . . . . . . . . . . 259
See alsoPerformance, weights and
dimensions . . . . . . . . . . . . . . . . . . . . 323
Engine oil capacity
SeePerformance, weights and
dimensions . . . . . . . . . . . . . . . . . . . . 323
Engine oil pressure
Warning lamp . . . . . . . . . . . . . . . . . . . . 33
Engine oil sensor
Malfunction . . . . . . . . . . . . . . . . . . . . . . 38
Environmental compatibility . . . . . . . . . . 231
Environmental tips
Filling the tank . . . . . . . . . . . . . . . . . . . 252
Heated rear window . . . . . . . . . . . 98, 106
Leaks . . . . . . . . . . . . . . . . . . . . . . . . . . . 255
Roof carrier . . . . . . . . . . . . . . . . . . . . . . 84
EPC
SeeEngine management . . . . . . . . . . . 16
ESP
SeeElectronic stabilisation program . 17
Ethanol fuel . . . . . . . . . . . . . . . . . . . . . . . . 251
Exterior mirrors . . . . . . . . . . . . . . . . . . . . . . 70
FFastening rings . . . . . . . . . . . . . . . . . . 79, 193
Filling the tank . . . . . . . . . . . . . . . . . . . . . 252
Releasing the tank flap manually . . . 253
Fire extinguisher . . . . . . . . . . . . . . . . . . . . 283
First-aid kit . . . . . . . . . . . . . . . . . . . . . . . . . 282
Floor mats . . . . . . . . . . . . . . . . . . . . . 191, 192
Fog lights . . . . . . . . . . . . . . . . . . . . . . . . . . . 58
Four-wheel drive . . . . . . . . . . . . . . . . . . . . 226Front passenger
SeeSitting position . . . . . . . . . . . . . . . 189
Fuel
Biodiesel . . . . . . . . . . . . . . . . . . . . . . . . 251
Capacity . . . . . . . . . . . . . . . . . . . . . . . . 321
Consumption . . . . . . . . . . . . . . . . . . . . 321
Current fuel consumption . . . . . . . . . . 25
Diesel . . . . . . . . . . . . . . . . . . . . . . . . . . 251
Ethanol . . . . . . . . . . . . . . . . . . . . . . . . . 251
Fuel level low . . . . . . . . . . . . . . . . . . . . . 37
Petrol . . . . . . . . . . . . . . . . . . . . . . . . . . 251
Saving fuel . . . . . . . . . . . . . . . . . . . . . . 229
Fuel consumption . . . . . . . . . . . . . . . . . . . 321
Fuel range . . . . . . . . . . . . . . . . . . . . . . . . . . 25
Fuel tank flap . . . . . . . . . . . . . . . . . . . . . . . 252
Fuse, changing . . . . . . . . . . . . . . . . . . . . . 300
GGarage door opener . . . . . . . . . . . . . . . . . 179
Gear-change indicator . . . . . . . . . . . . . . . . 22
Generator
SeeAlternator . . . . . . . . . . . . . . . . . . . . 32
Glove box . . . . . . . . . . . . . . . . . . . . . . . . . . . 90
Glow plug system
Indicator lamp . . . . . . . . . . . . . . . . . . . . 16HHandbrake
SeeElectro-mechanical parking brake . . .
121
document_0900452a81b1b9de.book Seite 334 Donnerstag, 26. Juli 2007 9:16 09
Page 337 of 342
Index335
Controls
Safety
Driving tips
General maintenance
Self-help
Technical data Hazard warning lights . . . . . . . . . . . . . . . . 61
Indicator lamp . . . . . . . . . . . . . . . . . . . . 18
Head restraints
Front seats . . . . . . . . . . . . . . . . . . . . . . . 77
Rear seats . . . . . . . . . . . . . . . . . . . . . . . . 78
Headlamp converter . . . . . . . . . . . . . . . . . . 59
Headlight flasher . . . . . . . . . . . . . . . . . . . . . 62
Headlight range control . . . . . . . . . . . . . . . 60
Malfunction . . . . . . . . . . . . . . . . . . . . . . 39
Headlights . . . . . . . . . . . . . . . . . . . . . . . . . . 57
adaptive light . . . . . . . . . . . . . . . . . . . . . 61
Changing dip settings . . . . . . . . . . . . . . 59
Driving abroad . . . . . . . . . . . . . . . . . . . . 59
Headlight range control . . . . . . . . . . . . 60
Washer system . . . . . . . . . . . . . . . . . . . . 67
Heated
Exterior mirrors . . . . . . . . . . . . . . . . . . . 70
Front seats (deluxe automatic air
conditioner) . . . . . . . . . . . . . . . . . . . . 114
Rear seats . . . . . . . . . . . . . . . . . . . . . . . 115
Rear window . . . . . . . . . . . . . . . . . 98, 106
Washer jets . . . . . . . . . . . . . . . . . . . . . . . 65
Heated rear window . . . . . . . . . . . . . . 98, 106
Heating
Deluxe automatic air conditioner . . . . 93
Deluxe automatic air conditioner plus . .
101
HomeLink . . . . . . . . . . . . . . . . . . . . . . . . . . 179
Horn . . . . . . . . . . . . . . . . . . . . . . . . . . . . . . . . 9
IIgnition key
Emergency release . . . . . . . . . . . . . . . . 46
Safety interlock . . . . . . . . . . . . . . . . . . 116
Ignition lock . . . . . . . . . . . . . . . . . . . . . . . . 116
Malfunction . . . . . . . . . . . . . . . . . . . 34, 39
Immobiliser . . . . . . . . . . . . . . . . . . . . . . 14, 43
Indicator lamps . . . . . . . . . . . . . . . . . . . . . . 15
adaptive cruise control . . . . . . . . . . . . 134
Cruise control system . . . . . . . . . . . . . . 19
Glow plug system . . . . . . . . . . . . . . . . . 16
Main beam headlights . . . . . . . . . . . . . 18
Overview . . . . . . . . . . . . . . . . . . . . . . . . . 15
Trailer turn signals . . . . . . . . . . . . . . . . 18
Turn signals . . . . . . . . . . . . . . . . . . . . . . 18
Inflation pressures (tyres) . . . . . . . . . 39, 268
Inspection intervals . . . . . . . . . . . . . . . . . . . 24
Instrument cluster . . . . . . . . . . . . . . . . . . . . 11
Instrument lighting . . . . . . . . . . . . . . . . . . . 59
Interior lights
Dimming . . . . . . . . . . . . . . . . . . . . . . . . . 63
Front . . . . . . . . . . . . . . . . . . . . . . . . . . . . 63
Rear . . . . . . . . . . . . . . . . . . . . . . . . . . . . . 63
Interior mirrors
SeeMirrors . . . . . . . . . . . . . . . . . . . . 68, 69
Interior monitor . . . . . . . . . . . . . . . . . . . . . . 50
Intermittent wipe . . . . . . . . . . . . . . . . . . . . . 65
Rain sensor . . . . . . . . . . . . . . . . . . . . . . . 65
ISOFIX . . . . . . . . . . . . . . . . . . . . . . . . . . . . . 218
JJack . . . . . . . . . . . . . . . . . . . . . . . . . . . 283, 290
Jacking points . . . . . . . . . . . . . . . . . . . . . . 290
Jump-starting . . . . . . . . . . . . . . . . . . . . . . 293KKey-operated switch for front passenger's
airbag . . . . . . . . . . . . . . . . . . . . . . . . . 208
Keys . . . . . . . . . . . . . . . . . . . . . . . . . . . . . . . . 43
Emergency key . . . . . . . . . . . . . . . . . . . . 45
Replacement keys . . . . . . . . . . . . . . . . . 43
Replacing the battery . . . . . . . . . . . . . . 45
Kick-down feature . . . . . . . . . . . . . . . . . . . 165Llane assist
Changing settings on the MMI . . . . . . 147
Description . . . . . . . . . . . . . . . . . . . . . . 145
Indicator lamp in instrument cluster . 145
Instrument cluster display . . . . . . . . . 146
Switching on and off . . . . . . . . . . . . . . 145
Leather care
Alcantara . . . . . . . . . . . . . . . . . . . . . . . . 250
Natural leather . . . . . . . . . . . . . . . . . . . 249
leaving home . . . . . . . . . . . . . . . . . . . . . . . . 59
Light sensor . . . . . . . . . . . . . . . . . . . . . . . . . 57
Light sensor defective . . . . . . . . . . . . . . . . . 37
Lights . . . . . . . . . . . . . . . . . . . . . . . . . . . . . . 57
coming home . . . . . . . . . . . . . . . . . . . . . 59
Daytime running lights . . . . . . . . . . . . . 59
document_0900452a81b1b9de.book Seite 335 Donnerstag, 26. Juli 2007 9:16 09