2008 AUDI A4 lock
[x] Cancel search: lockPage 166 of 342
Automatic gearbox 164moving the selector lever either in or out of position P. The lever can
only be moved out of position P when the ignition is on.
R - Reverse gear
When reverse gear is engaged the gearbox automatically selects the
lowest gear ratio.
Reverse gear must only be engaged when the vehicle is stationary
and the engine is idling ⇒.
To move the selector lever to position R, press in the interlock
button and at the same time press the brake pedal. Depending on
the model, one or two reversing lights will come on in selector lever
position R (when ignition is switched on).
N - Neutral
In this position the gearbox is in neutral ⇒.
D - Drive (forwards)
In this position the gearbox automatically selects the best gear
ratio. This depends on the engine load, the road speed and the
dynamic gear control program (DCP).
Press the brake pedal when moving the selector lever from N to D if
the vehicle is stationary or at speeds below 5 km/h ⇒.
In some situations (such as on mountain roads or when towing a
trailer or caravan) it can be advantageous to switch temporarily to
tiptronic mode ⇒page 166, so that the gear ratios can be selected
manually to suit the driving conditions.
S - Sport position
Select this position if you wish to take full advantage of the car's
performance. This setting makes use of the engine's maximum
power output. When accelerating the gear shifts will be noticeable.
Press the brake pedal when moving the selector lever from N to S if
the vehicle is stationary or at speeds below 5 km/h ⇒.
WARNING
•
Never move the selector lever to R or P when driving, as this
could cause an accident.
•
In selector position D or S the vehicle must always be held with
the foot brake when the engine is running. This is because an auto-
matic gearbox still transmits power even at idling speed, and the
vehicle tends to “creep”. The throttle must on no account be
opened inadvertently (for instance by hand from the engine
compartment) when a gear is engaged with the vehicle stationary.
The vehicle could otherwise start moving immediately (in some
cases even if the parking brake is engaged) and possibly cause an
accident.
•
To avoid accidents, apply the parking brake and put the
selector lever in position P before opening the bonnet and working
on the vehicle with the engine running. Please observe the impor-
tant safety warnings ⇒page 255, “Working on components in the
engine compartment”.Note
You can select the sport program for gear changes on vehicles with
Audi drive select* by activating the DYNAMIC mode. There is no S
position on the selector lever.•
Applies to vehicles with tiptronic gearbox:
•
If the lever is moved accidentally to N when driving, release the
accelerator and let the engine speed drop to idling before selecting
D or S again.
•
For the sake of fuel economy (and the environment), the gearbox
ratios on some models are designed so that maximum speed is only
obtained when the selector lever is at position S.
document_0900452a81b1b9de.book Seite 164 Donnerstag, 26. Juli 2007 9:16 09
Page 167 of 342
Automatic gearbox165
Controls
Safety
Driving tips
General maintenance
Self-help
Technical data
Applies to vehicles: with multitronic® or tiptronicSelector lever lock
The selector lever lock prevents gears from being
engaged inadvertently, so that the vehicle is not set in
motion unintentionally.The selector lever lock is released as follows:
– Switch on the ignition.
– Press the brake pedal and at the same time press in the
interlock button.Automatic selector lever lock
The selector lever is locked in the P and N positions when the igni-
tion is on. The brake pedal must be depressed before the lever can
be moved out of either of these positions. The following message
appears in the instrument display as a reminder for the driver when
the selector lever is in position P or N:
WHEN STATIONARY APPLY FOOTBRAKE WHILE SELECTING GEAR.
The selector lever lock only works if the vehicle is stationary or
driving at speeds up to 5 km/h. At higher speeds the selector lever
lock in the N position is disengaged automatically.
The selector lever lock is not engaged if the selector lever is moved
quickly through position N (e.g. when shifting from R to D). This makes it possible, for instance, to “rock” the vehicle backwards and
forwards if it is stuck in snow or mud. The selector lever lock
engages automatically if the brake pedal is not depressed and the
lever is in position N for more than about a second.
Interlock button
The interlock button on the selector lever handle prevents the driver
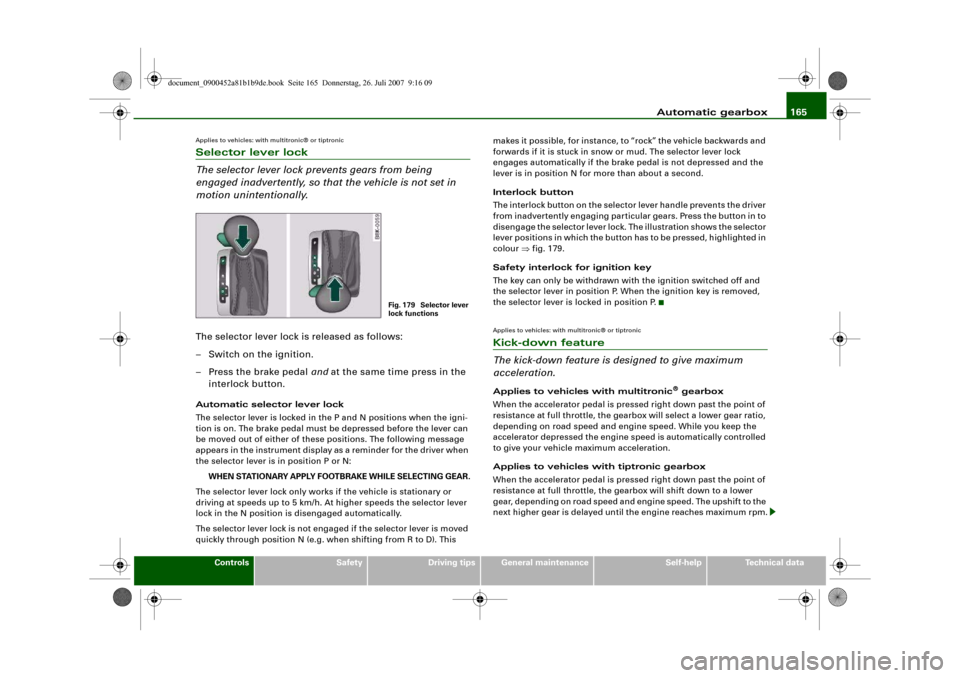
from inadvertently engaging particular gears. Press the button in to
disengage the selector lever lock. The illustration shows the selector
lever positions in which the button has to be pressed, highlighted in
colour ⇒fig. 179.
Safety interlock for ignition key
The key can only be withdrawn with the ignition switched off and
the selector lever in position P. When the ignition key is removed,
the selector lever is locked in position P.
Applies to vehicles: with multitronic® or tiptronicKick-down feature
The kick-down feature is designed to give maximum
acceleration.Applies to vehicles with multitronic
® gearbox
When the accelerator pedal is pressed right down past the point of
resistance at full throttle, the gearbox will select a lower gear ratio,
depending on road speed and engine speed. While you keep the
accelerator depressed the engine speed is automatically controlled
to give your vehicle maximum acceleration.
Applies to vehicles with tiptronic gearbox
When the accelerator pedal is pressed right down past the point of
resistance at full throttle, the gearbox will shift down to a lower
gear, depending on road speed and engine speed. The upshift to the
next higher gear is delayed until the engine reaches maximum rpm.
Fig. 179 Selector lever
lock functions
document_0900452a81b1b9de.book Seite 165 Donnerstag, 26. Juli 2007 9:16 09
Page 169 of 342
Automatic gearbox167
Controls
Safety
Driving tips
General maintenance
Self-help
Technical data
Shifting up a gear
– Briefly push the selector lever forwards (in the tiptronic
gate) ⇒page 166, fig. 180 .
Shifting down a gear
– Briefly pull the selector lever backwards (in the tiptronic
gate) .With the tiptronic system the driver can manually choose between
7 different pre-programmed gears. The manual programme can be
selected either with the vehicle stationary or on the move.
When accelerating, the gearbox automatically shifts up into the next
gear shortly before the maximum engine speed is reached.
If you select a gear which is lower than the gear shown in the instru-
ment display ⇒page 166, fig. 181, the gearbox will only shift down
when there is no longer a risk of overrevving the engine.
When the vehicle slows down (for instance when braking), the
gearbox automatically shifts down into the next gear when the
minimum engine speed is reached.
Changing down to a lower gear increases the engine braking effect
on downhill gradients.
When the accelerator pedal is pressed right down past the point of
resistance at full throttle, the gearbox will select a lower gear,
depending on road speed and engine speed.Applies to vehicles: with multitronic® or tiptronicBack-up programme
A back-up system is in place should a fault occur in the
control system.The automatic gearbox switches to the back-up programme if a fault
should occur in the control system. This is indicated by all segments of the display panel either lighting up together or going out
completely.
It is still possible to move the selector lever to all positions. The
manual shift programme (tiptronic) is not available when the back-
up programme is active.
Vehicles with tiptronic gearbox: When the selector lever is in posi-
tion D or S or in the manual shift programme, the gearbox will
remain in 3rd gear if 1st, 2nd or 3rd gears were engaged when the
fault occurred. The gearbox will remain in 5th gear if 4th, 5th or 6th
gears were engaged. The gearbox will then engage 3rd gear when
you drive away from a standstill or after the engine is restarted.
It will still be possible to use reverse gear in the normal way.
However, the electronic lock for reverse gear will be switched off.
Caution
Should the gearbox ever switch into the back-up programme, you
should take the vehicle to an Audi dealer or qualified workshop as
soon as possible.Applies to vehicles: Paddle leversSteering wheel with paddle levers
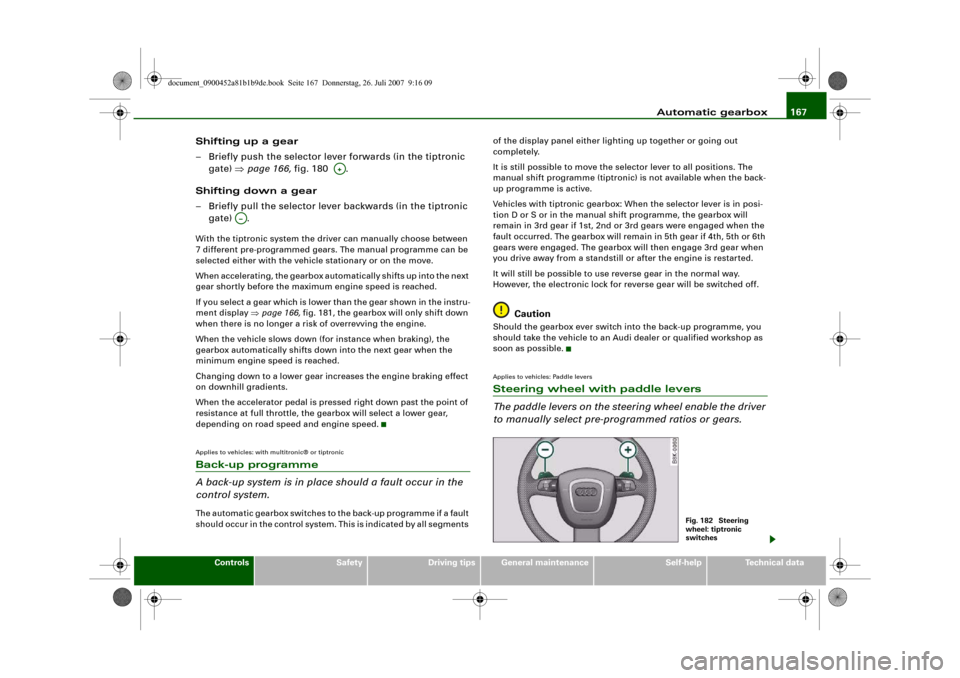
The paddle levers on the steering wheel enable the driver
to manually select pre-programmed ratios or gears.
A+
A…
Fig. 182 Steering
wheel: tiptronic
switches
document_0900452a81b1b9de.book Seite 167 Donnerstag, 26. Juli 2007 9:16 09
Page 170 of 342
Automatic gearbox 168
– Briefly pull the left-hand paddle lever to change down
to a lower gear.
– Briefly pull the right-hand paddle lever to change up
to a higher gear.The paddle levers are activated when the selector lever is in position
D or S, or the position for the manual shift programme (tiptronic).
The manual shift programme can, of course, still be operated using
the selector lever in the centre console.Applies to vehicles: with multitronic® or tiptronicManual release of selector lever
The selector lever can be released manually if the elec-
trical power supply should fail.
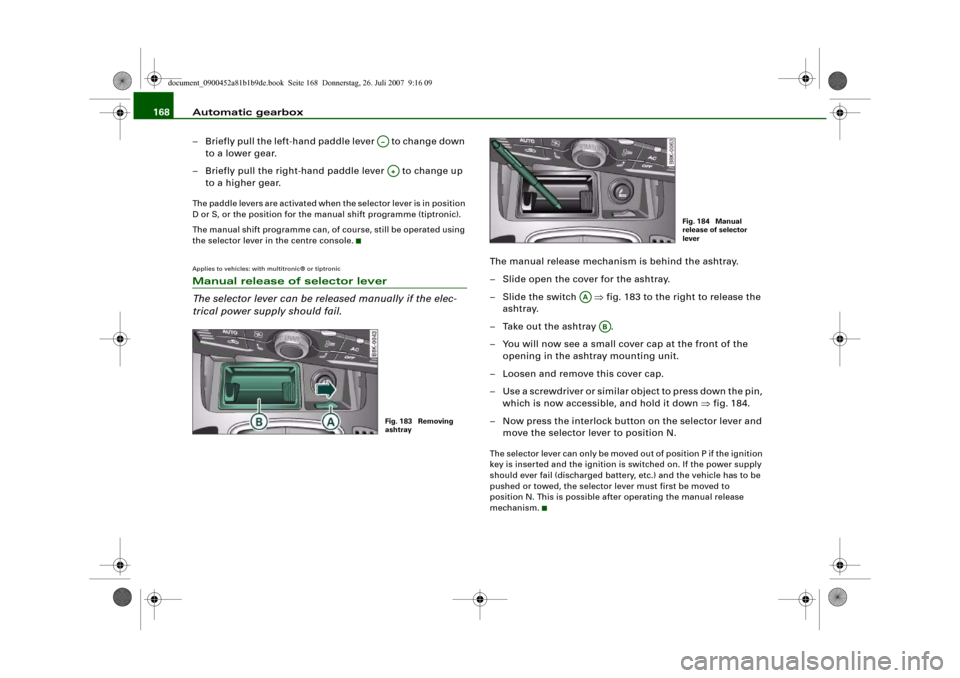
The manual release mechanism is behind the ashtray.
– Slide open the cover for the ashtray.
–Slide the switch ⇒fig. 183 to the right to release the
ashtray.
– Take out the ashtray .
– You will now see a small cover cap at the front of the
opening in the ashtray mounting unit.
– Loosen and remove this cover cap.
– Use a screwdriver or similar object to press down the pin,
which is now accessible, and hold it down ⇒fig. 184.
– Now press the interlock button on the selector lever and
move the selector lever to position N.The selector lever can only be moved out of position P if the ignition
key is inserted and the ignition is switched on. If the power supply
should ever fail (discharged battery, etc.) and the vehicle has to be
pushed or towed, the selector lever must first be moved to
position N. This is possible after operating the manual release
mechanism.
A–A+Fig. 183 Removing
ashtray
Fig. 184 Manual
release of selector
lever
AA
AB
document_0900452a81b1b9de.book Seite 168 Donnerstag, 26. Juli 2007 9:16 09
Page 176 of 342
Parking aid 174•
Only use the reversing camera to assist you if it is supplying
you with a good and clear picture. The quality of the picture could
be impaired by adverse light, dirt on the lens or a defect (accident
risk).
•
Only use the reversing camera when the boot lid is completely
c lo s e d . P l e a se m a k e su re t h a t t here are no objects mounted to the
rear end of the vehicle which could block the view of the reversing
camera.Note
•
If your vehicle is near an obstacle, the graphic display will also
appear in the reversing camera image. This superimposed graphic
helps the driver to localise the critical area of the vehicle.
•
You can change the display and adjust the volume and pitch of
the beeps ⇒page 177.
•
Please refer to the notes on towing ⇒page 177.
•
There is a slight delay in the picture display.
Applies to vehicles: with Audi parking system advancedParking perpendicular to the roadside
Parking mode 1 can be used when parking your vehicle in
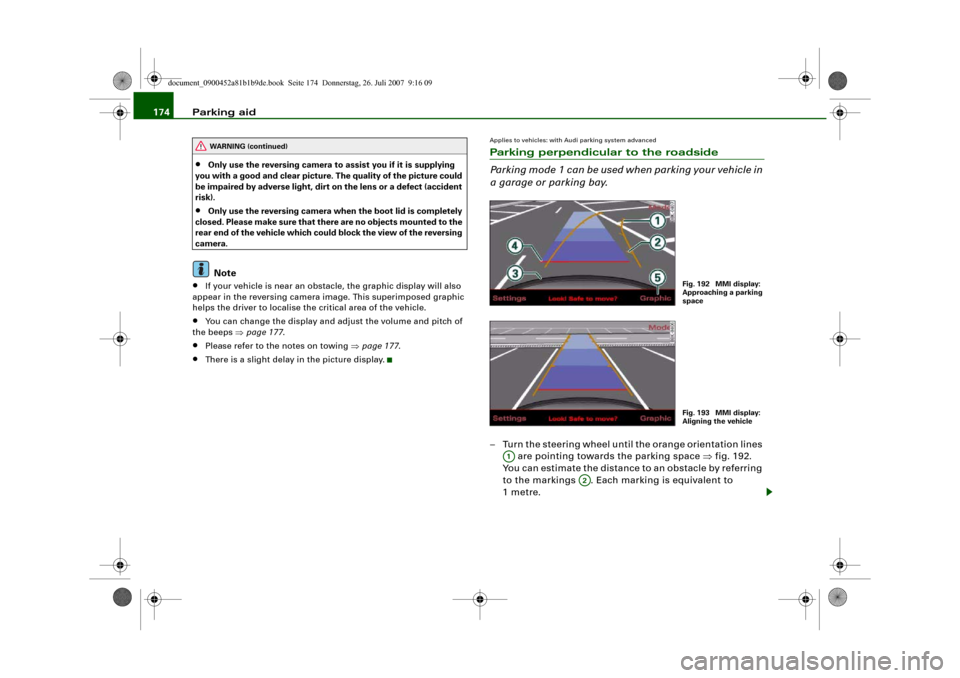
a garage or parking bay.– Turn the steering wheel until the orange orientation lines
are pointing towards the parking space ⇒fig. 192.
You can estimate the distance to an obstacle by referring
to the markings . Each marking is equivalent to
1metre.
WARNING (continued)
Fig. 192 MMI display:
Approaching a parking
spaceFig. 193 MMI display:
Aligning the vehicle
A1
A2
document_0900452a81b1b9de.book Seite 174 Donnerstag, 26. Juli 2007 9:16 09
Page 190 of 342
Safe driving 188Correct sitting positionsCorrect sitting position for driver
The correct driving position is important for safe and
fatigue-free driving.For your own safety, and to reduce the risk of injury in the
event of an accident, we recommend the following driving
position.
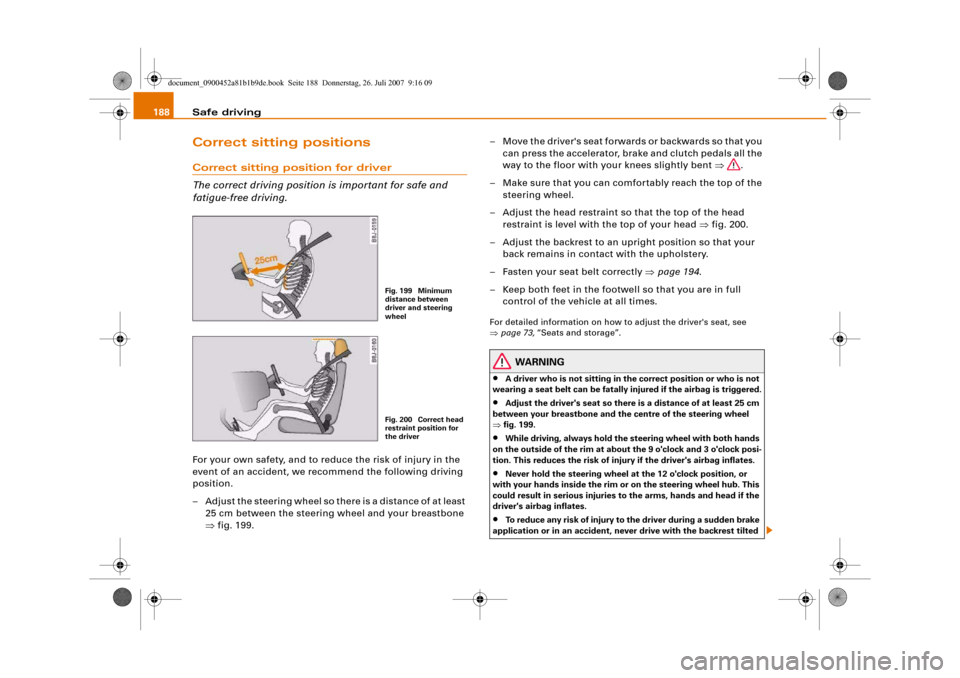
– Adjust the steering wheel so there is a distance of at least
25 cm between the steering wheel and your breastbone
⇒fig. 199.– Move the driver's seat forwards or backwards so that you
can press the accelerator, brake and clutch pedals all the
way to the floor with your knees slightly bent ⇒.
– Make sure that you can comfortably reach the top of the
steering wheel.
– Adjust the head restraint so that the top of the head
restraint is level with the top of your head ⇒fig. 200.
– Adjust the backrest to an upright position so that your
back remains in contact with the upholstery.
– Fasten your seat belt correctly ⇒page 194.
– Keep both feet in the footwell so that you are in full
control of the vehicle at all times.
For detailed information on how to adjust the driver's seat, see
⇒page 73, “Seats and storage”.
WARNING
•
A driver who is not sitting in the correct position or who is not
wearing a seat belt can be fatally injured if the airbag is triggered.
•
Adjust the driver's seat so there is a distance of at least 25 cm
between your breastbone and the centre of the steering wheel
⇒fig. 199.
•
While driving, always hold the steering wheel with both hands
on the outside of the rim at about the 9 o'clock and 3 o'clock posi-
tion. This reduces the risk of injury if the driver's airbag inflates.
•
Never hold the steering wheel at the 12 o'clock position, or
with your hands inside the rim or on the steering wheel hub. This
could result in serious injuries to the arms, hands and head if the
driver's airbag inflates.
•
To reduce any risk of injury to the driver during a sudden brake
application or in an accident, never drive with the backrest tilted
Fig. 199 Minimum
distance between
driver and steering
wheelFig. 200 Correct head
restraint position for
the driver
document_0900452a81b1b9de.book Seite 188 Donnerstag, 26. Juli 2007 9:16 09
Page 195 of 342
Safe driving193
Controls
Safety
Driving tips
General maintenance
Self-help
Technical data inside. In this case the child would be unable to get out of the
vehicle without help. This could have fatal consequences.
•
Never allow children to play in or around the vehicle. Always
close and lock the boot lid and all the doors when you leave the
vehicle.
•
Never let passengers ride in the luggage compartment. All
occupants must be properly restrained by the seat belts at all
times ⇒page 194.Note
•
Air circulation in the vehicle helps reduce fogging of the
windows. Used air escapes through ventilation slots in the rear of
the vehicle. Make sure that these ventilation slots are not
obstructed.
•
Suitable belts for securing loads to the fastening rings* are
commercially available.
Applies to vehicles: with fastening ringsFastening rings
Unsecured loads are a hazard to all vehicle occupants.There are fastening rings in the luggage compartment
which can be used to secure luggage and other objects
⇒page 79.
– Use the fastening rings to secure items safely in the
luggage compartment ⇒ in “Loading the luggage
compartment” on page 79.During a collision or an accident, even small and light objects can
possess so much energy that they can cause very severe injuries.
The amount of this “kinetic energy” depends on the speed of the vehicle and the weight of the object. The most significant factor,
however, is the speed of the vehicle.
An example: An object weighing 4.5 kg is lying unsecured in the
vehicle. During a frontal collision at a speed of 50 km/h, this object
generates a force corresponding to 20 times its weight. That means
that the effective weight of the object increases to about 90 kg. You
can imagine the severity of the injuries which might be sustained if
this “projectile” strikes an occupant as it flies through the
passenger compartment.
WARNING
If items of luggage or other objects are secured to the fastening
rings with inappropriate or damaged retaining cords, injuries
could result in the event of sudden braking or a collision.•
To prevent pieces of luggage or other objects from flying
forward, always use appropriate retaining cords which are prop-
erly secured to the fastening rings.
•
Never secure a child seat on the fastening rings.
WARNING (continued)
document_0900452a81b1b9de.book Seite 193 Donnerstag, 26. Juli 2007 9:16 09
Page 197 of 342
Seat belts195
Controls
Safety
Driving tips
General maintenance
Self-help
Technical data
Important safety instructions for using seat belts
There are a number of safety points concerning the seat
belts which you should remember. This will help to reduce
the risk of injury in an accident.
WARNING
•
The seat belts can only provide maximum protection if the
seats are adjusted properly ⇒page 73, “Seats and storage”.
•
To ensure proper protection, it is important to wear the seat
belts in the correct position ⇒page 197, “How to wear seat belts
properly”. Ensure that the seat belts are worn exactly as recom-
mended in this chapter. Belts which are not worn properly can
increase the risk of injury in accidents considerably.
•
Do not allow the seat belt to become twisted or jammed, or to
rub on any sharp edges.
•
Never allow two passengers (even children) to share the same
seat belt. It is especially dangerous to place a seat belt over a child
sitting on your lap.
•
Do not wear the belt over hard or fragile objects (such as
glasses or pens, etc.) because this can cause injuries.
•
Loose, bulky clothing (such as an overcoat over a jacket)
impairs the proper fit and function of the belts.
•
The belts must be kept clean, otherwise the retractors may not
work properly ⇒page 250, “Seat belts”.
•
The slot in the seat belt buckle must not be blocked with paper
or other objects, as this can prevent the latch plate from engaging
properly.
•
The latch plate of the belt must always be engaged in the
correct buckle for that seat, otherwise the belt will not be fully
effective.
•
Check the condition of the seat belts at regular intervals. If you
notice that the belt webbing, fittings, retractor mechanism or buckle of any of the belts is damaged, the belt must be replaced
by a qualified workshop.
•
The seat belts must not be removed or modified in any way. Do
not attempt to repair a damaged belt yourself.
•
Seat belts which have been worn in an accident and stretched
must be replaced by a qualified workshop. The belt anchorages
should also be checked.
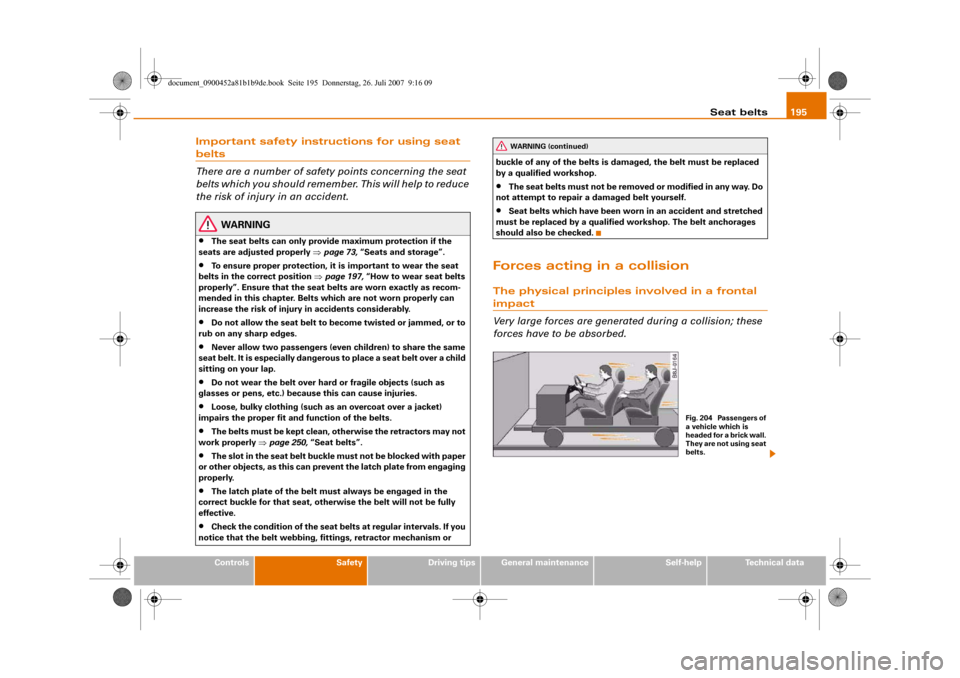
Forces acting in a collisionThe physical principles involved in a frontal impact
Very large forces are generated during a collision; these
forces have to be absorbed.
WARNING (continued)
Fig. 204 Passengers of
a vehicle which is
headed for a brick wall.
They are not using seat
belts.
document_0900452a81b1b9de.book Seite 195 Donnerstag, 26. Juli 2007 9:16 09