2008 AUDI A4 ECU
[x] Cancel search: ECUPage 221 of 342
Child safety219
Controls
Safety
Driving tips
General maintenance
Self-help
Technical data
– Fit the protective sleeves onto the retainers
between the backrest and the seat cushion ⇒page 218,
fig. 231.
– Push the mountings on the child safety seat into the
protective sleeves until they engage audibly (2x)
⇒page 218, fig. 231.
– Pull on the child safety seat to check whether both
catches have engaged properly.Child safety seats with the “ISOFIX” system can be secured quickly
and safely on the rear seat* or on the front passenger's seat*.
Detailed fitting instructions are supplied with the child safety seat.
Child seats with “ISOFIX” mountings are available from Audi dealers
and specialist retailers.
If required, the “ISOFIX” mounting system can be retrofitted.
WARNING
The retainers used here are specially designed for child safety
seats with “ISOFIX” mountings. Do not attempt to secure other
types of child safety seat, seat belts or other objects with these
retainers – this could result in serious or possibly fatal injury.
AA
AB
document_0900452a81b1b9de.book Seite 219 Donnerstag, 26. Juli 2007 9:16 09
Page 234 of 342
Towing a trailer 232Towing a trailerDriving the vehicle with a trailer or
caravanTechnical requirements
The towing bracket must comply with certain technical
requirements.Your car is intended mainly for transporting passengers and
luggage. However, if suitably equipped, it can also be used to tow a
trailer or caravan.
If the car is supplied with a factory-fitted towing bracket it will
already have the necessary technical modifications and meet the
statutory requirements.
A 13-pin socket is provided to make the electrical connection
between the car and the trailer. If the trailer has a 7-pin plug you can
use an adapter cable. This is available from Audi dealers.
WARNING
If a towing bracket is retrofitted, the installation should be carried
out by a qualified workshop.•
In particular in high outside temperatures it is not possible to
drive up long steep gradients without a suitable cooling system.
The engine would then overheat.
•
Incorrect installation can result in a safety risk.
Points to check before towingTrailer weights
Never exceed the maximum permitted trailer weights ⇒page 323.If you do not load the trailer up to the maximum permitted trailer
weight, you can then climb correspondingly steeper gradients.
The maximum trailer weights listed are only applicable for altitudes
up to 1000 m above sea level. With increasing altitude the engine
power and therefore the car's climbing ability are impaired because
of the reduced air density, so the maximum trailer weight has to be
reduced accordingly. The weight of the car and trailer must be
reduced by 10% for every further 1000 m (or part thereof). This
figure refers to the combined weight of the (loaded) vehicle and
(loaded) trailer.
The figures for the draw bar weight that appear on the identification
plate of the towing bracket are for certification purposes only. The
correct figures for your specific vehicle, which may be lower than
these figures for the towing bracket, are given in the registration
documents. Also refer to ⇒page 323.
Distributing the load
Distribute loads in the trailer so that heavy objects are as near to the
axle as possible. Loads carried in the trailer must be secured to
prevent them slipping.
Where possible, operate the trailer with the maximum permitted
draw bar weight on the ball joint of the towing bracket, but do not
exceed the specified limit.
Tyre pressure
Check the tyre pressures on your car and adjust for “full load” condi-
tions (refer to the sticker listing the tyre pressures on the end face
of the driver's door). It may also be necessary to adjust the tyre pres-
sures on the trailer according to the recommendations of the trailer
manufacturer.
Exterior mirrors
Check whether you can see enough of the road behind the trailer
with the standard mirrors. If this is not the case you should have
document_0900452a81b1b9de.book Seite 232 Donnerstag, 26. Juli 2007 9:16 09
Page 235 of 342
Towing a trailer233
Controls
Safety
Driving tips
General maintenance
Self-help
Technical data additional mirrors fitted. Both exterior mirrors should be mounted
on hinged extension brackets. Adjust the mirrors to give sufficient
vision to the rear.
Headlights
Before starting a journey, check the headlight beam settings with
the trailer hitched up. If necessary, alter the height of the headlight
beams by means of the headlight range control ⇒page 60.
Power supply
When you remove the ignition key the power supply to the trailer is
interrupted.
Removable ball joint coupling
Vehicles with a factory-fitted towing bracket are equipped with a
removable ball joint coupling. It is carried under the floor panel on
the left-hand side of the luggage compartment and is secured by a
strap.
Note
We recommend having the car serviced between the normal inspec-
tion intervals if it used frequently for towing a trailer.Applies to vehicles: with towing bracketTrailer stabilisation system
Trailer stabilisation helps to reduce the risk of the vehicle
skidding when towing a trailer.The trailer stabilisation system is operational only when the ESP is
switched on and there is no malfunction in the ESP ⇒page 17.
When is the trailer stabilisation system activated?
Trailer stabilisation is active when the following requirements are
met:•
The ESP must NOT be switched off ⇒page 222,
•
The trailer connector must be properly secured in the vehicle
socket.
•
Vehicle speed must be higher than approx. 60 km/h.
How trailer stabilisation works:
In many cases, the driver can stabilise a swaying trailer by manually
braking the vehicle.
However, if the ESP detects that the trailer is swaying and this is
affecting the towing vehicle, it will automatically brake the vehicle
to stabilise the trailer by slowing it down. The warning lamp
will
light up in the instrument cluster. If possible, do not turn the
steering wheel at this stage.
In order to warn traffic behind you, the brake lights will come on
during this automatic braking operation.
A trailer weighing less than 70% of the kerb weight of the towing
vehicle may sway quite considerably without the trailer stabilisation
system intervening. This can happen when the swaying movements
of the light-weight trailer are not or hardly passed on to the towing
vehicle and are therefore not detected by the ESP.
If the system for activating the trailer brake lights is defective, this
will be indicated in the instrument cluster display ⇒page 37, “Bulb
monitor ”.
Requirements for correct functioning of the trailer
stabilisation system
If these conditions are not met in full, the trailer stabilisation system
will only intervene to a limited extent or not at all ⇒.
•
The electrical connection between the towing vehicle and the
trailer must be functioning correctly, without any defects.
•
The load on the trailer must be properly secured.
•
The tyre pressures on both the vehicle and the trailer must be
adapted to the load that is being carried.
•
Where possible, operate the trailer with the maximum permitted
draw bar weight.
document_0900452a81b1b9de.book Seite 233 Donnerstag, 26. Juli 2007 9:16 09
Page 238 of 342
Towing a trailer 236The removable ball joint attachment for the towing bracket is
carried under the floor panel on the left-hand side of the luggage
compartment and is secured by a strap.
The ball joint can be fitted and removed by hand.
WARNING
•
Never use tools of any kind when fitting and removing the ball
joint. This could damage the mechanism which locks the ball joint
in place and impair its safety (accident risk).
•
Secure the ball joint again with the strap when you have
finished using it.Note
•
Do not attempt to modify or repair the ball joint or other towing
bracket components.
•
Should you have any difficulties when using the towing bracket,
or suspect that it is not fitted properly, contact a qualified workshop.
•
Before setting off, always check that the ball joint is secured
properly ⇒page 238.
•
Never disengage the ball joint with the caravan / trailer still
hitched or with a bicycle rack or similar accessory still attached.
•
It is advisable to remove the ball joint when you are not towing a
trailer. Fold the socket back to its original position so that the
mounting fixture is properly closed.
•
The ball joint must be removed if you intend to clean the car with
a steam cleaning attachment. Make sure that the mounting fixture
is properly closed.
•
For installation and removal of the ball joint we recommend that
the gloves provided be used.
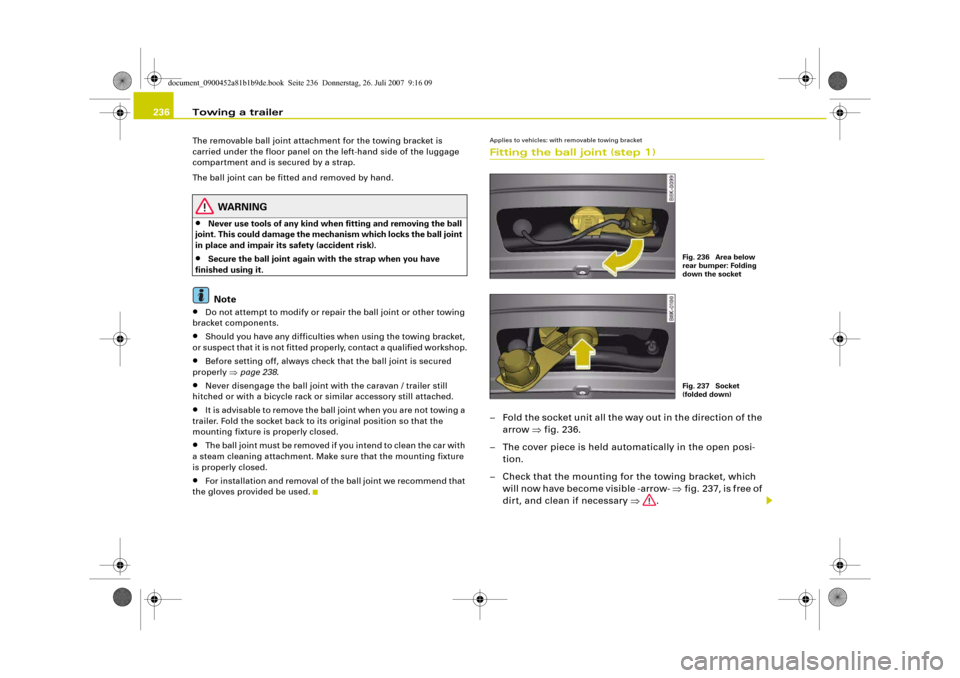
Applies to vehicles: with removable towing bracketFitting the ball joint (step 1)– Fold the socket unit all the way out in the direction of the
arrow ⇒fig. 236.
– The cover piece is held automatically in the open posi-
tion.
– Check that the mounting for the towing bracket, which
will now have become visible -arrow- ⇒fig. 237, is free of
dirt, and clean if necessary ⇒.
Fig. 236 Area below
rear bumper: Folding
down the socketFig. 237 Socket
(folded down)
document_0900452a81b1b9de.book Seite 236 Donnerstag, 26. Juli 2007 9:16 09
Page 239 of 342
Towing a trailer237
Controls
Safety
Driving tips
General maintenance
Self-help
Technical data
– Also check the shaft section of the ball joint and its asso-
ciated mechanical parts to make sure they are clean and
undamaged.Continued ⇒page 237, “Fitting the ball joint (step 2)”.
WARNING
It is important to keep the mounting fixture clean. Otherwise the
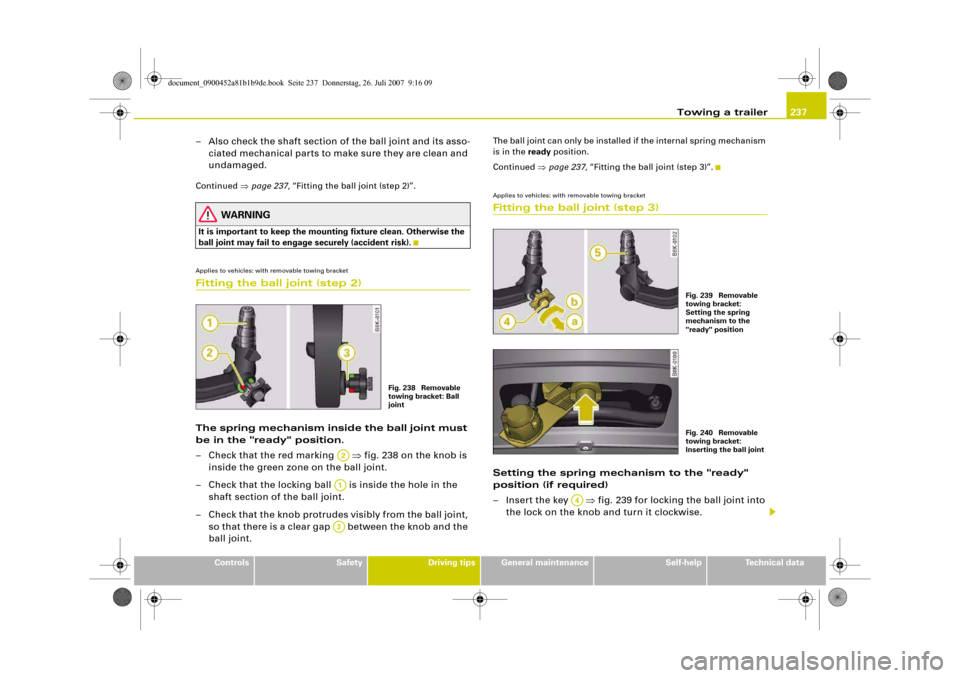
ball joint may fail to engage securely (accident risk).Applies to vehicles: with removable towing bracketFitting the ball joint (step 2)The spring mechanism inside the ball joint must
be in the "ready" position.
– Check that the red marking ⇒fig. 238 on the knob is
inside the green zone on the ball joint.
– Check that the locking ball is inside the hole in the
shaft section of the ball joint.
– Check that the knob protrudes visibly from the ball joint,
so that there is a clear gap between the knob and the
ball joint.
The ball joint can only be installed if the internal spring mechanism
is in the ready position.
Continued ⇒page 237, “Fitting the ball joint (step 3)”.Applies to vehicles: with removable towing bracketFitting the ball joint (step 3)Setting the spring mechanism to the "ready"
position (if required)
– Insert the key ⇒fig. 239 for locking the ball joint into
the lock on the knob and turn it clockwise.
Fig. 238 Removable
towing bracket: Ball
joint
A2A1A3
Fig. 239 Removable
towing bracket:
Setting the spring
mechanism to the
"ready" positionFig. 240 Removable
towing bracket:
Inserting the ball joint
A4
document_0900452a81b1b9de.book Seite 237 Donnerstag, 26. Juli 2007 9:16 09
Page 241 of 342
Towing a trailer239
Controls
Safety
Driving tips
General maintenance
Self-help
Technical data
– Check that the ball joint fits tightly in the mounting
fixture (try moving it about to check).
Electrical socket for trailer
– The cable of the towing bracket can be connected to the
socket ⇒page 238, fig. 242.If the safety check is not satisfactory, the ball joint must be fitted
again properly.
WARNING
To avoid accidents, the ball joint must meet all the safety require-
ments listed in the safety check. The towing bracket must not be
used if any one of these requirements is not met. If this is the case,
you should contact a qualified workshop.Applies to vehicles: with removable towing bracketRemoving the ball joint
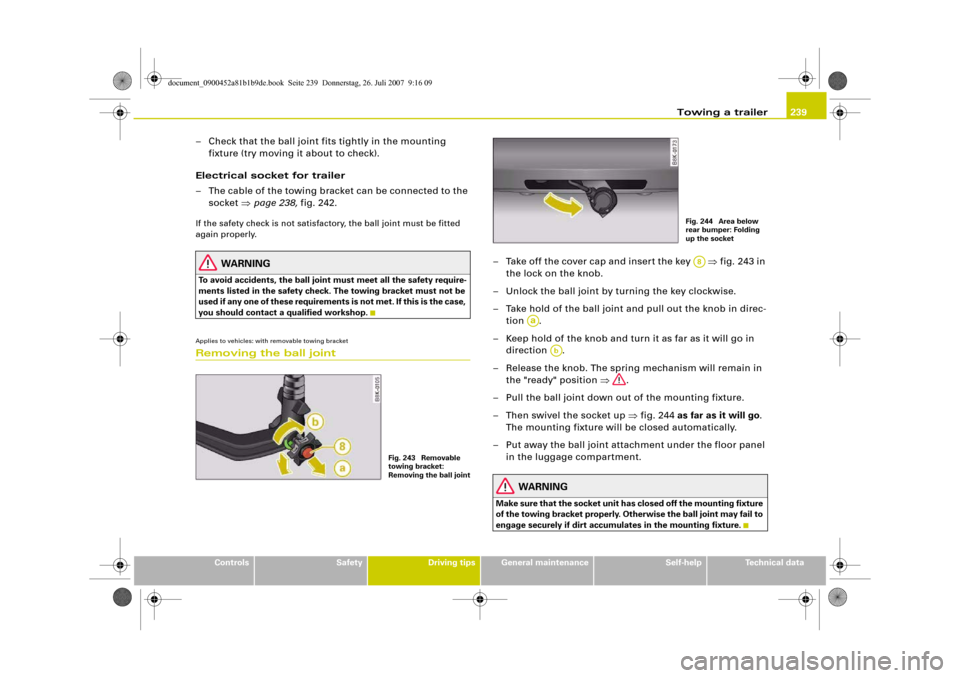
– Take off the cover cap and insert the key ⇒fig. 243 in
the lock on the knob.
– Unlock the ball joint by turning the key clockwise.
– Take hold of the ball joint and pull out the knob in direc-
tion .
– Keep hold of the knob and turn it as far as it will go in
direction .
– Release the knob. The spring mechanism will remain in
the "ready" position ⇒.
– Pull the ball joint down out of the mounting fixture.
– Then swivel the socket up ⇒fig. 244 as far as it will go.
The mounting fixture will be closed automatically.
– Put away the ball joint attachment under the floor panel
in the luggage compartment.
WARNING
Make sure that the socket unit has closed off the mounting fixture
of the towing bracket properly. Otherwise the ball joint may fail to
engage securely if dirt accumulates in the mounting fixture.
Fig. 243 Removable
towing bracket:
Removing the ball joint
Fig. 244 Area below
rear bumper: Folding
up the socketA8
Aa
Ab
document_0900452a81b1b9de.book Seite 239 Donnerstag, 26. Juli 2007 9:16 09
Page 242 of 342
Towing a trailer 240Applies to vehicles: with towing bracketTowing bracket (retrofitting)
If required, the vehicle can be retrofitted with a towing
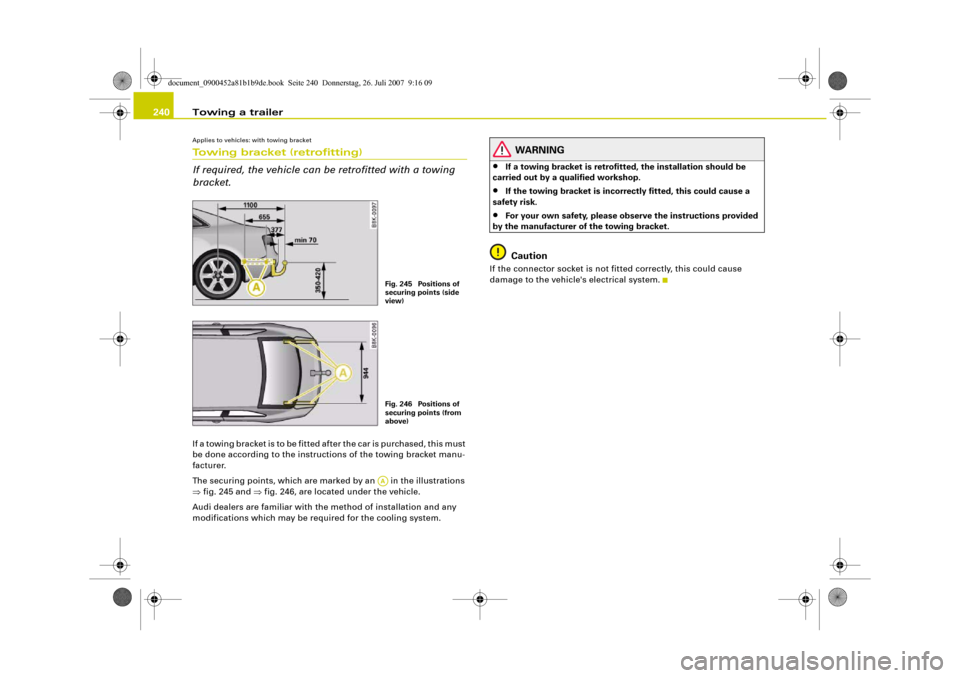
bracket.If a towing bracket is to be fitted after the car is purchased, this must
be done according to the instructions of the towing bracket manu-
facturer.
The securing points, which are marked by an in the illustrations
⇒fig. 245 and ⇒fig. 246, are located under the vehicle.
Audi dealers are familiar with the method of installation and any
modifications which may be required for the cooling system.
WARNING
•
If a towing bracket is retrofitted, the installation should be
carried out by a qualified workshop.
•
If the towing bracket is incorrectly fitted, this could cause a
safety risk.
•
For your own safety, please observe the instructions provided
by the manufacturer of the towing bracket.Caution
If the connector socket is not fitted correctly, this could cause
damage to the vehicle's electrical system.
Fig. 245 Positions of
securing points (side
view)Fig. 246 Positions of
securing points (from
above)AA
document_0900452a81b1b9de.book Seite 240 Donnerstag, 26. Juli 2007 9:16 09
Page 258 of 342
Checking and topping up fluids 256Closing the bonnet– To close the bonnet, pull it down to overcome the spring
pressure.
– Then let it drop into the catches; do not press down ⇒.
WARNING
•
For safety reasons the bonnet must always be completely
closed when the vehicle is moving. After closing it always check
that it is properly secured. The bonnet must be flush with the adja-
cent body panels.
•
Should you notice that the bonnet is not safely secured when
the vehicle is moving, stop the vehicle immediately and close the
bonnet properly, otherwise it could cause an accident.
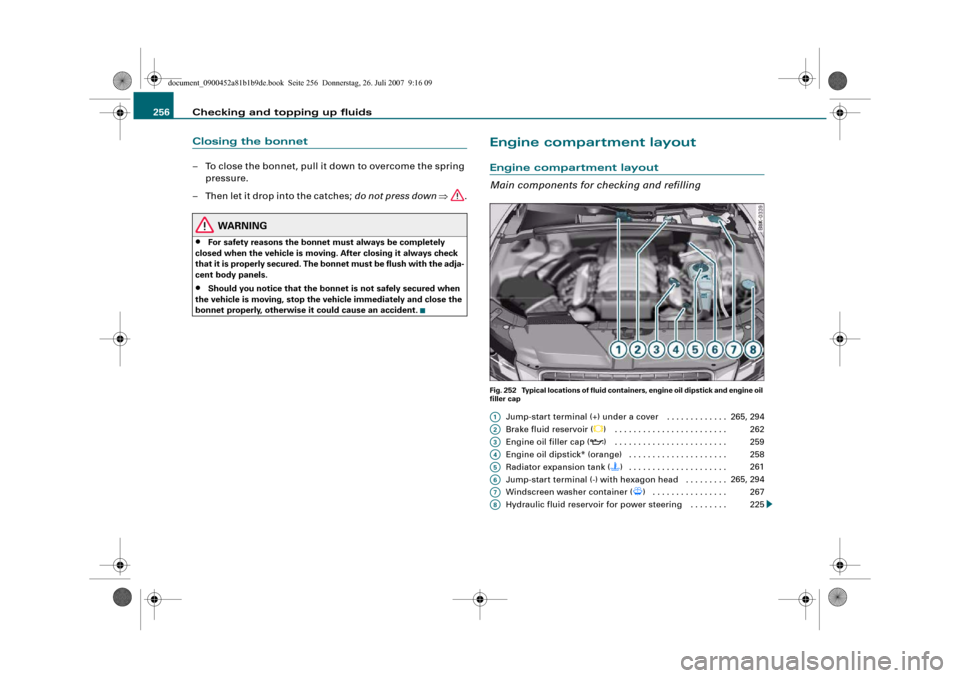
Engine compartment layoutEngine compartment layout
Main components for checking and refillingFig. 252 Typical locations of fluid containers, engine oil dipstick and engine oil
filler cap
Jump-start terminal (+) under a cover . . . . . . . . . . . . .
Brake fluid reservoir (
) . . . . . . . . . . . . . . . . . . . . . . . .
Engine oil filler cap (
) . . . . . . . . . . . . . . . . . . . . . . . .
Engine oil dipstick* (orange) . . . . . . . . . . . . . . . . . . . . .
Radiator expansion tank () . . . . . . . . . . . . . . . . . . . . .
Jump-start terminal (-) with hexagon head . . . . . . . . .
Windscreen washer container (
) . . . . . . . . . . . . . . . .
Hydraulic fluid reservoir for power steering . . . . . . . .
A1
265, 294
A2
262
A3
259
A4
258
A5
261
A6
265, 294
A7
267
A8
225
document_0900452a81b1b9de.book Seite 256 Donnerstag, 26. Juli 2007 9:16 09