2008 AUDI A4 towing
[x] Cancel search: towingPage 177 of 342
Parking aid175
Controls
Safety
Driving tips
General maintenance
Self-help
Technical data
– Reverse into the space and adapt the steering angle to
the parking space, using the orange lines to assist you
⇒. indicates the rear bumper. You should stop
reversing, at the latest, when the red orientation line
is bordering on an object ⇒!
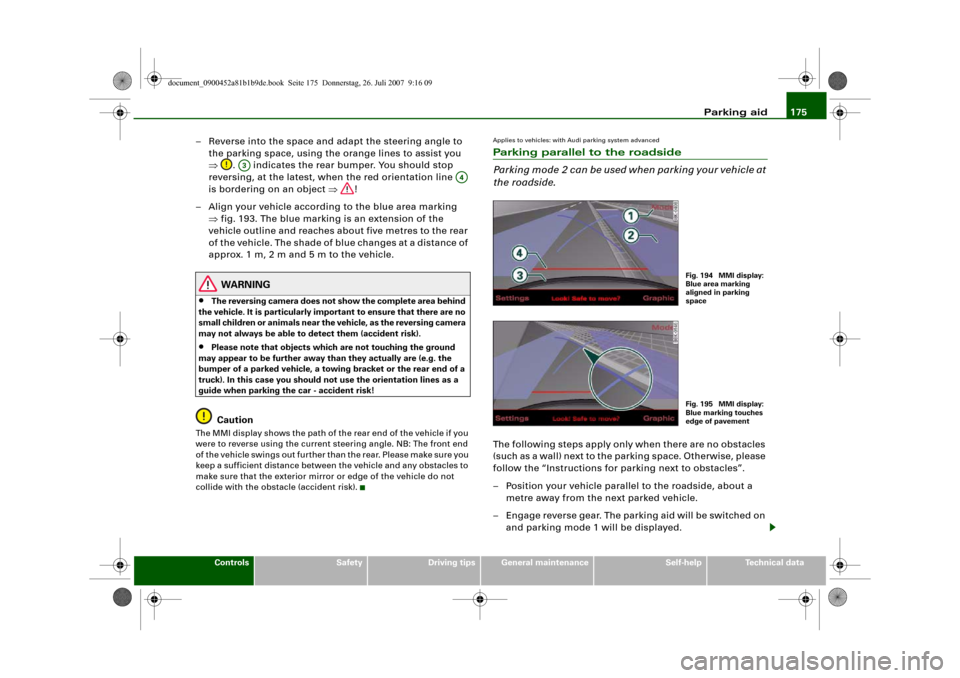
– Align your vehicle according to the blue area marking
⇒fig. 193. The blue marking is an extension of the
vehicle outline and reaches about five metres to the rear
of the vehicle. The shade of blue changes at a distance of
approx. 1m, 2m and 5m to the vehicle.
WARNING
•
The reversing camera does not show the complete area behind
the vehicle. It is particularly important to ensure that there are no
small children or animals near the vehicle, as the reversing camera
may not always be able to detect them (accident risk).
•
Please note that objects which are not touching the ground
may appear to be further away than they actually are (e.g. the
bumper of a parked vehicle, a towing bracket or the rear end of a
truck). In this case you should not use the orientation lines as a
guide when parking the car - accident risk!Caution
The MMI display shows the path of the rear end of the vehicle if you
were to reverse using the current steering angle. NB: The front end
of the vehicle swings out further than the rear. Please make sure you
keep a sufficient distance between the vehicle and any obstacles to
make sure that the exterior mirror or edge of the vehicle do not
collide with the obstacle (accident risk).
Applies to vehicles: with Audi parking system advancedParking parallel to the roadside
Parking mode 2 can be used when parking your vehicle at
the roadside.The following steps apply only when there are no obstacles
(such as a wall) next to the parking space. Otherwise, please
follow the “Instructions for parking next to obstacles”.
– Position your vehicle parallel to the roadside, about a
metre away from the next parked vehicle.
– Engage reverse gear. The parking aid will be switched on
and parking mode 1 will be displayed.
A3
A4
Fig. 194 MMI display:
Blue area marking
aligned in parking
spaceFig. 195 MMI display:
Blue marking touches
edge of pavement
document_0900452a81b1b9de.book Seite 175 Donnerstag, 26. Juli 2007 9:16 09
Page 178 of 342
Parking aid 176
– Press the control button for Mode ⇒fig. 194 on the
MMI control console. Parking mode 2 is displayed.
– Reverse and align your vehicle in such a way that the blue
area marking borders onto the vehicle behind or onto
the parking space line marking. The blue marking is an
extension of the vehicle outline and reaches about five
metres to the rear of the vehicle. The long side of the blue
marking should border onto the kerb. The complete blue
area marking must fit into the parking space.
– When the vehicle is stationary turn the steering wheel to
the left as far as it will go.
– Reverse into the parking space.
– Stop the vehicle as soon as the blue curve touches the
kerb ⇒page 175, fig. 195.
– When the vehicle is stationary turn the steering wheel to
the right as far as it will go.
– Continue to reverse into the parking space until the
vehicle is standing parallel to the kerb. indicates the
rear bumper. You should stop reversing, at the latest,
when the red orientation line is bordering on an
object ⇒! Keep a close watch on the front of your
vehicle ⇒.Parking next to obstacles
If an obstacle (such as a wall) is located next to the parking space,
the clearance at the side of the vehicle must be larger. Position the
long side of the blue marking so that there is sufficient clearance
from the kerb. The marking must not touch the kerb. You must also
start turning the steering wheel much earlier. The blue curve
⇒page 175, fig. 195 must not touch the kerb - make sure there is
sufficient clearance from the kerb.
WARNING
•
The reversing camera does not show the complete area behind
the vehicle. It is particularly important to ensure that there are no
small children or animals near the vehicle, as the reversing camera
may not always be able to detect them (accident risk).
•
Please note that objects which are not touching the ground
may appear to be further away than they actually are (e.g. the
bumper of a parked vehicle, a towing bracket or the rear end of a
truck). In this case you should not use the orientation lines as a
guide when parking the car - accident risk!Caution
The MMI display shows the path of the rear end of the vehicle if you
were to reverse using the current steering angle. NB: The front end
of the vehicle swings out further than the rear. Please make sure you
keep a sufficient distance between the vehicle and any obstacles to
make sure that the exterior mirror or edge of the vehicle do not
collide with the obstacle (accident risk).
Note
The orientation lines and markings appear on the left or right side,
depending on which turn signals are on.
A1
A2
A3
A4
document_0900452a81b1b9de.book Seite 176 Donnerstag, 26. Juli 2007 9:16 09
Page 179 of 342
Parking aid177
Controls
Safety
Driving tips
General maintenance
Self-help
Technical data
Applies to vehicles: with Audi parking system/plus/advancedSwitching display and acoustic signals on and offThe settings for the graphic display* and acoustic signals
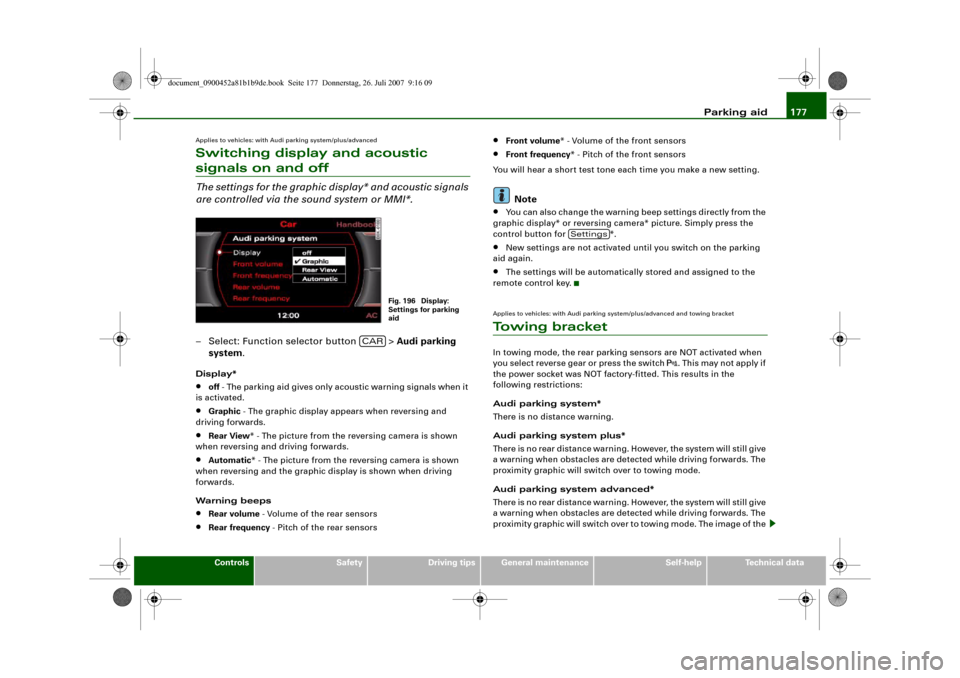
are controlled via the sound system or MMI*.– Select: Function selector button > Audi parking
system.Display*•
off - The parking aid gives only acoustic warning signals when it
is activated.
•
Graphic - The graphic display appears when reversing and
driving forwards.
•
Rear View* - The picture from the reversing camera is shown
when reversing and driving forwards.
•
Automatic* - The picture from the reversing camera is shown
when reversing and the graphic display is shown when driving
forwards.
Warning beeps
•
Rear volume - Volume of the rear sensors
•
Rear frequency - Pitch of the rear sensors
•
Front volume* - Volume of the front sensors
•
Front frequency* - Pitch of the front sensors
You will hear a short test tone each time you make a new setting.Note
•
You can also change the warning beep settings directly from the
graphic display* or reversing camera* picture. Simply press the
control button for *.
•
New settings are not activated until you switch on the parking
aid again.
•
The settings will be automatically stored and assigned to the
remote control key.
Applies to vehicles: with Audi parking system/plus/advanced and towing bracketTo w i n g b r a c k e tIn towing mode, the rear parking sensors are NOT activated when
you select reverse gear or press the switch
. This may not apply if
the power socket was NOT factory-fitted. This results in the
following restrictions:
Audi parking system*
There is no distance warning.
Audi parking system plus*
There is no rear distance warning. However, the system will still give
a warning when obstacles are detected while driving forwards. The
proximity graphic will switch over to towing mode.
Audi parking system advanced*
There is no rear distance warning. However, the system will still give
a warning when obstacles are detected while driving forwards. The
proximity graphic will switch over to towing mode. The image of the
Fig. 196 Display:
Settings for parking
aid
CAR
Settings
document_0900452a81b1b9de.book Seite 177 Donnerstag, 26. Juli 2007 9:16 09
Page 194 of 342

Safe driving 192
WARNING
Any obstructions that restrict pedal travel can cause loss of
vehicle control and critical situations on the road.•
Never place objects in the driver's footwell. Such objects could
move under the pedals and interfere with their proper function. In
the event of sudden braking or a change of direction, you would
not be able to use the pedals. This could result in a loss of control
and possibly cause an accident.
Floor mats on the driver's side
Use only floor mats which can be securely fastened in the
footwell and do not obstruct the pedals.– Make sure that floor mats are securely fastened and
cannot interfere with the pedals ⇒.Use only floor mats that leave the pedal area unobstructed and are
firmly secured to prevent them from slipping. You can obtain suit-
able floor mats from your dealer or a specialist retailer.
WARNING
Any obstructions that restrict pedal travel can cause loss of
vehicle control and increase the risk of serious personal injury. •
Always make sure that floor mats are properly secured.
•
Never lay or install additional floor mats or other floor cover-
ings over the existing floor mats; this would restrict the pedal area
and possibly obstruct the pedals, which could cause an
accident.
Stowing luggage safelyLuggage compartment
All luggage and other objects must be safely secured in
the luggage compartment.Loose items in the luggage compartment can shift suddenly
and cause a safety hazard or impair the handling of the
vehicle by changing the weight distribution.
– Distribute the load evenly in the luggage compartment
⇒page 79.
– Place heavy items as far forward as possible in the
luggage compartment and secure them properly.
– Use the fastening rings* provided ⇒page 193 or the
luggage net* for securing heavy items.
WARNING
•
Loose items in the luggage compartment can shift suddenly
and cause a safety hazard or impair the handling of the vehicle by
changing the weight distribution.
•
Always stow objects in the luggage compartment and secure
them on the fastening rings*.
•
Transporting heavy objects may affect the vehicle's handling by
shifting the centre of gravity – this could cause an accident. Take
extra care when driving and adjust your speed accordingly.
•
Never exceed the maximum axle loads or the maximum gross
weight for the vehicle ⇒page 323, “Performance, weights and
dimensions”. Exceeding the permitted axle loads or gross weight
limit can affect the vehicle's handling characteristics, and increase
the risk of accidents, personal injuries or damage to the vehicle.
•
Never leave your vehicle unattended when the boot lid is open.
Children could climb into the boot and close the boot lid from the
document_0900452a81b1b9de.book Seite 192 Donnerstag, 26. Juli 2007 9:16 09
Page 234 of 342
Towing a trailer 232Towing a trailerDriving the vehicle with a trailer or
caravanTechnical requirements
The towing bracket must comply with certain technical
requirements.Your car is intended mainly for transporting passengers and
luggage. However, if suitably equipped, it can also be used to tow a
trailer or caravan.
If the car is supplied with a factory-fitted towing bracket it will
already have the necessary technical modifications and meet the
statutory requirements.
A 13-pin socket is provided to make the electrical connection
between the car and the trailer. If the trailer has a 7-pin plug you can
use an adapter cable. This is available from Audi dealers.
WARNING
If a towing bracket is retrofitted, the installation should be carried
out by a qualified workshop.•
In particular in high outside temperatures it is not possible to
drive up long steep gradients without a suitable cooling system.
The engine would then overheat.
•
Incorrect installation can result in a safety risk.
Points to check before towingTrailer weights
Never exceed the maximum permitted trailer weights ⇒page 323.If you do not load the trailer up to the maximum permitted trailer
weight, you can then climb correspondingly steeper gradients.
The maximum trailer weights listed are only applicable for altitudes
up to 1000 m above sea level. With increasing altitude the engine
power and therefore the car's climbing ability are impaired because
of the reduced air density, so the maximum trailer weight has to be
reduced accordingly. The weight of the car and trailer must be
reduced by 10% for every further 1000 m (or part thereof). This
figure refers to the combined weight of the (loaded) vehicle and
(loaded) trailer.
The figures for the draw bar weight that appear on the identification
plate of the towing bracket are for certification purposes only. The
correct figures for your specific vehicle, which may be lower than
these figures for the towing bracket, are given in the registration
documents. Also refer to ⇒page 323.
Distributing the load
Distribute loads in the trailer so that heavy objects are as near to the
axle as possible. Loads carried in the trailer must be secured to
prevent them slipping.
Where possible, operate the trailer with the maximum permitted
draw bar weight on the ball joint of the towing bracket, but do not
exceed the specified limit.
Tyre pressure
Check the tyre pressures on your car and adjust for “full load” condi-
tions (refer to the sticker listing the tyre pressures on the end face
of the driver's door). It may also be necessary to adjust the tyre pres-
sures on the trailer according to the recommendations of the trailer
manufacturer.
Exterior mirrors
Check whether you can see enough of the road behind the trailer
with the standard mirrors. If this is not the case you should have
document_0900452a81b1b9de.book Seite 232 Donnerstag, 26. Juli 2007 9:16 09
Page 235 of 342
Towing a trailer233
Controls
Safety
Driving tips
General maintenance
Self-help
Technical data additional mirrors fitted. Both exterior mirrors should be mounted
on hinged extension brackets. Adjust the mirrors to give sufficient
vision to the rear.
Headlights
Before starting a journey, check the headlight beam settings with
the trailer hitched up. If necessary, alter the height of the headlight
beams by means of the headlight range control ⇒page 60.
Power supply
When you remove the ignition key the power supply to the trailer is
interrupted.
Removable ball joint coupling
Vehicles with a factory-fitted towing bracket are equipped with a
removable ball joint coupling. It is carried under the floor panel on
the left-hand side of the luggage compartment and is secured by a
strap.
Note
We recommend having the car serviced between the normal inspec-
tion intervals if it used frequently for towing a trailer.Applies to vehicles: with towing bracketTrailer stabilisation system
Trailer stabilisation helps to reduce the risk of the vehicle
skidding when towing a trailer.The trailer stabilisation system is operational only when the ESP is
switched on and there is no malfunction in the ESP ⇒page 17.
When is the trailer stabilisation system activated?
Trailer stabilisation is active when the following requirements are
met:•
The ESP must NOT be switched off ⇒page 222,
•
The trailer connector must be properly secured in the vehicle
socket.
•
Vehicle speed must be higher than approx. 60 km/h.
How trailer stabilisation works:
In many cases, the driver can stabilise a swaying trailer by manually
braking the vehicle.
However, if the ESP detects that the trailer is swaying and this is
affecting the towing vehicle, it will automatically brake the vehicle
to stabilise the trailer by slowing it down. The warning lamp
will
light up in the instrument cluster. If possible, do not turn the
steering wheel at this stage.
In order to warn traffic behind you, the brake lights will come on
during this automatic braking operation.
A trailer weighing less than 70% of the kerb weight of the towing
vehicle may sway quite considerably without the trailer stabilisation
system intervening. This can happen when the swaying movements
of the light-weight trailer are not or hardly passed on to the towing
vehicle and are therefore not detected by the ESP.
If the system for activating the trailer brake lights is defective, this
will be indicated in the instrument cluster display ⇒page 37, “Bulb
monitor ”.
Requirements for correct functioning of the trailer
stabilisation system
If these conditions are not met in full, the trailer stabilisation system
will only intervene to a limited extent or not at all ⇒.
•
The electrical connection between the towing vehicle and the
trailer must be functioning correctly, without any defects.
•
The load on the trailer must be properly secured.
•
The tyre pressures on both the vehicle and the trailer must be
adapted to the load that is being carried.
•
Where possible, operate the trailer with the maximum permitted
draw bar weight.
document_0900452a81b1b9de.book Seite 233 Donnerstag, 26. Juli 2007 9:16 09
Page 236 of 342
Towing a trailer 234•
The trailer overrun brake must be set correctly. This is important
to ensure that the trailer can be braked correctly, to avoid the vehicle
and trailer “jack-knifing” and to prevent excess braking of the trailer.
•
At low outside temperatures, both the towing vehicle and the
trailer should be fitted with winter tyres.
WARNING
It is essential that you adjust your speed to suit the weather, road
and traffic conditions. Do not let the trailer stabilisation system
tempt you into taking any risks when driving – this can cause acci-
dents.•
The ESP and trailer stabilisation system cannot defy the laws
of physics. This should be kept in mind, particularly on slippery
and wet roads and when towing a trailer with a light load.
•
The trailer stabilisation system is functional, regardless of
whether the trailer has a mechanical overrun brake or not.
•
The trailer stabilisation system is not always able to detect
swaying of trailers with a light load and will therefore not inter-
vene.
•
A trailer can still “jack-knife” on slippery roads with little grip,
even if the towing vehicle is equipped with the trailer stabilisation
system.
•
Trailers with a high centre of gravity may even tip over before
they start to sway sideways.
•
If you are not towing a trailer, but the trailer socket is being
used (e.g. for an illuminated bicycle rack), the trailer stabilisation
system may be activated in extreme driving conditions.
•
Please note the additional information and warnings
⇒page 234.
Notes on towing
Driving with a trailer always requires extra care.Weight distribution
Try to avoid towing a loaded trailer with an unladen vehicle. If this
cannot be avoided, drive extra slowly to allow for the unbalanced
weight distribution.
Speed
The stability of the car and trailer is reduced with increasing speed.
For this reason it is advisable not to drive at the maximum permis-
sible top speed in unfavourable road, weather or wind conditions.
This applies especially on a downhill gradient.
You should always reduce speed immediately if the trailer shows
the slightest sign of swaying. Never try to stop the swaying by accel-
erating further.
Always brake in good time. If the trailer has an overrun brake, apply
the brakes gently at first and then firmly. This will prevent the jerking
that can be caused by the trailer wheels locking. Change down in
good time before going down a steep hill so that you can use the
engine braking effect to slow down the vehicle.
Swaying and pitching can be reduced by stabiliser aids. We recom-
mend having stabiliser aids installed when towing trailers with a
high trailer weight. They can be purchased and installed at an Audi
dealer.
Overheating
When climbing long hills in hot weather with the engine running
fast in low gear, you should keep an eye on the coolant temperature
gauge ⇒page 11. Reduce speed immediately if the needle moves to
the top end of the scale. If the temperature warning lamp
in the
instrument cluster should start flashing, stop the car and let the
engine cool down by running it at idling speed for a few minutes.
document_0900452a81b1b9de.book Seite 234 Donnerstag, 26. Juli 2007 9:16 09
Page 237 of 342
Towing a trailer235
Controls
Safety
Driving tips
General maintenance
Self-help
Technical data
Applies to vehicles: with towing bracketAccessories
Before mounting equipment and accessories (e.g. bicycle
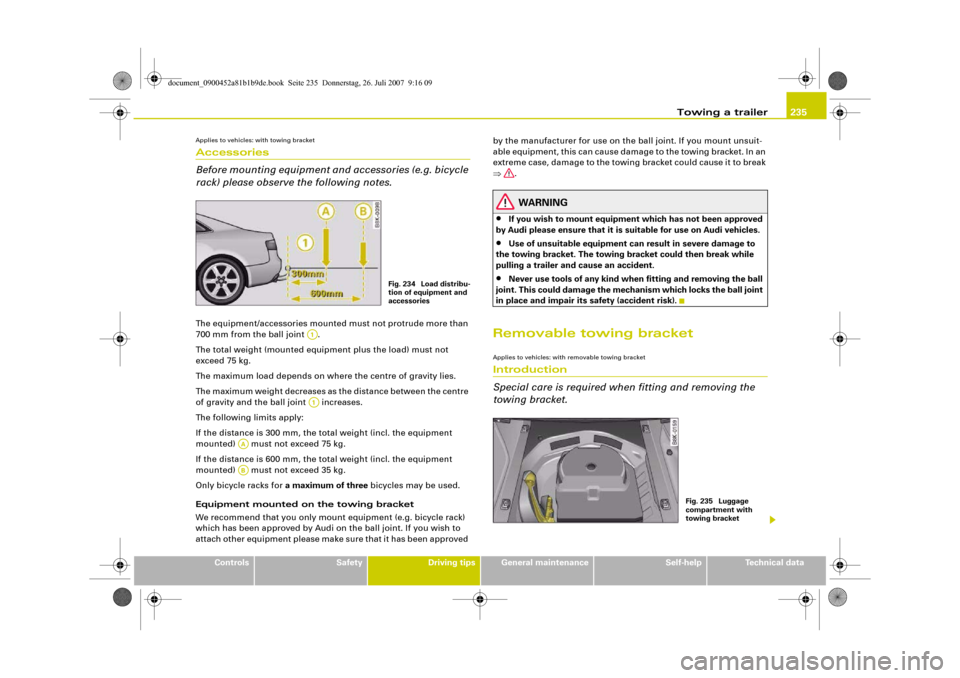
rack) please observe the following notes.The equipment/accessories mounted must not protrude more than
700 mm from the ball joint .
The total weight (mounted equipment plus the load) must not
exceed 75 kg.
The maximum load depends on where the centre of gravity lies.
The maximum weight decreases as the distance between the centre
of gravity and the ball joint increases.
The following limits apply:
If the distance is 300 mm, the total weight (incl. the equipment
mounted) must not exceed 75 kg.
If the distance is 600 mm, the total weight (incl. the equipment
mounted) must not exceed 35 kg.
Only bicycle racks for a maximum of three bicycles may be used.
Equipment mounted on the towing bracket
We recommend that you only mount equipment (e.g. bicycle rack)
which has been approved by Audi on the ball joint. If you wish to
attach other equipment please make sure that it has been approved by the manufacturer for use on the ball joint. If you mount unsuit-
able equipment, this can cause damage to the towing bracket. In an
extreme case, damage to the towing bracket could cause it to break
⇒.
WARNING
•
If you wish to mount equipment which has not been approved
by Audi please ensure that it is suitable for use on Audi vehicles.
•
Use of unsuitable equipment can result in severe damage to
the towing bracket. The towing bracket could then break while
pulling a trailer and cause an accident.
•
Never use tools of any kind when fitting and removing the ball
joint. This could damage the mechanism which locks the ball joint
in place and impair its safety (accident risk).
Removable towing bracketApplies to vehicles: with removable towing bracketIntroduction
Special care is required when fitting and removing the
towing bracket.
Fig. 234 Load distribu-
tion of equipment and
accessories
A1A1
AAAB
Fig. 235 Luggage
compartment with
towing bracket
document_0900452a81b1b9de.book Seite 235 Donnerstag, 26. Juli 2007 9:16 09