2008 AUDI A4 mirror controls
[x] Cancel search: mirror controlsPage 157 of 342
Audi side assist155
Controls
Safety
Driving tips
General maintenance
Self-help
Technical data quickly. The warning lamp on the exterior mirror does not light up
⇒ in “Safety notes” on page 157.
Warning lamp on exterior mirror does not light up
If you operate the turn signal in situation , the warning lamp on
the exterior mirror will still not give any warning ⇒ in “Safety
notes” on page 157.
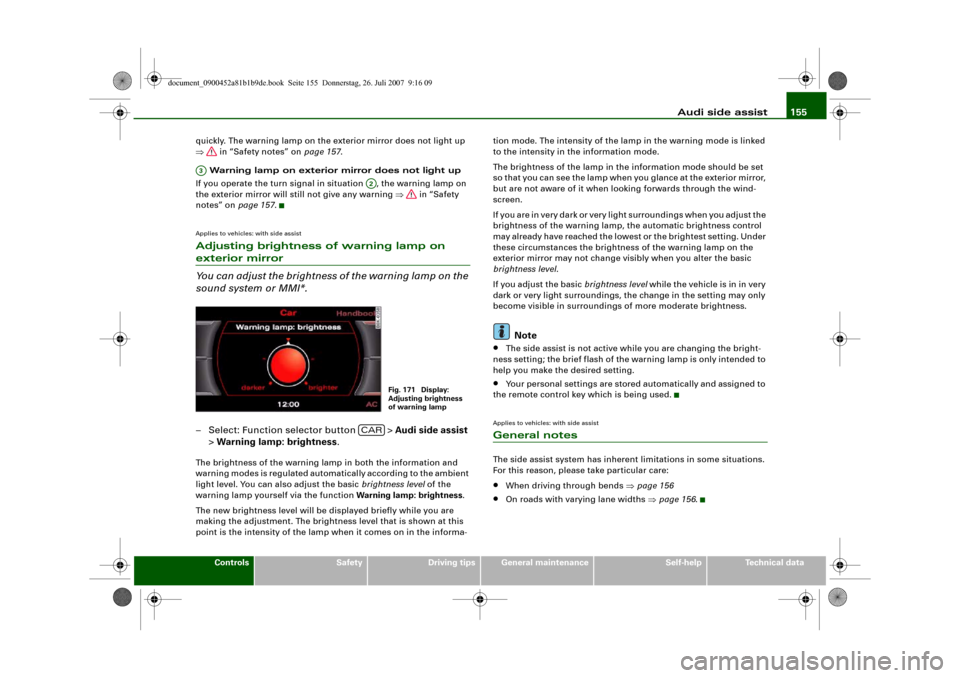
Applies to vehicles: with side assistAdjusting brightness of warning lamp on exterior mirror
You can adjust the brightness of the warning lamp on the
sound system or MMI*.– Select: Function selector button > Audi side assist
> Warning lamp: brightness.The brightness of the warning lamp in both the information and
warning modes is regulated automatically according to the ambient
light level. You can also adjust the basic brightness level of the
warning lamp yourself via the function Warning lamp: brightness.
The new brightness level will be displayed briefly while you are
making the adjustment. The brightness level that is shown at this
point is the intensity of the lamp when it comes on in the informa-tion mode. The intensity of the lamp in the warning mode is linked
to the intensity in the information mode.
The brightness of the lamp in the information mode should be set
so that you can see the lamp when you glance at the exterior mirror,
but are not aware of it when looking forwards through the wind-
screen.
If you are in very dark or very light surroundings when you adjust the
brightness of the warning lamp, the automatic brightness control
may already have reached the lowest or the brightest setting. Under
these circumstances the brightness of the warning lamp on the
exterior mirror may not change visibly when you alter the basic
brightness level.
If you adjust the basic brightness level while the vehicle is in in very
dark or very light surroundings, the change in the setting may only
become visible in surroundings of more moderate brightness.
Note
•
The side assist is not active while you are changing the bright-
ness setting; the brief flash of the warning lamp is only intended to
help you make the desired setting.
•
Your personal settings are stored automatically and assigned to
the remote control key which is being used.
Applies to vehicles: with side assistGeneral notesThe side assist system has inherent limitations in some situations.
For this reason, please take particular care:•
When driving through bends ⇒page 156
•
On roads with varying lane widths ⇒page 156.
A3
A2
Fig. 171 Display:
Adjusting brightness
of warning lamp
CAR
document_0900452a81b1b9de.book Seite 155 Donnerstag, 26. Juli 2007 9:16 09
Page 171 of 342
Parking aid169
Controls
Safety
Driving tips
General maintenance
Self-help
Technical data
Parking aidApplies to vehicles: with Audi parking system/plus/advancedGeneral notesVarious systems are available to help you when parking or manoeu-
vring in tight spaces, depending on the equipment fitted on your
vehicle.
The Audi parking system gives an acoustic warning if there are any
obstacles behind the car ⇒page 169.
When you are parking, the Audi parking system plus warns you
acoustically and optically about obstacles in front of and behind the
vehicle ⇒page 170.
In conjunction with a reversing camera, the Audi parking system
advanced shows a picture of the area behind the vehicle. This
picture helps you to manoevre the vehicle backwards and sideways.
In addition, you are assisted by the acoustic signals and graphic
display of the parking aid ⇒page 171.
Note
To ensure that the acoustic parking aid works properly, the sensors
must be kept clean and free of snow and ice.Audi parking systemApplies to vehicles: with Audi parking systemDescription
The Audi parking system is an acoustic parking aid.Sensors are located in the rear bumper. When the sensors detect an
obstacle, you are alerted by acoustic signals (beeps). The measuring
range of the sensors starts at about:The acoustic signals sound with increasing frequency as you
approach the obstacle. A warning tone will sound continuously
when the vehicle is less than approx. 0.30 m away from the obstacle.
Stop reversing immediately!
The volume of the warning beeps will be gradually reduced after
about 4 seconds if the vehicle remains at a constant distance from
a detected obstacle (it will not be reduced if the obstacle is closer
than 0.30 m).
The parking aid is switched on automatically when reverse gear is
engaged. You will hear a brief acknowledgement tone.
WARNING
•
The parking aid cannot replace the full concentration of the
driver. The driver is always responsible for safety during parking
and other manoeuvres.
•
The sensors have blind spots in which obstacles are not regis-
tered. It is particularly important to ensure that there are no small
children or animals near the vehicle, as the sensors may not
always be able to detect them.
•
Always keep a close watch on the area around the vehicle and
make full use of the rear-view mirrors.Caution
Please note that low obstacles detected by the system may no
longer be registered by the sensors as the car moves closer, so the
system will not give any further warning. Certain kinds of obstacles
(such as wire fences, chains, thin painted posts or trailer draw bars, Rear
Side
0.60 m
Centre
1.60 m
document_0900452a81b1b9de.book Seite 169 Donnerstag, 26. Juli 2007 9:16 09
Page 173 of 342
Parking aid171
Controls
Safety
Driving tips
General maintenance
Self-help
Technical data
– Press the switch
, or
– Switch off the ignition.
Segments in the graphic display
You can estimate the distance to an obstacle by referring to the red
segments at the front and rear of the vehicle ⇒page 170, fig. 186.
The closer the vehicle gets to the obstacle the closer the segments
move towards the vehicle in the graphic. At the latest when the
penultimate segment is highlighted the vehicle has reached the
danger (collision) zone. Stop moving immediately ⇒!
WARNING
•
The parking aid cannot replace the full concentration of the
driver. The driver is always responsible for safety during parking
and other manoeuvres.
•
The sensors have blind spots in which obstacles are not regis-
tered. It is particularly important to ensure that there are no small
children or animals near the vehicle, as the sensors may not
always be able to detect them.
•
Always keep a close watch on the area around the vehicle and
make full use of the rear-view mirrors.Caution
Please note that low obstacles detected by the system may no
longer be registered by the sensors as the car moves closer, so the
system will not give any further warning. Certain kinds of obstacles
(such as wire fences, chains, thin painted posts or trailer draw bars,
etc.) may not always be detected by the system, so take care not to
damage the vehicle in such cases.
Note
•
You can change the display and adjust the volume and pitch of
the beeps ⇒page 177.
•
Please refer to the notes on towing ⇒page 177.
•
There is a slight delay in the picture display.
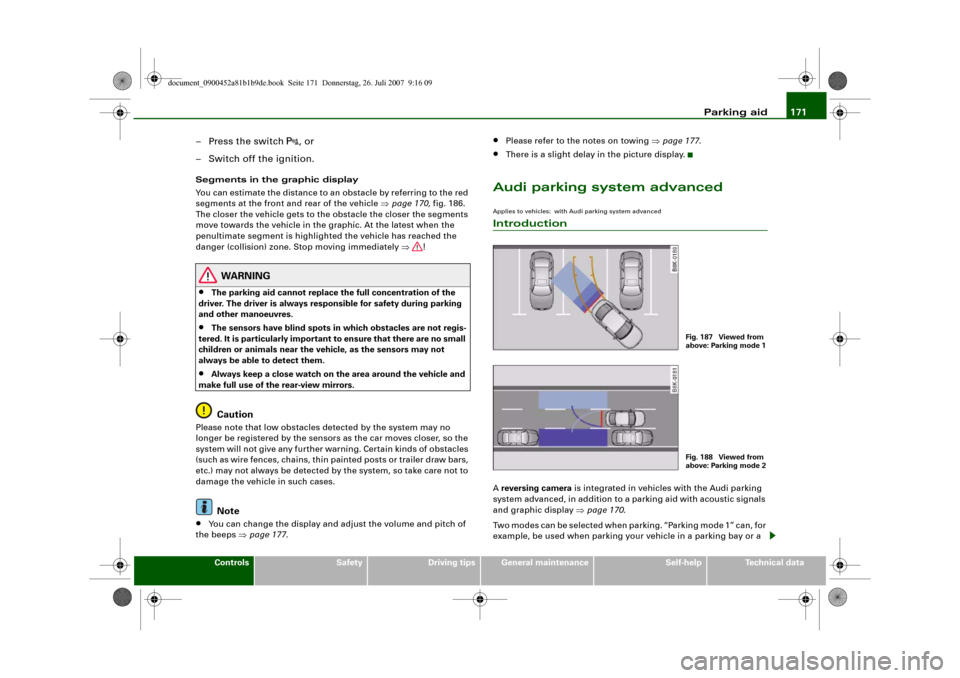
Audi parking system advancedApplies to vehicles: with Audi parking system advancedIntroductionA reversing camera is integrated in vehicles with the Audi parking
system advanced, in addition to a parking aid with acoustic signals
and graphic display ⇒page 170.
Two modes can be selected when parking. “Parking mode 1” can, for
example, be used when parking your vehicle in a parking bay or a
Fig. 187 Viewed from
above: Parking mode 1Fig. 188 Viewed from
above: Parking mode 2
document_0900452a81b1b9de.book Seite 171 Donnerstag, 26. Juli 2007 9:16 09
Page 175 of 342
Parking aid173
Controls
Safety
Driving tips
General maintenance
Self-help
Technical data
•
Moisten the lens using a commercially available, alcohol-based
glass cleaning agent and clean the lens with a dry cloth ⇒.
•
Use a small brush to remove snow and a de-icer spray to remove
ice ⇒.
WARNING
•
The parking aid cannot replace the full concentration of the
driver. The driver is always responsible for safety during parking
and other manoeuvres.
•
Always keep a close watch on the area around the vehicle and
make full use of the rear-view mirrors.
•
Do not allow the camera images in the MMI display to distract
you from watching the traffic.
•
For safety reasons, you should not use the system if the posi-
tion and installation angle of the camera have been changed, e.g.
in a rear-end collision. Have it checked by a qualified workshop.Caution
•
Please note that low obstacles detected by the system may no
longer be registered by the sensors as the car moves closer, so the
system will not give any further warning. Certain kinds of obstacles
(such as wire fences, chains, thin painted posts or trailer draw bars,
etc.) may not always be detected by the system, so take care not to
damage the vehicle in such cases.
•
Never remove snow and ice from the lens of the reversing
camera using warm or hot water - danger of cracks appearing on the
lens.
•
Never use abrasive cleaning agents on the lens.
Applies to vehicles: with Audi parking system advancedSwitching on/off
The reversing camera is automatically switched on
together with the acoustic signals and graphic display
when you select reverse gear.Switching on
– Switch on the MMI system.
– Engage reverse gear, or
– Press the switch
in the centre console ⇒page 170,
fig. 185. You will hear a brief acknowledgement tone and
the diode in the switch will light up.
Switching off
– Drive forwards faster than 10 km/h, or
– Press the switch
, or
– Switch off the ignition.
Changing display via MMI
– Press the control button for Graphic ⇒page 174, fig. 192
to show the graphic display on the screen.
– Press the control button for Rear View to display the
picture from the reversing camera.
WARNING
•
Some objects (e.g. narrow posts or bars), recesses in the
ground or protruding parts on other vehicles may not be displayed
in a satisfactory manner or may not be displayed at all on the MMI
screen.A5
document_0900452a81b1b9de.book Seite 173 Donnerstag, 26. Juli 2007 9:16 09
Page 177 of 342
Parking aid175
Controls
Safety
Driving tips
General maintenance
Self-help
Technical data
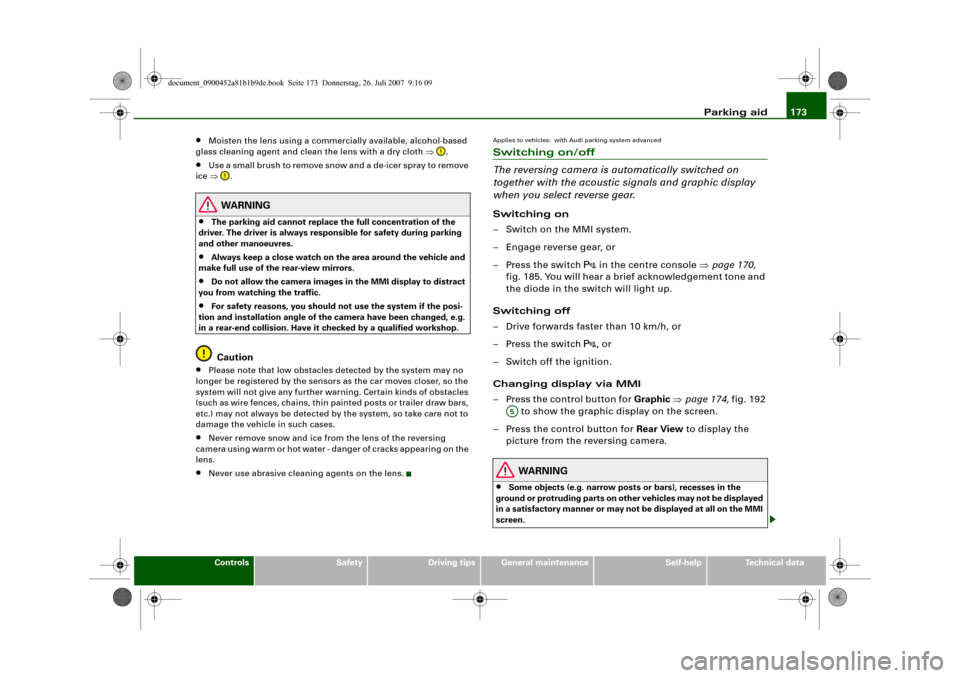
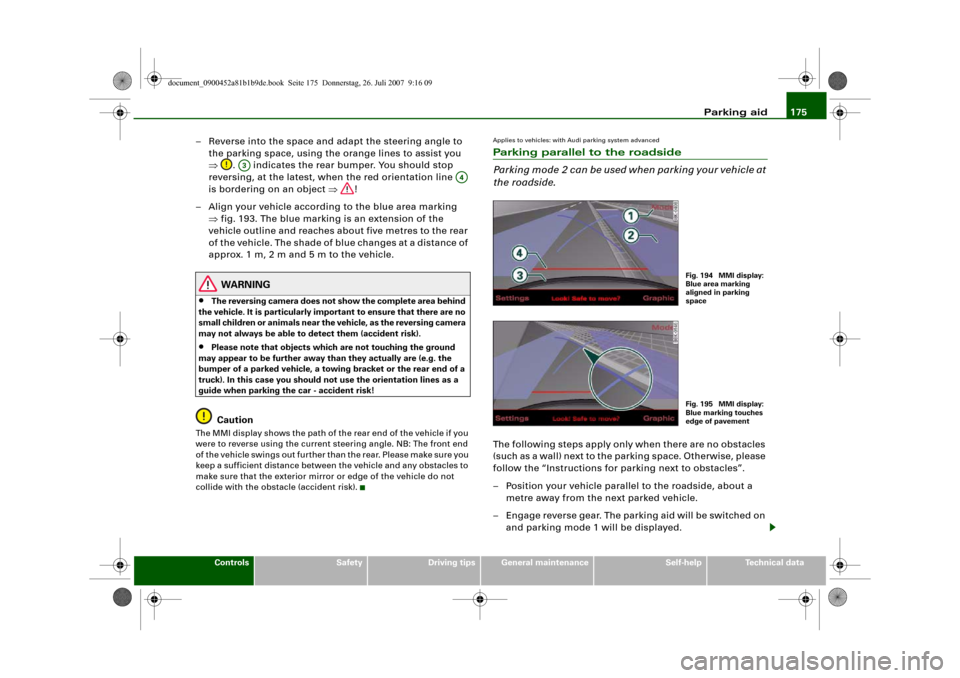
– Reverse into the space and adapt the steering angle to
the parking space, using the orange lines to assist you
⇒. indicates the rear bumper. You should stop
reversing, at the latest, when the red orientation line
is bordering on an object ⇒!
– Align your vehicle according to the blue area marking
⇒fig. 193. The blue marking is an extension of the
vehicle outline and reaches about five metres to the rear
of the vehicle. The shade of blue changes at a distance of
approx. 1m, 2m and 5m to the vehicle.
WARNING
•
The reversing camera does not show the complete area behind
the vehicle. It is particularly important to ensure that there are no
small children or animals near the vehicle, as the reversing camera
may not always be able to detect them (accident risk).
•
Please note that objects which are not touching the ground
may appear to be further away than they actually are (e.g. the
bumper of a parked vehicle, a towing bracket or the rear end of a
truck). In this case you should not use the orientation lines as a
guide when parking the car - accident risk!Caution
The MMI display shows the path of the rear end of the vehicle if you
were to reverse using the current steering angle. NB: The front end
of the vehicle swings out further than the rear. Please make sure you
keep a sufficient distance between the vehicle and any obstacles to
make sure that the exterior mirror or edge of the vehicle do not
collide with the obstacle (accident risk).
Applies to vehicles: with Audi parking system advancedParking parallel to the roadside
Parking mode 2 can be used when parking your vehicle at
the roadside.The following steps apply only when there are no obstacles
(such as a wall) next to the parking space. Otherwise, please
follow the “Instructions for parking next to obstacles”.
– Position your vehicle parallel to the roadside, about a
metre away from the next parked vehicle.
– Engage reverse gear. The parking aid will be switched on
and parking mode 1 will be displayed.
A3
A4
Fig. 194 MMI display:
Blue area marking
aligned in parking
spaceFig. 195 MMI display:
Blue marking touches
edge of pavement
document_0900452a81b1b9de.book Seite 175 Donnerstag, 26. Juli 2007 9:16 09
Page 189 of 342
Safe driving187
Controls
Safety
Driving tips
General maintenance
Self-help
Technical data
Before every trip
The driver is responsible for the safety of the passengers
and the safe operation of the vehicle at all times.For your own safety and the safety of your passengers,
always note the following points before every trip:
– Make sure that all lights and turn signals are working
properly.
– Check the tyre pressures.
– Make sure that all windows are clean and give good visi-
bility to the outside.
– Secure all luggage and other items carefully ⇒page 79.
– Make sure that no objects can interfere with the pedals.
– Adjust the front seat, head restraint and mirrors
correctly.
– Make sure that the head restraints for all passengers are
adjusted to the correct position.
– Make sure that children are protected with suitable
safety seats and properly worn seat belts ⇒page 210.
– Sit in the correct position in your seat and make sure that
your passengers do the same. ⇒page 73.
– Fasten your seat belt correctly. Make sure that your
passengers do the same ⇒page 194.
What affects driving safety?
Safety on the road is directly related to how you drive, and
can also be affected by the passengers in the vehicle.The driver is responsible for the safety of the vehicle and all
its occupants. If your ability to drive is impaired in any way,
you endanger yourself and other road users ⇒. There-
fore:
– Do not let yourself be distracted by passengers or by
using a mobile phone, etc.
– Never drive when your driving ability is impaired (by
medication, alcohol, drugs, etc.).
– Obey all traffic regulations and speed limits and always
maintain a safe distance to the vehicle in front.
– Always adjust your speed to suit the road, traffic and
weather conditions.
– Take frequent breaks on long trips. Do not drive for more
than two hours without a stop.
– If possible, avoid driving when you are tired or stressed.
WARNING
•
Distractions while driving or any kind of impairment to your
driving ability increase the risk of accident and injury.
•
Do not store loose objects on the dashboard. These objects
could fly around the interior when the vehicle is moving (under
acceleration or whilst cornering) and distract the driver – this
could lead to an accident.
document_0900452a81b1b9de.book Seite 187 Donnerstag, 26. Juli 2007 9:16 09
Page 235 of 342
Towing a trailer233
Controls
Safety
Driving tips
General maintenance
Self-help
Technical data additional mirrors fitted. Both exterior mirrors should be mounted
on hinged extension brackets. Adjust the mirrors to give sufficient
vision to the rear.
Headlights
Before starting a journey, check the headlight beam settings with
the trailer hitched up. If necessary, alter the height of the headlight
beams by means of the headlight range control ⇒page 60.
Power supply
When you remove the ignition key the power supply to the trailer is
interrupted.
Removable ball joint coupling
Vehicles with a factory-fitted towing bracket are equipped with a
removable ball joint coupling. It is carried under the floor panel on
the left-hand side of the luggage compartment and is secured by a
strap.
Note
We recommend having the car serviced between the normal inspec-
tion intervals if it used frequently for towing a trailer.Applies to vehicles: with towing bracketTrailer stabilisation system
Trailer stabilisation helps to reduce the risk of the vehicle
skidding when towing a trailer.The trailer stabilisation system is operational only when the ESP is
switched on and there is no malfunction in the ESP ⇒page 17.
When is the trailer stabilisation system activated?
Trailer stabilisation is active when the following requirements are
met:•
The ESP must NOT be switched off ⇒page 222,
•
The trailer connector must be properly secured in the vehicle
socket.
•
Vehicle speed must be higher than approx. 60 km/h.
How trailer stabilisation works:
In many cases, the driver can stabilise a swaying trailer by manually
braking the vehicle.
However, if the ESP detects that the trailer is swaying and this is
affecting the towing vehicle, it will automatically brake the vehicle
to stabilise the trailer by slowing it down. The warning lamp
will
light up in the instrument cluster. If possible, do not turn the
steering wheel at this stage.
In order to warn traffic behind you, the brake lights will come on
during this automatic braking operation.
A trailer weighing less than 70% of the kerb weight of the towing
vehicle may sway quite considerably without the trailer stabilisation
system intervening. This can happen when the swaying movements
of the light-weight trailer are not or hardly passed on to the towing
vehicle and are therefore not detected by the ESP.
If the system for activating the trailer brake lights is defective, this
will be indicated in the instrument cluster display ⇒page 37, “Bulb
monitor ”.
Requirements for correct functioning of the trailer
stabilisation system
If these conditions are not met in full, the trailer stabilisation system
will only intervene to a limited extent or not at all ⇒.
•
The electrical connection between the towing vehicle and the
trailer must be functioning correctly, without any defects.
•
The load on the trailer must be properly secured.
•
The tyre pressures on both the vehicle and the trailer must be
adapted to the load that is being carried.
•
Where possible, operate the trailer with the maximum permitted
draw bar weight.
document_0900452a81b1b9de.book Seite 233 Donnerstag, 26. Juli 2007 9:16 09
Page 303 of 342
Fuses and bulbs301
Controls
Safety
Driving tips
General maintenance
Self-help
Technical data The seats with electrical adjustment are protected by circuit
breakers. These reset automatically after a few seconds when the
overload has been corrected.
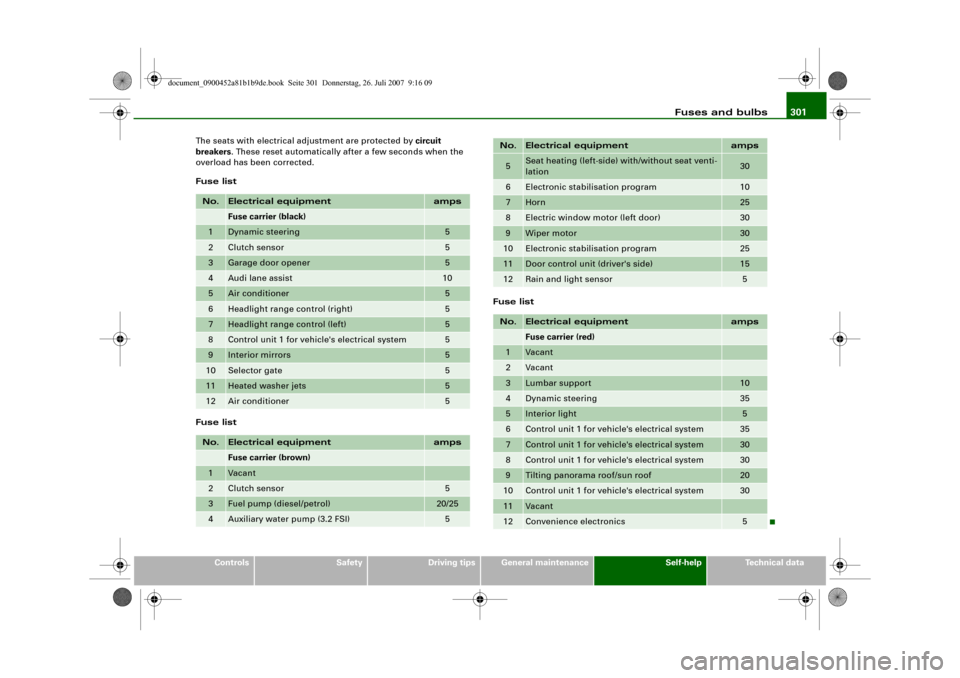
Fuse list
Fuse listFuse list
No.
Electrical equipment
amps
Fuse carrier (black)
1
Dynamic steering
5
2
Clutch sensor
5
3
Garage door opener
5
4
Audi lane assist
10
5
Air conditioner
5
6
Headlight range control (right)
5
7
Headlight range control (left)
5
8
Control unit 1 for vehicle's electrical system
5
9
Interior mirrors
5
10
Selector gate
5
11
Heated washer jets
5
12
Air conditioner
5
No.
Electrical equipment
amps
Fuse carrier (brown)
1
Vacant
2
Clutch sensor
5
3
Fuel pump (diesel/petrol)
20/25
4
Auxiliary water pump (3.2 FSI)
5
5
Seat heating (left-side) with/without seat venti-
lation
30
6
Electronic stabilisation program
10
7
Horn
25
8
Electric window motor (left door)
30
9
Wiper motor
30
10
Electronic stabilisation program
25
11
Door control unit (driver's side)
15
12
Rain and light sensor
5
No.
Electrical equipment
amps
Fuse carrier (red)
1
Vacant
2
Vacant
3
Lumbar support
10
4
Dynamic steering
35
5
Interior light
5
6
Control unit 1 for vehicle's electrical system
35
7
Control unit 1 for vehicle's electrical system
30
8
Control unit 1 for vehicle's electrical system
30
9
Tilting panorama roof/sun roof
20
10
Control unit 1 for vehicle's electrical system
30
11
Vacant
12
Convenience electronics
5
No.
Electrical equipment
amps
document_0900452a81b1b9de.book Seite 301 Donnerstag, 26. Juli 2007 9:16 09