2008 AUDI A4 change time
[x] Cancel search: change timePage 61 of 342
Lights and vision59
Controls
Safety
Driving tips
General maintenance
Self-help
Technical data
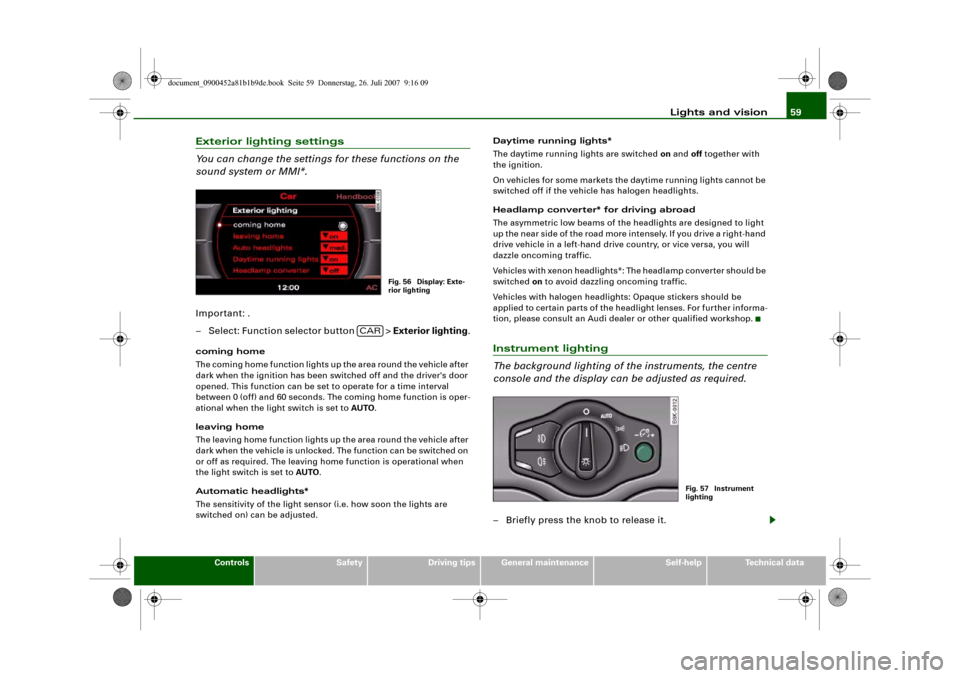
Exterior lighting settings
You can change the settings for these functions on the
sound system or MMI*.Important: .
– Select: Function selector button > Exterior lighting.coming home
The coming home function lights up the area round the vehicle after
dark when the ignition has been switched off and the driver's door
opened. This function can be set to operate for a time interval
between 0 (off) and 60 seconds. The coming home function is oper-
ational when the light switch is set to AUTO.
leaving home
The leaving home function lights up the area round the vehicle after
dark when the vehicle is unlocked. The function can be switched on
or off as required. The leaving home function is operational when
the light switch is set to AUTO.
Automatic headlights*
The sensitivity of the light sensor (i.e. how soon the lights are
switched on) can be adjusted.Daytime running lights*
The daytime running lights are switched on and off together with
the ignition.
On vehicles for some markets the daytime running lights cannot be
switched off if the vehicle has halogen headlights.
Headlamp converter* for driving abroad
The asymmetric low beams of the headlights are designed to light
up the near side of the road more intensely. If you drive a right-hand
drive vehicle in a left-hand drive country, or vice versa, you will
dazzle oncoming traffic.
Vehicles with xenon headlights*: The headlamp converter should be
switched on to avoid dazzling oncoming traffic.
Vehicles with halogen headlights: Opaque stickers should be
applied to certain parts of the headlight lenses. For further informa-
tion, please consult an Audi dealer or other qualified workshop.
Instrument lighting
The background lighting of the instruments, the centre
console and the display can be adjusted as required.– Briefly press the knob to release it.
Fig. 56 Display: Exte-
rior lighting
CAR
Fig. 57 Instrument
lighting
document_0900452a81b1b9de.book Seite 59 Donnerstag, 26. Juli 2007 9:16 09
Page 62 of 342
Lights and vision 60
– Turn the button clockwise +” to increase the brightness
of the instrument lighting in dark conditions.
– Turn the button anti-clockwise -” to reduce the bright-
ness of the instrument lighting in dark conditions.
– Press the knob in again to prevent the setting from being
changed unintentionally.The instrument lighting (dials and needles), the centre console illu-
mination and the illumination of the displays are regulated by a
light sensor incorporated in the instrument cluster. In bright condi-
tions any changes made to the brightness of the instrument lighting
have no effect.
Note
The instrument lighting (illumination of dials and needles) is
switched on when the ignition is on and the vehicle's lights are off.
The instrument lighting is dimmed automatically as the daylight
starts to fade; it is switched off completely when the light condi-
tions become very poor. This function is intended to remind the
driver to switch on the dipped-beam headlights in good time when
light conditions become poor.
Applies to vehicles: with headlight range controlHeadlight range control
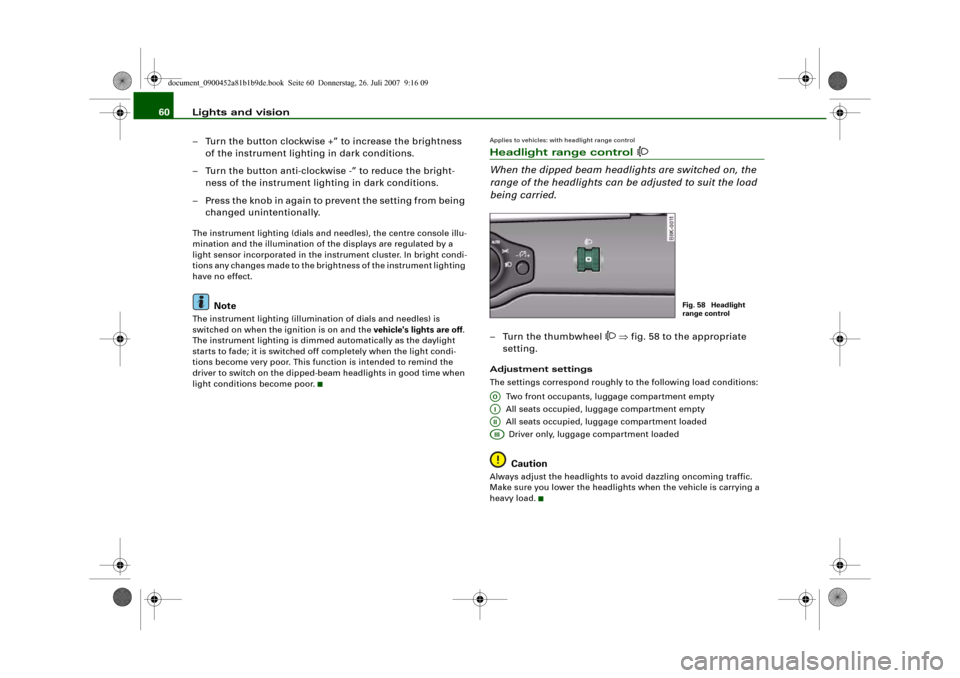
When the dipped beam headlights are switched on, the
range of the headlights can be adjusted to suit the load
being carried.– Turn the thumbwheel
⇒fig. 58 to the appropriate
setting.
Adjustment settings
The settings correspond roughly to the following load conditions:
Two front occupants, luggage compartment empty
All seats occupied, luggage compartment empty
All seats occupied, luggage compartment loaded
Driver only, luggage compartment loaded
Caution
Always adjust the headlights to avoid dazzling oncoming traffic.
Make sure you lower the headlights when the vehicle is carrying a
heavy load.
Fig. 58 Headlight
range control
AOAIAIIAIII
document_0900452a81b1b9de.book Seite 60 Donnerstag, 26. Juli 2007 9:16 09
Page 69 of 342
Lights and vision67
Controls
Safety
Driving tips
General maintenance
Self-help
Technical data
Note
•
Check that the washer fluid reservoir is full before starting a long
journey. Filling the reservoir ⇒page 267.
•
Worn or dirty wiper blades can cause smearing on the glass
which can also impair the effectiveness of the rain sensor. Please
check the wiper blades regularly.
Applies to vehicles: with headlight washersHeadlight washer systemThe headlight washer system only operates when the lights
are switched on.
– Move the automatic wash and wipe lever to position
⇒page 65, fig. 67.The headlight washer system is always activated the first time you
operate the automatic wash and wipe. Subsequently, it is only acti-
vated about every five wash and wipe cycles. The headlights are
always washed if you hold the lever for longer than about
2seconds.
The headlight washer jets come out of the bumper automatically
(under water pressure).
Clean off stubborn dirt (insects, etc.) from the lenses at regular
intervals, for instance when stopping for fuel.
To ensure that the system works properly in winter, keep the nozzle
holders free of snow and remove any ice with a de-icer spray.
Service position
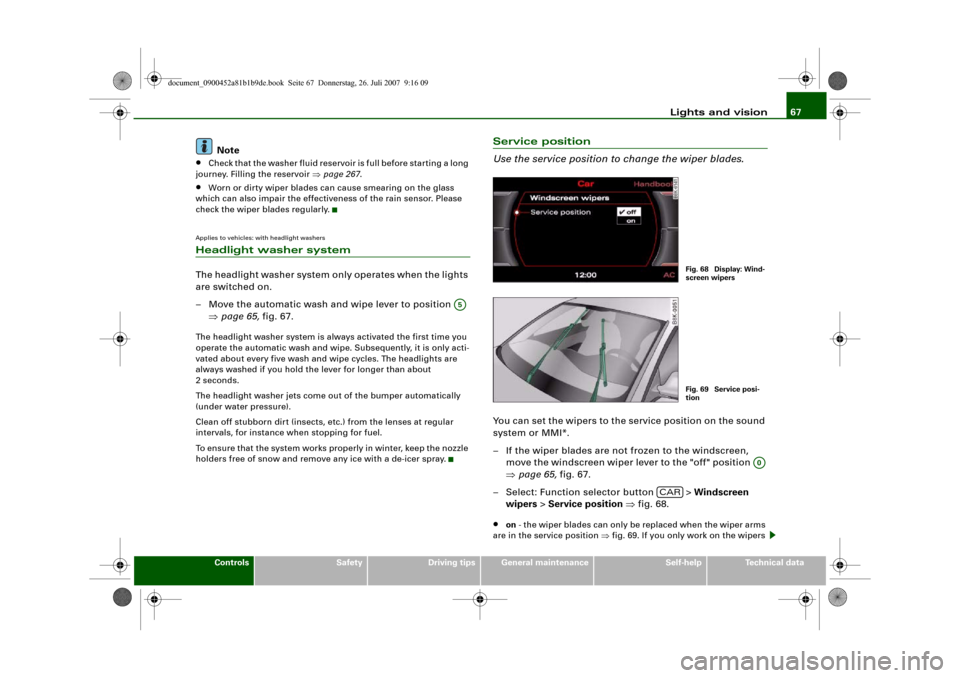
Use the service position to change the wiper blades.You can set the wipers to the service position on the sound
system or MMI*.
– If the wiper blades are not frozen to the windscreen,
move the windscreen wiper lever to the "off" position
⇒page 65, fig. 67.
– Select: Function selector button > Windscreen
wipers > Service position ⇒fig. 68.•
on - the wiper blades can only be replaced when the wiper arms
are in the service position ⇒fig. 69. If you only work on the wipers
A5
Fig. 68 Display: Wind-
screen wipersFig. 69 Service posi-
tion
A0
CAR
document_0900452a81b1b9de.book Seite 67 Donnerstag, 26. Juli 2007 9:16 09
Page 103 of 342
Heating and cooling101
Controls
Safety
Driving tips
General maintenance
Self-help
Technical data
Applies to vehicles: with diesel engineSupplementary heater– Set the Supplementary heater to auto or off.Models with a diesel engine are equipped with a supplementary
heater to help warm up the interior more quickly. At outside temper-
atures below about +5 °C the supplementary heater is switched on
(and off) automatically when the engine is running, depending on
the coolant temperature, the temperature in the vehicle interior and
the temperature the heater is set to.Deluxe automatic air conditioner plusApplies to vehicles: with deluxe automatic air conditioner plusDescription
The air conditioner is designed to keep the passenger
compartment at the temperature you find most comfort-
able at all times of the year.The air conditioner provides heating and ventilation and also cools
and dehumidifies the air inside the vehicle.
The air conditioner is fully automatic, and will maintain the desired
temperature at a constant level. To achieve this, the temperature of
the air supplied to the interior, the blower speed (volume of air
delivery) and the air distribution are regulated automatically. The
system also allows for the effect of strong sunlight, so there is no
need for manual adjustment. For these reasons it is advisable to use
the automatic mode for the comfort of all the passengers in virtually
all conditions throughout the year ⇒page 103.
Please note:
The humidity of the air is automatically reduced when the system
cools the interior of the vehicle. This helps to prevent condensation
on the windows.If the humidity and temperature outside the vehicle are high,
condensation can drip off the evaporator in the air cooling system
and form a pool underneath the vehicle. This is normal and does not
indicate a leak.
If the outside temperature is low, the blower normally only switches
to a higher speed once the coolant has warmed up sufficiently (this
does not apply to the defrost setting).
In order to achieve maximum engine power, the air conditioner
compressor is temporarily switched off when pulling away from a
standstill with full throttle.
The compressor also switches off if the coolant temperature is
excessively high, to ensure adequate engine cooling under extreme
loads.
Pollution filter
The pollution filter (a combined particle filter and activated charcoal
filter) serves as a barrier against impurities in the outside air,
including dust and pollen, and against unpleasant smells. The air is
also filtered when the air recirculation mode is activated.
For the air conditioner to work with maximum efficiency, the pollu-
tion filter element must be replaced at the intervals specified in the
Service Schedule.
If the vehicle is driven in areas with a high level of air pollution and
the filter is no longer fully effective, it may be necessary to change
the filter element more frequently.
Key-coded settings
The currently selected air conditioner settings are automatically
stored and assigned to the remote control key.
Power management
To prevent the battery from becoming discharged and to maintain
the necessary power level, the system will temporarily shut off the
electrical components that are using a lot of power, or reduce the
current they are consuming ⇒page 226. Heating systems in partic-
ular use a large amount of electrical power. If you notice, for
document_0900452a81b1b9de.book Seite 101 Donnerstag, 26. Juli 2007 9:16 09
Page 114 of 342
Heating and cooling 112
Setting the timers
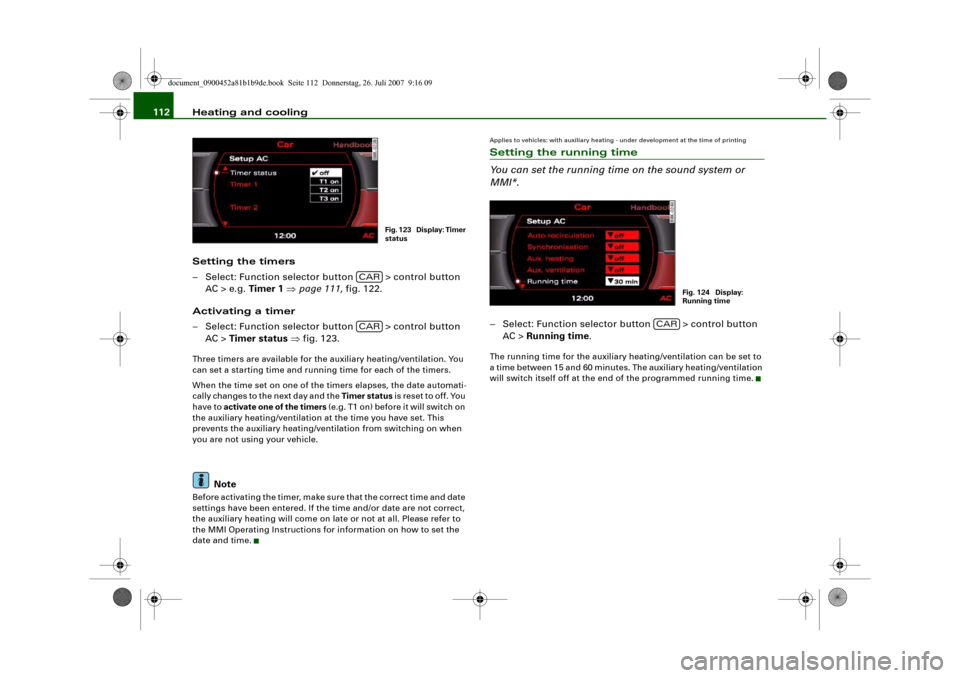
– Select: Function selector button > control button
AC > e.g. Timer 1 ⇒page 111, fig. 122.
Activating a timer
– Select: Function selector button > control button
AC > Timer status ⇒fig. 123.Three timers are available for the auxiliary heating/ventilation. You
can set a starting time and running time for each of the timers.
When the time set on one of the timers elapses, the date automati-
cally changes to the next day and the Timer status is reset to off. You
have to activate one of the timers (e.g. T1 on) before it will switch on
the auxiliary heating/ventilation at the time you have set. This
prevents the auxiliary heating/ventilation from switching on when
you are not using your vehicle.
Note
Before activating the timer, make sure that the correct time and date
settings have been entered. If the time and/or date are not correct,
the auxiliary heating will come on late or not at all. Please refer to
the MMI Operating Instructions for information on how to set the
date and time.
Applies to vehicles: with auxiliary heating - under development at the time of printingSetting the running time
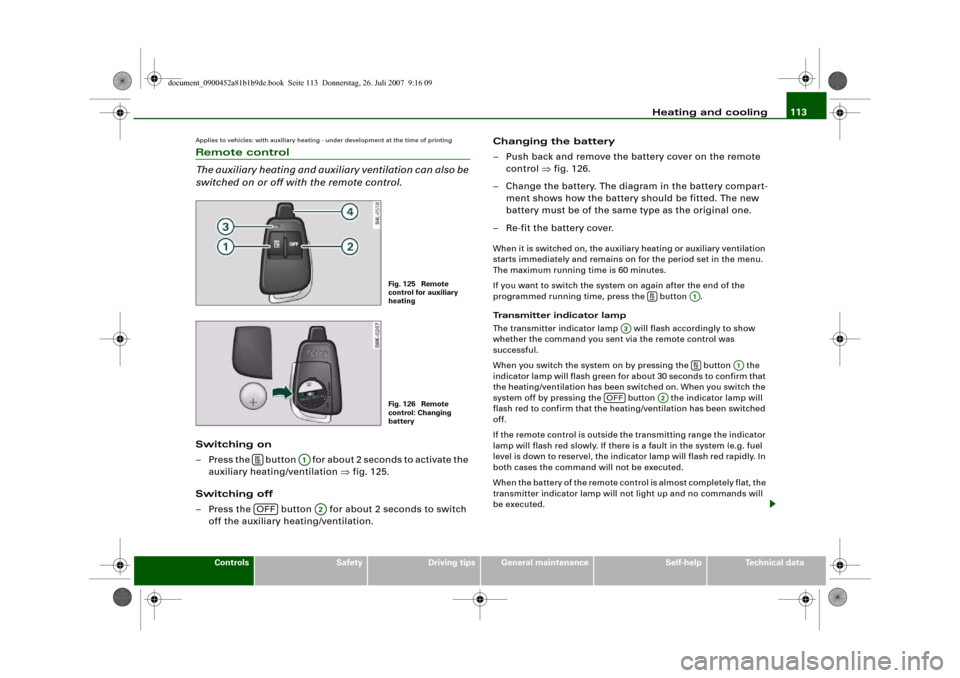
You can set the running time on the sound system or
MMI*.– Select: Function selector button > control button
AC > Running time.The running time for the auxiliary heating/ventilation can be set to
a time between 15 and 60 minutes. The auxiliary heating/ventilation
will switch itself off at the end of the programmed running time.
Fig. 123 Display: Timer
status
CARCAR
Fig. 124 Display:
Running time
CAR
document_0900452a81b1b9de.book Seite 112 Donnerstag, 26. Juli 2007 9:16 09
Page 115 of 342
Heating and cooling113
Controls
Safety
Driving tips
General maintenance
Self-help
Technical data
Applies to vehicles: with auxiliary heating - under development at the time of printingRemote control
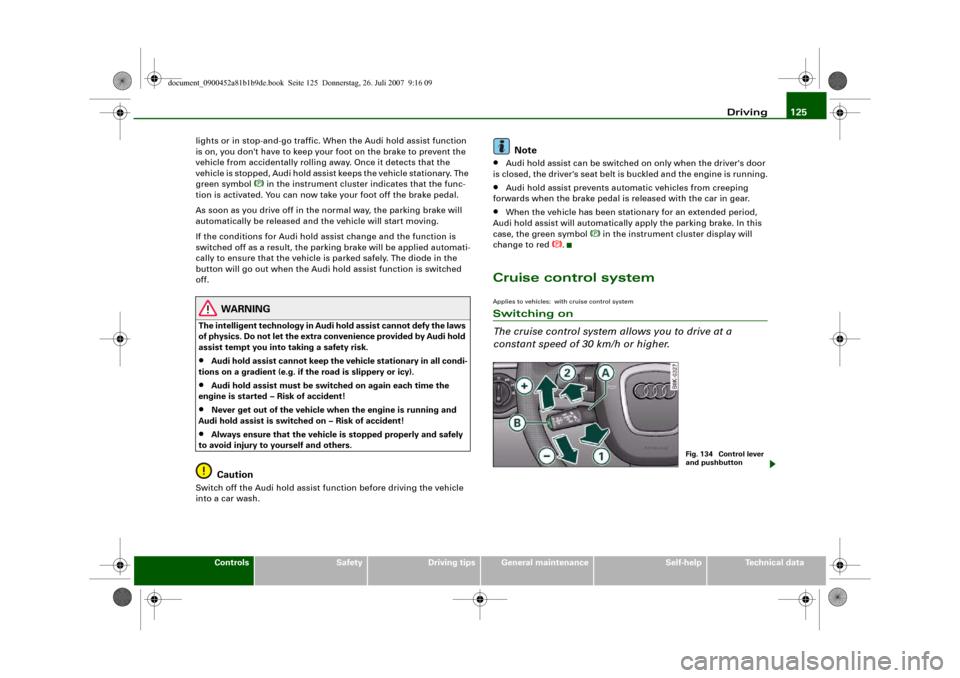
The auxiliary heating and auxiliary ventilation can also be
switched on or off with the remote control.Switching on
– Press the button for about 2 seconds to activate the
auxiliary heating/ventilation ⇒fig. 125.
Switching off
– Press the button for about 2 seconds to switch
off the auxiliary heating/ventilation.Changing the battery
– Push back and remove the battery cover on the remote
control ⇒fig. 126.
– Change the battery. The diagram in the battery compart-
ment shows how the battery should be fitted. The new
battery must be of the same type as the original one.
– Re-fit the battery cover.
When it is switched on, the auxiliary heating or auxiliary ventilation
starts immediately and remains on for the period set in the menu.
The maximum running time is 60 minutes.
If you want to switch the system on again after the end of the
programmed running time, press the button .
Transmitter indicator lamp
The transmitter indicator lamp will flash accordingly to show
whether the command you sent via the remote control was
successful.
When you switch the system on by pressing the button the
indicator lamp will flash green for about 30 seconds to confirm that
the heating/ventilation has been switched on. When you switch the
system off by pressing the button the indicator lamp will
flash red to confirm that the heating/ventilation has been switched
off.
If the remote control is outside the transmitting range the indicator
lamp will flash red slowly. If there is a fault in the system (e.g. fuel
level is down to reserve), the indicator lamp will flash red rapidly. In
both cases the command will not be executed.
When the battery of the remote control is almost completely flat, the
transmitter indicator lamp will not light up and no commands will
be executed.
Fig. 125 Remote
control for auxiliary
heatingFig. 126 Remote
control: Changing
battery
A1
OFF
A2
A1
A3
A1
OFF
A2
document_0900452a81b1b9de.book Seite 113 Donnerstag, 26. Juli 2007 9:16 09
Page 127 of 342
Driving125
Controls
Safety
Driving tips
General maintenance
Self-help
Technical data lights or in stop-and-go traffic. When the Audi hold assist function
is on, you don't have to keep your foot on the brake to prevent the
vehicle from accidentally rolling away. Once it detects that the
vehicle is stopped, Audi hold assist keeps the vehicle stationary. The
green symbol
in the instrument cluster indicates that the func-
tion is activated. You can now take your foot off the brake pedal.
As soon as you drive off in the normal way, the parking brake will
automatically be released and the vehicle will start moving.
If the conditions for Audi hold assist change and the function is
switched off as a result, the parking brake will be applied automati-
cally to ensure that the vehicle is parked safely. The diode in the
button will go out when the Audi hold assist function is switched
off.
WARNING
The intelligent technology in Audi hold assist cannot defy the laws
of physics. Do not let the extra convenience provided by Audi hold
assist tempt you into taking a safety risk.•
Audi hold assist cannot keep the vehicle stationary in all condi-
tions on a gradient (e.g. if the road is slippery or icy).
•
Audi hold assist must be switched on again each time the
engine is started – Risk of accident!
•
Never get out of the vehicle when the engine is running and
Audi hold assist is switched on – Risk of accident!
•
Always ensure that the vehicle is stopped properly and safely
to avoid injury to yourself and others.Caution
Switch off the Audi hold assist function before driving the vehicle
into a car wash.
Note
•
Audi hold assist can be switched on only when the driver's door
is closed, the driver's seat belt is buckled and the engine is running.
•
Audi hold assist prevents automatic vehicles from creeping
forwards when the brake pedal is released with the car in gear.
•
When the vehicle has been stationary for an extended period,
Audi hold assist will automatically apply the parking brake. In this
case, the green symbol
in the instrument cluster display will
change to red
.
Cruise control systemApplies to vehicles: with cruise control systemSwitching on
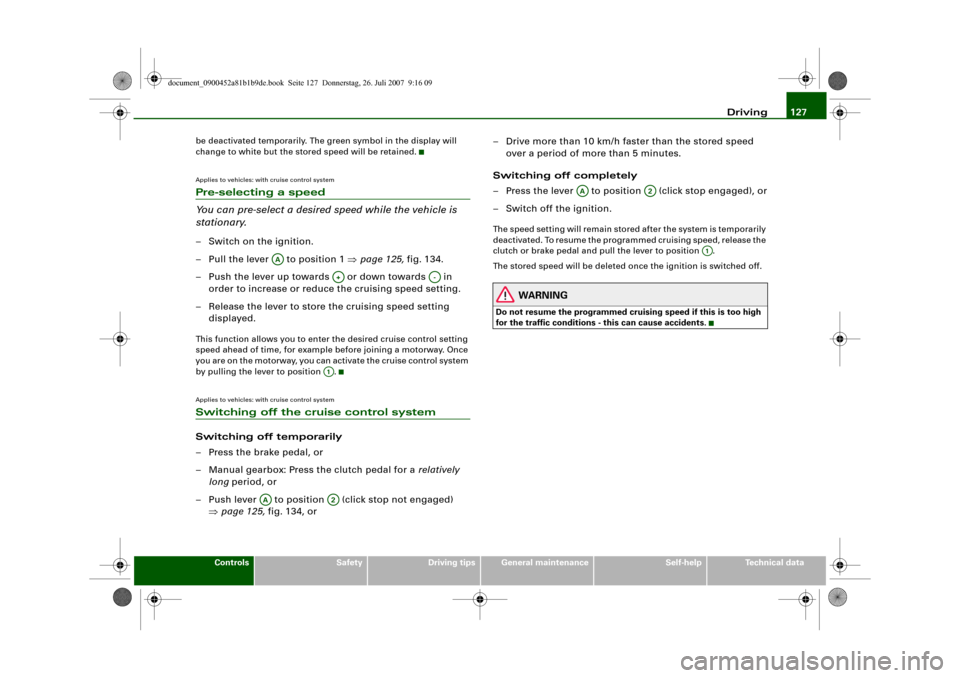
The cruise control system allows you to drive at a
constant speed of 30 km/h or higher.
Fig. 134 Control lever
and pushbutton
document_0900452a81b1b9de.book Seite 125 Donnerstag, 26. Juli 2007 9:16 09
Page 129 of 342
Driving127
Controls
Safety
Driving tips
General maintenance
Self-help
Technical data be deactivated temporarily. The green symbol in the display will
change to white but the stored speed will be retained.
Applies to vehicles: with cruise control systemPre-selecting a speed
You can pre-select a desired speed while the vehicle is
stationary.– Switch on the ignition.
– Pull the lever to position 1 ⇒page 125, fig. 134.
– Push the lever up towards or down towards in
order to increase or reduce the cruising speed setting.
– Release the lever to store the cruising speed setting
displayed.This function allows you to enter the desired cruise control setting
speed ahead of time, for example before joining a motorway. Once
you are on the motorway, you can activate the cruise control system
by pulling the lever to position .Applies to vehicles: with cruise control systemSwitching off the cruise control systemSwitching off temporarily
– Press the brake pedal, or
– Manual gearbox: Press the clutch pedal for a relatively
long period, or
– Push lever to position (click stop not engaged)
⇒page 125, fig. 134, or– Drive more than 10 km/h faster than the stored speed
over a period of more than 5 minutes.
Switching off completely
– Press the lever to position (click stop engaged), or
– Switch off the ignition.
The speed setting will remain stored after the system is temporarily
deactivated. To resume the programmed cruising speed, release the
clutch or brake pedal and pull the lever to position .
The stored speed will be deleted once the ignition is switched off.
WARNING
Do not resume the programmed cruising speed if this is too high
for the traffic conditions - this can cause accidents.
AA
A+
A-
A1
AA
A2
AA
A2
A1
document_0900452a81b1b9de.book Seite 127 Donnerstag, 26. Juli 2007 9:16 09