2008 Acura TL light
[x] Cancel search: lightPage 20 of 152
20Navigation System
Getting Started
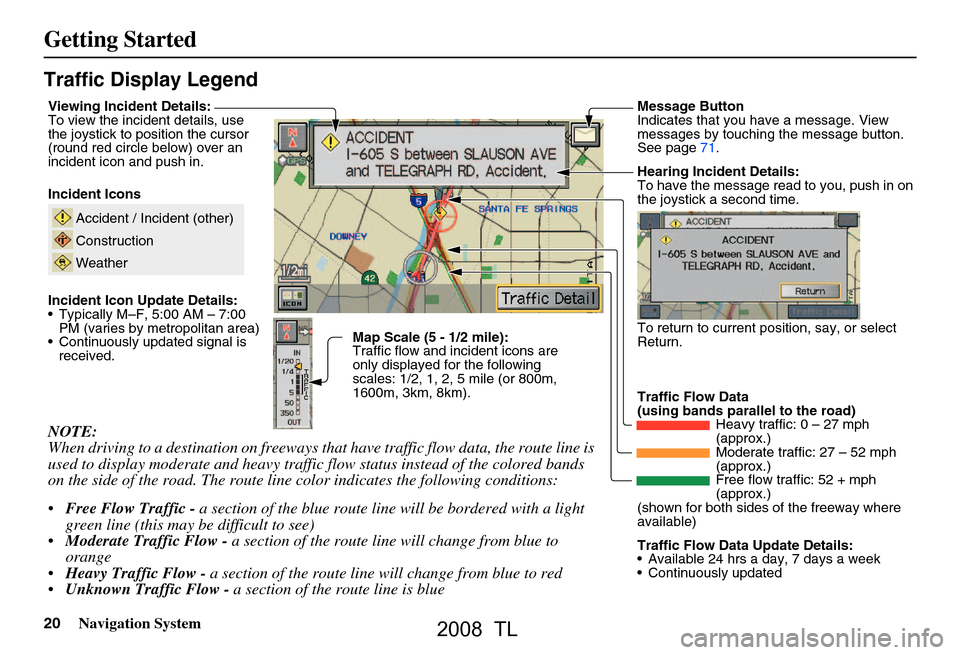
Traffic Display Legend
NOTE:
When driving to a destination on freeways that have traffic flow data, the route line is
used to display moderate and heavy traffic flow status instead of the colored bands
on the side of the road. The route line color indicates the following conditions:
Free Flow Traffic - a section of the blue route line will be bordered with a light
green line (this may be difficult to see)
Moderate Traffic Flow - a section of the route line will change from blue to
orange
Heavy Traffic Flow - a section of the route line will change from blue to red
Unknown Traffic Flow - a section of the route line is blue
Map Scale (5 - 1/2 mile):
Traffic flow and incident icons are
only displayed for the following
scales: 1/2, 1, 2, 5 mile (or 800m,
1600m, 3km, 8km).
Incident Icons
Incident Icon Update Details:
Typically M–F, 5:00 AM – 7:00
PM (varies by metropolitan area)
Continuously updated signal is received.
Accident / Incident (other)
Construction
Weather
Traffic Flow Data
(using bands parallel to the road) Heavy traffic: 0 – 27 mph
(approx.)
Moderate traffic: 27 – 52 mph
(approx.)
Free flow traffic: 52 + mph
(approx.)
(shown for both sides of the freeway where
available)
Viewing Incident Details:
To view the incident details, use
the joystick to position the cursor
(round red circle below) over an
incident icon and push in.
Hearing Incident Details:
To have the message read to you, push in on
the joystick a second time.
To return to current position, say, or select
Return.
Message Button
Indicates that you have a message. View
messages by touching the message button.
See page71.
Traffic Flow Data Update Details:
Available 24 hrs a day, 7 days a week
Continuously updated
2008 TL
Page 24 of 152
24Navigation System
Getting Started
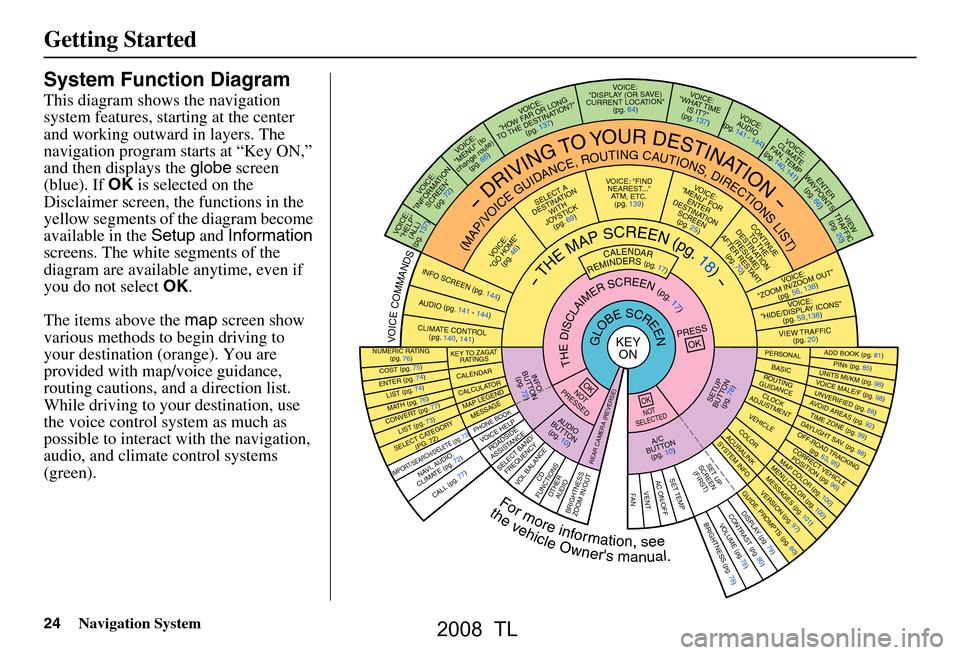
System Function Diagram
This diagram shows the navigation
system features, starting at the center
and working outward in layers. The
navigation program starts at “Key ON,”
and then displays the globe screen
(blue). If OK is selected on the
Disclaimer screen, the functions in the
yellow segments of the diagram become
available in the Setup and Information
screens. The white segments of the
diagram are available anytime, even if
you do not select OK.
The items above the map screen show
various methods to begin driving to
your destination (orange). You are
provided with map/voice guidance,
routing cautions, and a direction list.
While driving to your destination, use
the voice control system as much as
possible to interact with the navigation,
audio, and climat e control systems
(green).
REMINDERS(pg.17)CALENDAR
-THEMAPSCREEN(pg.18)-
(MAP/VOICEGUIDANCE,ROUTINGCAUTIONS,DIRECTIONSLIST)
-DRIVINGTOYOURDESTINATION-
VOI CE:
"HELP"
(ALL)
(pg. 137)
VOICE:
"INFORMA TION
SCREE N"
(pg. 72)
VOICE:
"MENU" (to
change route) (pg. 66)
VOICE:
"HOW F AR OR LONG
TO THE
DESTIN AT ION?"
(pg.
137)
VOICE:
"DISPLAY (OR S AV E )
CURR
ENT LOCA TION"
(pg.
64)VOICE:
"WHAT TIME
IS IT?"
(pg. 137)
VOI CE:
AUD IO
(pg. 141 - 144)
VOI CE:
CLIMA TE
F
AN, TEMP
(pg. 140, 141)
ENTER
WAY POINTS
(pg. 66)
VIEW
TRAFFIC (pg. 20)
VOI CE:
"ZOOM IN/Z OOM OUT"
(pg. 56, 138)
VOI CE:
"HIDE/DISPLA Y ICONS"
(pg. 59,138)
VIEW TRAFFIC (pg. 20)
ADD BOOK (pg. 81)PINs (pg. 85)UNITS MI/KM (pg. 98)VOICE MALE/F (pg . 98)UNVERIFIED (pg. 88)AVOID ARE
AS (pg. 92)TIME ZONE (pg. 99)DAYLIGHT SAV. ( pg. 98)OFF-ROAD TRACKING
(pg. 63, 95)CORRECT VEHICLE POSITIO N (pg. 96)MAP COLOR (pg. 100)MENU COLO R (pg. 100)
GUIDE. PROMPTS (pg. 80)VERSION (pg . 97)
MESS
AGES (pg. 101)
BRIGHTNESS (pg. 78)VO
LUM E (pg.78)DISPLAY (pg. 79)CONTRAST (pg. 80)
CALL (pg. 77)
COST (pg. 75)
NUMERIC RA TING
(pg. 76)
ENTER (pg. 74)LIST (pg. 74)MATH (pg. 76)CONVER T (pg. 77)LIST (pg. 73)
NAVI, AUDIO,
CLIMA TE (pg. 72)
SELECT CA TEGOR Y
(PG. 72)
IMPORT/SEAR CH/DELETE (pg. 73)
PRESS
OK
NOT
PRESSEDOK
NOT
SELECTEDOK
ROAD SIDE
ASSISTAN CE
KEY TO ZAGAT
RATINGS
CALEND ARCALCULA TORMAP LEGEND
PHONE BOOKMESSAGE
VOI CE HELP
SELECT BAND/
FREQUENCYVOL BALANCECD
FUNCTIONSOTHER AUD IOBRIGHTNESS
ZOOM IN/OUT
SETUP
BUT TO N
(pg. 78)
A/C
B
UTTON
(pg. 10)
AUDIO
BUT TO N
(pg. 10)
INFO
BUT TO N
(pg. 72)
REAR CA MERA (REVERSE)
THEDISCLAIMERSCREEN(pg.17)
VOICE: "FIND
NEAREST..." A
TM, ETC .
(pg.
139)
SELECT A
DESTINA TION
WITH
JO YSTIC K
(pg. 69)
VOI CE:
"GO HOME" (pg. 46)
VOICE:
"MENU" FOR ENTER
DESTINATION
SCREEN (pg. 25)
CONTINUE TO THE
DESTINATION
(RESUME)
AFTER REST
ART
(pg. 70)
GLOBESCREENKEYON
Formoreinformation,see
PERSO NALBASICROUTING
GUIDANCE
CLOCK
ADJUSTMENT
VEHICLECOLOR
SET TEMPAC ON/OFFVENTFA N
ACU RALINKSYSTEM INFO .
SET UP
SCREEN (FIRST)
thevehicleOwner'smanual.
VOICECOMMANDS
AUD IO (pg. 141 - 14 4)
CLIMATE CONTR OL
(pg. 140, 141)
INFO SCREEN (pg. 1 44)
2008 TL
Page 50 of 152

50Navigation System
Driving to Your Destination
After calculating the route with the new
method, the system displays a map of
your current location. The calculated
route will be highlighted as a blue line,
and a voice prompt will tell you how to
proceed along the hi ghlighted route.
Touch Voice to have the guidance
repeated.Viewing the Destination Map
Touching View Dest. Map displays a
map of the destination vicinity. Press the
CANCEL or NAVI BACK button to
return. You can view the destination
map anytime while on route saying
“Display destination map.”
Map Screen
When you select OK on the Calculate
route to screen, the map screen
appears, showing your highlighted route
in real time.
Route Line
When driving to a destination on
verified roads in a metropolitan area, the
route line is displayed as a blue line.
When driving in rural areas on
unverified streets (light brown color),
the route line changes to either a blue
dotted “vector line” pointing to your
destination, or a blue-pink line. See
Unverified Area Routing on page88 for
a detailed expl anation of how to enable
unverified routing, and the related
cautions and disclaimers.
NOTE:
You can always view the entire route by simply saying, “Display entire
route.”
When your route line uses streets that display traffic information, the route
line may consist of orange or red
segments. This is normal. See Traffic
Display Legend on page20, and
Viewing Flow Data on page21.
2008 TL
Page 52 of 152

52Navigation System
Driving to Your Destination
Map Features
Dark Green: Park Gray:
Light Blue: Hospital Airport/Stadium/Business
Brown: Shopping Mall Blue: Body of Water
Light Brown: Blue/Green: CemeteryIndian Reservation Matte Blue: University
Green: Golf Course
NOTE:
If you move the joystick over an area (map features
shown above), the name is displayed on the screen.
Acura Dealer
School
Restaurant
AT M
Parking Lot
Post OfficeHonda Dealer
Hospital
Grocery Store
Gas Station
Hotel/Lodging
Parking Garage
Freeway Exit Information
Map Screen Legend
Map Orientation
(see page57)
Map Scale Adjustment
(Mile or km per half inch
appears only when you
ZOOM IN or OUT.)
(see page56)
Current Map Scale
(see page56)
ICON Button
(see page61)
“Breadcrumbs”
(see Off-road Tracking on page63)
NOTE:
See Map Legend from the Information screen for further explanation (see page73).
Direction of Destination
(When on route)
(see page54)
Voice
(see page51)
(Announces next
driving instruction)
Distance to Destination
(see page54) Time to Destination
(see page54)
Waypoint
(When on route)
(see page66)
Current Street
(see page6)
Vehicle Position (see page64)
(Use voice command, “Display curr ent location,” or touch the icon to show the current location.)
Direction List
(see page54)
Blue Line
Calculated route
(see page50) Destination Icon
(see page58)
Streets
(see
Map Overview on page6, or Unverified
Area Routing on page88)
Red: Interstates or Freeways
Black: Verified Street
Light Brown: Unverified Street
Landmark Icon (see page58)
“North Up”
“Heading Up”
2008 TL
Page 56 of 152

56Navigation System
Driving to Your Destination
Map Scale
Use the ZOOM buttons or a voice command such as “Display 1/2 mile scale” (see page138) to change the scale of the map.
Zooming in increases the detail, while zooming out gives you a vi ew of a wider area. After changing the scale, give the system a
few moments to update the display.
Functions available at various map scales
NOTE:
You can change between miles or kilometers in Setup (see Units on page
98 ).
For information on the av ailable voice commands, see Voice Command Index on page137.
Map Scale (English and Metric)
For selecting uni ts, see page
98.1/20 mi. 1/8 mi. 1/4 mi. 1/2 mi. 1 mi. 2 mi. 5 mi. 15 mi. 50 mi. 150 mi. 350 mi.
80 m 200 m 400 m 800 m1.6 km3 km 8 km 24 km 80 km240 km 560 km
POI icon symbols (like ATM) page58X X
Breadcrumbs (off-road tracking dots)page63XXXX
Freeway exit information icons page55X X X
Unverified road displa y (light brown) page88X X X
Map orientation “Heading up” page57XXXXX
Map orientation “North up” page57XXXXXXXXXXX
Map features (like park, golf course)page52XXXXXXXXXX
Avoid area shown on map page92X X X
Avoid area scales (w hen creating) page92X X X
Waypoint “flag” icons page66 XXXXXXXXXXX
Traffic speed page20XXXX
Traffic incident page20XXXX
2008 TL
Page 64 of 152
64Navigation System
Driving to Your Destination
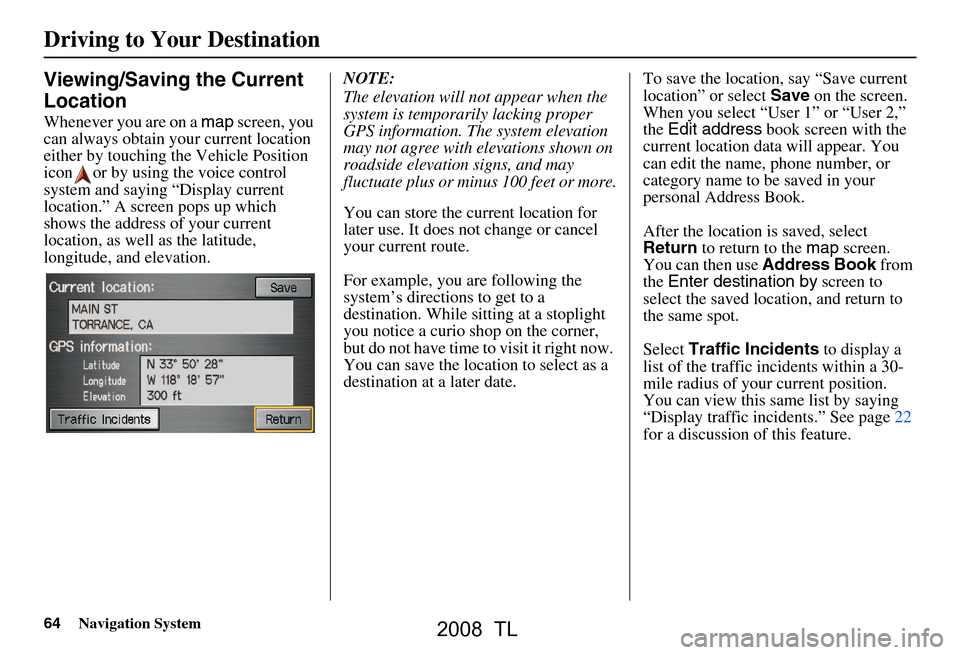
Viewing/Saving the Current
Location
Whenever you are on a map screen, you
can always obtain your current location
either by touching the Vehicle Position
icon or by using the voice control
system and saying “Display current
location.” A screen pops up which
shows the address of your current
location, as well as the latitude,
longitude, and elevation. NOTE:
The elevation will not appear when the
system is temporarily lacking proper
GPS information. The system elevation
may not agree with elevations shown on
roadside elevation signs, and may
fluctuate plus or minus 100 feet or more.
You can store the current location for
later use. It does not change or cancel
your current route.
For example, you
are following the
system’s directions to get to a
destination. While sitting at a stoplight
you notice a curio shop on the corner,
but do not have time to visit it right now.
You can save the location to select as a
destination at a later date. To save the location, say “Save current
location” or select
Save on the screen.
When you select “User 1” or “User 2,”
the Edit address book screen with the
current location data will appear. You
can edit the name, phone number, or
category name to be saved in your
personal Address Book.
After the location is saved, select
Return to return to the map screen.
You can then use Address Book from
the Enter destination by screen to
select the saved loca tion, and return to
the same spot.
Select Traffic Incidents to display a
list of the traffic incidents within a 30-
mile radius of your current position.
You can view this same list by saying
“Display traffic incidents.” See page22
for a discussion of this feature.
2008 TL
Page 74 of 152
74Navigation System
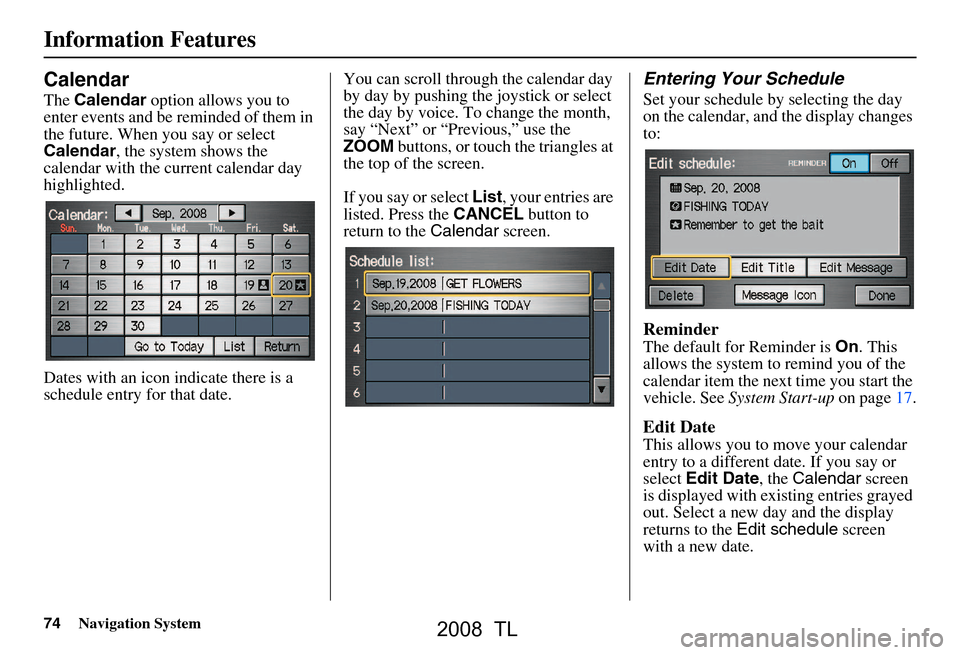
Calendar
The Calendar option allows you to
enter events and be reminded of them in
the future. When you say or select
Calendar , the system shows the
calendar with the current calendar day
highlighted.
Dates with an icon indicate there is a
schedule entry for that date. You can scroll through the calendar day
by day by pushing the joystick or select
the day by voice. To change the month,
say “Next” or “Previous,” use the
ZOOM
buttons, or touch the triangles at
the top of the screen.
If you say or select List, your entries are
listed. Press the CANCEL button to
return to the Calendar screen.
Entering Your Schedule
Set your schedule by selecting the day
on the calendar, and the display changes
to:
Reminder
The default for Reminder is On. This
allows the system to remind you of the
calendar item the next time you start the
vehicle. See System Start-up on page17.
Edit Date
This allows you to move your calendar
entry to a different date. If you say or
select Edit Date , the Calendar screen
is displayed with existing entries grayed
out. Select a new day and the display
returns to the Edit schedule screen
with a new date.
Information Features
2008 TL
Page 79 of 152
Navigation System79
System Set-up
Display
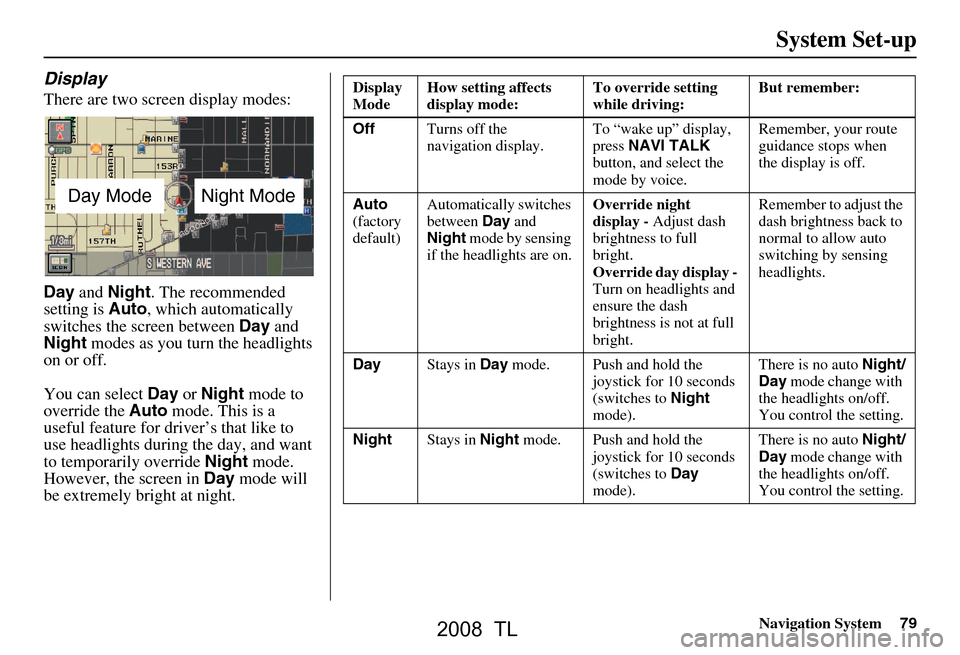
There are two screen display modes:
Day and Night . The recommended
setting is Auto, which automatically
switches the screen between Day and
Night modes as you turn the headlights
on or off.
You can select Day or Night mode to
override the Auto mode. This is a
useful feature for driver’s that like to
use headlights during the day, and want
to temporarily override Night mode.
However, the screen in Day mode will
be extremely bright at night.
Day ModeNight Mode
Display
Mode How setting affects
display mode: To override setting
while driving: But remember:
Off Turns off the
navigation display. To “wake up” display,
press
NAVI TALK
button, and select the
mode by voice. Remember, your route
guidance stops when
the display is off.
Auto
(factory
default) Automatically switches
between
Day and
Night mode by sensing
if the headlights are on. Override night
display -
Adjust dash
brightness to full
bright.
Override d ay display -
Turn on headlights and
ensure the dash
brightness is not at full
bright. Remember to adjust the
dash brightness back to
normal to allow auto
switching by sensing
headlights.
Day Stays in Day mode. Push and hold the
joystick for 10 seconds
(switches to Night
mode). There is no auto
Night/
Day mode change with
the headlights on/off.
You control the setting.
Night Stays in Night mode. Push and hold the
joystick for 10 seconds
(switches to Day
mode). There is no auto
Night/
Day mode change with
the headlights on/off.
You control the setting.
2008 TL