Page 247 of 489

�Û�Ý
�Û �Û�Ý
�Ý
While the overhead screen is closed,
you can see the XM radio
inf ormation in the subsidiary display
in the ceiling. Pressing the DISP
MODE button repeatedly changes
the subsidiary display f rom the
channel number, to the category
name, to the music title, to the artist
name, and to the channel name, and
then back to the channel number.
If discs are loaded in the disc
changer, select them by pressing the
6 DISC button.
To change the disc currently playing,
usethe,,,or
button to highlight your
selected disc icon, and press ENT.
If CDs are loaded in the CD changer
and the overhead screen is not open,
pressing the or button changes
the discs.
To change mode, press and hold the
DISP MODE button f or 5 seconds. Usethe,,,or
button to highlight REPEAT,
RANDOM, SCAN, , (skip),
, or (cue) on the overhead
screen. You can enter the
highlighted f unction by pressing the
ENT button. These f unctions have
the same features as those of the
f ront audio system.
Rear Entertainment System
To Play a Disc in the 6-Disc
Changer f rom the Rear Control
Panel
Features
243
�\f���—�\f���—�\f���y�\f�������������y���
�(�)�-���
�\f�y�\f�������y
2008 MDX
Page 249 of 489

When you press the DISP button
while a DVD is playing, the current
status of title, chapter, elapsed time,
angle, subtitle, audio, and sound
characteristics, with the personal
surround logo are displayed. To
return to the DVD video screen,
press the DISP button again.
If you do not press the DISP button,
the screen returns to the DVD video
screen af ter several seconds.When you press the MENU
SCROLL button while a DVD is
playing, the DVD Menu appears.
ThemenuoptionsareTOPMENU,
MENU, PLAY MODE, SEARCH,
and NumInput.
To go to your selected menu, use the
or button to highlight the
icon and press the ENT button. To
return to the DVD video screen,
select EXIT. When you select ‘‘TOP MENU’’, the
screen changes to the DVD’s title
menu. This menu also appears when
you press the MENU SCROLL
button while a DVD is not playing.
To go back to play, press the
RETURN button.
Top Menu
CONT INUED
DISP Button MENU SCROLL Button
Rear Entertainment System
Features
245
�\f���—�\f���—�\f���y�\f�������������y���
�(�)�-���
�\f�y�\f�����\f�y
2008 MDX
Page 250 of 489
�Û�Ý
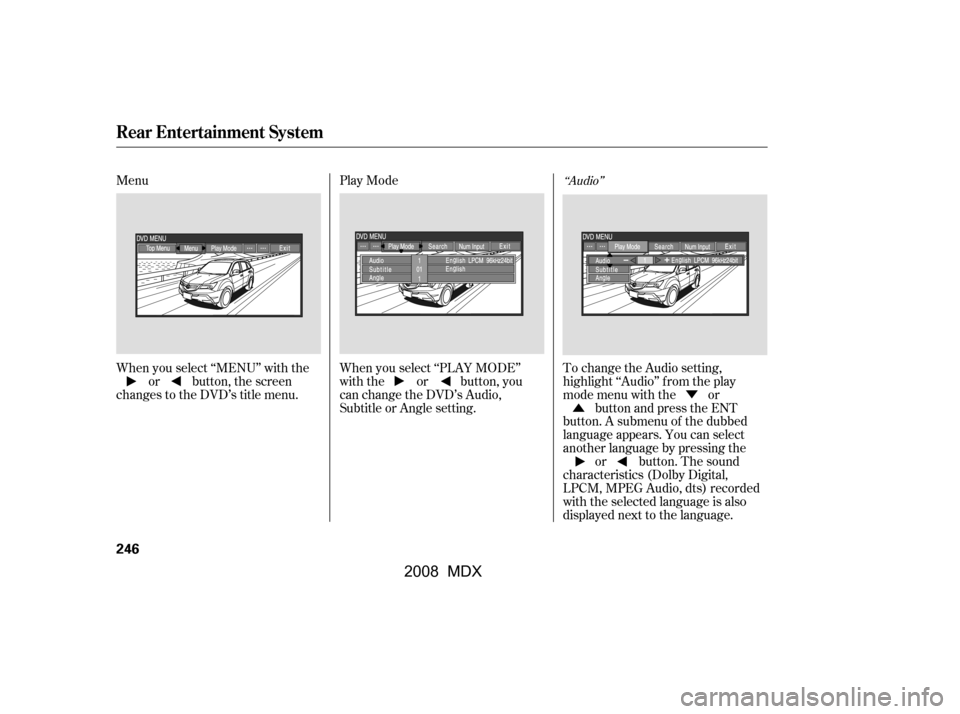
Menu Play Mode
When you select ‘‘MENU’’ with the
or button, the screen
changes to the DVD’s title menu. When you select ‘‘PLAY MODE’’
with the or button, you
can change the DVD’s Audio,
Subtitle or Angle setting.To change the Audio setting,
highlight ‘‘Audio’’ f rom the play
mode menu with the or
button and press the ENT
button. A submenu of the dubbed
language appears. You can select
another language by pressing the or button. The sound
characteristics (Dolby Digital,
LPCM, MPEG Audio, dts) recorded
with the selected language is also
displayed next to the language.
‘‘Audio’’
Rear Entertainment System
246
�\f���—�\f���—�\f���y�\f���������\f���y���
�(�)�-���
�\f�y�\f�����
�y
2008 MDX
Page 256 of 489
Select the ‘‘Aspect Ratio’’ by pressing
the or button, then press
the ENT button.The selected setting will be
highlighted in blue f or one second,
and the screen returns to the play
mode in the selected setting.
The selectable setting menu is
displayed, and the current setting is
highlighted in blue.
You can set the screen mode to
these settings:
Normal
Wide
Zoom
Full
Select the desired setting by
pressing the or button,
then press the ENT button.
Aspect Ratio
Rear Entertainment System
252
�\f���—�\f���—�\f���y�\f�������������y���
�(�)�-���
�\f�y�\f�������y
2008 MDX
Page 260 of 489

�Ý�Û
Audio Language
If you select ‘‘Yes,’’ the display
changes to the language code input
mode. Select the f irst number digit
usingthe,,,or button, and press the ENT
button to enter it. Repeat this until all
f our digits are f illed. When the
f ourth digit is entered, the cursor
automatically moves to ‘‘ENT’’ on the
display. Press the ENT button on the
control panel to enter the new
language code. If you made a mistake entering a
number digit, select ‘‘DEL’’ on the
display with the , , ,
or button, and press the ENT
buttononthecontrolpanel.Then
select and enter the correct number
digit as described. The display
returns to the initial ‘‘Language’’
menu screen.
You can select the dubbed language
bef ore playing DVDs.
Select ‘‘Audio Language’’ by pressing
the or button. You will see the
submenu next to ‘‘Audio Language.’’
Follow the same instructions you
used to set the menu language.
Rear Entertainment System
256
�\f���—�\f���—�\f���y�\f�������������y���
�(�)�-���
�\f�y�\f�����
�y
2008 MDX
Page 277 of 489

�µ�µ�Ý
�µ�µ
�Ý
CONT INUED
Press and hold the SET button for
f ive seconds until the Clock
display changes to ‘‘ZON ? N.’’
(Clock adjustment mode will be
started after the first two seconds.)
The compass may need to be
manually calibrated af ter exposure to
a strong magnetic field. If the
compassseemstobecontinually
showing the wrong direction and is
not self -calibrating, do the f ollowing.
If you see ‘‘ ’’ in the compass
display and ‘‘CAL’’ and ‘‘ ’’ are
showninthecalendardisplay,the
compassisself-calibrating.
Compass operation can be af f ected
by driving near power lines or
stations, across bridges, through
tunnels, over railroad crossings, past
large vehicles, or driving near large
objects that can cause a magnetic
disturbance. It can also be af f ected
by accessories such as antennas and
roof racks that are mounted by
magnets.
Press the button. ‘‘CAL ? Y’’ will
be displayed.
Press the SET button. The
compass display will change to
‘‘ ’’ and ‘‘CAL’’ and ‘‘ ’’ are
shown.
Drive the vehicle slowly in two
complete circles.
Press the SET button. ‘‘CAL ? N’’
will be displayed. At this point,
pressing SET button will exit
calibration mode.
1.
2.
3.
4.
5.
Canadian MDX model
Compass
Compass Calibration
Compass Operation
Features
273
COMPASS DISPLAY
Press and
hold SET
Press SET
Press
�\f���—�\f���—�\f���y�\f�������������y���
�(�)�-���
�\f�y�\f�������y
2008 MDX
Page 278 of 489

When the")
�µ�µ�Ý�Û
�Ý
Press and hold the SET button for
f ive seconds until the Clock
display changes to ‘‘ZON ? N.’’
(Clock adjustment mode will be
started after the first two seconds.)
When the display goes f rom
‘‘ ’’ to an actual heading, the
unit is calibrated and the display
returns to normal.
Do this procedure in an open
area, away f rom buildings, power
lines, and other vehicles.
In most areas, there is a variation
between magnetic north and true
north. Zone selection is required so
the compass can compensate f or this
variation. To check and select the
zone, do this: Find the zone f or your area on the
map.
If the zone is incorrect, press the
button to cycle the count down,
or the button to cycle the count
up. Once the correct zone is
displayed, continue to step 6.
Press the SET button to set the
zone selection.
Press and hold the SET button for
about 5 seconds to exit the zone
selection and return display to
normal.
Press the button. ‘‘ZOY ? Y’’ will
be displayed.
Press the SET button. The zone
the compass is currently in will be
displayed.
1.
2.
3. 4.
5.
6.
6.
7.
Compass
Compass Zone Select ion
274
NOTE:
�\f���—�\f���—�\f���y�\f�������������y���
�(�)�-���
�\f�y�\f�������y
2008 MDX
Page 284 of 489
.
HFL uses Bluetooth
technology to
link your cell phone to your vehicle.
With HFL, you can place and receive
calls through your vehicle’s")
Your vehicle is equipped with
Bluetooth
HandsFreeLink(HFL).
HFL uses Bluetooth
technology to
link your cell phone to your vehicle.
With HFL, you can place and receive
calls through your vehicle’s audio
system, without the distraction of
handling your cell phone. To use this
f eature, you need a Bluetooth-
compatible cell phone with the
Hands-Free Prof ile. For more
inf ormation, and a list of compatible
cell phones, visit
, or call 1-888-528-7876.
In Canada, visit , or call
1-888-9-ACURA-9. The HFL is
available in English on U.S. models,
andinbothEnglishandFrenchon
Canadian models. To change the
language, see page . HFL recognizes simple voice
commands, such as phone numbers
and names. It uses these commands
to automatically dial, receive, and
store numbers. For more
inf ormation on voice control, see
UsingVoiceControlonpage .
Here are the main features of the
HFL. Instructions f or using the HFL
begin on page . Bluetooth
is a registered trademark
of Bluetooth SIG, Inc.
Bluetooth is the wireless technology
that links your phone to the HFL.
TheHFLusesaClass2Bluetooth,
which means the maximum range
between your phone and vehicle is
30 f eet (10 meters).
To use the HFL, your phone must
have approved Bluetooth capability
along with the Hands Free Prof ile.
This type of phone is available
through many phone makers and
cellular carriers. You can also find an
approved phone by visiting ,orby
calling the HandsFreeLink
consumer support at 1-888-528-7876.
In Canada, visit , or call
1-888-9-ACURA-9.
With a linked phone, the HFL allows
you to send and receive calls in your
vehicle without holding the phone.
The HFL can store up to 50 names
and phone numbers in its phonebook.
Withalinkedphone,youcanthen
automatically dial any name or
number in the phonebook.
283
305
290
www.acura.com/
handsf reelink www.acura.ca www.acura.com/handsfree
link
www.acura.ca
BluetoothHandsFreeL ink
Voice Control
Bluetooth
Wireless Technology Incoming/Outgoing Calls
Phonebook
280
�\f���—�\f���—�\f���y�\f�������������y���
�(�)�-���
�\f�y�\f�������y
2008 MDX