Page 141 of 489
Avoid dropping or throwing the
transmitter.
Protect the transmitter from
extreme temperature.
Do not immerse the transmitter in
any liquid.
If you lose a transmitter, the
replacement needs to be
reprogrammed by your dealer.If it takes several pushes on the
button to lock or unlock the doors
and the tailgate, replace the battery
as soon as possible.
To replace the battery:Remove the screw at the base of
the transmitter with a small
Phillips-head screwdriver.
Separate the keypad from the
transmitter by pushing any button
f rom outside.
Battery type: CR1616
1.
2.
CONT INUED
Remote Transmitter CareReplacing the Transmitter
Battery
Remote Transmitter
Inst rument s and Cont rols
137
KEYPAD
SCREW
�\f���—�\f���—�\f���y�\f�������������y���
�(�)�-���
�\f�y�\f�
�����y
2008 MDX
Page 142 of 489
, then
insert it in the keypad.
An improperly disposed of battery
can hurt")
�µ
Remove the old battery and note
the polarity. Make sure the
polarity of the new battery is the
same ( side f acing up), then
insert it in the keypad.
An improperly disposed of battery
can hurt the environment.
Always conf irm local regulations
for battery disposal.
Snap the two halves of the keypad,
then install the parts in reverse
order.
Place a cloth on the edge of the
keypad, and remove the upper half
by caref ully prying on the edge
with a small f lat-tip screwdriver. 4.
5.
3.
As required by the FCC: This device complies with Part 15 of theFCC rules. Operation is subject to thef ollowing two conditions: (1) This devicemay not cause harmf ul interf erence, and(2) this device must accept anyinterf erence received, includinginterf erence that may cause undesiredoperation.
Changes or modif ications not expresslyapproved by the party responsible f orcompliance could void the user’sauthority to operate the equipment.
This device complies with IndustryCanada Standard RSS-210.Operation is subject to the f ollowing twoconditions: (1) this device may not causeinterf erence, and (2) this device mustaccept any interf erence that may causeundesired operation of the device.
Remote Transmitter
138
BATTERY
�\f���—�\f���—�\f���y�\f������\f��\f���y���
�(�)�-���
�\f�y�\f�
�����y
2008 MDX
Page 143 of 489
.
When you unlock the driver’s door
with your remote, each remote
activates the keyless memory
settings related t")
Here are the settings activated with
the remote;Driving position memory
(see page ).
When you unlock the driver’s door
with your remote, each remote
activates the keyless memory
settings related to that remote. The
driver’s ID (MEMORY 1 or
MEMORY 2) is shown on the back
of each remote. When you unlock and open the
driver’s door with the remote
transmitter, the driver’s seat (except
the power lumbar feature) and
outside mirrors start to move to the
positions stored in memory. The
indicator in the related memory
button to the remote comes on.Audio system settings
(see page ).
Climate control settings
(see page ).
Customized settings
(see page ).
To turn the keyless memory settings
back on, repeat this procedure. The
LED will blink once to indicate the
f eature has been turned on.
To turn of f this f eature, press and
hold the LOCK and UNLOCK
buttonsatthesametime.TheLED
in the remote will blink twice. Then
release the buttons. Doing this
cancels the keyless memory settings
f or that remote and restores the
def ault settings.
You will also see the ‘‘WELCOME
DRIVER 1’’ or ‘‘WELCOME
DRIVER 2’’ message on the multi-
inf ormation display, depending on
which linked remote transmitter is
used.
The steering wheel will move to the
stored position when you insert the
key into the ignition switch.
83
200 157
171
K eyless Memory Settings
Remote Transmitter
Inst rument s and Cont rols
139
TM
�\f���—�\f���—�\f���y�\f������\f��
���y���
�(�)�-���
�\f�y�\f�
�����y
2008 MDX
Page 155 of 489

You can open and close the windows
and moonroof with the key in the
driver’s door lock.Insert the key in the driver’s door
lock.
Turn the key clockwise, then
release it. Turnthekeyclockwiseagain,and
hold it. All f our windows and the
moonroof start to open. To stop
the windows and the moonroof ,
release the key.
To open:
You can open all of the windows and
the moonroof f rom outside with the
remote transmitter.
You cannot close the windows or the
moonroof with the remote
transmitter.
To open the windows and
moonroof f urther, press the
button again (within 10 seconds of
step 1) and hold it. If the windows
and the moonroof stop bef ore the
desired position, repeat steps 1
and 2.
Press the UNLOCK button a
second time, and hold it. All the
doors unlock, and all f our windows
and moonroof start to open. To
stop the windows and moonroof ,
release the button.
Press the UNLOCK button once
to unlock the driver’s door.
To open the windows and the
moonroof f urther, turn and hold
the key again (within 10 seconds
of step 2).
To close: Insert the key in the driver’s door
lock.
Turn the key counterclockwise,
then release it.
Turn the key counterclockwise
again, and hold it. All four
windows and the moonroof start to
close. To stop the windows and
the moonroof , release the key.
1.
2.
2.
3. 3.
1.
2.
3.
4.
1.
CONT INUED
Opening/Closing the Windows
and Moonroof with the K ey
Opening the Windows and
Moonroof with the Remote
Transmitter
Power Windows
Inst rument s and Cont rols
151
�\f���—�\f���—�\f���y�\f���������\f�
�y���
�(�)�-���
�\f�y�\f�
�����y
2008 MDX
Page 156 of 489

To open the moonroof f ully, pull
back the moonroof switch f irmly.
The moonroof opens all the way. To
stop the moonroof f rom opening
f ully, push the switch brief ly.To tilt up the moonroof , push on the
center of the moonroof switch. To
stop the moonroof f rom tilting up
f ully, push the switch brief ly.
To close the moonroof f ully, f irmly
push the moonroof switch f orward,
then release it. The moonroof
automatically closes all the way. To
stop the moonroof f rom closing,
push the switch briefly.
To open or close the moonroof
partially, pull back or push f orward
the moonroof switch lightly and hold
it. The moonroof will stop when you
release the switch.
To close the windows and the
moonroof f urther, turn and hold
the key again (within 10 seconds
of step 2).
Auto reverse does not work when
closing the windows and moonroof
with the key.
NOTE: If the windows and the
moonroof stop bef ore the desired
position, repeat steps 2 and 3.
4. Moonroof
Power Windows, Moonroof
152
MOONROOF SWITCH
�\f���—�\f���—�\f���y�\f���������\f���y���
�(�)�-���
�\f�y�\f�
�����y
2008 MDX
Page 163 of 489

The individual map lights in the
f ront can be turned on and of f by
pressing the lenses.
The light control switch has three
positions: OFF, Door Activated, and
ON.
Withanydoororthetailgateleft
open, the lights stay on about 3
minutes, then go out. After all doors are closed tightly, the
lights dim slightly, then f ade out in
about 30 seconds.
To change the ‘‘INTERIOR LIGHT
DIMMING TIME’’ setting, see page
.
The lights also come on when the
key is removed f rom the ignition
switch.
The individual map lights in the
second row and the cargo area
light in the third row cannot be
turned on.
The individual map lights in the
f ront and second rows come on
whenanydoororthetailgateis
opened, or when the remote
transmitter is used to unlock the
doors (see page ). When the
doors and the tailgate are closed,
eachlightcanbeturnedonandoff
by pushing the lens.
The cargo area light comes on
whenanydoororthetailgateis
opened if the light control switch
is in the door activated (center)
position. When the doors and the
tailgate are closed, the cargo area
lightcanbeturnedonwiththe
switch in the light.
The individual door lights or the
tailgate lights will operate when a
door or the tailgate is opened. 136
101
When the switch is in the OFF position: When the switch is in the door activated
position:
CONT INUED
L ight Control Switch
Interior Lights
Inst rument s and Cont rols
159
DOOR ACTIVATED POSITION
OFF ON
�����—�����—�����y�����������
���y���
�(�)�-���
���y���
�����y
2008 MDX
Page 168 of 489
Open the glove box by pulling the
handle to the lef t. Close it with a f irm
push. Lock or unlock the glove box
with the master key.
The storage compartment with a
sliding lid is at the lef t-side f oot of
the f ront passenger seat.
For the third row, a storage
compartment is located in the
passenger side armrest. To open the
compartment, push the button and
lif t the lid.
Your vehicle is equipped with a f ront
seat armrest pad that is also a
console compartment. To open the
console compartment f ully, push
both buttons at the front of the
compartment.
Interior Convenience Items
Glove Box
Console Compartment Storage Compartment
164
LID
LIDS
BUTTONS
An open glove box can cause
serious injury to your passenger
inacrash,evenifthe
passenger is wearing the seat
belt.
Always keep the glove box
closed while driving.
�\f���—�\f���—�\f���y�\f�������������y���
�(�)�-���
�\f�y�\f�
�����y
2008 MDX
Page 253 of 489
�Û
�Ý
CONT INUED
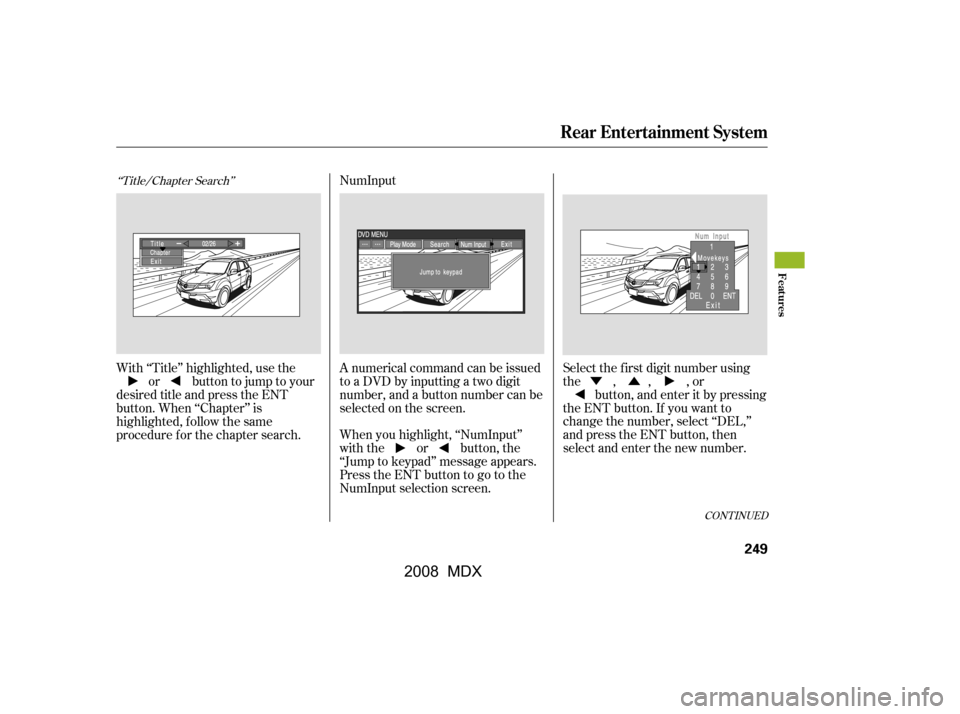
‘‘Title/Chapter Search’’
With ‘‘Title’’ highlighted, use the
or buttontojumptoyour
desired title and press the ENT
button. When ‘‘Chapter’’ is
highlighted, f ollow the same
procedure f or the chapter search. A numerical command can be issued
to a DVD by inputting a two digit
number, and a button number can be
selected on the screen.
Select the f irst digit number using
the , , , or
button, and enter it by pressing
the ENT button. If you want to
change the number, select ‘‘DEL,’’
and press the ENT button, then
select and enter the new number.
When you highlight, ‘‘NumInput’’
with the or button, the
‘‘Jump to keypad’’ message appears.
PresstheENTbuttontogotothe
NumInput selection screen.
NumInput
Rear Entertainment System
Features
249
�\f���—�\f���—�\f���y�\f�����������\f�y���
�(�)�-���
�\f�y�\f�������y
2008 MDX