Page 105 of 170
104
WARNING
LIGHTS AND
MESSAGES
CAR
MAINTENANCE
TECHNICAL
SPECIFICATIONS
IINDEX
YOUR CAR
SAFETY
DEVICES
CORRECT USE
OF THE
CAR
IN AN
EMERGENCY
Apply the adhesive label in a
position clearly visible by the
driver as a reminder that the tyre has
been treated with the quick repair kit.
Drive carefully, particularly on bends.
Don’t exceed 80 km/h. Don’t accel-
erate and brake suddenly.
WARNING❒after driving for about 10 minutes stop
and check again the tyre pressure; pull
up the handbrake;
Stop if the pressure has
dropped to less than 1.8
bars: the automatic Fix & Go quick
repair kit cannot work properly be-
cause the tyre is excessively damaged.
Go to a Abarth Dealership.
WARNING
095-122 ABARTH 500 GB 29-04-2009 9:43 Pagina 104
Page 106 of 170
105
WARNING
LIGHTS AND
MESSAGES
CAR
MAINTENANCE
TECHNICAL
SPECIFICATIONS
INDEX
YOUR CAR
SAFETY
DEVICES
CORRECT USE
OF THE
CAR
IN AN
EMERGENCY
❒if at least 1.8 bar pressure is read, re-
store proper pressure (with engine
running and handbrake on) and restart;
❒drive with the utmost care to the near-
est Abarth Dealership.
Remember to inform the
workshop that the tyre has
been treated with a quick repair kit.
Give the instruction booklet to the
tyre repair workshop personnel.
WARNING
FOR CHECKING AND
RESTORING PRESSURE ONLY
The compressor may also be used for
restoring pressure only. Release the quick
coupling and connect directly to the tyre
valve fig. 17; in this way, the cylinder will
not be connected to the compressor and
no sealant will be injected.
fig. 17F0S090Ab
095-122 ABARTH 500 GB 29-04-2009 9:43 Pagina 105
Page 107 of 170
106
WARNING
LIGHTS AND
MESSAGES
CAR
MAINTENANCE
TECHNICAL
SPECIFICATIONS
IINDEX
YOUR CAR
SAFETY
DEVICES
CORRECT USE
OF THE
CAR
IN AN
EMERGENCY
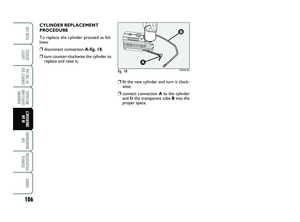
CYLINDER REPLACEMENT
PROCEDURE
To replace the cylinder proceed as fol-
lows:
❒disconnect connection A-fig. 18;
❒turn counter-clockwise the cylinder to
replace and raise it;
fig. 18F0S091Ab
❒fit the new cylinder and turn it clock-
wise;
❒connect connection Ato the cylinder
and fit the transparent tube Binto the
proper space.
095-122 ABARTH 500 GB 29-04-2009 9:43 Pagina 106
Page 108 of 170
107
WARNING
LIGHTS AND
MESSAGES
CAR
MAINTENANCE
TECHNICAL
SPECIFICATIONS
INDEX
YOUR CAR
SAFETY
DEVICES
CORRECT USE
OF THE
CAR
IN AN
EMERGENCY
WHEN NEEDING
TO CHANGE A BULB
GENERAL INSTRUCTIONS
❒Before changing a bulb check the con-
tacts for oxidation;
❒Burnt bulbs must be replaced by oth-
ers of the same type and power;
Modifications or repairs to
the electrical system that are
not carried out properly or do not
take the system’s technical specifica-
tions into account can cause mal-
functions leading to the risk of fire.
WARNING❒Always check the height of the head-
light beam after changing a bulb;
❒When a bulb is not working, check that
the corresponding fuse is intact before
replacing it: refer to the “If a fuse
blows” paragraph in this chapter for
fuse location.
095-122 ABARTH 500 GB 29-04-2009 9:43 Pagina 107
Page 109 of 170
108
WARNING
LIGHTS AND
MESSAGES
CAR
MAINTENANCE
TECHNICAL
SPECIFICATIONS
IINDEX
YOUR CAR
SAFETY
DEVICES
CORRECT USE
OF THE
CAR
IN AN
EMERGENCY
If possible, we recommend
that you let Abarth Dealer-
ship replace the lamps. Prop-
er operation and orientation
of the external lights are essential for
the safety of the running vehicle, and
to avoid incurring legal sanctions.
Halogen bulbs contain gas
under pressure, if they break
glass fragments may be thrown
around.
WARNINGWhen handling halogen bulbs
just touch the metal part.
Touching the transparent
part of the bulb with your fin-
gers may reduce the intensity of the
emitted light and even compromise du-
ration of the lamp. In the case of ac-
cidental contact, rub the lamp with a
cloth and spirit and leave to dry.
095-122 ABARTH 500 GB 29-04-2009 9:43 Pagina 108
Page 110 of 170

109
WARNING
LIGHTS AND
MESSAGES
CAR
MAINTENANCE
TECHNICAL
SPECIFICATIONS
INDEX
YOUR CAR
SAFETY
DEVICES
CORRECT USE
OF THE
CAR
IN AN
EMERGENCY
BULB TYPES fig. 19
Various types of bulbs are fitted to your
car:
A All glass bulb: clipped into place. Pull
to extract.
B Bayonet bulbs: to remove this type
of bulb from its holder, press the bulb
and turn it anticlockwise.
C Cylindrical bulbs: release from the
contacts to extract.
D Halogen bulbs: release the fastening
clip from the corresponding seat to re-
move the lamp.
E Halogen bulbs: release the fastening
clip from the corresponding seat to re-
move the lamp. IMPORTANT A slight misting may appear
on the internal surface of the headlight:
this does not indicate a fault and is caused
by low temperature and the degree of hu-
midity in the air. Misting will rapidly dis-
appear when the headlights are switched
on. The presence of drops inside the head-
lights indicates infiltration of water. Go to
a Abarth Dealership.
F0S092Abfig. 19
095-122 ABARTH 500 GB 29-04-2009 9:43 Pagina 109
Page 111 of 170
110
WARNING
LIGHTS AND
MESSAGES
CAR
MAINTENANCE
TECHNICAL
SPECIFICATIONS
IINDEX
YOUR CAR
SAFETY
DEVICES
CORRECT USE
OF THE
CAR
IN AN
EMERGENCY
H1
H7
W21/5W
WY21W
W5W
PY21W
R10W
P21W
P21W
P21W
C5W
W5W
C5W
H1
W5W55W
55W
5/21W
21
5
21
10
21
21
21
5
5
5
55
5D
D
A
B
A
B
B
B
B
B
C
A
C
E
A
Bulb Type Power Ref. figure
Main beam headlight
Dipped beam headlight
Front sidelight/daylight
Front direction indicators
Side direction indicators
Rear direction indicators
Rear sidelight
Stop
Reverse gear
Rear fog lights
Ceiling light
Boot light
Number plate lights
Fog lights
Supplementary stop light (3rd stop)
095-122 ABARTH 500 GB 29-04-2009 9:43 Pagina 110
Page 112 of 170

111
WARNING
LIGHTS AND
MESSAGES
CAR
MAINTENANCE
TECHNICAL
SPECIFICATIONS
INDEX
YOUR CAR
SAFETY
DEVICES
CORRECT USE
OF THE
CAR
IN AN
EMERGENCY
DIRECTION INDICATORS
Front
To change the bulb, proceed as follows:
❒remove the protecting rubber cap men-
tioned above;
❒turn the bulb holder clockwise A-fig.
22and withdraw it;
❒remove the snap-fitted bulb and replace
it;
❒refit the bulb holder Aby turning it
clockwise and locking it properly;
❒reinstall the rubber cap;
IF AN EXTERIOR LIGHT
BURNS OUT
For the type of bulb and power rating, see
“When needing to change a bulb”.
FRONT LIGHT CLUSTERS
The front light clusters contain sidelights,
dipped beam, main beam and direction in-
dicator bulbs.
Operating from the engine compartment
remove the rubber cap A-fig. 20to ac-
cess the direction indicators; remove the
rubber cap B-fig. 20 to access the bulbs
of the dipped beam headlights.
To access the bulbs of the sidelights/day-
lights and of the main beams, after fully
steering the wheels open the guard door
C-fig. 21on the wheelhouse at the level
of the lights, then remove the rubber cap
D-fig. 21.
fig. 20F0S093Ab
fig. 21F0S094Ab
fig. 22F0S095Ab
095-122 ABARTH 500 GB 29-04-2009 9:43 Pagina 111