Page 40 of 79

WARNING
WARNING
Minimum tyre
tread depth :
(front and rear)
1.0 mm
Tyre inflation pressure should be
checked and adjusted when the
temperature of the tyre equals the
ambient air temperature. Tyre
inflation pressure must be adjust-
ed according to total weight of
cargo, rider, passenger, and
accessories (fairing, saddlebags,
etc. approved for this model), and
vehicle speed.Proper loading of your Motorcycle
is important for several character-
istics of your Motorcycle, such as
handling, braking, performance
and safety. Do not carry loosely
packed items that can shift.
Securely pack your heaviest items
close to the center of the Motorcy-
cle, and distribute the weight
evenly from side to side. Properly
adjust the suspension for your
load, and check the condition and
pressure of your tyres. NEVER
OVERLOAD YOUR
MOTORCYCLE. Make sure the
total weight of the cargo, rider,
passenger, and accessories
(fairing, saddlebags, etc.
approved for this model) does not
exceed the maximum load of the
Motorcycle. Operation of an over-
loaded Motorcycle could cause
tyre damage, an accident, or even
injury.2. Tyre inspection
Always check the tyres before
operating the Motorcycle. If a tyre
tread shows crosswise lines
(minimum tread depth), if the tyre
has a nail or glass fragments in it,
or if the side wall is cracked,
contact a dealer
immediately and have the tyre
replaced.YAMAHAPERIODIC MAINTENANCE AND MINOR REPAIR
6-14
Front Rear Cold tyre pressure:
Single Rider25 psi
25 psi (1.75kg/cm )
2
(1.75kg/cm )
2(2.25kg/cm )
2
(2.50kg/cm )
2
33 psi
36 psi
With Pillion Rider
Front tyre size:
2.75-18” 4PR
Rear tyre size:
3.00-18” 6PR
Page 49 of 79

CAUTION :
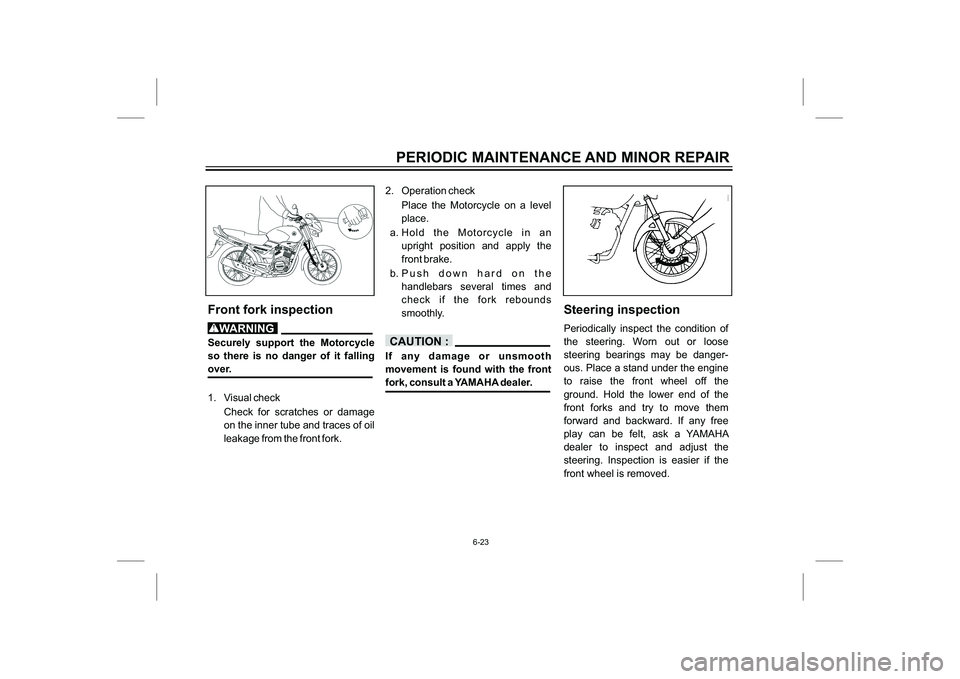
Front fork inspectionSecurely support the Motorcycle
so there is no danger of it falling
over.
1. Visual check
Check for scratches or damage
on the inner tube and traces of oil
leakage from the front fork.2. Operation check
Place the Motorcycle on a level
place.
a. Hold the Motorcycle in an
upright position and apply the
front brake.
b. Push down hard on the
handlebars several times and
check if the fork rebounds
smoothly.
If any damage or unsmooth
movement is found with the front
fork, consult a YAMAHA dealer.
Steering inspectionPeriodically inspect the condition of
the steering. Worn out or loose
steering bearings may be danger-
ous. Place a stand under the engine
to raise the front wheel off the
ground. Hold the lower end of the
front forks and try to move them
forward and backward. If any free
play can be felt, ask a YAMAHA
dealer to inspect and adjust the
steering. Inspection is easier if the
front wheel is removed.
PERIODIC MAINTENANCE AND MINOR REPAIR
6-23
WARNING
Page 50 of 79
Securely support the Motorcycle
so there is no danger of it falling
over.
Wheel bearingsIf there is play in the front or rear
wheel hub or if the wheel does not
turn smoothly, have a YAMAHA
dealer inspect the wheel bearings.
1. Maximum level mark
2. Minimum level markBattery1. Battery is located inside the
L.H. side panel (for removal &
installation of L.H. side panel
please refer page 6-5)
2. Open the lid.
3. Check the level of the battery
electrolyte and make sure that
the terminals are tight.
Top up with distilled water if the
electrolyte level is low.
PERIODIC MAINTENANCE AND MINOR REPAIR
6-24
WARNING
Page 53 of 79
1. Screw (2 Nos.)
2. Bolt (1Headlight bulb replacementIf the headlight bulb burns out,
replace the bulb as follows:
1. Remove the two screws from the
Head Light.
2. Loosen bolt.
3. Remove head light bezel assy.
Forward.
No.)1. Bulb holder
3. Remove headlight bulb holder
from bezel
1. Bulb (Halogen)Keep flammable products and
your hands away from the bulb
while it is on, as it is hot. Do not
touch the bulb until it cools down.
4. Remove the defective bulb.
5. Put a new bulb into position and
secure it in place with the bulb
holder.
6. Install the Head Light Assy.
7. If the headlight beam adjustment
is necessary, ask a YAMAHA
dealer to make adjustment.
PERIODIC MAINTENANCE AND MINOR REPAIR
6-27
WARNING
1
Page 54 of 79
1. Indicator Screws (1 No.)Turn signal and taillight
bulb replacement1. Remove the screws and the
lense.
2. Push the bulb inward and turn it
counterclockwise.
3. Place a new bulb in the socket.
Push the bulb inward and turn it
clockwise until it engages into the
socket.
4. Install the lense and the
screws.1. Tail lamp Screws (2 Nos.)
Do not over-tighten the screws as
the lense may break.
Front wheel removalIt is advisable to have a
YAMAHA dealer service the
wheel.
Securely support the
Motorcycle so there is no
danger of it falling over.
PERIODIC MAINTENANCE AND MINOR REPAIR
6-28
WARNING
CAUTION :
Page 56 of 79
1. StopperFront wheel installationWhen installing the front wheel,
reverse the removal procedure.
Pay attention to the following points:
1. Make sure the slot in the brake
shoe plate fits over the stopper on
the front fork outer tube.
2. Make sure the axle nut is properly
torqued and a new cotter pin is
installed.Always use a new cotter pin.
Axle nut torque:
33 ft-lb (4.55 m-kg)
3. Adjust the free play in the brake
lever.PERIODIC MAINTENANCE AND MINOR REPAIR
6-30
WARNING
Rear wheel removalIt is advisable to service the
wheel by a YAMAHA dealer.
Securely support the
Motorcycle so there is no
danger of it falling over.
WARNING