2007 YAMAHA GIGGLE50 fuel cap
[x] Cancel search: fuel capPage 6 of 72

1
2
3
4
5
6
7
8
9
EAU10210
TABLE OF CONTENTSSAFETY INFORMATION ................... 1-1
Fur ther safe-riding points ............... 1-4
DESCRIPTION ................................... 2-1
Left view ......................................... 2-1
Right view ....................................... 2-2
Controls and instruments ............... 2-3
INSTRUMENT AND CONTROL FUNC-
TIONS ................................................ 3-1
Main switch/steering lock ............... 3-1
Keyhole cover ................................. 3-2
Indicator and warning lights ........... 3-2
Speedometer unit ........................... 3-4
Fuel gauge ...................................... 3-4
Handlebar switches ........................ 3-5
Front brake lever ............................. 3-6
Rear brake lever ............................. 3-6
Fuel tank cap .................................. 3-6
Fuel .................................................3-7
Catalytic converter .......................... 3-8
Kickstarter....................................... 3-8
Seat ................................................3-9
Luggage hook ................................. 3-9
Helmet holder ................................. 3-9
Storage compartment ................... 3-10
PRE-OPERATION CHECKS ............. 4-1
Pre-operation check list .................. 4-2OPERATION AND IMPORTANT RIDING
POINTS .............................................. 5-1
Star ting the engine ......................... 5-1
Star ting off ...................................... 5-2
Acceleration and deceleration ........ 5-2
Braking........................................... 5-2
Engine break-in .............................. 5-3
Parking........................................... 5-3
PERIODIC MAINTENANCE AND MINOR
REPAIR .............................................. 6-1
Periodic maintenance and lubrication
chart............................................ 6-2
Removing and installing panels ..... 6-5
Checking the spark plug ................. 6-6
Engine oil and oil strainer ............... 6-7
Final transmission oil ...................... 6-9
Coolant......................................... 6-10
Replacing the air filter element ..... 6-12
Checking the throttle cable free
play............................................ 6-12
Valve clearance ............................ 6-12
Tires.............................................. 6-13
Cast wheels .................................. 6-15
Adjusting the brake lever free
play............................................ 6-15
Adjusting the rear brake lever free
play............................................ 6-16
Checking the front and rear brake
shoes......................................... 6-16Checking and lubricating the throttle
grip and cable ............................ 6-17
Lubricating the front and rear brake
levers......................................... 6-17
Checking and lubricating the
centerstand............................... 6-18
Checking the front fork ................. 6-18
Checking the steering ................... 6-19
Checking the wheel bearings ....... 6-19
Battery.......................................... 6-20
Replacing the fuse ........................ 6-21
Replacing the headlight bulb ........ 6-22
Replacing the tail/brake light bulb 6-23
Replacing a turn signal light bulb . 6-24
Troubleshooting............................ 6-24
Troubleshooting charts ................. 6-25
SCOOTER CARE AND STORAGE ... 7-1
Care ................................................ 7-1
Storage ........................................... 7-3
SPECIFICATIONS ............................. 8-1
CONSUMER INFORMATION ............ 9-1
Identification numbers .................... 9-1
15P-F8199-E0_ch0.pmd2007/06/13, 11:15 5
Page 10 of 72

1-3
1
2
3
4
5
6
7
8
9
EAU10220
Q QQ Q
Q
SAFETY INFORMATION
When loading within this weight limit,
keep the following in mind:
8Cargo and accessory weight should
be kept as low and close to the
scooter as possible. Make sure to
distribute the weight as evenly as
possible on both sides of the
scooter to minimize imbalance or
instability.
8Shifting weights can create a sud-
den imbalance. Make sure that ac-
cessories and cargo are securely
attached to the scooter before riding.
Check accessory mounts and
cargo restraints frequently.
8Never attach any large or heavy
items to the handlebar, front fork,
or front fender. Such items can cre-
ate unstable handling or a slow
steering response.Accessories
Genuine Yamaha accessories have
been specifically designed for use on
this scooter. Since Yamaha cannot test
all other accessories that may be avail-
able, you must personally be responsible
for the proper selection, installation and
use of non-Yamaha accessories. Useextreme caution when selecting and in-
stalling any accessories.
Keep the following guidelines in mind,
as well as those provided under “Load-
ing” when mounting accessories.
8Never install accessories or carry
cargo that would impair the perfor-
mance of your scooter. Carefully
inspect the accessory before us-
ing it to make sure that it does not
in any way reduce ground clear-
ance or cornering clearance, limit
suspension travel, steering travel
or control operation, or obscure
lights or reflectors.
9Accessories fitted to the
handlebar or the front fork area
can create instability due to
improper weight distribution or
aerodynamic changes. If
accessories are added to the
handlebar or front fork area,
they must be as lightweight as
possible and should be kept to
a minimum.
9Bulky or large accessories may
seriously affect the stability of
the scooter due to aerodynamic
effects. Wind may attempt tolift the scooter, or the scooter
may become unstable in cross
winds. These accessories may
also cause instability when
passing or being passed by
large vehicles.
9Certain accessories can
displace the operator from his
or her normal riding position.
This improper position limits
the freedom of movement of
the operator and may limit
control ability, therefore, such
accessories are not recom-
mended.
8Use caution when adding electrical
accessories. If electrical accesso-
ries exceed the capacity of the
scooter’s electrical system an elec-
tric failure could result, which could
cause a dangerous loss of lights or
engine power.
Gasoline and exhaust gas
8GASOLINE IS HIGHLY FLAM-
MABLE:
9Always turn the engine off
when refueling.
15P-F8199-E0_ch1.pmd2007/06/20, 14:20 3
Page 14 of 72

2-1
1
2
3
4
5
6
7
8
9
DESCRIPTION
EAU10400
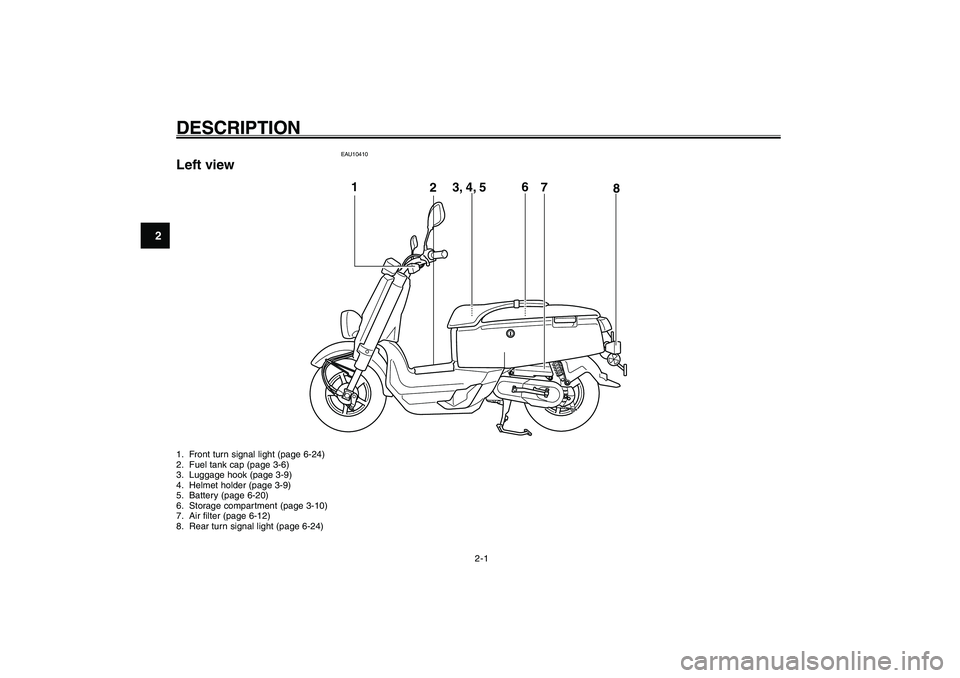
DESCRIPTIONPart locations
EAU10410
Left view1. Front turn signal light (page 6-24)
2. Fuel tank cap (page 3-6)
3. Luggage hook (page 3-9)
4. Helmet holder (page 3-9)
5. Battery (page 6-20)
6. Storage compartment (page 3-10)
7. Air filter (page 6-12)
8. Rear turn signal light (page 6-24)
1
23, 4, 56
8
7
15P-F8199-E0_ch2.pmd2007/06/13, 11:16 1
Page 22 of 72

3-6
1
2
3
4
5
6
7
8
9
INSTRUMENT AND CONTROL FUNCTIONSBrake lever, front
Brake lever, rear
Fuel tank cap
EAU12950
Rear brake lever
1
ZAUM00**1. Rear brake leverThe rear brake lever is located on the
left handlebar grip. To apply the rear
brake, pull this lever toward the handle-
bar grip.
EAUT2280
Fuel tank capZAUM00**
3
1
2
1. Fuel tank cap lid
2. Fuel tank cap
3. Match marksTo remove the fuel tank cap
Open the lid, insert the key into the lock,
and then turn it 1/4 turn clockwise. The
lock will be released and the fuel tank
cap can be removed.
To install the fuel tank cap
1. Inser t the fuel tank cap into the tank
opening with the key inserted in the
lock and the match marks aligned.
2. Turn the key counterclockwise to
the original position, remove it, and
then close the lid.
EAU12900
Front brake lever
1
ZAUM00**1. Front brake leverThe front brake lever is located on the
right handlebar grip. To apply the front
brake, pull this lever toward the handle-
bar grip.
15P-F8199-E0_ch3.pmd2007/06/20, 14:21 6
Page 23 of 72

3-7
1
2
3
4
5
6
7
8
9
INSTRUMENT AND CONTROL FUNCTIONS
EAU13211
FuelZAUM00**
1
1. Fuel tank filler tubeMake sure that there is sufficient fuel in
the tank. Fill the fuel tank to the bottom
of the filler tube as shown.
EWA10880
w● ●● ●
●
Do not overfill the fuel tank, oth-
erwise it may overflow when the
fuel warms up and expands.
● ●● ●
●
Avoid spilling fuel on the hot
engine.
Fuel
ECA10070
cCImmediately wipe off spilled fuel with
a clean, dry, soft cloth, since fuel may
deteriorate painted surfaces or plas-
tic parts.
EAU33520
Recommended fuel:
REGULAR UNLEADED GASOLINE
ONLY
Fuel tank capacity:
4.5 L (1.19 US gal) (0.99 Imp.gal)
ECA11400
cCUse only unleaded gasoline. The use
of leaded gasoline will cause severe
damage to internal engine parts,
such as the valves and piston rings,
as well as to the exhaust system.Your Yamaha engine has been designed
to use regular unleaded gasoline with a
research octane number of 91 or higher.
If knocking (or pinging) occurs, use a
gasoline of a different brand or premium
unleaded fuel. Use of unleaded fuel will
NOTE:
The fuel tank cap cannot be installed
unless the key is in the lock. In addition,
the key cannot be removed if the cap is
not properly installed and locked.
EWA10130
wMake sure that the fuel tank cap is
properly installed before riding.
15P-F8199-E0_ch3.pmd2007/06/20, 14:21 7
Page 59 of 72

7-1
1
2
3
4
5
6
7
8
9
SCOOTER CARE AND STORAGE
Care
EAU25991
SCOOTER CARE AND STORAGE
EAU26091
CareWhile the open design of a scooter re-
veals the attractiveness of the technol-
ogy, it also makes it more vulnerable.
Rust and corrosion can develop even if
high-quality components are used. A
rusty exhaust pipe may go unnoticed
on a car, however, it detracts from the
overall appearance of a scooter. Fre-
quent and proper care does not only
comply with the terms of the warranty,
but it will also keep your scooter look-
ing good, extend its life and optimize its
performance.
Before cleaning
1. Cover the muffler outlet with a plas-
tic bag after the engine has cooled
down.
2. Make sure that all caps and cov-
ers as well as all electrical couplers
and connectors, including the
spark plug cap, are tightly installed.
3. Remove extremely stubborn dirt,
like oil burnt onto the crankcase,
with a degreasing agent and a
brush, but never apply such prod-
ucts onto seals, gaskets and wheelaxles. Always rinse the dirt and
degreaser off with water.
Cleaning
ECA10781
cC● ●● ●
●
Avoid using strong acidic wheel
cleaners, especially on spoked
wheels. If such products are
used on hard-to-remove dirt, do
not leave the cleaner on the af-
fected area any longer than in-
structed. Also, thoroughly rinse
the area off with water, immedi-
ately dry it, and then apply a cor-
rosion protection spray.
● ●● ●
●
Improper cleaning can damage
plastic parts such as cowlings,
panels, windshields, headlight
lenses, meter lenses, etc. Use
only a soft, clean cloth or sponge
with mild detergent and water to
clean plastic.
● ●● ●
●
Do not use any harsh chemical
products on plastic parts. Be
sure to avoid using cloths or
sponges which have been in
contact with strong or abrasive
cleaning products, solvent orthinner, fuel (gasoline), rust re-
movers or inhibitors, brake fluid,
antifreeze or electrolyte.
● ●● ●
●
Do not use high-pressure wash-
ers or steam-jet cleaners since
they cause water seepage and
deterioration in the following
areas: seals (of wheel and
swingarm bearings, fork and
brakes), electric components
(couplers, connectors, instru-
ments, switches and lights),
breather hoses and vents.
● ●● ●
●
For scooters equipped with a
windshield: Do not use strong
cleaners or hard sponges as
they will cause dulling or
scratching. Some cleaning com-
pounds for plastic may leave
scratches on the windshield.
Test the product on a small hid-
den part of the windshield to
make sure that it does not leave
any marks. If the windshield is
scratched, use a quality plastic
polishing compound after wash-
ing.
15P-F8199-E0_ch7.pmd2007/06/13, 11:18 1
Page 61 of 72

7-3
1
2
3
4
5
6
7
8
9
SCOOTER CARE AND STORAGE
away the paint.
NOTE:
Consult a Yamaha dealer for advice on
what products to use.
EAU36560
StorageShort-term
Always store your scooter in a cool, dry
place and, if necessary, protect it
against dust with a porous cover.
ECA10820
cC● ●● ●
●
Storing the scooter in a poorly
ventilated room or covering it
with a tarp, while it is still wet,
will allow water and humidity to
seep in and cause rust.
● ●● ●
●
To prevent corrosion, avoid
damp cellars, stables (because
of the presence of ammonia) and
areas where strong chemicals
are stored.
Long-term
Before storing your scooter for several
months:
1. Follow all the instructions in the
“Care” section of this chapter.
2. Fill up the fuel tank and add fuel
stabilizer (if available) to prevent the
fuel tank from rusting and the fuel
from deteriorating. Storage
3. Perform the following steps to pro-
tect the cylinder, piston rings, etc.
from corrosion.
a. Remove the spark plug cap and
spark plug.
b. Pour a teaspoonful of engine oil
into the spark plug bore.
c. Install the spark plug cap onto
the spark plug, and then place
the spark plug on the cylinder
head so that the electrodes are
grounded. (This will limit spark-
ing during the next step.)
d. Turn the engine over several
times with the starter. (This will
coat the cylinder wall with oil.)
e. Remove the spark plug cap from
the spark plug, and then install
the spark plug and the spark plug
cap.
EWA10950
wTo prevent damage or injury from
sparking, make sure to ground the
spark plug electrodes while turning
the engine over.
15P-F8199-E0_ch7.pmd2007/06/13, 11:18 3
Page 63 of 72

8-1
1
2
3
4
5
6
7
8
9
SPECIFICATIONS
Specifications
EAU26320
SPECIFICATIONS
DimensionsOverall length
1915 mm (75.4 in)
Overall width
695 mm (27.4 in)
Overall height
1040 mm (40.9 in)
Seat height
750 mm (29.5 in)
Wheelbase
1280 mm (50.4 in)
Ground clearance
115 mm (4.53 in)
Minimum turning radius
2000 mm (78.7 in)WeightWith oil and fuel
93.0 kg (205 lb)EngineEngine type
Liquid cooled 4-stroke, SOHC
Cylinder arrangement
Forward-inclined single cylinder
Displacement
49.0 cm
3
Bore x stroke
38.0 x 43.6 mm (1.50 x 1.72 in)
Compression ratio
12.00 :1
Starting system
Electric starter and kickstarter
Lubrication system
Wet sump
Engine oilType
SAE10W40
-10 0 10 20 30
40 -20
50
˚C
SAE 10W-30
SAE 10W-40
SAE 15W-40SAE 20W-40SAE 20W-50
Recommended engine oil grade
API service SG type or higher, JASO
standard MA
Periodic oil change
0.78 L (0.82 US qt) (0.69 Imp.qt)Final transmission oilType
SAE10W30 type SE motor oil
Quantity
0.10 L (0.11 US qt) (0.09 Imp.qt)Cooling systemCoolant reservoir capacity (up to the maxi-
mum level mark)
0.26 L (0.27 US qt) (0.23 Imp.qt)
Radiator capacity (including all routes)
0.50 L (0.53 US qt) (0.44 Imp.qt)Air filterAir filter element
Wet element”FuelRecommended fuel
Regular unleaded gasoline onlyFuel tank capacity
4.5 L (1.19 US gal) (0.99 Imp.gal)
Throttle bodyType/quantity
3B31 00(SE AC19-1) / 1
Manufacturer
MIKUNI”Spark plug (s)Manufacturer/model
NGK/CR7E
Spark plug gap
0.7-0.8 mm (0.028-0.031 in)ClutchClutch type
Dry, centrifugal automaticTransmissionPrimary reduction system
Helical gear
Primary reduction ratio
50/13 (3.846)
Secondary reduction system
Helical gear
Secondary reduction ratio
43/12 (3.583)
Transmission type
V-belt automatic
Operation
Centrifugal automatic typeChassisFrame type
Steel tube backbone
Caster angle
26.00 degree
15P-F8199-E0_ch8.pmd2007/07/18, 12:26 1